Reading a microcontroller datasheet
I approach the weekly assignment by firstly checking the Attiny 44 microcontroller datasheet. I found on Sigridur Helga Hauksdottir embedded programing web page a diagram explaining the pin configurations which specifies the pins initials.The information gave me a better understanding about the planning of the board design during week no. 6 assignment.

The programing challenge
This weekly assignment, programing my board, was very challenging and part of the time frustrating. We’d handle the difficulties as a team. As we reached to a breaking point we turn to our regional instructor support. It seemed we did every possible mistakes:
- Using the wrong programer.
- Not supplying current separately to the board.
- Setting the Arduino IDE the wrong way.
- Bad connections of the board traces and components.
Following Craig and Wendy instructions we changed our approach and worked through this method:
- Starting by only the Attiny and its headers.
- Checking for any short wiring.
- Connecting the Sparkfun AVR Pocket programmer which can also supply current to the board.
- Setting the correct parameters of the board in Arduino IDE (controller chip, internal or external clock, programmer kind etc.)
- Burning the bootloader to the chip.
- Finally if all succeeded continuing with stuffing the board.
We’ll adapted this working process in every future electronic assignment
download INO.FILE

The code editing challenge
After burning the Bootloader on my board and running the bare minimum example sketch I turn to editing my own code. It based on the “Blink” code from the arduino example sketch.
There is a constant structure for any code on any language. Understanding that helped me figuring out where and what I needed to edit on the example code.


The different code's elements:
Constants
These are the variables that will stay fix. The pins configuration that won't change and the button state that will.
Void setup
This is the part where to determine the setting of every constan, in this case the pin's main function in/output.
Void loop
In this loop there are two

Attny using C
My next challenge was to experience with programing my board in C language. I started the text by downloading both of the files given in the lecture page:
I located the file inside a folder on my computer and changed the makefile to a simpler name. I connected my board to the programer providing power to both of the circuits. Then I opened the terminal, navigated to the pre made folder and followed the instructions from this tutorial:
- Running the make -f filename command.
- Checking the folder to see the files that been created.
- Running the make -f filename program-usbtiny command.
- Connecting my board through the FTDI and opening Arduino IDE
- Opening the serial monitor and typing!!

Experiencing more architectures:
Using Photon
About the board
I wanted to experience with one more architecture and programing environment. My college Guy Shalev gave me the opportunity to try with Photon. Photon is Particle's Internet of Things hardware development kit. The Photon can be used to create commercial sensor networks and smart home projects alike. By using Photon, a wi-fi enabled microcontroller, you earned Particle’s full-stack Internet of Things (IoT) platform that gives you everything you need to securely and reliably connect your IoT devices to the web. For more information visit the Particle and see the Photon’s datasheet.

Getting started:
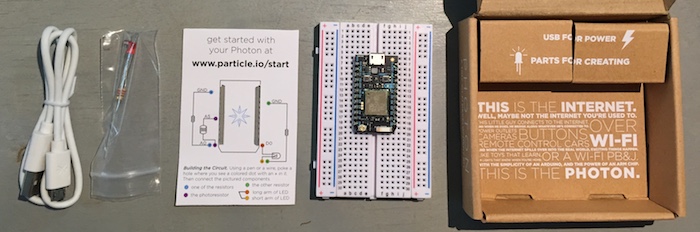
The tiny wi-fi development kit
Photon Kit includes:
- (1) Photon
- (1) Breadboard
- (1) Photoresistor
- (1) Basic LED - Red
- (2) Resistor 220-Ohm
Connecting to the core
I powered my device through the USB cable and connected it to the internet using my iphone. I’ve downloaded, opened the application and logged in. I followed the instructions, on the mobile app and, step by step and succeeded.

After connecting I tried the “Blink an led”. I used the Tinker and my smartphone to talk to my device. The D7 pin comes already wired to a small blue LED on the face of the device. When I set the power of the D7 pin to high, this LED turns on. I Tapped D7 then digitalWrite in the popup. When tapping the D7 circle the tiny blue LED turned on and off. The website instructions of the above steps.

The Web IDE:
About
Particle Build is an Integrated Development Environment, or IDE; that means that you can do software development in an easy-to-use application, which runs in your web browser. Particle Build starts with the navigation bar on the left. On the top, there are three buttons, which serve important functions and on the bottom seven more... Here is a guide for working over the IDE

Programing
For start I “flashed” the Blink an LED example for experiencing the platform.
download INO.FILE