

Week 16 - Interface and Application Programming
![]()

![]()
Assignment:
write an application that interfaces with an input &/or output device that you made, comparing as many tool options as possible
![]()
![]()
Required hardware for this assignment:
![]()
Required software for this assignment:
![]()
![]()
At first some theorie again. Processing is an open source computer programming language and integrated development environment (IDE) built for the electronic arts, new media art, and visual design communities with the purpose of teaching the fundamentals of computer programming in a visual context, and to serve as the foundation for electronic sketchbooks. The project was initiated in 2001 by Casey Reas and Benjamin Fry, both formerly of the Aesthetics and Computation Group at the MIT Media Lab. In 2012, they started the Processing Foundation along with Daniel Shiffman, who joined as a third project lead. Johanna Hedva joined the Foundation in 2014 as Director of Advocacy. One of the aims of Processing is to allow non-programmers to start computer programming aided by visual feedback. The Processing language builds on the Java language, but uses a simplified syntax and a graphics user interface.
![]()
![]()
void setup() {
  size(300,300);
  /*window size*/
}

void draw() {
  rect(50,50,100,100); // draw a rectangle on the screen
}
![]()
Processing is based on Java and also takes its syntax. However, some elements have been added to improve usability for graphical tasks.
![]()
Comments:
// single-line comment, / * * / multi-line comment, see example above Instruction flag: ";" - each program statement should be terminated with a semicolon.
![]()
Functions:
they can be used to perform certain actions. For example: size (300,300). Functions are always followed by two round brackets, within which different parameters can be found. Parameters can also be missing, eg: smooth () ;. It is also possible to write your own functions and then call them in other parts of the program, which clearly increases the clarity of the program code.![]()
Expressions:
Are perhaps known from mathematics and also with these to comparisons. An operator combines different values.
Bsp:

Ausdruck                    Wert
7                             7
3+8                          11
(12,8+179)*8                 1534,4
7>5                          true
6<3                          false
![]()
Console window: To output important values, e.g. In the application window too fast, you can use the console. Ex: print (), or println () The following example prints a 10 in the console window.
int x=10;
println(x);
![]()
Functions related to my application
// Celsius
textAlign(LEFT);
for (int i = 0; i < 6; i += 1) { // mit der For-Schleife macht man eine Gruppe von Anweisungen (Block) mit einer bestimmten Anzahl von Wiederholungen: in dem fall soll die schleife bei i=0 anfangen und so lange laufen bis i<6 ist. Dabei inkrementier das ganze um 1
line(268, 204-35*i, 278, 204-35*i); //umrechnung 1 celsius= 268 Fahrenheit
if(i < 5) line(268, 187-35*i, 273, 187-35*i); //if- Anweisung: wenn i <5, dann rechnet der was anderes
textFont(font12); //der angezeigte Text
text(str(0+10*i), 282, 210-35*i); //celsius anzeige in 10er schritten
![]()
With the For loop you make a group of statements (block) with a certain number of repetitions: in this case the loop should start at i = 0 and run until i <6. The whole increment by 1.
![]()
Conversion 1 celsius = 268 Fahrenheit: Line (268, 204-35 * i, 278, 204-35 * i);
![]()
The displayed text = text font (font12);
![]()
Celsius display in 10er steps = Text (str (0 + 10 * i), 282, 210-35 * i);
![]()
![]()
The processing GUI for this assignment:
![]()

![]()

![]()
Video: Running the GUI with the DHT22 sensor:
![]()
![]()
![]()
Sketch for the Fabkit
// Laden der DHT Sensor Bibliothek
#include <WireDHT.h>

dht DHT;

// Definieren der Datenanbindung für den passenden DHT Sensor.

//#define DHT11_PIN 4
//#define DHT21_PIN 5
#define DHT22_PIN 4

int chk;

void setup()
{
  Serial.begin(57600);
//  Serial.println("DHT TEST PROGRAM ");
//  Serial.print("LIBRARY VERSION: ");
//  Serial.println(DHT_LIB_VERSION);
//  Serial.println();
}

void loop()
{
  // Daten für den DHT22 Sensor Lesen

    //Serial.print("Type: DHT22, \t");
    chk = DHT.read22(DHT22_PIN);
    switch (chk)
    {
      case DHTLIB_OK:
     // Serial.print("Status: OK,\t");
      break;
      case DHTLIB_ERROR_CHECKSUM:
    //  Serial.print("Status: Checksum error,\t");
      break;
      case DHTLIB_ERROR_TIMEOUT:
    //  Serial.print("Status: Time out error,\t");
      break;
      default:
    //  Serial.print("Status: unbekannter Fehler,\t");
      break;
    }
     // Ausgabe der Daten über die serielle Schnittstelle. Alles auskommentieren, da für die GUI nur die reinen Werte für Temperatur und
     Luftfeuchtigkeit wichtig sind.
  //  Serial.print("relative Luftfeuchtigkeit (%): ");
  //  Serial.print(DHT.humidity, 1);
  //  Serial.print(",\tTemperatur (C)");
  //  Serial.println(DHT.temperature, 1);

  float h = DHT.humidity;
  float t = DHT.temperature;

  Serial.print(h);
  Serial.print(" ");
  Serial.println(t);

    delay(1000);
![]()
![]()
Modificated Sketch for the processing software
/**********************************************
Termometro ed Umidità su piattaforma Processing
Progetto di Giovanni Gentile
http://www.0lab.it
Ottobre 2013
Creative Common License

**********************************************/


import processing.serial.*;

Serial commPort;

float tempC = 0;
float tempF = 0;
float RH;
float y, h, msbyte, lsbyte;

int yDist, xx=-15;

PFont font12;
PFont font24;

void setup()
{
font12 = createFont("Helvetica", 13);
font24 = createFont("Helvetica",20);

size(345, 330);
commPort = new Serial(this, Serial.list()[1], 57600);
}

void draw()
{
background(800);
//Thermometer
//
fill(200, 0, 0);
smooth();
stroke(0, 46, 200);
strokeWeight(8);
ellipse(250, 250, 58, 50);

// Thermometer
noStroke();
fill(0, 46, 200);
arc(250, 30, 30, 20, PI, PI+PI);
rect(235.2,30,30,200);

// Ausführung
fill(250, 250, 250);
rect(245,30,10,200);

// Thermometer numerische Werte
stroke(245, 240, 220);
strokeWeight(1);
textAlign(RIGHT);
fill(0,46,250);

// Farenheit
stroke(0);
for (int i = 0; i < 5; i += 1) {
line(222, 190-40*i, 232, 190-40*i);
if(i < 4) line(225, 170-40*i, 230, 170-40*i);
textFont(font12);
text(str(40+20*i), 218, 195-40*i);
}

// Celsius
textAlign(LEFT);
for (int i = 0; i < 6; i += 1) {
line(268, 204-35*i, 278, 204-35*i);
if(i < 5) line(268, 187-35*i, 273, 187-35*i);
textFont(font12);
text(str(0+10*i), 282, 210-35*i);
}

// Quecksilber
fill(200,0, 0);
smooth();
strokeWeight(0);
y = -2.0*tempF + 268;
h = 240-y;
rect(245.2, y, 10, h);

// Rechteck Umweltdaten
fill(120);
stroke(0);
strokeWeight(1);
rect(10,10,180,140,7);
rect(10,160, 180, 150, 7);
fill(0,0,0);
textFont(font24);
textAlign(LEFT);
text("Fabacademy 2017", 20,35);
text("°C", 70, 70);
text(nfc(tempC, 1), 20, 70);
text("°F", 70, 100);
text(nfc(tempF, 1), 20, 100);
text("% rF", 70, 130);
text(nfc(RH, 0), 20, 130);

textFont(font12);
String s = ("Thermometer GUI with the software processing for Fabacademy 2017");
text(s, 20, 170, 150, 140);
}

void serialEvent(Serial p) {
// get message till line break (ASCII > 13)
String message = p.readStringUntil(13);
if (message != null) {
// try catch function because of possible issues in received data
try {
String[] elements = splitTokens(message);
RH = float(elements[0]);
tempC = float(elements[1]);
tempF = (((tempC)*9)/5) + 32;

println("tempC: "+tempC);
println("tempF: "+ (int)tempF);
println("RH: "+RH);

}
catch (Exception e) {
}
}
}
![]()
![]()
Postscript/Additions:
![]()
Explain the code a lil bit more: Because I found the code for processing on the internet and modified it, I would now like to explain it by the individual lines and show what I have learned from it:
The following topics I would like to explain a lil bit more:
![]()
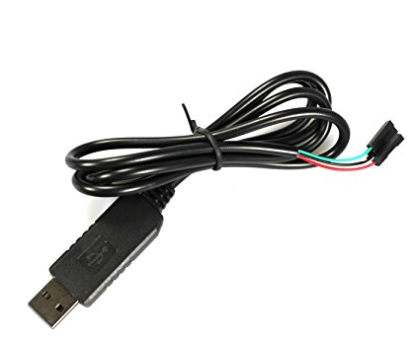
1. The serial interface (also called COM port or UART or UART interface):
The ATmega 328 P-AU can communicate serially with a connected computer. This allows e.g. The control of software or for debugging the program. However, additional devices can also be addressed via a serial interface.
For my assignments I bought a ftdi USB-Serial Adapter cable from Amazon (check: embedded programming):
The USB RS232 module based on TTL offers the best and most convenient way to connect your RS232 TTL devices or demo boards to the PC via the USB port.
![]()
In order to use a serial connection, the following program parts are required.
Initialize the serial connection The initialization is done in the setup () function:
void setup()
{
  Serial.begin(57600);
The value 57600 indicates the Baud rate.
Send data:
The sending can be done in any function, even in setup. However, the serial connection must first be initialized for sending:
Serial.print(h);
Baud rate
The Baud rate is given in the unit Baud (abbreviation: Bd). So how many symbols are transmitted per second. Depending on the encoding of a symbol, the number of bits can deviate.
Baud rate at transmitter (TX - Transmit) and receiver (RX - Receive):
The baud rate must be identical on the transmitter and receiver side, otherwise the Fabkit "talks" faster than the PC "listens".
![]()
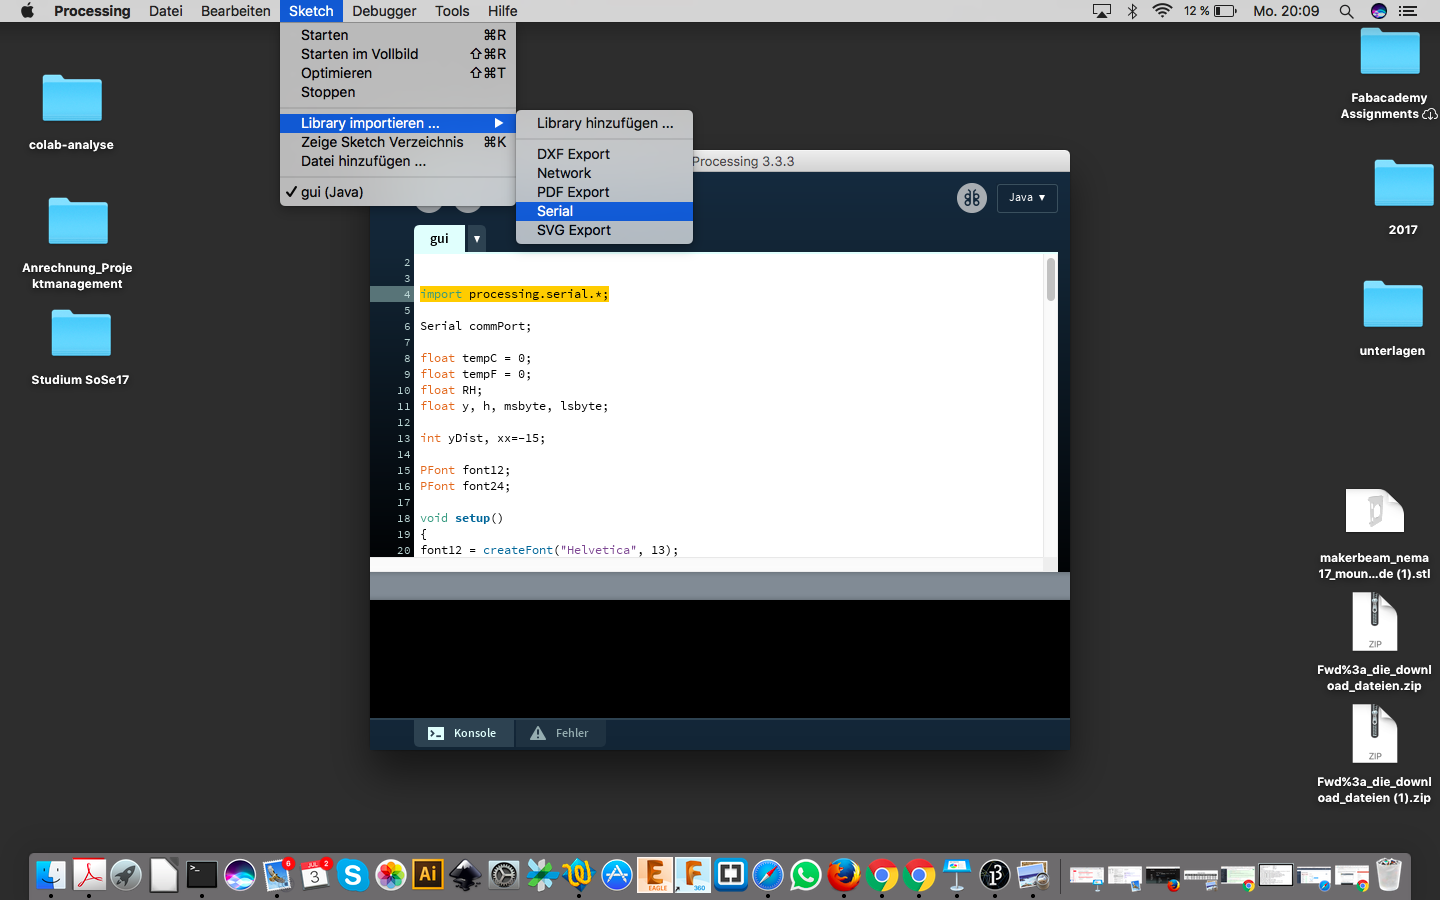
Processing-Code:
In processing, the serial library serial.h is first integrated, afterwards a serial object is created.
import processing.serial.*;

Serial commPort;
![]()
The floating point numbers are then declared:
float tempC = 0;
float tempF = 0;
float RH;
float y, h, msbyte, lsbyte;
![]()
In the setup, the serial port is opened for communication with the Fabkit. The command println (Serial.list ()); Lists all available serial devices. Here I have to choose the right port (1) and the same Baudrate like Serial.begin(57600):
commPort = new Serial(this, Serial.list()[1], 57600);
![]()
Functions related to my application
// Celsius
textAlign(LEFT);
for (int i = 0; i < 6; i += 1) {
line(268, 204-35*i, 278, 204-35*i);
if(i < 5) line(268, 187-35*i, 273, 187-35*i);
textFont(font12);
text(str(0+10*i), 282, 210-35*i);
}
for (int i = 0; i < 6; i += 1) { //With the For loop you make a group of statements
(block) with a certain number of repetitions:
in this case the loop should start at i = 0 and run until i <6. The whole increment by 1.
line(268, 204-35*i, 278, 204-35*i); //Convert 1 celsius= 268 Fahrenheit
if(i < 5) line(268, 187-35*i, 273, 187-35*i); //if i <5, calculate other value
textFont(font12); //The displayed text = text font (font12);
text(str(0+10*i), 282, 210-35*i); //Celsius display in 10er
steps = Text (str (0 + 10 * i), 282, 210-35 * i);
fill(120); // This example creates variables for colors that may be referred to in the program by
a name, rather than a number.
stroke(0); // Sets the color used to draw lines and borders around shapes.
strokeWeight(1); // Sets the width of the stroke used for lines, points, and the border around shapes
rect(10,10,180,140,7); // Draws a rectangle to the screen
rect(10,160, 180, 150, 7);
fill(0,0,0); // Sets the color used to fill shapes
textFont(font24); // Sets the current font that will be drawn with the text() function
textAlign(LEFT); // Sets the current alignment for drawing text
text("Fabacademy 2017", 20,35); // 	Draws text to the screen
Syntax:
text(c, x, y)
text(c, x, y, z)
text(str, x, y)
text(chars, start, stop, x, y)
text(str, x, y, z)
text(chars, start, stop, x, y, z)
text(str, x1, y1, x2, y2)
text(num, x, y)
text(num, x, y, z)

Parameters

c	char: the alphanumeric character to be displayed
x	float: x-coordinate of text
y	float: y-coordinate of text
z	float: z-coordinate of text
![]()
![]()
Download-Section:
modificated processing-sketch
arduino-dht-sketch
Download the Fabkit Version 2 (with ISP-header)
on my Week 10 - Output device download section.
Source:
The Source of the origin processing code: Klick here
Informations about Processing explainings: Klick here
![]()
![]()