About Intelligent Robotic Tracker
This is a great opportunity to tell you about my project.
in Rwanda like other places in Africa we don't have enough Autonomous systems, many individuals, businesses, institutions and Governments are still spending a lot of money in human resource to do some work that would be done using technology to speed up and sustain development.
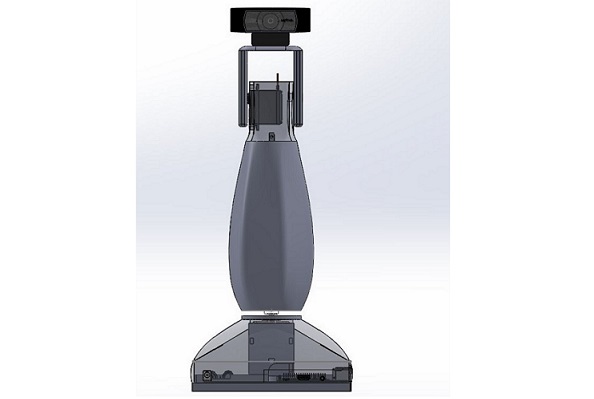
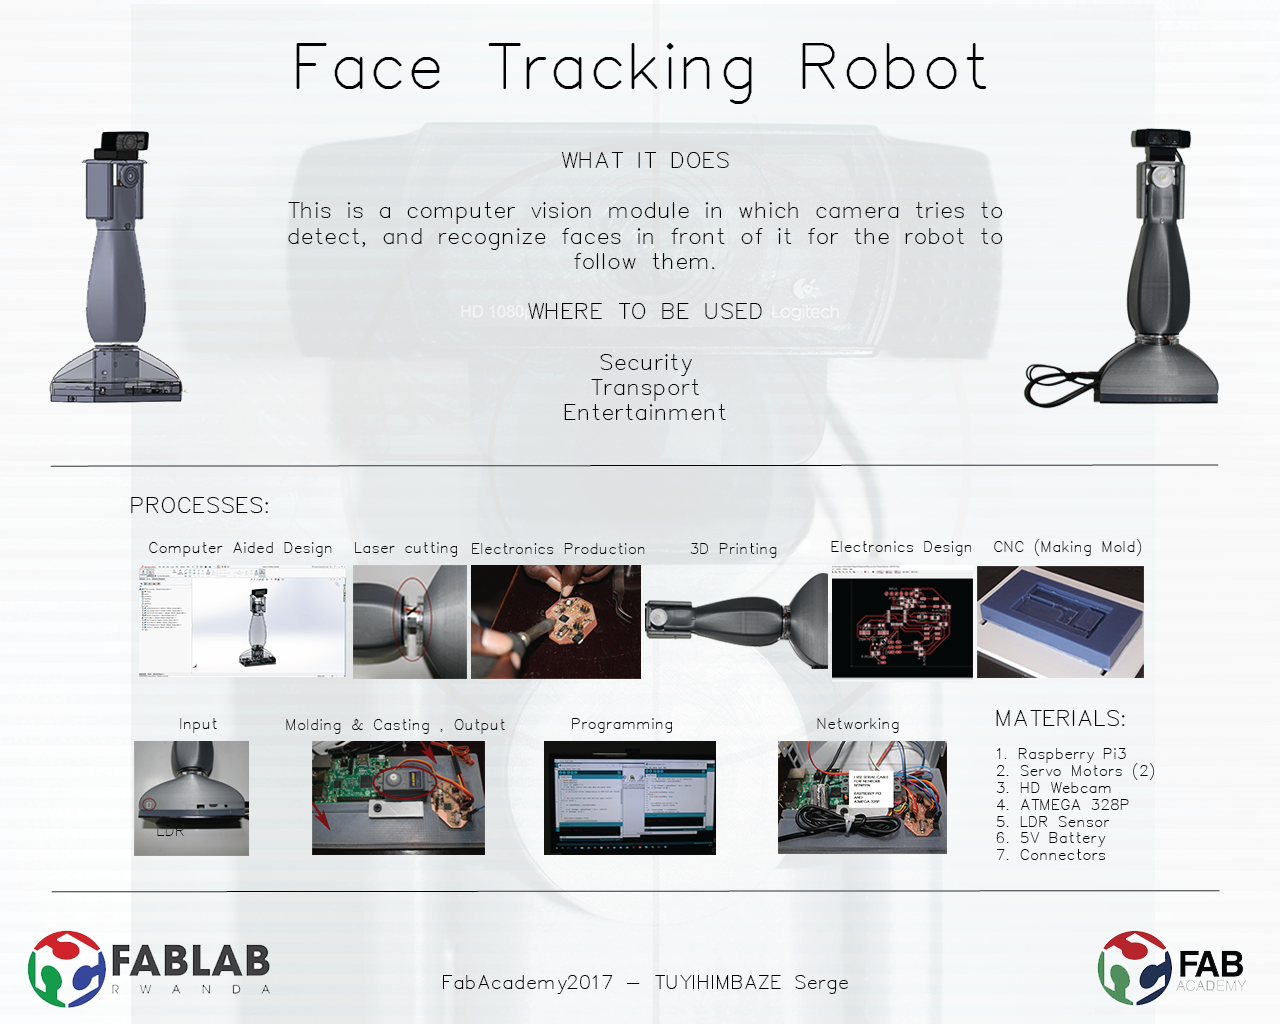
I have realized and decided to use different skills I am obtaining from FabAcademy - making almost anything - that is why I chose to make an Intelligent Robotic Tracker that will be able to track human face and follow him, face recognition will be done using HD webcam and will have a lamp to automatically light in darkness.
Intelligent Robotic Face Tracker
When I was designing my final project, in my wish I wanted to have almost all the machines we have in FabLab Rwanda contribute to making my final project. but it couldn't work because some assignment was not matching my final project. but I used to do assignment and still use that machine to make a certain part of my project
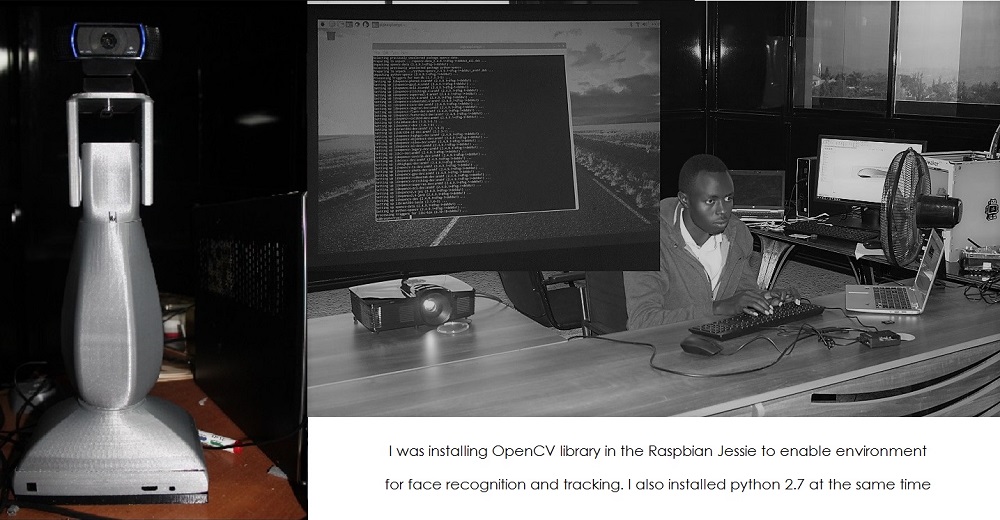
Before I design my final project, I didn't have any Idea of what could better fit in the FabAcademy requirement. But I was like I need something of the latest technology. I finally chose to work on computer vision. I visited different sites, and finally I found the person called Adrian Rosebrock Chief PyImageSearcher, and I followed his tutorials, they were helpful to me. I was able to install OpenCV library.
A Simple table to show the Bill of Materials for my Robot
| Item | Unit | Cost (USD) |
|---|---|---|
| Raspberry Pi3 | 1 | 39 |
| Servo Motor | 2 | 24 |
| Logitech HD 1080p Webcam | 1 | 59 |
| Baterry 9v | 2 | 17 |
| LED | 1 | 9 |
| Light sensor | 1 | 3 |
| Connectors | 1 | 10 |
| Total | - | 161 |
Here are links to weeks that I worked on my final project
Computer-aided design
February 01, 2017 - Week#2
Electronics design
March 01, 2017 - Week#6
Read MoreOutput Device
March 29, 2017 - Week#10
Read MoreInput Devices
April 26, 2017 - Week#13
Read MoreInterface and application programming
May 17, 2017 - Week#16
Read MoreInvention, Intellectual Property and Business Models
May 31, 2017 - Week#18
Read MoreSLIDE PRESENTATION
VIDEO PRESENTATION
Here attached are design files of my final Project
Download Original Files of My Final Project - My Robot Body Design files
Download Original Files of My Final Project - My Robot Controller Design Files
Here are arduino codes I wrote to run motors for face tracking:
#includechar tiltChanel=0; char panChanel = 1; #define pinTilt 8 #define pinPan 9 #define lightPin 7 Servo servoTilt, servoPan; char serialChar = 0; void setup() { servoTilt.attach(pinTilt); servoPan.attach(pinPan); servoTilt.write(90); servoPan.write(90); //setup pin 7 mode pinMode(lightPin, OUTPUT); Serial.begin(57600); } void loop() { // put your main code here, to run repeatedly: int ldr = analogRead(A1); Serial.println(ldr); if(ldr > 800){ digitalWrite(lightPin, HIGH); Serial.println("Dark Detected"); }else { digitalWrite(lightPin, LOW); Serial.println("Light Detected"); } while(Serial.available() <= 0); serialChar = Serial.read(); if(serialChar == tiltChanel){ while(Serial.available() <=0); servoTilt.write(Serial.read()); } else if(serialChar == panChanel){ while(Serial.available() <= 0); servoPan.write(Serial.read()); } }
Here are Raspberry pi codes for face detection:
#!/usr/bin/python
"""
This program is demonstration for face and object detection using haar-like features.
The program finds faces in a camera image or video stream and displays a red box around them,
then centers the webcam via two servos so the face is at the center of the screen
Based on facedetect.py in the OpenCV samples directory
"""
import sys
from optparse import OptionParser
import cv2.cv as cv
import os

# Parameters for haar detection
# From the API:
# The default parameters (scale_factor=2, min_neighbors=3, flags=0) are tuned
# for accurate yet slow object detection. For a faster operation on real video
# images the settings are:
# scale_factor=1.2, min_neighbors=2, flags=CV_HAAR_DO_CANNY_PRUNING,
# min_size=>> servo.move(2, 90)
           ... # "move servo #2 to 90 degrees"'''

    if (min_pwm <= angle <= max_pwm):
        command = 'echo %s=%s > /dev/servoblaster' % (str(servo), str(angle))
        os.system(command)
        #print command
    else:
        print "Servo angle must be an integer between 0 and 249.\n"

if __name__ == '__main__':
    # parse cmd line options, setup Haar classifier
    parser = OptionParser(usage = "usage: %prog [options] [camera_index]")
    parser.add_option("-c", "--cascade", action="store", dest="cascade", type="str", help="Haar cascade file, default %default", default = "./haarcascade_frontalface_alt.xml")
    (options, args) = parser.parse_args()

    cascade = cv.Load(options.cascade)

    if len(args) != 1:
        parser.print_help()
        sys.exit(1)

    input_name = args[0]
    if input_name.isdigit():
        capture = cv.CreateCameraCapture(int(input_name))
    else:
        print "We need a camera input! Specify camera index e.g. 0"
        sys.exit(0)

    cv.NamedWindow("result", 1)

    if capture:
        frame_copy = None

        move(panGpioPin, servoPanPosition)
        move(tiltGpioPin, servoTiltPosition)

        while True:
            frame = cv.QueryFrame(capture)
            if not frame:
                cv.WaitKey(0)
                break
            if not frame_copy:
                frame_copy = cv.CreateImage((frame.width,frame.height),
                                            cv.IPL_DEPTH_8U, frame.nChannels)
            if frame.origin == cv.IPL_ORIGIN_TL:
                cv.Copy(frame, frame_copy)
            else:
                cv.Flip(frame, frame_copy, 0)

            midScreenX = (frame.width/2)
            midScreenY = (frame.height/2)

            midFace = detect_and_draw(frame_copy, cascade)

            if midFace is not None:
                midFaceX = midFace[0]
                midFaceY = midFace[1]

                #Find out if the X component of the face is to the left of the middle of the screen.
                if(midFaceX < (midScreenX - midScreenWindow)):
                    #Update the pan position variable to move the servo to the right.
                    servoPanPosition += panStepSize
                    print str(midFaceX) + " > " + str(midScreenX) + " : Pan Right : " + str(servoPanPosition)
                #Find out if the X component of the face is to the right of the middle of the screen.
                elif(midFaceX > (midScreenX + midScreenWindow)):
                    #Update the pan position variable to move the servo to the left.
                    servoPanPosition -= panStepSize
                    print str(midFaceX) + " < " + str(midScreenX) + " : Pan Left : " + str(servoPanPosition)
                else:
                    print str(midFaceX) + " ~ " + str(midScreenX) + " : " + str(servoPanPosition)

                servoPanPosition = min(servoPanPosition, max_pwm)
                servoPanPosition = max(servoPanPosition, min_pwm)
                move(panGpioPin, servoPanPosition)

                #Find out if the Y component of the face is below the middle of the screen.
                if(midFaceY < (midScreenY - midScreenWindow)):
                    if(servoTiltPosition <= max_pwm):
                        #Update the tilt position variable to lower the tilt servo.
                        servoTiltPosition -= tiltStepSize
                        print str(midFaceY) + " > " + str(midScreenY) + " : Tilt Down : " + str(servoTiltPosition)
                #Find out if the Y component of the face is above the middle of the screen.
                elif(midFaceY > (midScreenY + midScreenWindow)):
                    if(servoTiltPosition >= 1):
                        #Update the tilt position variable to raise the tilt servo.
                        servoTiltPosition += tiltStepSize
                        print str(midFaceY) + " < " + str(midScreenY) + " : Tilt Up : " + str(servoTiltPosition)
                else:
                    print str(midFaceY) + " ~ " + str(midScreenY) + " : " + str(servoTiltPosition)

                servoTiltPosition = min(servoTiltPosition, max_pwm)
                servoTiltPosition = max(servoTiltPosition, min_pwm)
                move(tiltGpioPin, servoTiltPosition)

            if cv.WaitKey(10) >= 0: # 10ms delay
                break

    cv.DestroyWindow("result")
My work should be licensed under a Creative Commons Attribution-NonComercial 4.0 Internacional. By TUYIHIMBAZE Serge
ACKNOWLEDGMENT
I would like to express my special thanks and gratitude to the FabAcademy Coordination directed by Prof. Neil Gershenfeld as well as my supervisors Enrico Bassi and Francisco Sanchez who gave us useful guidance throughout this wonderful project for FabAcademy2017 on how to make almost anything. This course also encouraged me to do a lot of research and I learned about many new things. I am very thankful to both Mr. NTALE Alex and IRERE Claudette for their effort to have us enrolled in this course and providing continuous motivation during the course. I recognize the support of many people including; Adrian Rosebrock, MUGARURA Amiri, UKUNDABAREZI Jean Methode, DAVID Erhun, SUGIRA Samuel and especially FabLab Rwanda.