WEEK 1
PROJECT MANAGEMENT
WEEK ASSIGNMENT
Build a personal site in the class archive describing you and your final project
To develop the web page required by the assignment I learned how to use Adobe Muse, this software allows you to build nice and very useful webpages without writing code. It has a easy to use interface and in case you have some experience working with other Adobe software, for instance InDesign, would be easier for you to use Adobe Muse.

So let's begin, how to build a web page in Adobe Muse?
First it is necessary to set the layout size, I would recommend you to keep the size as it is by default, however you can change the size as you wish on any stage of the process. As an interesting aspect Adobe Muse gives you the option to design layouts for tablets and smartphones, I didn't do that but could be an interesting perk if you are working on this assignment.
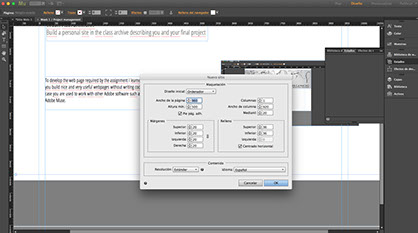
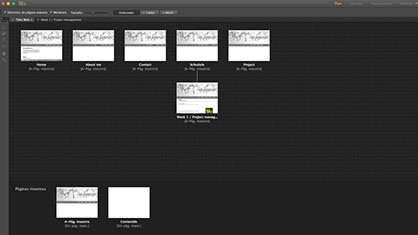
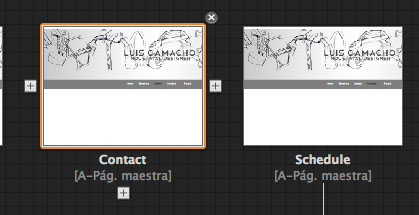
Now that you have your layout you must design your Master pages, in my case I just made one but you might need more depending on your project. The master page will be applied to the individual pages of your choice, on the master page you can set some background pictures, navigation menu, widgets and other things that you think you would like to have in all the pages. To explain it easy the master page is like the background but with some buttons and navigation bars.
once you have it is possible to start adding your individual pages, in them you will able to place any information like text, pictures, videos, Photo galleries and interesting widgets that are available for download in the Internet.
To place files like pictures is as easy as dragging the file and placing it in the canvas that's great, but something better it is the cool feature that all Adobe programs and its the !linked files" possibility for instance, if you are editing a picture in Photoshop or illustrator and you have already placed it in adobe muse you can make any changes of that file in Photoshop or illustrator and once you have saved it it will be updated in adobe Muse so you won't have to place it again.
The web page structure depends on you this software allows to add sub pages of any individual page you do that by pressing the + button that can be found beneath the individual page icon. You can make your webpage as complex as you want.
This was just an overview of the features that this software has, I strongly recommend you to watch the official tutorials that Adobe offers, it will take you just 1 hour to learn how to use and you could be creating your webpage in just a couple of hours, follow this link and you will find more information
https://helpx.adobe.com/muse/how-to/create-website.html.
To upload a file to archive we need to follow the next steps.
First time steps:
First we register the email that will be doing all the updates for the FabAcademy archive in the case of this example we are using the email of our instructor Huber Giron
Huber@Hgnto_ULTRABOOK MINGW64 ~
$ ssh-keygen -t rsa -C "hgnto_08@hotmail.com"
Generating public/private rsa key pair.
Enter file in which to save the key (/c/Users/Huber/.ssh/id_rsa):
Created directory '/c/Users/Huber/.ssh'.
Enter passphrase (empty for no passphrase):
Enter same passphrase again:
Your identification has been saved in /c/Users/Huber/.ssh/id_rsa.
Your public key has been saved in /c/Users/Huber/.ssh/id_rsa.pub.
The key fingerprint is:
SHA256:hHiLQtSq9dkrKgFfTpKerhjwI3hlffcxR+xnX28fQUs hgnto_08@hotmail.com
The key's randomart image is:
+---[RSA 2048]----+
| .. |
| . .. . . |
| .o. o . oE |
|..= o+ o oo .|
|o=.B+oo S . o oo+|
|=.+++ .. . . + o=|
|+o+ . . .+|
|o+... . .o|
|oo.. . .|
+----[SHA256]-----+
After verifying that the email is correct the server will assign us a Keygen specific for our email
Huber@Hgnto_ULTRABOOK MINGW64 ~
$ cat ~/.ssh/id_rsa.pub
ssh-rsa AAAAB3NzaC1yc2EAAAADAQABAAABAQCsfH6WNmUBJnmfbW5efp1vngpk01AAH5111ZJwxxx6I0xTIGVV5UIOoyj4nMomLvO4V8Y57U6EHDu+5kcUd9MSO8O1ebnRlrHLQx0XSSKg4AV2cNZ6hK/La5bI6ENpRg3mL9Mi6gGJILwBAHOLfYVDsRM8JzQfh8ygWYKhSKkWQ2MjMXc0JN1pWDb459wijkLRwpbhbhs5Evf1hK/baCaig3VGG94XVdc+dCfWmgvnLpQTpCbwhIoACaOcmyCZZDqumW+lwMSgiN3eOq8mOhQrS0TxN+wBJUh3dyc3/j+efw72lq4J8Vg6zMllGxw38Z1lhwnG2PA617vTYOXTcyer hgnto_08@hotmail.com
Once you have set up your account, a local copy is made in our computer. Kind of like other cloud services such as dropbox.
Huber@Hgnto_ULTRABOOK MINGW64 ~
$ clip < ~/.ssh/id_rsa.pub
Huber@Hgnto_ULTRABOOK MINGW64 ~
$ git clone git@git.fabacademy.org:fabacademy2016/fablabpuebla.git
Cloning into 'fablabpuebla'...
The authenticity of host 'git.fabacademy.org (159.203.138.39)' can't be established.
ECDSA key fingerprint is SHA256:phNKu45bm+6CDiLaQDfkr96f76G14yBSzmE5rw1GBSU.
Are you sure you want to continue connecting (yes/no)? y
Please type 'yes' or 'no': yes
Warning: Permanently added 'git.fabacademy.org,159.203.138.39' (ECDSA) to the list of known hosts.
remote: Counting objects: 19, done.
remote: Compressing objects: 100% (15/15), done.
remote: Total 19 (delta 3), reused 0 (delta 0)
Receiving objects: 100% (19/19), 454.98 KiB | 440.00 KiB/s, done.
Resolving deltas: 100% (3/3), done.
Checking connectivity... done.
Huber@Hgnto_ULTRABOOK MINGW64 ~ (master)
Steps after first time set up
Using the command line CD we move to the folder were we are updating all the details.
$ cd fablabpuebla
Huber@Hgnto_ULTRABOOK MINGW64 ~/fablabpuebla (master)
We add our files
$ git add .
Huber@Hgnto_ULTRABOOK MINGW64 ~/fablabpuebla (master)
And then we commit them to upload.
$ git commit -m "prueba xx"
[master f172eb3] prueba xx
Committer: Huber Girón <Huber Girón>
Your name and email address were configured automatically based
on your username and hostname. Please check that they are accurate.
You can suppress this message by setting them explicitly. Run the
following command and follow the instructions in your editor to edit
your configuration file:
git config --global --edit
After doing this, you may fix the identity used for this commit with:
git commit --amend --reset-author
1 file changed, 19 insertions(+)
create mode 100644 students/275/index.html
Huber@Hgnto_ULTRABOOK MINGW64 ~/fablabpuebla (master)
Finally we push our local files into the origin of the archives in this case the Fabacademy main servers.
$ git push origin master
Counting objects: 4, done.
Delta compression using up to 4 threads.
Compressing objects: 100% (4/4), done.
Writing objects: 100% (4/4), 371 bytes | 0 bytes/s, done.
Total 4 (delta 2), reused 0 (delta 0)
To git@git.fabacademy.org:fabacademy2016/fablabpuebla.git
f2d993f..f172eb3 master -> master
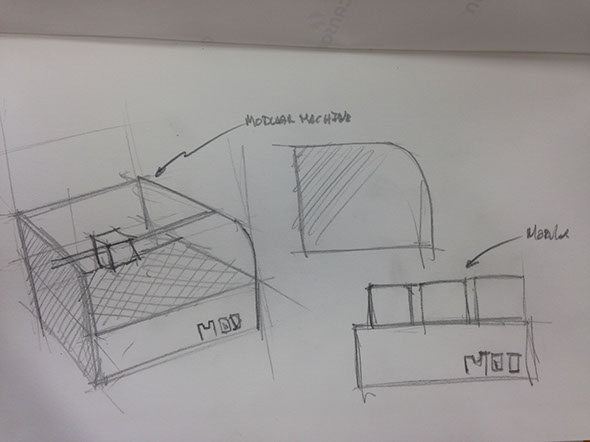
POTENTIAL SEMESTER PROJECT
As a potential semester project I would like to develop a modular desktop CNC machine that could be used as a 3D printer, router and laser engraver. The main challenges in this project are: developing the attachment system for the modules and developing an appropriate layout for all the components. Some examples of homemade 3D printers, CNC routers and laser engravers are found below.
dd