Applications and implications
This week is a reflexion about the final project for this FabAcademy 2016.
Lesson
Academany Fab-2016.05.25D Lesson 17: Applications and Implications from Fab Academy on Vimeo.
Analysis of the project
How will others be able to make your project by reading your documentation?
Any good FabAcademy project should have good documentation intended to be replicated. So I will try to do my best and provide that documentation
Is a easy project as mapping and hologram pyramids are now well known. The structure is not very complex and the electronic boards are inside the parameters for be made in a fablab
As the code will be available for download any fabber could be modify and improve it
What will it do?
The project is a interactive guide system for fablabs, which show information in a visual way with a projection in a pyramid made of clear plastic
Also turn on lights near the machine chosen sending a wireless signal to a remote board
Who has done what beforehand?
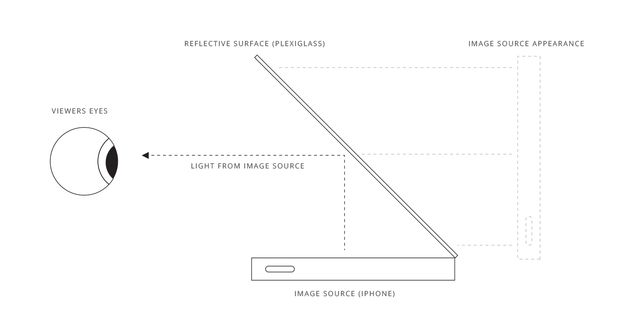
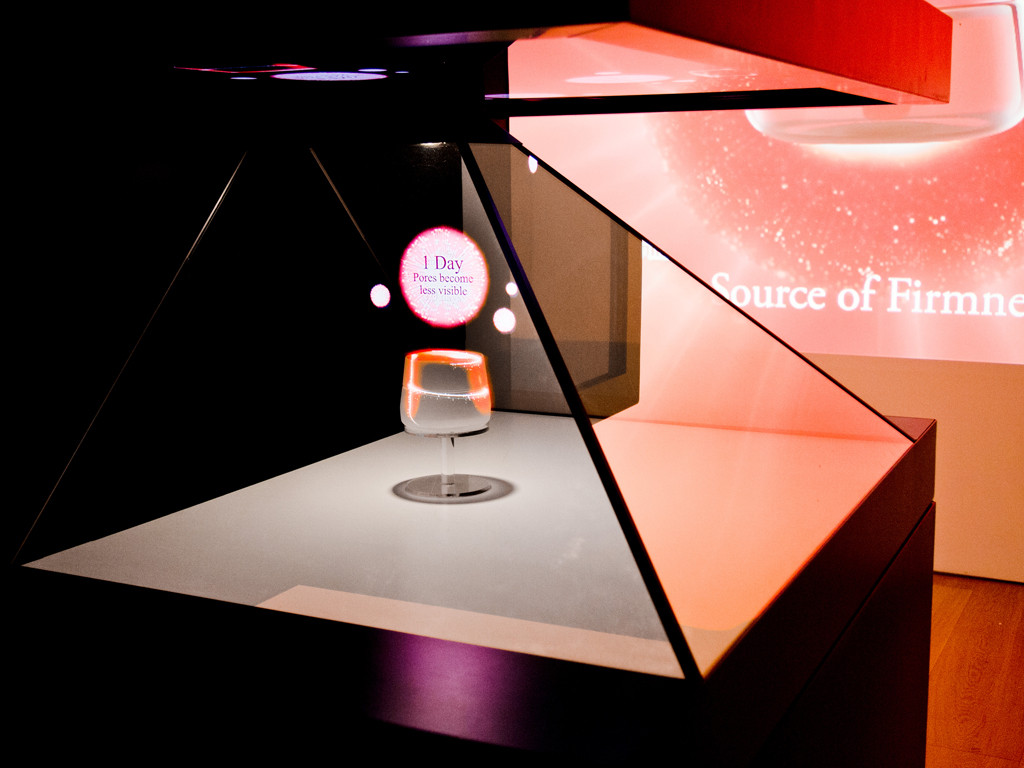
The bad named digital holograms as are not based in optic holographic instead they are based in a well known optic trick called Pepper's Ghost. Where a image is projected in a clear crystal, often oriented 45 degrees in front the scene we want to modify.

Examples of structures for a hologram pyramid


What materials and components will be required?
- Methacrylate sheets for making the hologram pyramid.
- Led Strips for each node
- PCB board with Attiny or AtMegas for controlling the system
- Wireless nodes (Xbee or NRF2401L)
- A Way for projecting images (Monitor, projector or Tablet)
- A wooden structure for supporting everything
Where will they come from?
As is intended everything should be possible made in a normal FabLab, so the structures like the pyramid, mapping surfaces or the structures to support them are made inside the fablab.
Most of the electronics component are from the Fab Inventory or are easily buy from one of the normal suppliers like RadioShack or Digikey. or Electronics shops like Adafruit or Sparkfun.
How much will it cost?
Materials like Methacrylate cost around 20 euros square meter, so maybe around 40 euros of this material
Wooden material would be also around that cost depending the final structure
Electronics would consume much more as I need more nodes. Usually a FabKit is around 12 euros, each shields that would need another components and the wireless modules will cost around 6 euros, so maybe 50-60 euros in electronics
Apart the cost of the method you choose to project, maybe an old monitor will cost you around 50 euros, a table just for this will cost 100 euros, and projectors are in the scale of 200-600 euros.
What parts and systems will be made?
As was explained before it will be oriented for be FABable as much as possible. So any structure will be laser cut or milled in the CNC with materials that are common in a FabLab like plywood, foam or methacrylate
3D Objects for smart objects will be printed with PLA in the Makerbot 3d Printer. and electronic Boards will be milled with the Modela MX-20, and the FabModules, for being soldered.
What parts and systems won't be made
Some electronic parts like the wireless modules will be just connected to the part of boards and not made, as design PCBs and soldering the components from zero is more time consuming and less productive that just get the module of the FabInventory
What processes will be used?
Laser cut and Milling with a big CNC will be used for making the parts for the structure and they will be ensemble using joints of the same materials or by the own cut of the parts.
3D avatars will be designed with a CAD program like Rhinoceros and 3D printed after modify with Meshmixer and the own program of the 3D printer Makerbot.
The electronic boards will be designed with an ECAD program like eagle and later be milled using the fabmodules and the Modela MX-20. The electronic components will be soldered by a tip soldering pen and later programming using ARVdude
The programming will be made mostly using C++ and different frameworks like Openframeworks or Unity3D
What tasks need to be completed?
- Design the electronics boards
- Milling, soldering, program boards
- Design the structure
- Cut and mill the structure, for build the stucture
- Program the application
Tasks to complete in the next weeks are:
- Designing, Milling, Soldering and Programming the Nodes for the project, based in the Fabkit version 0.2
What questions need to be answered?
How to make my own smart objects using RFID technologies that are possible using one of the ATTiny 45 as passive antenna which frequency is around the 125 Hz range
How will it be evaluated?
The interactive guide will be completed when at least after receiving an input of the user will produce and output (mostly light the zone of the machine selected), in a remote node and in a visual way show audiovisual information in a surface (hologram pyramid or mapping surface)
What is the schedule?
June 1 to June 5: Designing and Milling the PCB
June 6 - June 8: Soldering, testing, Programming the PCB
June 9 - June 15 - Designing, milling and fixing the structure and supports
June 16 - 18 - Application development
June 19 - June 22 - Fixing errors, putting all together
