Assignment for week 10 Machine Design
Group assignment:
1.Make a machine
2. Including the end effector
3. Build the passive parts and operate it manually
4. Automate your machine
5. Document the group project and your individual contribution
The Gestalt Nodes
For this week my part was to code and test the machine. So, I went with some Gestalt Nodes tutorial
Fabnet a multi-drop network
Fabnet is a multi-drop network, meaning that multiple modules (a.k.a. nodes) share a single set of communication wires. Signalling is differential based on the RS-485 specification. Each node is assigned a four-byte IP address which uniquely identifies it over the network. Besides communication, Fabnet provides power at two voltages: high voltage (12V - 24V) is intended to drive motors, lamps and actuators, while low voltage (7.5V) supplies power to the logic circuits of the nodes.
Fabnet header

Required Tools
We follow all the tutorials to use FaBnet, and develop Gestalt nodes for the three axis. Starting from the tutorials. Moreover, a first version of the machine has been prototyped laser cutting cardboard and drawing the first version to command the steppers
1.high and low voltage power supplies
2. USB-RS485 converter cable.
3. an adaptor board (076-000A) with bias resistors.

Fabnet is essentially an RS-485 bus with a few additional signals
Pinout reference for RS-485 Version. This FTDI Cable has a little difference than the other available FTDI Cables

Step to be followed:
1. first we need to create a bridge board that adapt that cable to Fabnet for this we need to download the board files.
3. Fabnet board also provide power to the network
4. All of the nodes have a regulator and are getting power from the line marked "high" on the board
5. According to Nadya's notes: make sure you have a supply that can provide at least a couple of amps.
6. The FTDI cable comes with bare wires on one side; solder them to the pads
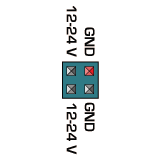
7. The header on the other side provides power, ground, and the A and B RS-485 signals (or plus and minus; RS-485 uses a differential voltage to help make noise matter less). Here's what those signals are on that header:

8. Next we need to make one cable that connects from this header to the Fabnet header on the first node.
Running the software
1. download the pygestalt code
2. Change to the directory and run setup.py to install:
sudo python ./setup.py install
3. Now change into the directory examples/machines/htmaa. Look for the script singlenode.py to start with. On Linux it should work right out of the box. On the Mac you'll need to hardcode the name of your FTDI cable (they all have unique IDs when they enumerate). Type:
ls /dev/tty.usb*
4. And copy the device name that looks something like:
tty.usbserial-FTXW7FE2
5. Edit the line in singlenode.py:
else: self.fabnet = interfaces.gestaltInterface('FABNET', interfaces.serialInterface(baudRate = 115200, interfaceType = 'ftdi', portName = '/dev/ttyUSB0'))
6. change portName to whatever your potname is. Now power it up and type:
python single_node.py