
Week 9. Machine design
During this week, we designed in a group a machine to move liquid between different containers.

Tasks
- Design a machine including the end effector
- Build the passive parts and operate it manually
- Document the group project and your individual contribution.
Process explanation
Project overview
One of the goals of Fab Lab is create our own machines. Biology is slowly coming to FabLab world, and during this week aim to ideate a device that can be used in a Biology lab. During this week, whe have designed a machine that should be able to move liquid sample among multiple containers located on a tray.
The project is documented in our group page
Own contribution
We have all collaborated in all parts of the project. We all have been cutting and mounting the linear phase modules and have been collaborating during the assembly phase, deciding which were the best configuration. I might have had strongest participation in the design and assembling of the rotation phase and the tray as well as in writing the documentation.
I designed, cut and built by myself the circular stage. I basically built a disc that contained a step motor inside. The motor was connected to a circular tray, that permits the rotation of the liquid container. The disc was made out of cardboard in order to test the feasibility of the stage. I utilized the Inkscape Elliptical Box Maker as a base to build this stage. The stage was built out of 4 parts. The base, two semicircunferences for the lateral walls and and a cicular lid that will rotate. The base and the lateral walls were connected via tabs. The center of the tray had a hole to accommodate the motor. The motor should be connected to the lid via bolts. The height of the walls were the same as the height of the motor. The top-lid was attached directly to the motor, and it was free to rotate.
I built this stage in order to give an additional degree of freedom to the system. The liquid container does not need to be placed in lines, but they can be located, additionally, in concenctric lines inside the tray.
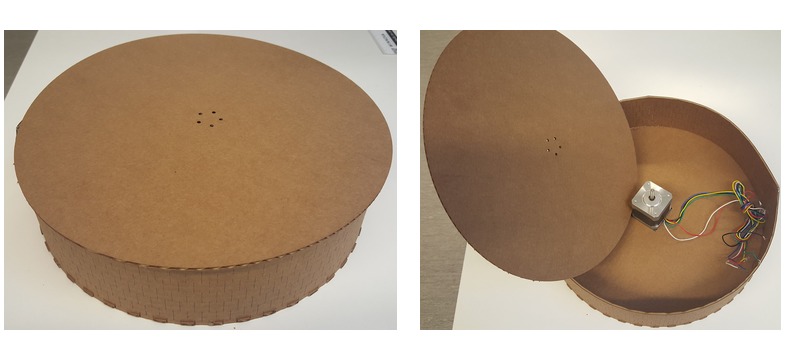
I had to cut several models till the measurements were correct and the hinge lines permit correct bending without breaking the material. I did not have time to test carefully the state, but initial tests shown that the material is not the most adequate one for this stage. It is not consistent enough.
Resources utilized
- Machines that make: cardboard stages
- Steps motors, rods
- Inkscape to trasnform the content to SVG.
- Elliptical box makerplugin for Inkscape: to make the circular stages.
Reflection
Summary
During this week I designed for the first time a machine. We did not have time to have a solid prototype, but at least we managed to build a device that we can improve and make it work during assignment 11
Main learnings
It is not easy to build a machine. There are plenty aspects you need to consider before hand. Weight balance is an important aspect. Even utilizing pre-made modules it took us almost one week to assembly the full machine not including either the electronics or the programming. Cardboard might not be the best option for the final prototype, specially for the rotating phase.
Main difficulties
My spatial vision is reallly bad. It took me some time to understand which were the correct positions and the necessary changes to the original design in order to assembly the parts as we expected. Until the machine was not partially assembled I could find the issues. In that sense, utilizing cardboard and premade modules it was really an advantage. It was quite easy to assembly and dissassembly the different parts.
- The two parts of the circular stage: the tray and the bottom disc