#04week
electronics production
tasks- - mill the pcb for the in-system-programmer
- - solder all necessary components onto the board
- - optionally, use an alternative to produce the pcb
For this week assignment we had an introduction to electronics production. We had to go through some basic processes to manufacture a PCB (printed circuit board) for an electronic device. We were provided with some ready made field for an ISP board. ISP stands for ‚in-system-programmer’. That means that several micro processors can be programmed with this module in built-In state.
The Fab ISP is very basic tool, it has a few external components like resistors, capacitors, diodes and more. And with a professional guidance it is also for a beginner easy to build. Nevertheless it’s few components, the fabISP is fully functional and will be used in coming assignments to transfer program code to other micro processors.
At first I had to download the necessary repository for the fabISP from the Fab Academy Server, for this task the FA was so kind to provide us with all needed files, for the task was only to make not to design/develop the board from scratch. You can find all files and links I used for this assignment at the bottom of this page and of course on my separate ‚links & resources‘ page.
The downloaded repository (here's the original link) contained the schematics, the layout and the description for our fabISP, so everything that is needed to build the board.
At this point I want to thank Andy Bardagjy for his work and for sharing it with us.
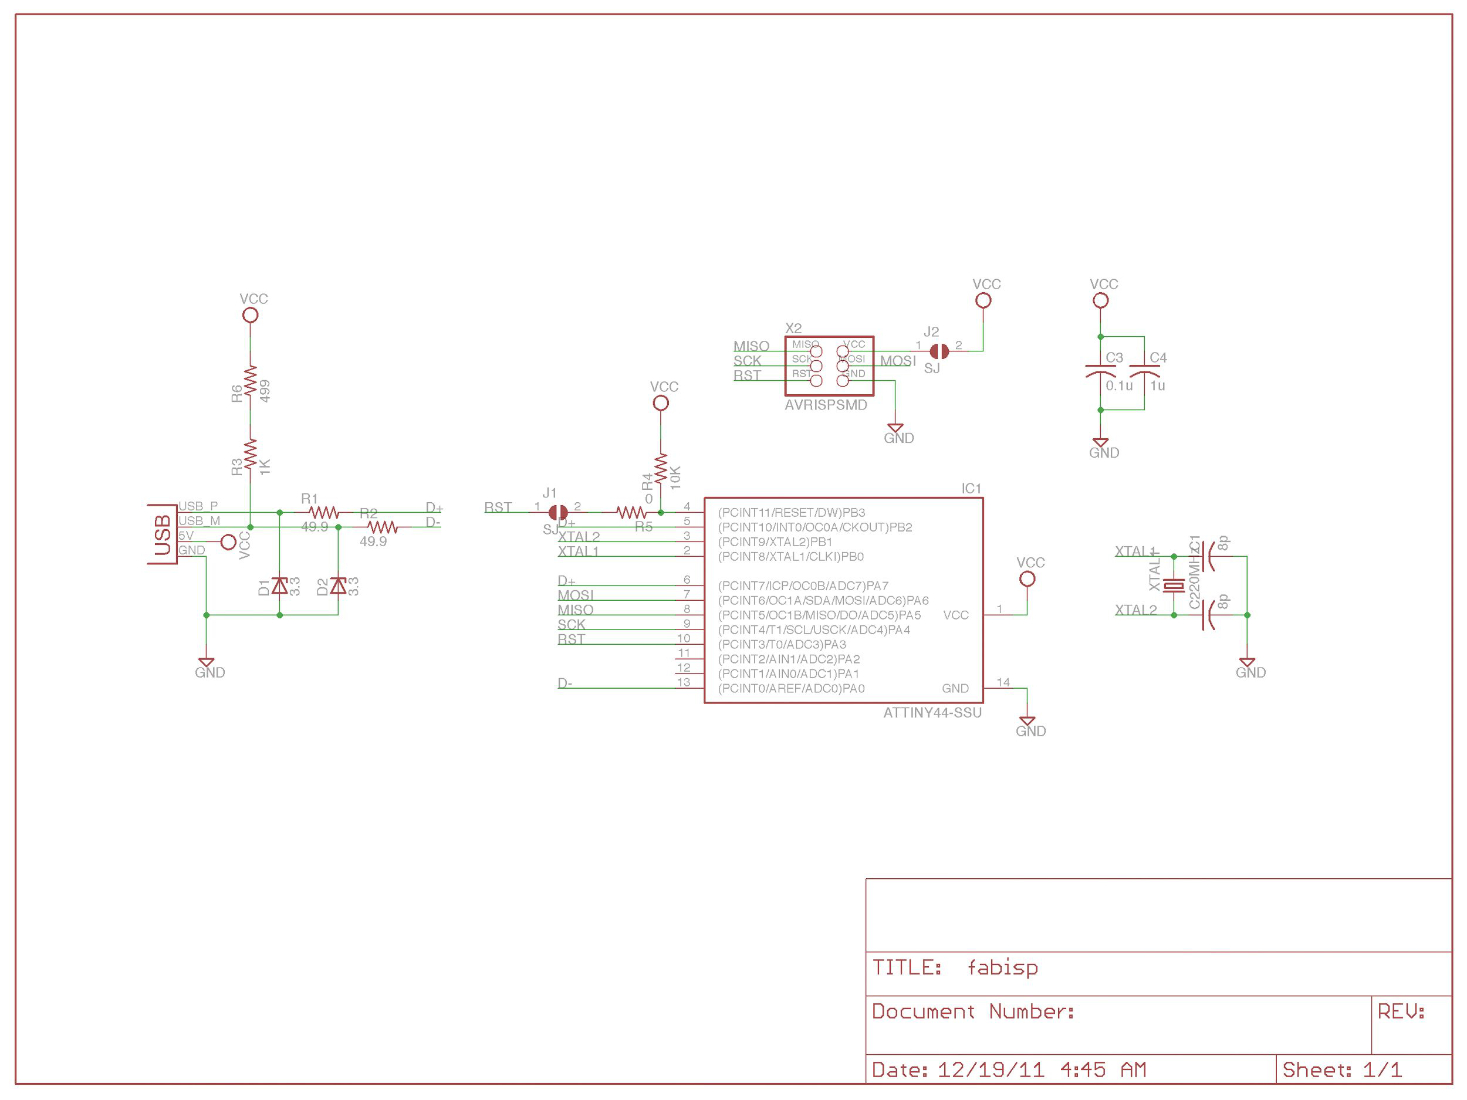
- fabISP schematics
- fabISP layout
- fabISP componentsplan
Basic Information
Some basic information about pcb board production. There several ways to fabricate a pcb board, for example etching by using chemicals that erode the copper that is not needed.
Connection lines have to be transferred before to the board with different technics like lithography or transfer or manually by drawing or using special adhesive material that covers those parts of the copper that has to remain on the board.
When this is done than the prepared board goes into the etching process - for etching, chemicals like ferric/cupric chloride or ammonium/sodium persulfate were used. But his actually is more the industrial standard, for single boards or/and prototypes this procedure is not recommended, because of the hazardous properties of the chemicals and the issues of the disposal.
Another way is machining the pcb board, the main disadvantage of machining is the time factor. Usually it is much slower and if a number of boards is needed than this would definitely not be the right choice for factoring the job. Machining is a serial process, that is the workflow is one after one. The etching can go simultaneous for a numbers of boards - limitations coming from the sizes of the etching pool capacity. But the advantages by using machining are the less steps needed for starting the job. As before mentioned, when we are talking about prototyping machining is the one we go for. No thoughts about hazardous chemicals and how to handle them or how to dispose them correctly.
So our (FabAcademy) way is the second one: machining /milling.
Milling
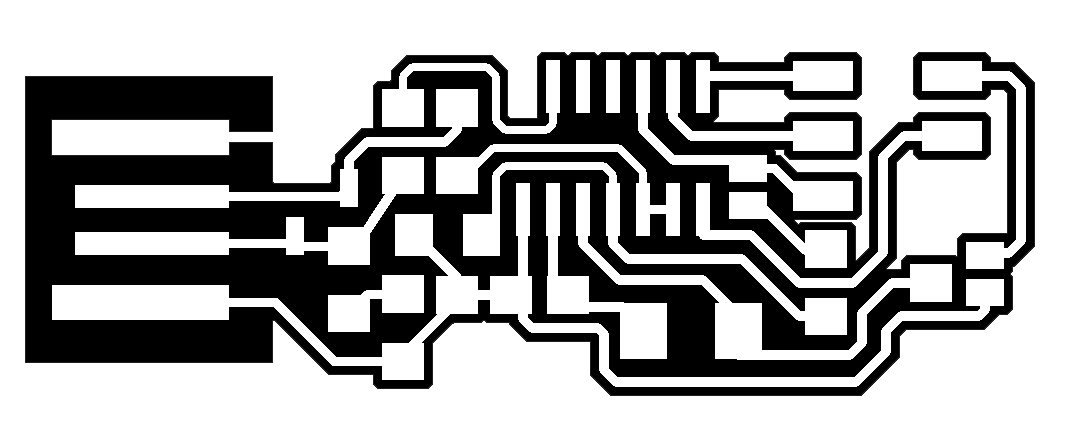
For preparing the process of milling the pcb I had to convert the provided layout (see img 02/ above) that was in a raster format (see #2 assignment) to be more precise a png format into a format that the milling machine can understand. The machine we use in our FabLab is the Roland MDX40.For doing so I had access to the Fab Modules, the Fab Modules are developed by the MIT Center for Bits and Atoms with the Fab Network. By the following visual documentation (screenshots) with description below I’ll explain what I did.
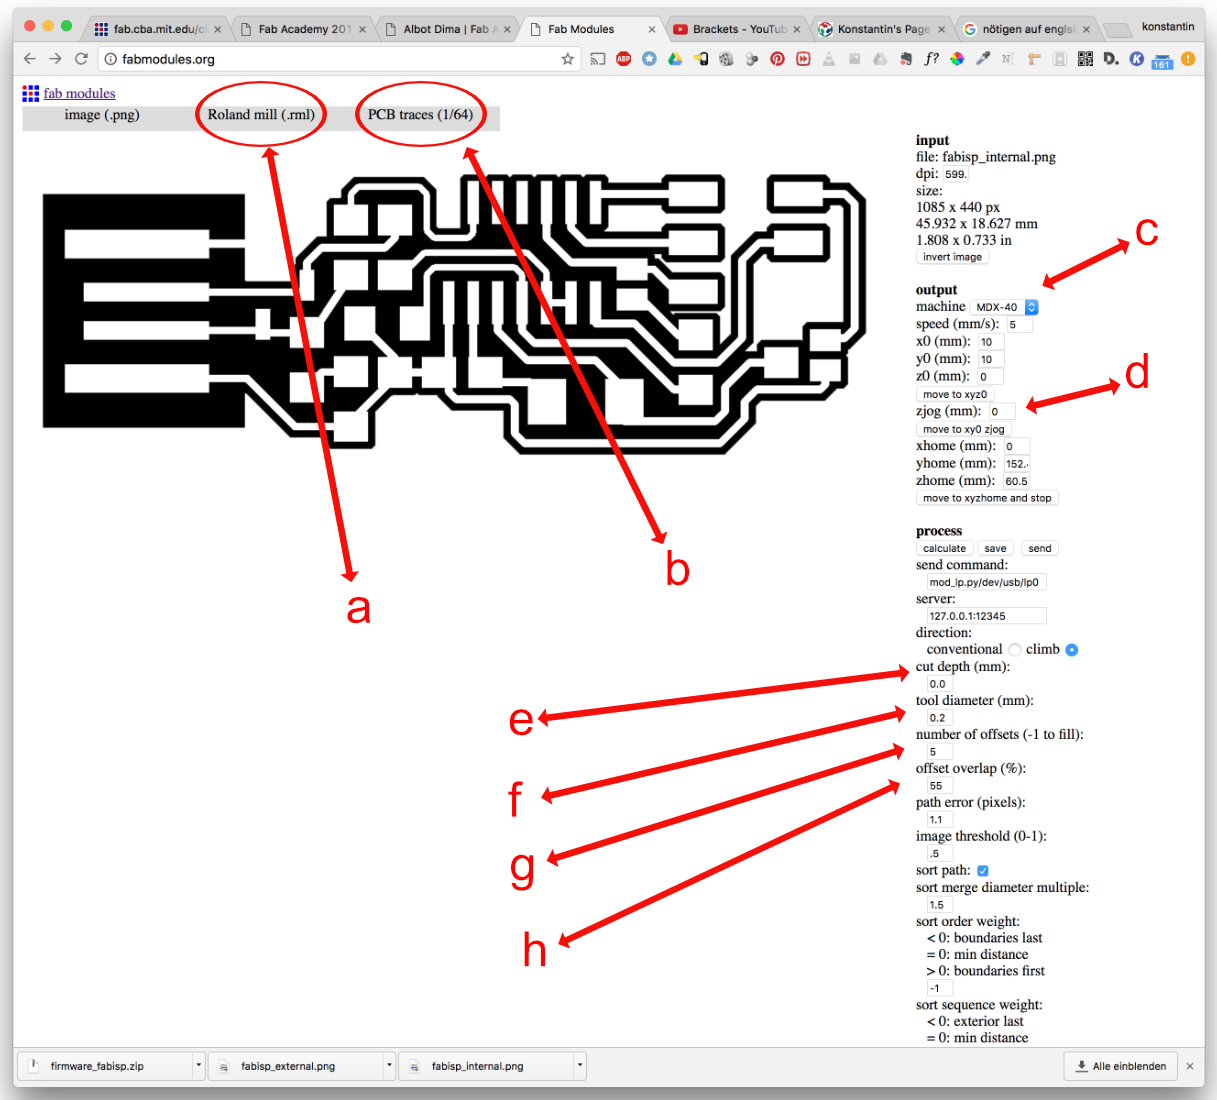
At first I had to load the layout image of the board into the modul, than I had to choose (a) the output format for the machine I intend to use, after doing this I had to decide which process to calculate (b).
In my case it was PCB traces 1/64.
The Next step was to choose the right machine in the 'output section'
I had now just a few settings left before I could start milling my pcb. Next was setting the cutting depth
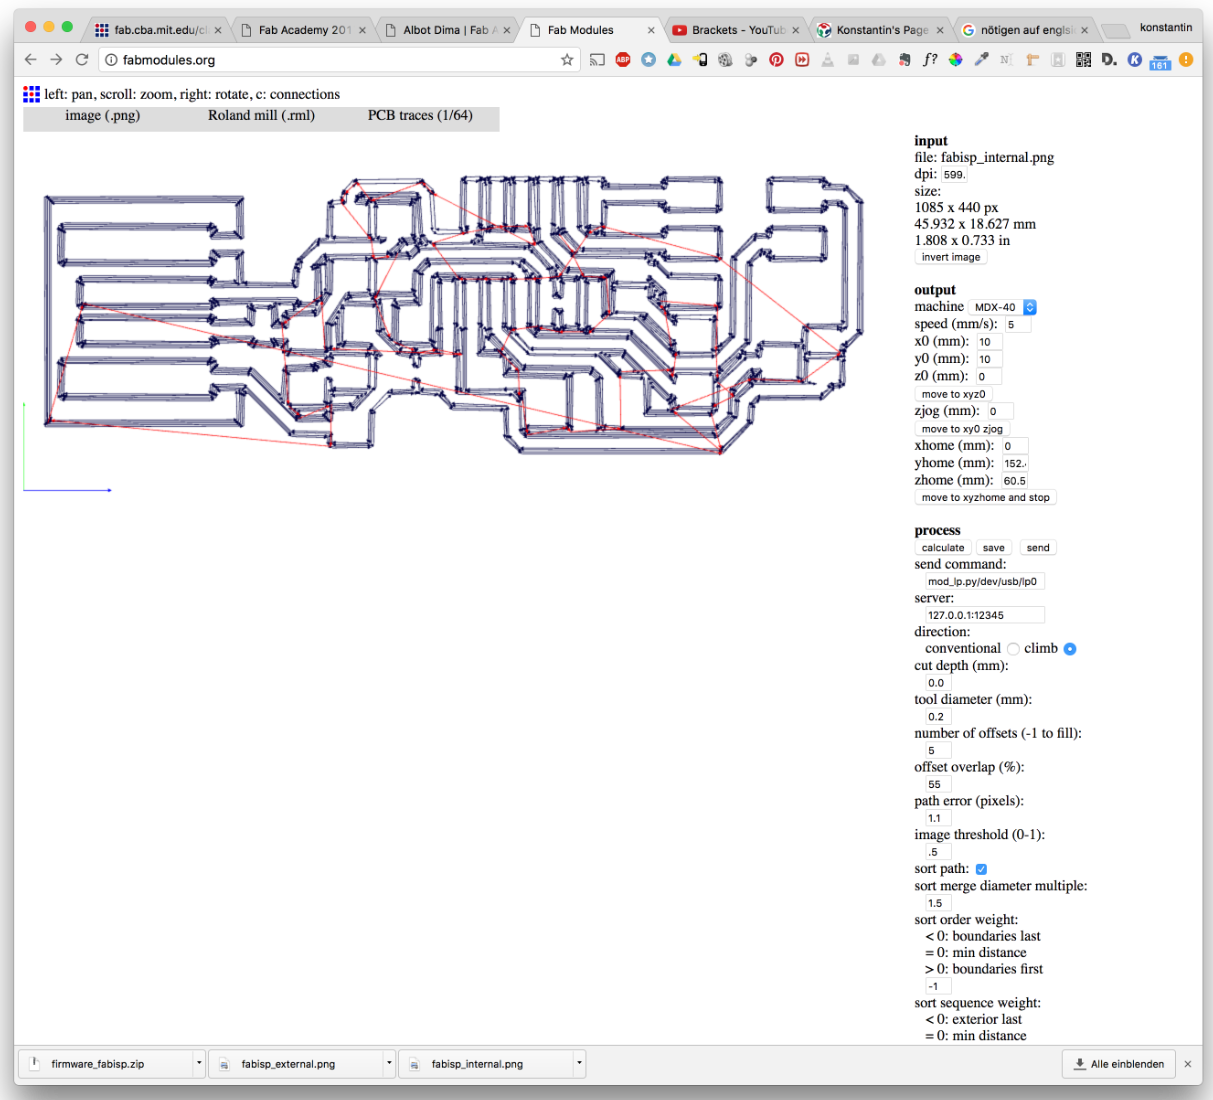
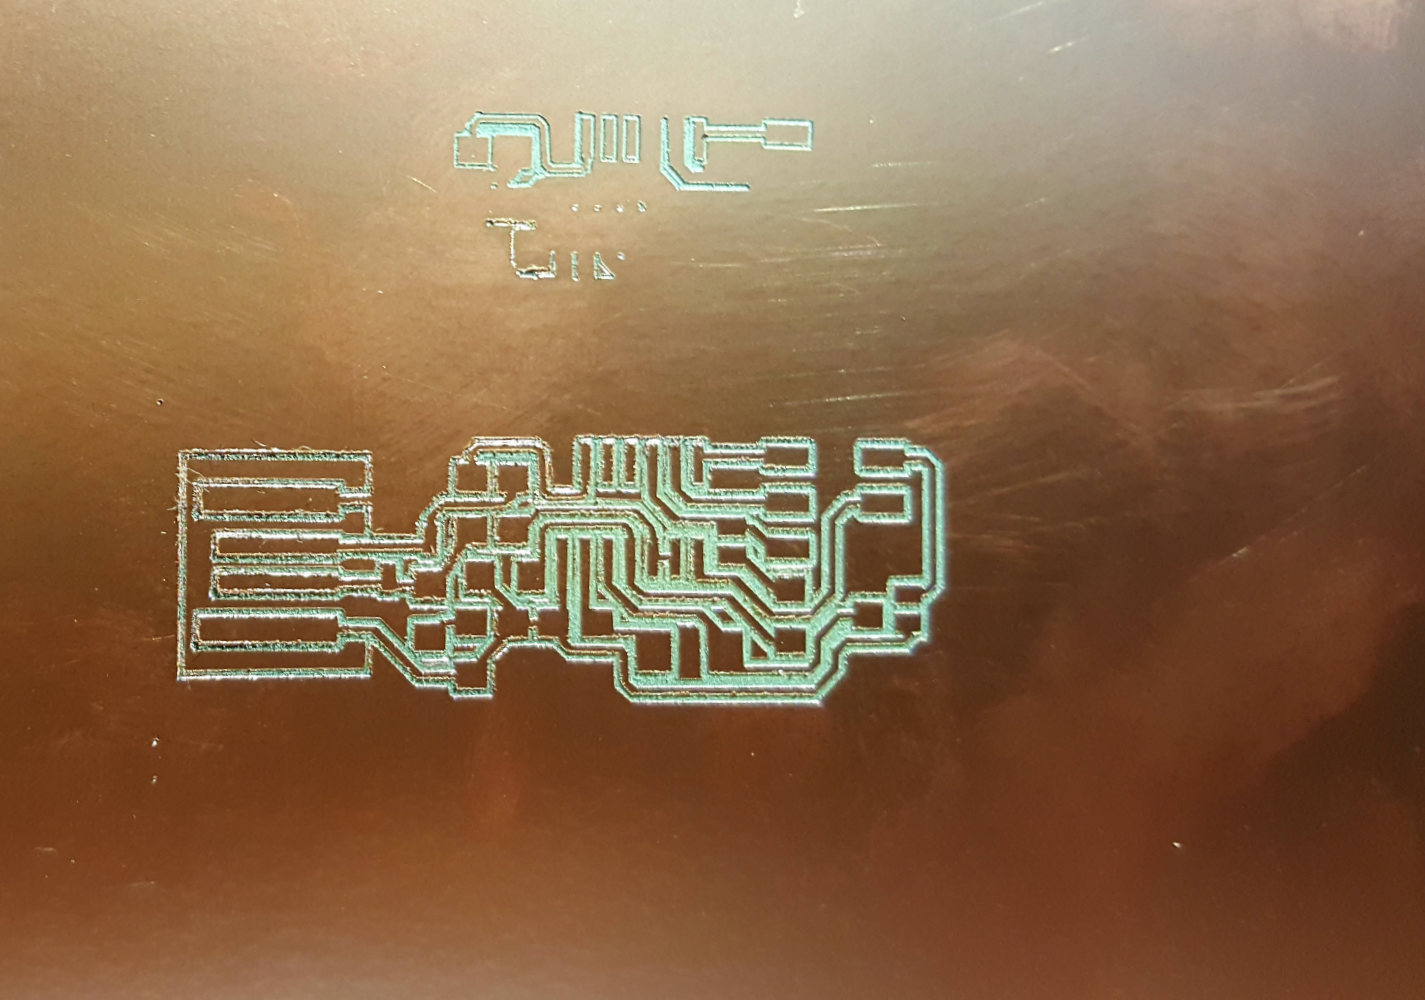
On the screenshot above is very nice to see the calculated traces done by the fabmoduls, based on the settings I did before as explained. The single traces are clearly visible and it is clearly recognizable where the machine does positioning moves without milling
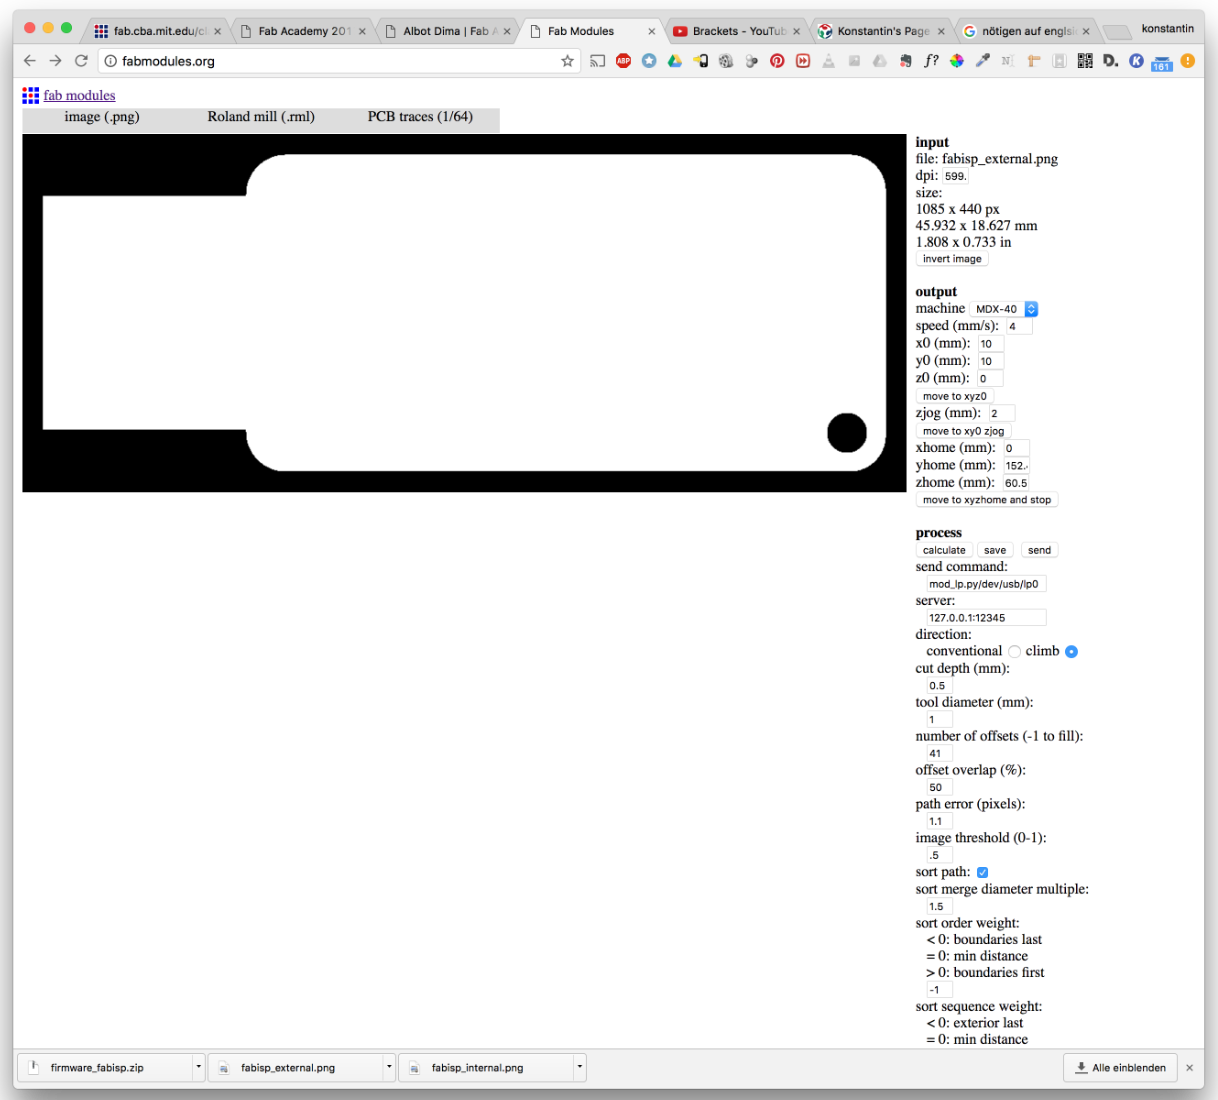
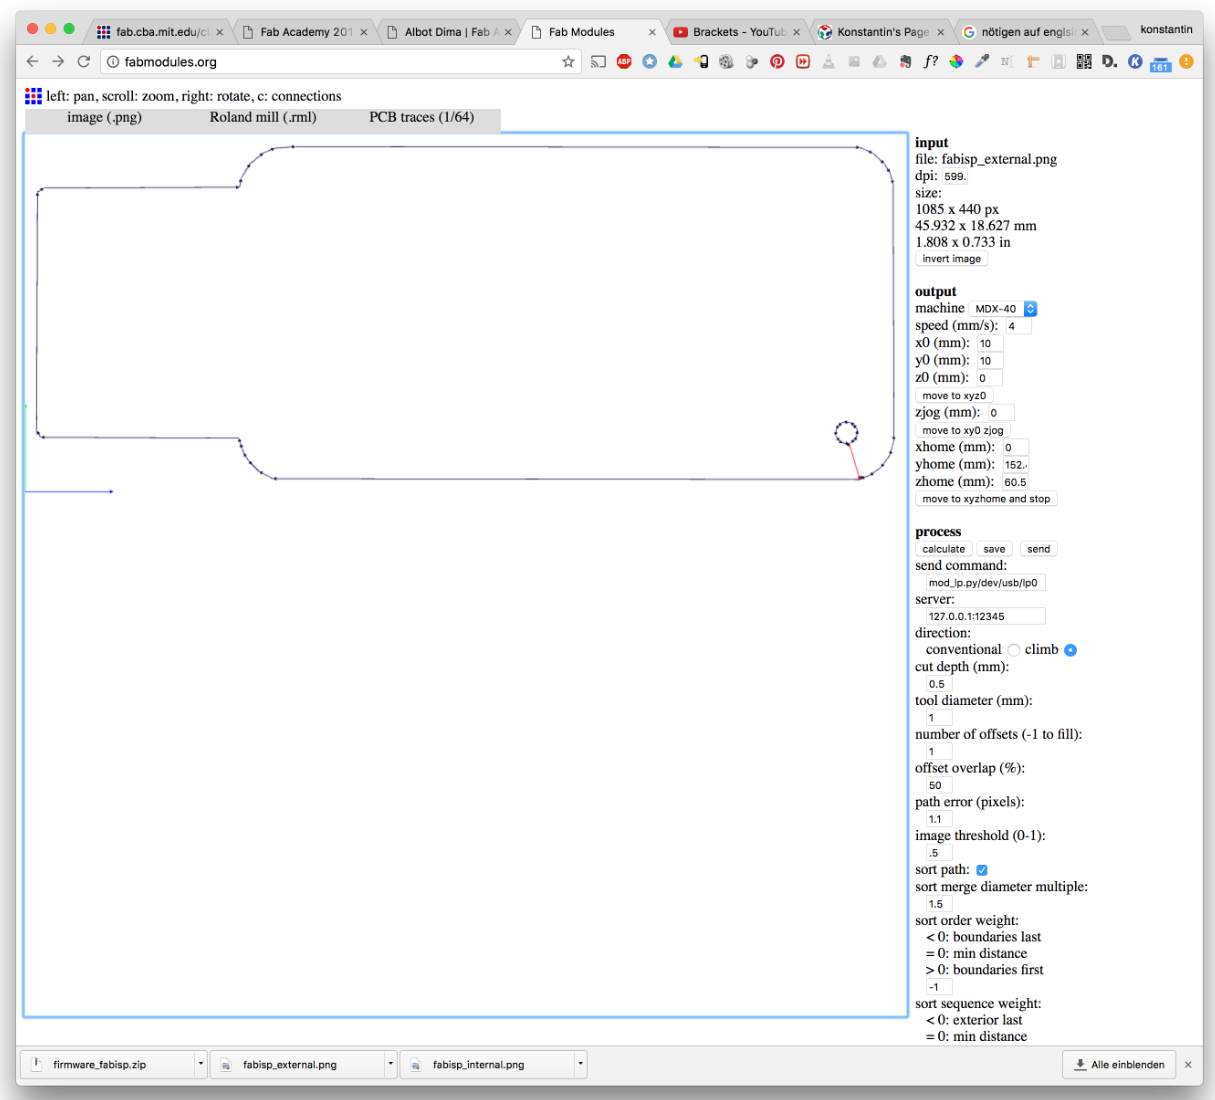
On the following two screenshots I used the same settings, I just changed the values for number of offsets and the cutting depth. It was just a simple cutting job, I needed only one trace with a deeper cutting depth.
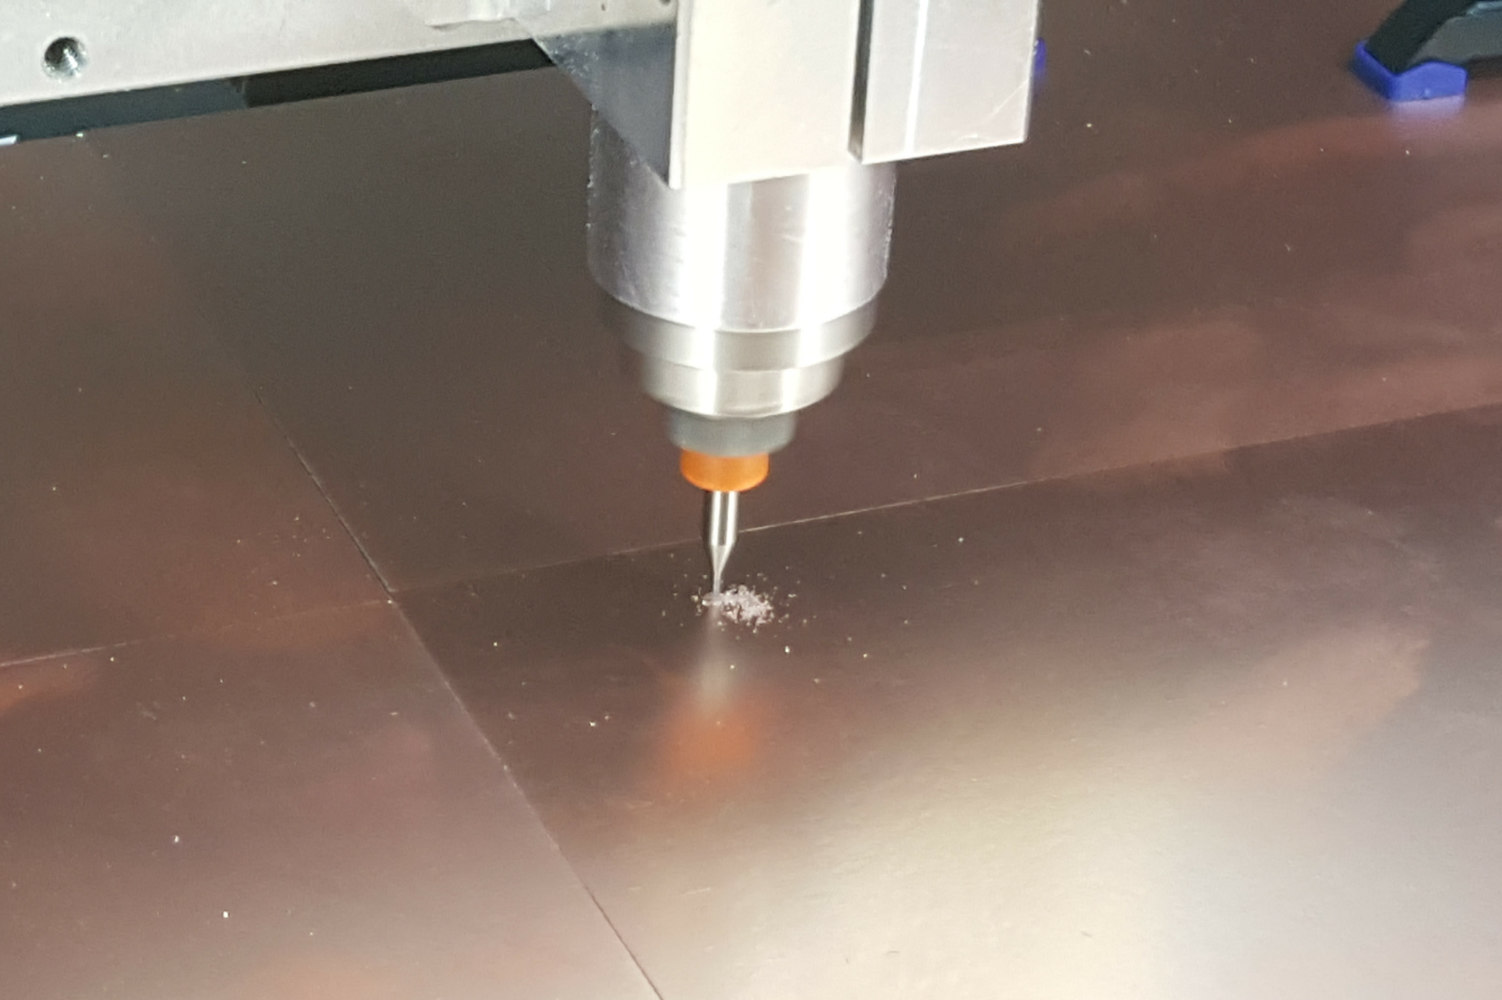
Below a screenshot after successfull milling - not without mentioning that I managed this task in the third run. The first two times weren't successfull because the milling process stopped suddenly after a view minutes
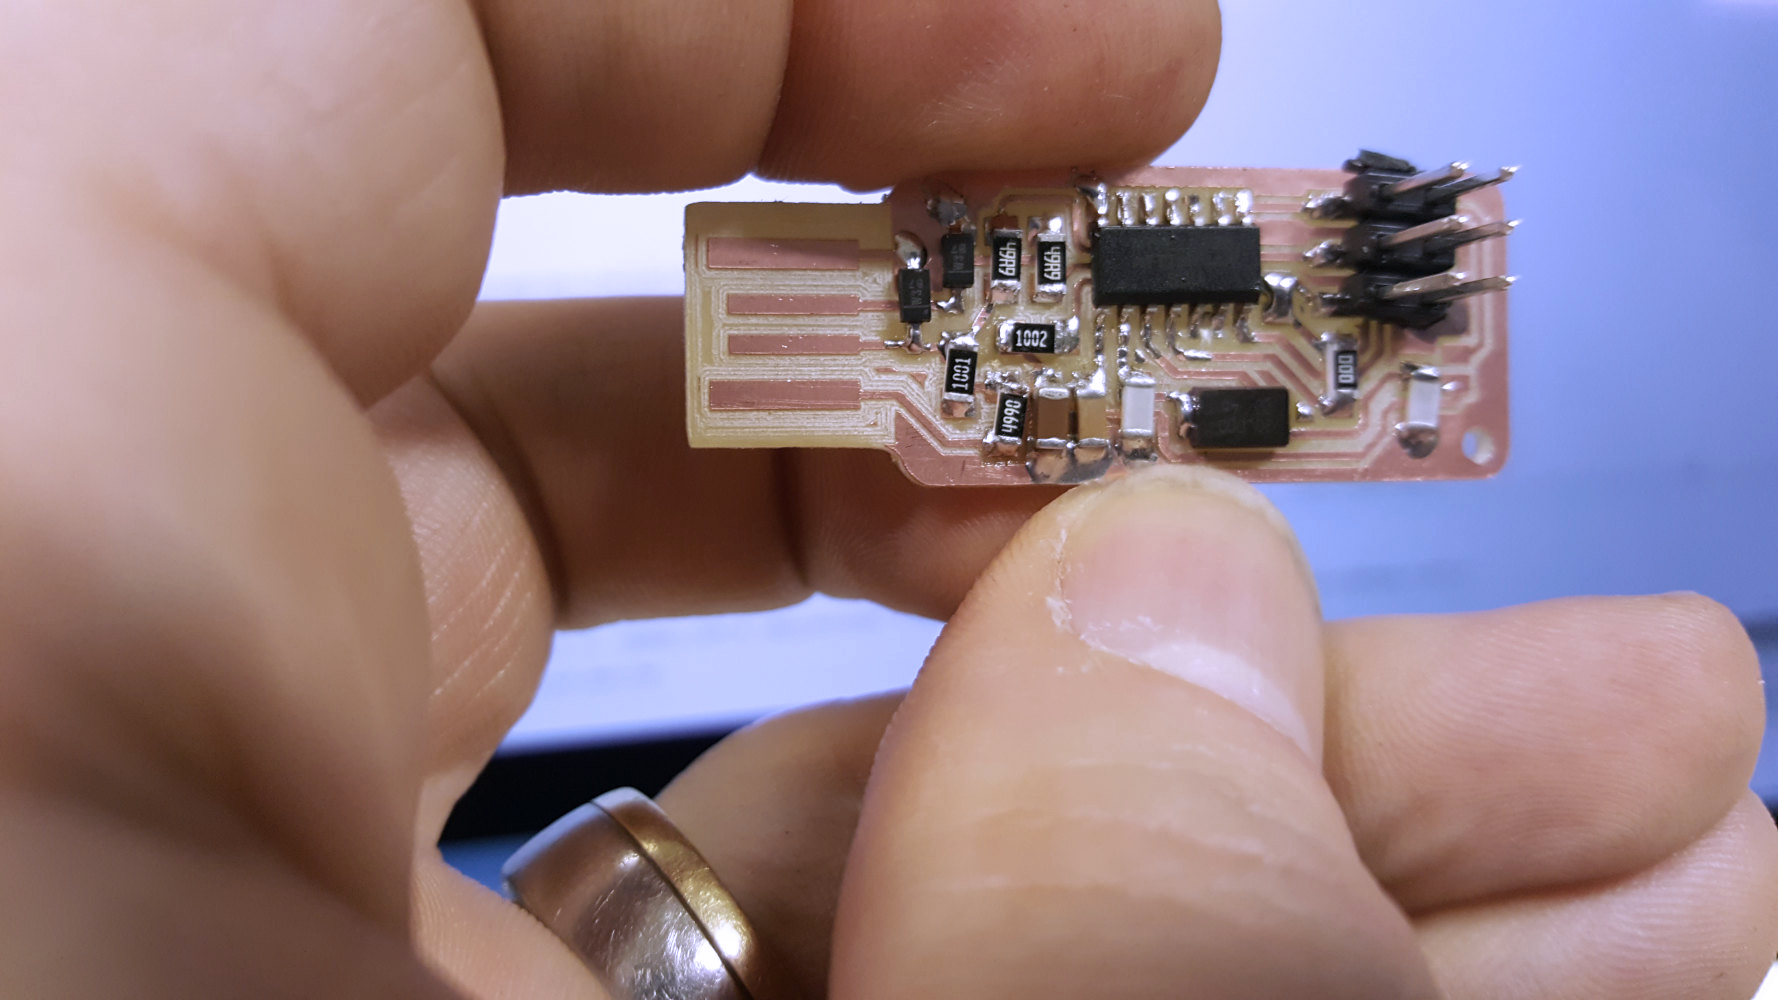
Soldering
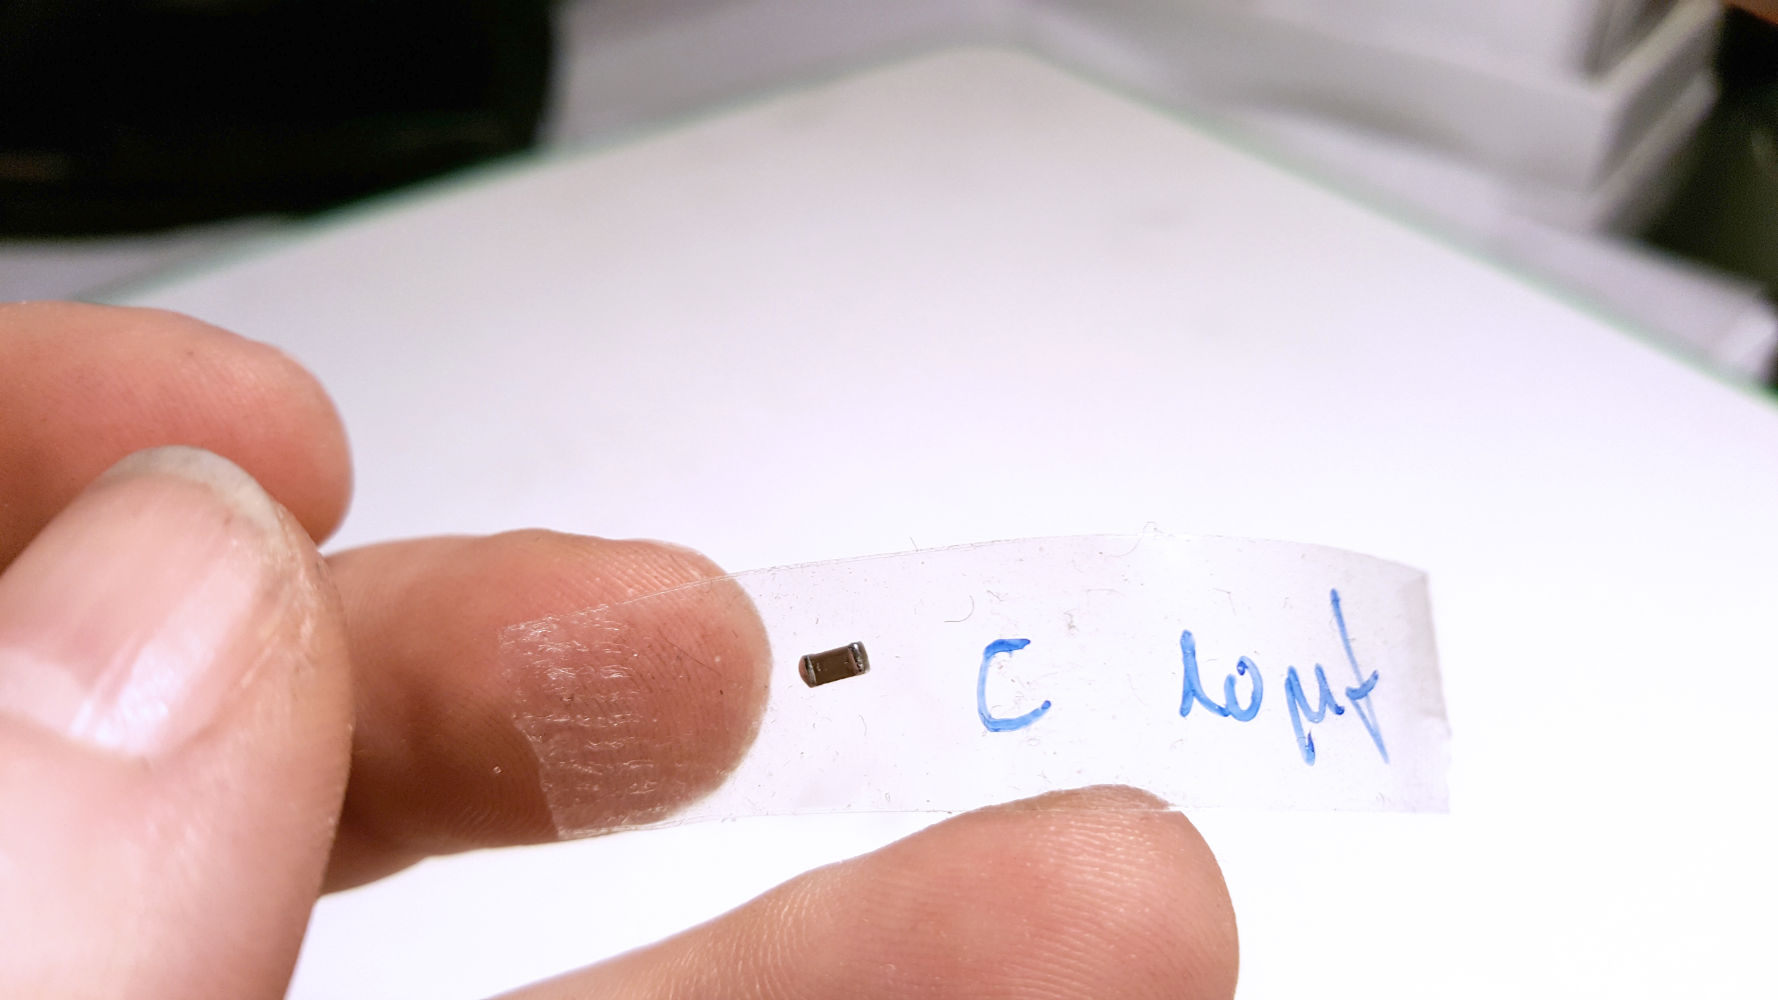
Next came the more active part, the soldering. I did some soldering before but until now never those tiny SMD'sOf course the blister package were labeled with the values, but as soon as the component was removed from the packages no hint of any value was visible. So either I had to handle one after one or I had to think of some other workflow.
Well for me worked this well, I took a adhesive stripe sticked the component on it and marked down the corresponding value on it -
List of components:
- 1x ic - microcontroller Atmel AT-Tiny44A - IC1
- 1x crystal - 20 Mhz version - XTAL1
- 2x zener diodes - D1,D2
- 2x resistors 49.9 ohm - R1,R2
- 1x resistor 499 ohm - R6
- 1x resistor 1 kohm - R3
- 1x resistor 100 ohm
- 1x resistor 10 kohm - R4
- 1x resistor 0 ohm (bridge) - R5
- 1x capacitor 1 µF - C3
- 1x capacitor 0,1 µF - C4
- 2x capacitor 8/10 pF - C1,C2
Unfortunately for me the SMD capacitors are not marked at all, at least not those ones I had to use for my ISP board. Finding them was no problem, as our FabLab is quite good organised, but because of the missing labels/marks I couldn’t take them all at once. I was forced to improvise - so I used a stripe of tape on which I wrote the value of the capacitor that I sticked on it. So on one hand I had the value and on the other hand I reduced the risk of loosing the tiny component, what surely easily could happen.
And as you can see, for the first run - not to bad! I checked the board against any shortage, but it was without any errors. That meant it was good for the next step.
Programming the fabISP
After I did the soldering part and tested the board if there’s any shortage i went to the final step - the programming of the fabISP. Up till now it’s just an electronic board without any function. After the upload of the program code it will (hopefully) be more than just a PCB with some components on it. If everything goes right, than i will have a tiny but fine in-system-programmer with all the functionality that is just right for me at this stage.But before I could start the upload, I had to make sure that all necessary software packages and applications were available on my system. So I downloaded AVRDude from here, and here is a short definition for AVRDude:
AVRDUDE - AVR Downloader Uploader - is a program for downloading and uploading the on-chip memories of Atmel’s AVR microcontrollers. It can program the Flash and EEPROM, and where supported by the serial programming protocol, it can program fuse and lock bits. AVRDUDE also supplies a direct instruction mode allowing one to issue any programming instruction to the AVR chip regardless of whether AVRDUDE implements that specific feature of a particular chip.

AVRDUDE can be used effectively via the command line to read or write all chip memory types (eeprom, flash, fuse bits, lock bits, signature bytes) or via an interactive (terminal) mode. Using AVRDUDE from the command line works well for programming the entire memory of the chip from the contents of a file, while interactive mode is useful for exploring memory contents, modifying individual bytes of eeprom, programming fuse/lock bits, etc.
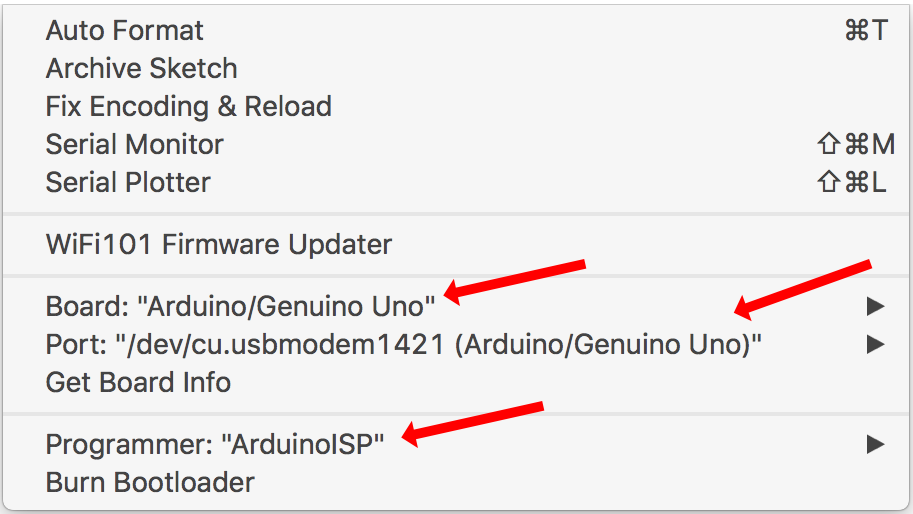
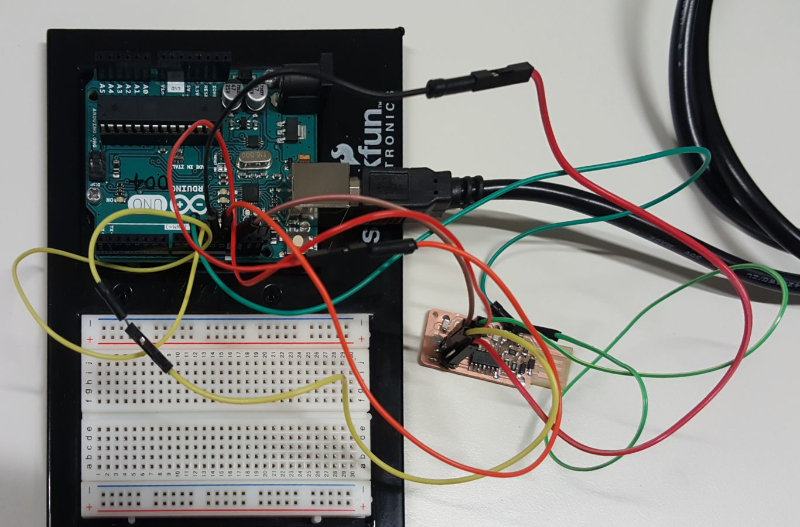
Now to get my fabISP running I had to use another microprocessorboard to load once the firmware onto it - in my case, an arduino uno was - what a surprise - lying here next to me. To make use of the arduino I also needed the right software to communicate with it. So I downloaded the Arduino IDE from here and installed it right away. Then I started the application.
Under the menu 'tools' I was able to read out some important information that I needed to edit afterwards the 'makefile'.

After done this I had to connect the arduino with my fabISP through the 6-Pin connector like this

Than I had to unzip the firmware archive first, since it was a compressed the steps at the terminal were:
unzip firmware_fabisp.zip
KonMax:kon Kon$ cd W4_zip/
KonMax:W4_zip Kon$ ls
firmware_fabisp.zip
KonMax:W4_zip Kon$ unzip firmware_fabisp.zip
Archive:  firmware_fabisp.zip
   creating: fabISP_mac.0.8.2_firmware/
  inflating: fabISP_mac.0.8.2_firmware/.DS_Store
   creating: __MACOSX/
   creating: __MACOSX/fabISP_mac.0.8.2_firmware/
  inflating: __MACOSX/fabISP_mac.0.8.2_firmware/._.DS_Store
  inflating: fabISP_mac.0.8.2_firmware/main.c
  inflating: __MACOSX/fabISP_mac.0.8.2_firmware/._main.c
  inflating: fabISP_mac.0.8.2_firmware/main.elf
  inflating: fabISP_mac.0.8.2_firmware/main.hex
  inflating: fabISP_mac.0.8.2_firmware/main.o
  inflating: fabISP_mac.0.8.2_firmware/Makefile
  inflating: __MACOSX/fabISP_mac.0.8.2_firmware/._Makefile
  inflating: fabISP_mac.0.8.2_firmware/usbconfig.h
  inflating: __MACOSX/fabISP_mac.0.8.2_firmware/._usbconfig.h
   creating: fabISP_mac.0.8.2_firmware/usbdrv/
  inflating: fabISP_mac.0.8.2_firmware/usbdrv/.DS_Store
   creating: __MACOSX/fabISP_mac.0.8.2_firmware/usbdrv/
  inflating: __MACOSX/fabISP_mac.0.8.2_firmware/usbdrv/._.DS_Store
  inflating: fabISP_mac.0.8.2_firmware/usbdrv/asmcommon.inc
  inflating: __MACOSX/fabISP_mac.0.8.2_firmware/usbdrv/._asmcommon.inc
  inflating: fabISP_mac.0.8.2_firmware/usbdrv/Changelog.txt
  inflating: __MACOSX/fabISP_mac.0.8.2_firmware/usbdrv/._Changelog.txt
  inflating: fabISP_mac.0.8.2_firmware/usbdrv/CommercialLicense.txt
  inflating: __MACOSX/fabISP_mac.0.8.2_firmware/usbdrv/._CommercialLicense.txt
  inflating: fabISP_mac.0.8.2_firmware/usbdrv/License.txt
  inflating: __MACOSX/fabISP_mac.0.8.2_firmware/usbdrv/._License.txt
  inflating: fabISP_mac.0.8.2_firmware/usbdrv/oddebug.c
  inflating: __MACOSX/fabISP_mac.0.8.2_firmware/usbdrv/._oddebug.c
  inflating: fabISP_mac.0.8.2_firmware/usbdrv/oddebug.h
  inflating: __MACOSX/fabISP_mac.0.8.2_firmware/usbdrv/._oddebug.h
  inflating: fabISP_mac.0.8.2_firmware/usbdrv/oddebug.o
  inflating: fabISP_mac.0.8.2_firmware/usbdrv/Readme.txt
  inflating: __MACOSX/fabISP_mac.0.8.2_firmware/usbdrv/._Readme.txt
  inflating: fabISP_mac.0.8.2_firmware/usbdrv/USB-ID-FAQ.txt
  inflating: __MACOSX/fabISP_mac.0.8.2_firmware/usbdrv/._USB-ID-FAQ.txt
  inflating: fabISP_mac.0.8.2_firmware/usbdrv/USB-IDs-for-free.txt
  inflating: __MACOSX/fabISP_mac.0.8.2_firmware/usbdrv/._USB-IDs-for-free.txt
  inflating: fabISP_mac.0.8.2_firmware/usbdrv/usbconfig-prototype.h
  inflating: __MACOSX/fabISP_mac.0.8.2_firmware/usbdrv/._usbconfig-prototype.h
  inflating: fabISP_mac.0.8.2_firmware/usbdrv/usbdrv.c
  inflating: __MACOSX/fabISP_mac.0.8.2_firmware/usbdrv/._usbdrv.c
  inflating: fabISP_mac.0.8.2_firmware/usbdrv/usbdrv.h
  inflating: __MACOSX/fabISP_mac.0.8.2_firmware/usbdrv/._usbdrv.h
  inflating: fabISP_mac.0.8.2_firmware/usbdrv/usbdrv.o
  inflating: fabISP_mac.0.8.2_firmware/usbdrv/usbdrvasm.asm
  inflating: __MACOSX/fabISP_mac.0.8.2_firmware/usbdrv/._usbdrvasm.asm
  inflating: fabISP_mac.0.8.2_firmware/usbdrv/usbdrvasm.o
  inflating: fabISP_mac.0.8.2_firmware/usbdrv/usbdrvasm.S
  inflating: __MACOSX/fabISP_mac.0.8.2_firmware/usbdrv/._usbdrvasm.S
  inflating: fabISP_mac.0.8.2_firmware/usbdrv/usbdrvasm12.inc
  inflating: __MACOSX/fabISP_mac.0.8.2_firmware/usbdrv/._usbdrvasm12.inc
  inflating: fabISP_mac.0.8.2_firmware/usbdrv/usbdrvasm128.inc
  inflating: __MACOSX/fabISP_mac.0.8.2_firmware/usbdrv/._usbdrvasm128.inc
  inflating: fabISP_mac.0.8.2_firmware/usbdrv/usbdrvasm15.inc
  inflating: __MACOSX/fabISP_mac.0.8.2_firmware/usbdrv/._usbdrvasm15.inc
  inflating: fabISP_mac.0.8.2_firmware/usbdrv/usbdrvasm16.inc
  inflating: __MACOSX/fabISP_mac.0.8.2_firmware/usbdrv/._usbdrvasm16.inc
  inflating: fabISP_mac.0.8.2_firmware/usbdrv/usbdrvasm165.inc
  inflating: __MACOSX/fabISP_mac.0.8.2_firmware/usbdrv/._usbdrvasm165.inc
  inflating: fabISP_mac.0.8.2_firmware/usbdrv/usbdrvasm18-crc.inc
  inflating: __MACOSX/fabISP_mac.0.8.2_firmware/usbdrv/._usbdrvasm18-crc.inc
  inflating: fabISP_mac.0.8.2_firmware/usbdrv/usbdrvasm20.inc
  inflating: __MACOSX/fabISP_mac.0.8.2_firmware/usbdrv/._usbdrvasm20.inc
  inflating: fabISP_mac.0.8.2_firmware/usbdrv/USBID-License.txt
  inflating: __MACOSX/fabISP_mac.0.8.2_firmware/usbdrv/._USBID-License.txt
  inflating: fabISP_mac.0.8.2_firmware/usbdrv/usbportability.h
  inflating: __MACOSX/fabISP_mac.0.8.2_firmware/usbdrv/._usbportability.h
KonMax:W4_zip Kon$
By doing so a directory was created and anything that was in the archive were decompresses into it. The next steps were to compile the suitable code for the board on my system. Following steps/commands were necessary: To make sure that no old and not suitable files were in the directory I took care with the command 'make clean':
KonMax:fabISP_mac.0.8.2_firmware Kon$ make clean
rm -f main.hex main.lst main.obj main.cof main.list main.map main.eep.hex main.elf *.o usbdrv/*.o main.s usbdrv/oddebug.s usbdrv/usbdrv.s
Next I had to create new program files with the command 'make hex':
KonMax:fabISP_mac.0.8.2_firmware Kon$ make hex
avr-gcc -Wall -Os -DF_CPU=20000000	 -Iusbdrv -I. -DDEBUG_LEVEL=0 -mmcu=attiny44 -c usbdrv/usbdrv.c -o usbdrv/usbdrv.o
avr-gcc -Wall -Os -DF_CPU=20000000	 -Iusbdrv -I. -DDEBUG_LEVEL=0 -mmcu=attiny44 -x assembler-with-cpp -c usbdrv/usbdrvasm.S -o usbdrv/usbdrvasm.o
avr-gcc -Wall -Os -DF_CPU=20000000	 -Iusbdrv -I. -DDEBUG_LEVEL=0 -mmcu=attiny44 -c usbdrv/oddebug.c -o usbdrv/oddebug.o
avr-gcc -Wall -Os -DF_CPU=20000000	 -Iusbdrv -I. -DDEBUG_LEVEL=0 -mmcu=attiny44 -c main.c -o main.o
main.c:88:13: warning: always_inline function might not be inlinable [-Wattributes]
 static void delay ( void )
             ^
avr-gcc -Wall -Os -DF_CPU=20000000	 -Iusbdrv -I. -DDEBUG_LEVEL=0 -mmcu=attiny44 -o main.elf usbdrv/usbdrv.o usbdrv/usbdrvasm.o usbdrv/oddebug.o main.o
rm -f main.hex main.eep.hex
avr-objcopy -j .text -j .data -O ihex main.elf main.hex
avr-size main.hex
   text	   data	    bss	    dec	    hex	filename
      0	   2002	      0	   2002	    7d2	main.hex
With the make hex command I created a bunch new files that were up to date and the base for new program files suitable for my system. Before I continued I had to edit now the corresponding ‚Makefile‘ within the directory to tell the program on which port to communicate. This information I got before with the help of the arduino IDE, where the port was named:
/dev/cu.usbmodem1421So I had to comment out this line and add...
# Name: Makefile
# Project: custom-class example
# Author: Christian Starkjohann
# Creation Date: 2008-04-07
# Tabsize: 4
# Copyright: (c) 2008 by OBJECTIVE DEVELOPMENT Software GmbH
# License: GNU GPL v2 (see License.txt), GNU GPL v3 or proprietary (CommercialLicense.txt)
# This Revision: $Id: Makefile 692 2008-11-07 15:07:40Z cs $

DEVICE  = attiny44
#F_CPU   = 12000000	# edit this line for crystal speed, in Hz
F_CPU   = 20000000	# edit this line for crystal speed, in Hz
FUSE_L  = 0xFF
FUSE_H  = 0xDF
#AVRDUDE = avrdude -c usbtiny -p $(DEVICE) # edit this line for your programmer
AVRDUDE = avrdude -c avrisp2 -P usb -p $(DEVICE) # edit this line for your programmer

CFLAGS  = -Iusbdrv -I. -DDEBUG_LEVEL=0
OBJECTS = usbdrv/usbdrv.o usbdrv/usbdrvasm.o usbdrv/oddebug.o main.o

COMPILE = avr-gcc -Wall -Os -DF_CPU=$(F_CPU) $(CFLAGS) -mmcu=$(DEVICE)
here the new line with the port description.
# Name: Makefile
# Project: custom-class example
# Author: Christian Starkjohann
# Creation Date: 2008-04-07
# Tabsize: 4
# Copyright: (c) 2008 by OBJECTIVE DEVELOPMENT Software GmbH
# License: GNU GPL v2 (see License.txt), GNU GPL v3 or proprietary (CommercialLicense.txt)
# This Revision: $Id: Makefile 692 2008-11-07 15:07:40Z cs $

DEVICE  = attiny44
#F_CPU   = 12000000	# edit this line for crystal speed, in Hz
F_CPU   = 20000000	# edit this line for crystal speed, in Hz
FUSE_L  = 0xFF
FUSE_H  = 0xDF
#AVRDUDE = avrdude -c usbtiny -p $(DEVICE) # edit this line for your programmer
#AVRDUDE = avrdude -c avrisp2 -P usb -p $(DEVICE) # edit this line for your programmer
AVRDUDE = avrdude -c stk500v1 -P /dev/cu.usbmodem1421 -b19200 -p $(DEVICE)
Than with the commands and verified admin password:
sudo make fuseKonMax:fabISP_mac.0.8.2_firmware Kon$ sudo make fuse
Password:
avrdude -c stk500v1 -P /dev/cu.usbmodem1421 -b19200 -p attiny44 -U hfuse:w:0xDF:m -U lfuse:w:0xFF:m
avrdude: AVR device initialized and ready to accept instructions
Reading | ################################################## | 100% 0.02s
avrdude: Device signature = 0x1e9207
avrdude: reading input file "0xDF"
avrdude: writing hfuse (1 bytes):
Writing | ################################################## | 100% 0.01s
avrdude: 1 bytes of hfuse written
avrdude: verifying hfuse memory against 0xDF:
avrdude: load data hfuse data from input file 0xDF:
avrdude: input file 0xDF contains 1 bytes
avrdude: reading on-chip hfuse data:
Reading | ################################################## | 100% 0.01s
avrdude: verifying ...
avrdude: 1 bytes of hfuse verified
avrdude: reading input file "0xFF"
avrdude: writing lfuse (1 bytes):
Writing | ################################################## | 100% 0.01s
avrdude: 1 bytes of lfuse written
avrdude: verifying lfuse memory against 0xFF:
avrdude: load data lfuse data from input file 0xFF:
avrdude: input file 0xFF contains 1 bytes
avrdude: reading on-chip lfuse data:
Reading | ################################################## | 100% 0.01s
avrdude: verifying ...
avrdude: 1 bytes of lfuse verified
avrdude: safemode: Fuses OK (H:FF, E:DF, L:FF)
avrdude done. Thank you.
and...
sudo make programKonMax:fabISP_mac.0.8.2_firmware Kon$ sudo make program
avrdude -c stk500v1 -P /dev/cu.usbmodem1421 -b19200 -p attiny44 -U flash:w:main.hex:i
avrdude: AVR device initialized and ready to accept instructions
Reading | ################################################## | 100% 0.03s
avrdude: Device signature = 0x1e9207
avrdude: NOTE: "flash" memory has been specified, an erase cycle will be performed
To disable this feature, specify the -D option.
avrdude: erasing chip
avrdude: reading input file "main.hex"
avrdude: writing flash (2002 bytes):
Writing | ################################################## | 100% 2.89s
avrdude: 2002 bytes of flash written
avrdude: verifying flash memory against main.hex:
avrdude: load data flash data from input file main.hex:
avrdude: input file main.hex contains 2002 bytes
avrdude: reading on-chip flash data:
Reading | ################################################## | 100% 1.44s
avrdude: verifying ...
avrdude: 2002 bytes of flash verified
avrdude: safemode: Fuses OK (H:FF, E:DF, L:FF)
avrdude done. Thank you.
avrdude -c stk500v1 -P /dev/cu.usbmodem1421 -b19200 -p attiny44 -U hfuse:w:0xDF:m -U lfuse:w:0xFF:m
avrdude: AVR device initialized and ready to accept instructions
Reading | ################################################## | 100% 0.02s
avrdude: Device signature = 0x1e9207
avrdude: reading input file "0xDF"
avrdude: writing hfuse (1 bytes):
Writing | ################################################## | 100% 0.01s
avrdude: 1 bytes of hfuse written
avrdude: verifying hfuse memory against 0xDF:
avrdude: load data hfuse data from input file 0xDF:
avrdude: input file 0xDF contains 1 bytes
avrdude: reading on-chip hfuse data:
Reading | ################################################## | 100% 0.01s
avrdude: verifying ...
avrdude: 1 bytes of hfuse verified
avrdude: reading input file "0xFF"
avrdude: writing lfuse (1 bytes):
Writing | ################################################## | 100% 0.01s
avrdude: 1 bytes of lfuse written
avrdude: verifying lfuse memory against 0xFF:
avrdude: load data lfuse data from input file 0xFF:
avrdude: input file 0xFF contains 1 bytes
avrdude: reading on-chip lfuse data:
Reading | ################################################## | 100% 0.01s
avrdude: verifying ...
avrdude: 1 bytes of lfuse verified
avrdude: safemode: Fuses OK (H:FF, E:DF, L:FF)
avrdude done. Thank you.
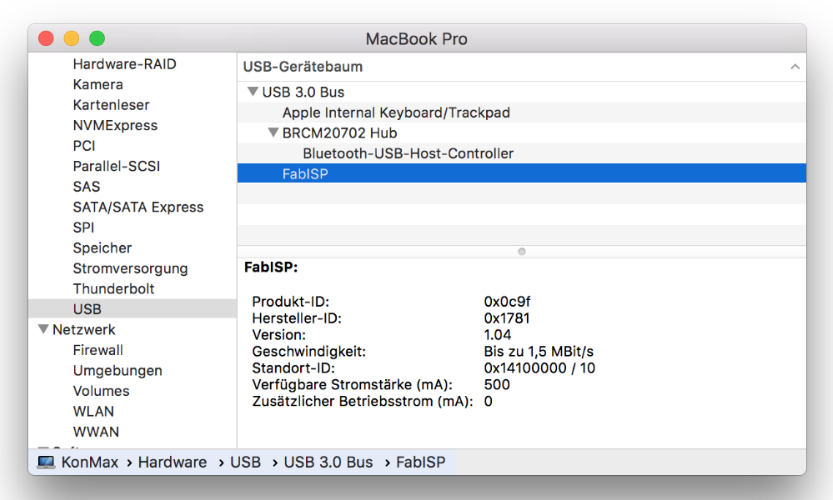
And yes! It's done that little 'thing' is alive and ready for business!
Here a screenshot of my system overview, where it's appearance is named...
Downloads
- fabISP files
- AVRDude
- fabISP Firmware
- Arduino Software
- Crosspack AVR
- Andy Bardagjy's fabISP - 'the Original'
And to the end of this assignment I had to thank my fellow students Ahmed & Dima,who both helped me when I struggled and of course my Instructor Daniele Ingrassia.
Without you boys I would have drowned in my own sweat ;) And Finally the...
HERO SHOT


This work is licensed under a
Creative Commons
Attribution-NonCommercial-ShareAlike 4.0 International License.