ADITYA BHATT

week-9-10 Machine Building
Assignment
This week we are doing a group project, which is an interesting task in our fab academy. The group project is to make a machine that makes someting(MTM) which has atleast 2 axes.
OUR TEAM-
1) Rudrapal solanki
2) tapan Betai
3) Aditya Bhatt
4) Vipul arora
The link to our group project doccumentation is here-
http://archive.fabacademy.org/archives/2016/fablabcept/week-9.html
All of us sat together and brainstromed what we weanted to make. We had great ideas in mind some of them being
a machine that can draw portarait, a automatic 3-D scanner,gripper,etc.With all these ideas nobody of us was satisfied, because we thought to make something for different usability than already available, and we again started thinking and came up with an idea of decorating candles with melting wax using MTM module and then we started working on it.
Once everything was decided we planned our work flow as follows-
1)Making a basic design and structure of machine
2)Figuring out the material and components needed
3)making a working model of machine
4)making it automated
5)final doccumentation
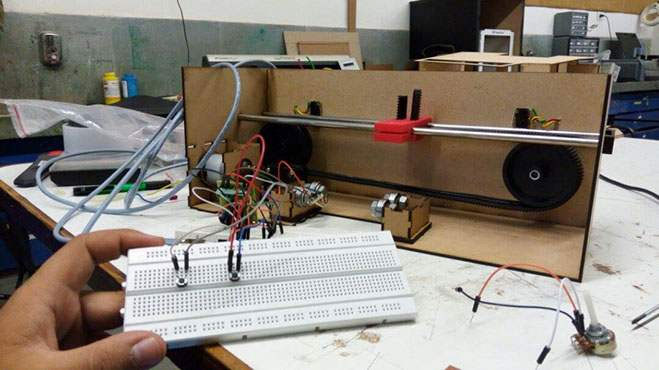
I helped with the joining of the circuit and fixing of the motor to the system.
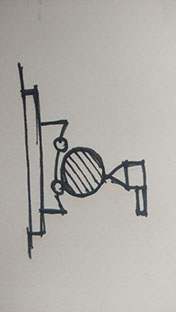
Here are some sketches that can explain the structure and design of the machine:

List of components and material needed to build the machine-
1) D.C. motor
2) D. C. motor supply
3) Stepper motor
4) Stepper motor driver
5) Counter weight for stepper motor
6) 2 Pulley
7) Belt
8) Extruder
9) Extruder mountin
10) Shaft for Extruder mounting
11) Shaft for mounting pulley
12) Rollers
13) Roller nut, bolt and washer
14) Candle holder
15) Cooling fan
16) Extruder temperature controller
17) Lever(for manual operation)
18) Joy stick(for manual operation)
19) Jumper wires
20) Push buttons (to control material flow)
21) D.C. motor for feeding the material
22) Bread-board to make the circuit
23) MDF/plywood for frame and structure
24) Screws
25) Drill machine
26) Electronic components
27) On/off switches
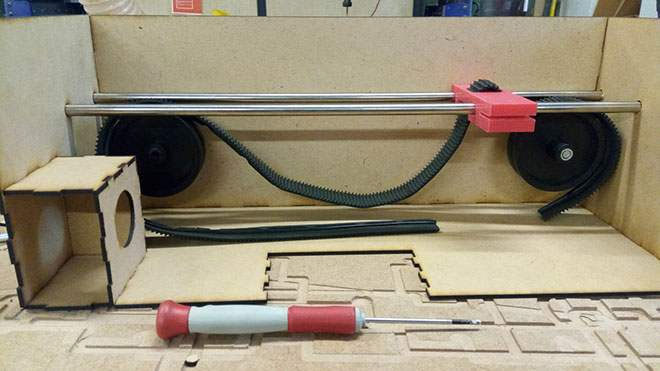
Assembly of the Machine
After planning, designing and making all the parts of the machine it was time to assemble the machine.
All the base and other MDF components are designed to be press fit in nature, so it was easy to assmble the base and the plane with the D.C motor box. Now the challenging task was coding the machine which was done by tapan bhai.All the M.D.F cutted members are joined to each other.
Steps for the assembly-
1)All the M.D.F cutted members are to be joined to each other.All the elements should be joined to one another by the components that are given.Then the guides are to be connected to the box. After the guides are alligned and the pulley is joined to the box , the allignment of the wheels needs to be checked.
2)Once all the components are ready and now the main task will start to assemble the whole kit and start coding it.
All the base and other MDF components are designed to be press fit in nature, so it is easy to assemble the base plane and other planes adjoining and to make the D.C motor box.The rollers are fixed to the base plate for the rotation of the candle.

3)The candle is placed in the machine and the axis of the candle is checked and placed carefully.
Once all the basic elements in the machine is placed it is ready for the electric circuit assembly.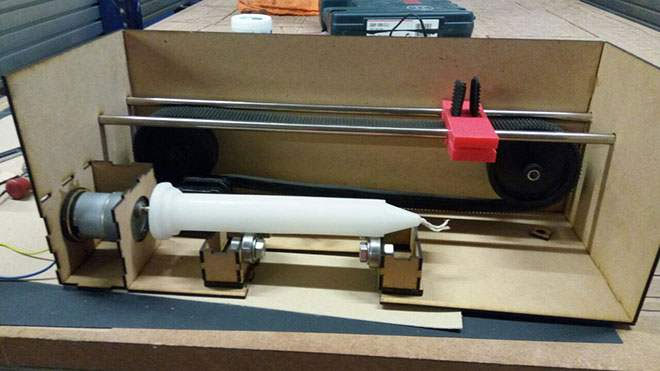
4)The Circuit is made according to the step by step process.Stepper motor driver is fixed to the Arduino board with help of coding of the moment on x-y axis.Then the stepper motor is connected to the circuit to take the movement of the header and controlling its speed through the belt and pulley.Then all the other connections are checked through the bread board and than its ready to work.
Tapan tested the code in a randomized way to decide the position of the axes ranging from -10 to 10.
Now that we have done the testing and trial and error we move on to develop the final code to test the DC motor motion and speed.We are giving only 7.5 volt to the DC motor for this much motion.
FINAL CODE FOR THE MACHINE-
#include <Stepper.h>
// change this to the number of steps on your motor
#define STEPS 200
int val[] = {35, -35, 23, -23, 34, -34, 12, -12, 50, -10, 23, -73, 10 };
int i = 0;
Stepper stepper(STEPS, 8, 9, 10, 11);
void setup() {
stepper.setSpeed(40);
pinMode(7, INPUT);
}
void loop()
{ while (i < 10)
{ if (val[i] > 0)
for (int j = 0; j < val[i]; ++j)
{
stepper.step(1);
}
if (val[i] < 0)
for (int k = val[i]; k < 0; ++k)
{
stepper.step(-1);
}
i++;
}
if (i == 10);
i = 0;
}
THE FINAL PRESENTATION IS SHOWN HERE-
http://archive.fabacademy.org/archives/2016/fablabcept/week-9.html