„Principle and Practices“
is about: „how to create and manage an open source work documentation“ without using consumer friendly programs. For developing a website based on a git structured repository one needs three tools: html, css, gitYou can use html for programming the basic structure of websites, css for layout and design and git for intra- and intercommunication with local and remote repositories.
HTML
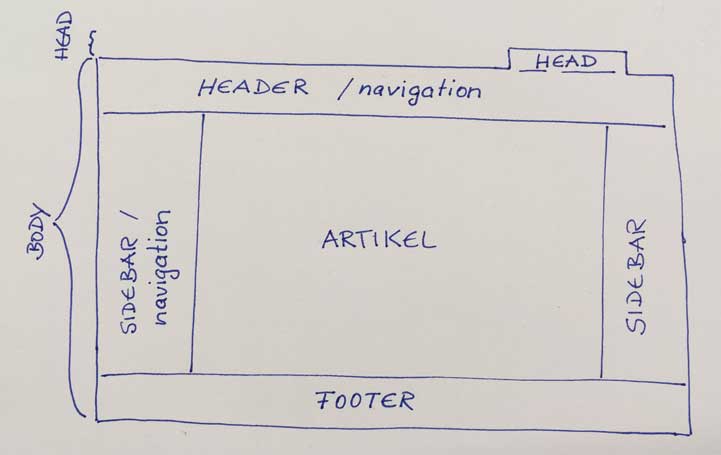
A webpage is divided into several parts: head and body. Head is useful for meta informations you want to set for all webpages. Body is divided into following sections:- Header: mainly used für navigation
- Sidebars: left and right most likely used for navigation
- Artikel: all main informations
- Footer: for additional informations, links, navigation and back to top link
Programming html allways starts with <! DOCTYPE html > to declare the programming language used for your websites. After that you define the body.
Example for copying to get started:
<!DOCTYPE html>

<html>

    <head >

        <title>PageTitle<title>

    </head>

    <body>

        <h1>Hello</h1>

        <p>This is my first paragraph.</p>

    </body>

</html>
CSS
is useful for layout and design of html written webpages. There are some basic css elements that you need to know to be able to use the huge range of commands.1. Main structure of css commands: e.g. body { color: blue} or style color: blue
2. Priority of commands: if you format an element directly with style attributes it will be higher prioritized then external stylesheets or attributes written in head of the page.
Layout example for copying:
<!DOCTYPE html>

<html>

    <head >

        <meta charset="utf-8">
        <title>PageTitle<title>

    <style>

        article {width: 100%;

            border: 1px dotted red;}

        p.one{ text-align: center;}

        p.two{text-align: center;

            color: mediumaquamarine;}

    </style>

    </head>

        <body>


            <h1>Hello</h1>

            <p>This is my first paragraph.</p>


        </body>

</html>
My head layout works as follows:
    <!DOCTYPE html>

<html>

    <head>

        <meta charset="utf-8">

        <title>fab academy 2017</title>

        <link rel="stylesheet" href="../style.css">

    </head>
With my link to a stylesheet, I transfered all general design commands in a separate file "style.css". Now,the body parts can refer to this file whenever there is a need.
<body>

<div class="container">

<header>

<link href=index.html"style="color:white" class="ohne">fabacadamy2017</a>

</header>

<nav>

  <ul>

    <li>a href="about.html">about me<>a></li>

    <li><a href="final.html"> final project</a></li>

    <li><div class="dropdown">

      <span>assignments 2017</span>

    <div class="dropdown-content">

      <a href="01week.html" style="color:white">1.PrinciplesAndPractices</a>

    </div>

</div></li>

    <li><a href="contact.html">contact</a></li>

</ul>

</nav>

<article>
    <h1<„Principle and Practices“</h1>
    <!--You can put your text and images:-->>
    <Text>
    <img src="Fablablogo.jpg" alt= "Fab Lab Logo" align= center>

</article>
.dropdown {
                position: relative;
                display: inline-block;
        }
        .dropdown-content {
                display: none;
                position: absolute;
                background-color: black;
                min-width: 200px;
                box-shadow: 0px 8px 16px 0px rgba(0,0,0,0.2);
                padding: 12px 16px;
                z-index: 1;
        }
        .dropdown:hover .dropdown-content {
                display: block;
        }
        div.container {
            width: 250%;
            border: 1px solid gray;
        }
        header, footer {
            padding: 1em;
            color: white;
            background-color: black;
            clear: left;
            text-align: center;
        }
        nav {
            float: left;
            max-width: 160px;
            margin: 0;
            padding: 1em;
        }
        nav ul {
            list-style-type: none;
            padding: 0;
        }
        nav ul a {
            color: black;
            text-decoration: none;
         }
        article {
            margin-left: 170px;
            margin-right: 170px;
            border-left: 1px solid gray;
            border-right: 1px solid gray;
            padding: 100px;
            overflow: hidden;
        }
        .ohne { text-decoration: none;
        }
        .kreis {
            border-radius: 50%;
        }

        body      { font-family: arial, sans-serif; width: 30em; }

        div.copy{
            background-color: whitesmoke;
            padding-left: 20px;
            border-radius: 10px;
            border-color: white;
            clear: left;
            }
The layout idea of my website is based on W3schools html-layout proposal.
html-layout Tutorials and Vocabulary: w3schools, Selfhtml German Tutorial
BRACKETS
is a web tool combining html, css and java scripts. The main feature for me: It is possible to mix these languages directly or split them in single folders.Download Brackets
GIT, Github, Gitrepository
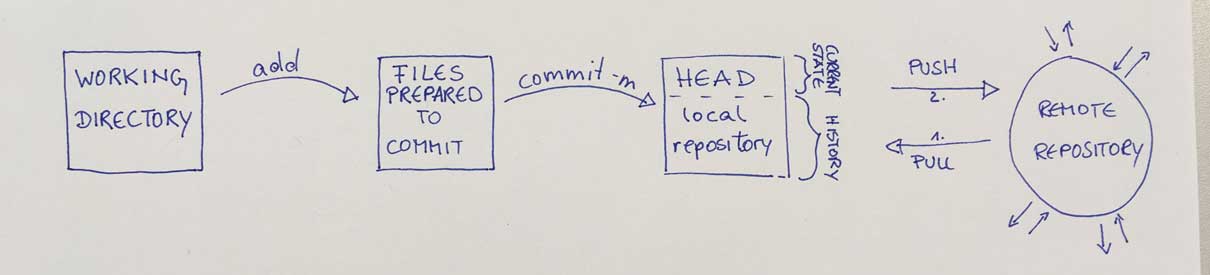
Github is a web-based Git repository hosting service for version control and collaboration, where groups, participants of a project have a common access to all distributed files of this project. They can upload (push) new files and download (pull) the newest revision. By this it is easy to work together on one project. After pulling the remote repository into you local repository, you can see the newest development of the project and work with it. Pushing your changes or new files means, actualize the remote repositories content. Now, the other participants are able to see and work with it. Git works well with bash, your computer terminal. There you can create new files, pull and push your changes. A possible way to build up a repository communication: Open bash. Change directory until you get to your folder, where you want to clone your remote repository:
cd foldername
Then copy git@repositoriesname you find on your remote repositories webpage and clone it in your open file:
git clone git@repositoriesname.
You have built up a local repository. Now, look into your cloned files and change directory until you get into your dedicated file:
cd dedicatedfolder There you put your own files or changes. You can start with an index.html file you create: touch filename.html These files you need to be able to build up a webpage. Then you add them to your working dir to be able to push them later on:
git add newfile
With git status you can find out if all changes you have made are added.
git status If everything is done you can commit them to stage an show your files are ready to be pushed:
git commit -m
After that you can push:
git push origin master.
Origin master is your remote repo. If you have made changes to your website you can see them online, now. Next time you want to push something make sure to pull beforehand to update your local repository:
git pull origin master
Download my webtemplate here: web template zip