
8.Embedded programming
This week's assignment
- -Read a microcontroller data sheet
- -Program your board to do something, with as many different programming languages and programming environments as possible
- Software:
- -Atmel Studio7
- -ArduinoIDE
- Hardware:
- Laptop PC(Win10 64bit)
- USBtiny programmer
- Hello ISP Board
- mini USB cable
- FTDI cable
- 6pin ribbon cable
- References:
- -AVR datasheet(attiny44A)
- -AVR datasheet(attiny44A Japanese ver.)
- -Make:AVR programming
- Procedures:
- AVR enviroment is a little complecated at first time.
- Read data sheet to get correct information.
- If using C is too large step, just practice from ArduinoIDE
- Understanding AVR and C need some more time, just keep practice!
This week I tried AVR programming.
I have used below tools and materials to complete this assignment.
Procedures:
1.Understanding Tool chain
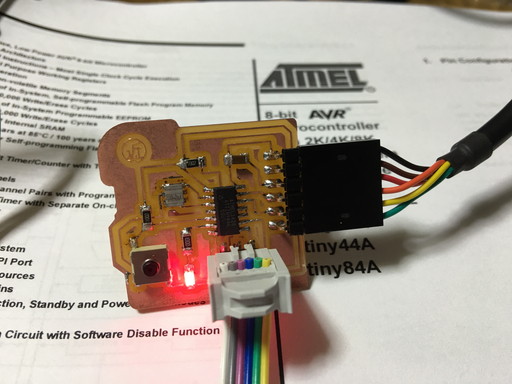
This week we used some tools which we made before.(Week4 AVR programmer=USBtiny, Week6 HelloISP board) As first step I learnd how to connect and how to use it.

[AVR programming]
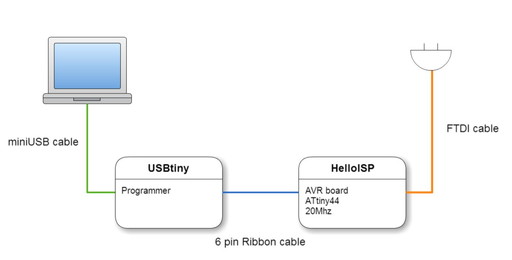
[Connect relative tools]
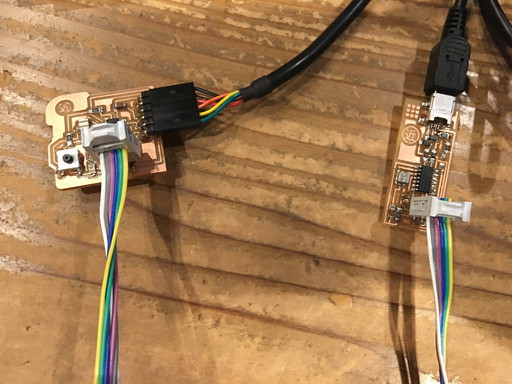
[Connect Programmer and AVR board]
...
[connecting AVR Slideshow]
2.Write program via ArduinoIDE
As programming C is big challenge for me. I used ArduinoIDE for excersize.
Coding, compile and flash were fine, but in serial communication phase I got strange symbols.
It seemed code and crystal frequesy doesn't match. I changed external crystal from 8Mhz to 20Mhz.
Then I got correct feedback.
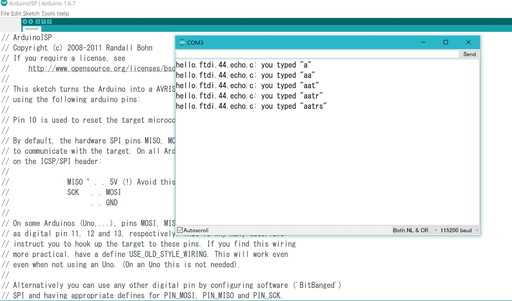
[talk to AVR board via serial terminal]
[blink LED]
[blink LED:Movie1]
[blink LED:Movie2 modified blink timing]
...
[ArduinoIDE Slideshow]
What I coudn't do
Though I could got echo and lit LED. but button dind't work as I expected.
I should learn logic by reading data sheet again and improve.
3.Write program via AtmelStudio
After trying ArduinoIDE, 2nd step is use official software AtmelStudio7.
I searched information on the web and configured USBtiny as programmer.

[official software Atmel Studio7]
...
[Atmel StudioSlideshow]
What I coudn't do
I could learn process, compiling and flash, but my board didn't work.
As the board work well by ArduinoIDE, there may be something wrong in whole process.
I will investigate root cause and clear problems.
Files
Appendix
Making Satsha kit board(on the way)
As practice and also for final project I started to make Satsha kit.
Because some parts are not in our stock(ex.button) I modifeid from schematic.

[Milling PCB board]
...
[Making Satsha kit(still on the way) slideshow]
What I've learned
[Connect relative tools]
[Connect Programmer and AVR board]
...
[connecting AVR Slideshow]
2.Write program via ArduinoIDE
As programming C is big challenge for me. I used ArduinoIDE for excersize.
Coding, compile and flash were fine, but in serial communication phase I got strange symbols.
It seemed code and crystal frequesy doesn't match. I changed external crystal from 8Mhz to 20Mhz.
Then I got correct feedback.
[talk to AVR board via serial terminal]
[blink LED]
[blink LED:Movie1]
[blink LED:Movie2 modified blink timing]
...
[ArduinoIDE Slideshow]
What I coudn't do
Though I could got echo and lit LED. but button dind't work as I expected.
I should learn logic by reading data sheet again and improve.
3.Write program via AtmelStudio
After trying ArduinoIDE, 2nd step is use official software AtmelStudio7.
I searched information on the web and configured USBtiny as programmer.
[official software Atmel Studio7]
...
[Atmel StudioSlideshow]
What I coudn't do
I could learn process, compiling and flash, but my board didn't work.
As the board work well by ArduinoIDE, there may be something wrong in whole process.
I will investigate root cause and clear problems.
Files
Appendix
Making Satsha kit board(on the way)
As practice and also for final project I started to make Satsha kit.
Because some parts are not in our stock(ex.button) I modifeid from schematic.
[Milling PCB board]
...
[Making Satsha kit(still on the way) slideshow]
What I've learned
...
[connecting AVR Slideshow]
2.Write program via ArduinoIDE
As programming C is big challenge for me. I used ArduinoIDE for excersize.
Coding, compile and flash were fine, but in serial communication phase I got strange symbols.
It seemed code and crystal frequesy doesn't match. I changed external crystal from 8Mhz to 20Mhz.
Then I got correct feedback.
[talk to AVR board via serial terminal]
[blink LED]
[blink LED:Movie1]
[blink LED:Movie2 modified blink timing]
...
[ArduinoIDE Slideshow]
What I coudn't do
Though I could got echo and lit LED. but button dind't work as I expected.
I should learn logic by reading data sheet again and improve.
3.Write program via AtmelStudio
After trying ArduinoIDE, 2nd step is use official software AtmelStudio7.
I searched information on the web and configured USBtiny as programmer.
[official software Atmel Studio7]
...
[Atmel StudioSlideshow]
What I coudn't do
I could learn process, compiling and flash, but my board didn't work.
As the board work well by ArduinoIDE, there may be something wrong in whole process.
I will investigate root cause and clear problems.
Files
Appendix
Making Satsha kit board(on the way)
As practice and also for final project I started to make Satsha kit.
Because some parts are not in our stock(ex.button) I modifeid from schematic.
[Milling PCB board]
...
[Making Satsha kit(still on the way) slideshow]
What I've learned
2.Write program via ArduinoIDE
As programming C is big challenge for me. I used ArduinoIDE for excersize. Coding, compile and flash were fine, but in serial communication phase I got strange symbols. It seemed code and crystal frequesy doesn't match. I changed external crystal from 8Mhz to 20Mhz. Then I got correct feedback.
[talk to AVR board via serial terminal]
[blink LED]
[blink LED:Movie1]
[blink LED:Movie2 modified blink timing]
...
[ArduinoIDE Slideshow]
What I coudn't do
Though I could got echo and lit LED. but button dind't work as I expected.
I should learn logic by reading data sheet again and improve.
3.Write program via AtmelStudio
After trying ArduinoIDE, 2nd step is use official software AtmelStudio7.
I searched information on the web and configured USBtiny as programmer.
[official software Atmel Studio7]
...
[Atmel StudioSlideshow]
What I coudn't do
I could learn process, compiling and flash, but my board didn't work.
As the board work well by ArduinoIDE, there may be something wrong in whole process.
I will investigate root cause and clear problems.
Files
Appendix
Making Satsha kit board(on the way)
As practice and also for final project I started to make Satsha kit.
Because some parts are not in our stock(ex.button) I modifeid from schematic.
[Milling PCB board]
...
[Making Satsha kit(still on the way) slideshow]
What I've learned
...
[ArduinoIDE Slideshow]
What I coudn't do
Though I could got echo and lit LED. but button dind't work as I expected.
I should learn logic by reading data sheet again and improve.
3.Write program via AtmelStudio
After trying ArduinoIDE, 2nd step is use official software AtmelStudio7.
I searched information on the web and configured USBtiny as programmer.
[official software Atmel Studio7]
...
[Atmel StudioSlideshow]
What I coudn't do
I could learn process, compiling and flash, but my board didn't work.
As the board work well by ArduinoIDE, there may be something wrong in whole process.
I will investigate root cause and clear problems.
Files
Appendix
Making Satsha kit board(on the way)
As practice and also for final project I started to make Satsha kit.
Because some parts are not in our stock(ex.button) I modifeid from schematic.
[Milling PCB board]
...
[Making Satsha kit(still on the way) slideshow]
What I've learned
What I coudn't do
Though I could got echo and lit LED. but button dind't work as I expected. I should learn logic by reading data sheet again and improve.3.Write program via AtmelStudio
After trying ArduinoIDE, 2nd step is use official software AtmelStudio7. I searched information on the web and configured USBtiny as programmer.
[official software Atmel Studio7]
...
[Atmel StudioSlideshow]
What I coudn't do
I could learn process, compiling and flash, but my board didn't work.
As the board work well by ArduinoIDE, there may be something wrong in whole process.
I will investigate root cause and clear problems.
Files
Appendix
Making Satsha kit board(on the way)
As practice and also for final project I started to make Satsha kit.
Because some parts are not in our stock(ex.button) I modifeid from schematic.
[Milling PCB board]
...
[Making Satsha kit(still on the way) slideshow]
What I've learned
...
[Atmel StudioSlideshow]
What I coudn't do
I could learn process, compiling and flash, but my board didn't work.
As the board work well by ArduinoIDE, there may be something wrong in whole process.
I will investigate root cause and clear problems.
Files
Appendix
Making Satsha kit board(on the way)
As practice and also for final project I started to make Satsha kit.
Because some parts are not in our stock(ex.button) I modifeid from schematic.
[Milling PCB board]
...
[Making Satsha kit(still on the way) slideshow]
What I've learned
What I coudn't do
I could learn process, compiling and flash, but my board didn't work. As the board work well by ArduinoIDE, there may be something wrong in whole process. I will investigate root cause and clear problems.
Files
Appendix
Making Satsha kit board(on the way)
As practice and also for final project I started to make Satsha kit. Because some parts are not in our stock(ex.button) I modifeid from schematic.