17. Machine Design
Further development of the Kura CoreXY Brush Painting Machine (BPM) from Machine Design week.
Group Assignment page here
Fusion 360 - Machine Design
- The Kura CoreXY BPM mechanism concept design developed nicely in Fusion 360 last week…but refinement will be required.
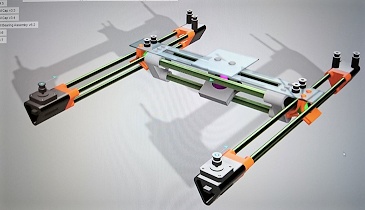
- Animation modeling in F360 hints at potential real world mechanical movement issues that will be addressed with some design reconsideration
- Prototype 3D printing revealed tolerance and mechanical connection issues that will require design modification.
- Review of the available bamboo stock cut the week earlier…reveals that usable tube diameters of ~14mm, ~22mm and ~40mm (+/- 3mm) will need to be factored into final parts design and modeling in F360

Redesign completed
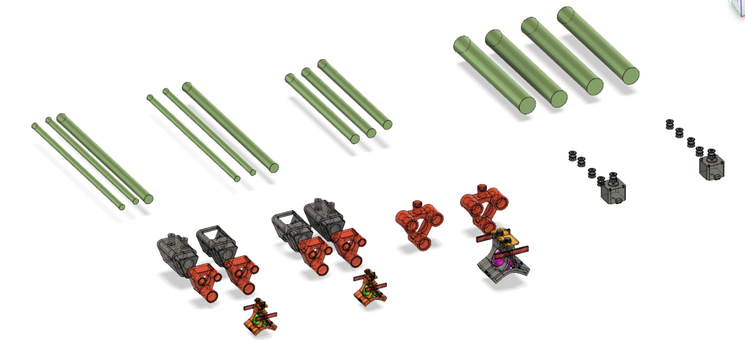
The itemized list of required parts as follows…
Parts to be fabricated: 19 in all
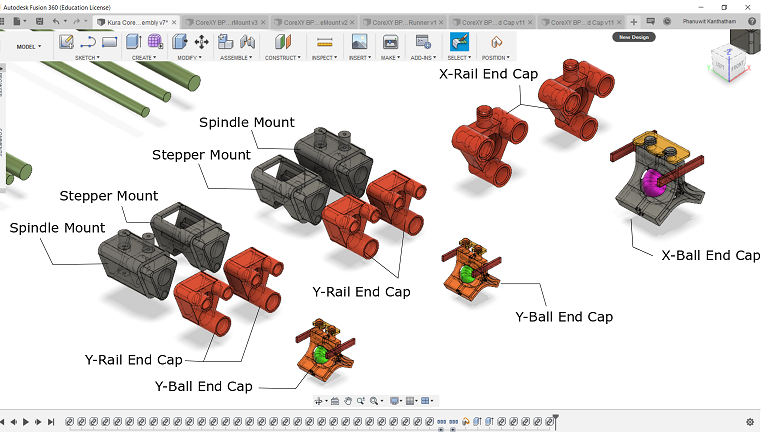
4x Y-Rail End Capture
2x X-Rail End Capture
2x Y-Ball Bearing Capture/Y-Rail Glide/Y-Top Lock Tab
1x X-Ball Bearing Capure/X-Rail Glide/X-Top Lock Tab
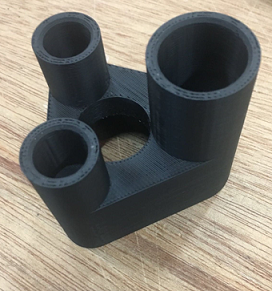
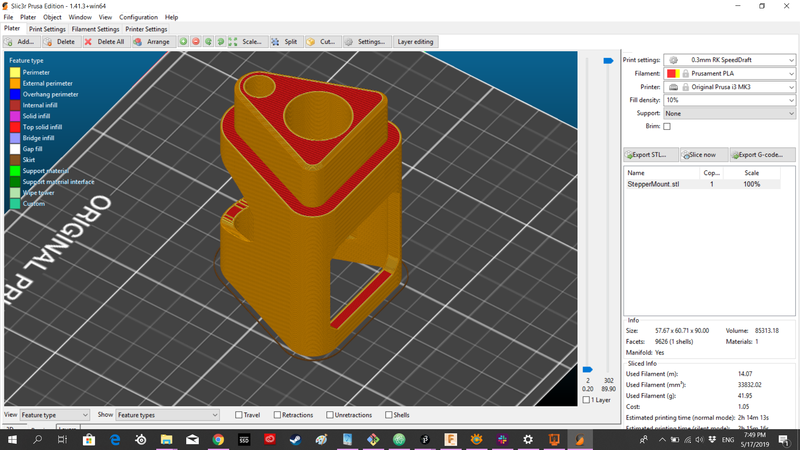
2x Stepper Motor Mount
2X Spindles Mount
Parts to be Procured:
4x 14mm Bamboo rails
5x 22mm Bamboo rails
4x 40mm Bamboo posts
2x Stepper Motors
10x Spindles
1x 6mm Wide Rubber Toothed Driving Belt
Misc. fasteners as required
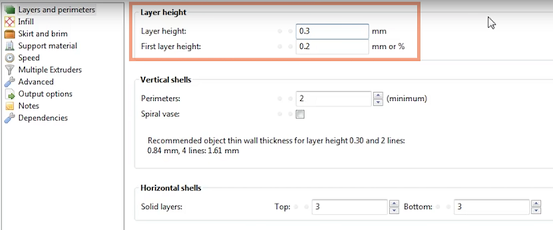
3D Printing - Machine Parts Fabrication
3D printing…is frustrating. It is slow. It is inconsistent. Printers used…
- Prusa i3 Mk3, PLA
- Flash Forge Dreamer
But with little time left until the build weekend…it is the only option. With possibly Mold & Cast as a backup option.

The smallest parts prints in under 1 hour…the larger pieces…over 15 hours on the Prusa printer. We will have to use multiple machines running as many hours as possible if we hope to be able to assemble this weekend (it is Thursday, May 16 now).
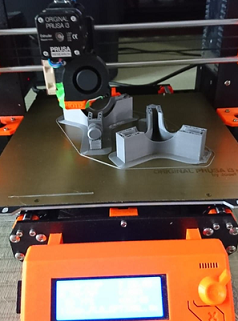
The successful prints look reasonably good and should be usable (fingers and toes crossed!!!)
3D Printing - Increasing Print Speed
Desperate times requires desperate measures! Sought help from All-Knowing-Google on how to increase the print speed on my Prusa Mk3 printer…and the answer, use the Slicer software (rather the simplistic Prusa Control) and tweak print settings to create ultra fast draft prints.
Warning…adjustments made results in weaker structural characteristics for the printed part…but I figure that for the CoreXY machine, the amount of stress should be manageable for ‘draft’ quality parts. If not, I can print again at a higher quality.
Settings changes recommended by Maker Muse in his video as follows…
- Taller layer height of 0.3mm…resulting in less refined finish than optimal 0.15mm
- Only 10% infill…vs standard 20%…but use the ‘Cubic’ fill option which generates a spare but strong 3D infill matrix.

- Faster print speeds of varying degree for different printing conditions

- Higher temperature for nozzle and bed for better adhesion…when moving faster

- No ‘brim’ and no ‘supports’…unless absolutely necessary
Don’t know about ‘Ultra Fast’…but fine tuning print settings in this way seems to save 15%-20% of time (guesstimating). And the quality…for a prototype…looks pretty good!
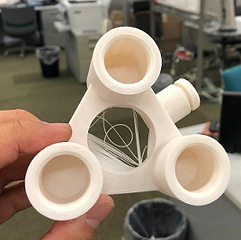
High speed printing of Ball Bearing Assembly (supports used here to ensure clean connection post)
Good result and clean assembly!
Slowly the collection of parts grows. Some post processing required to ensure good part to part fit.

Hopefully it comes together and works as well in reality as it did in Fusion 360!!! Time to work on the bamboo…
Bamboo Prep
Bamboo with rod diameters of approximately 14mm, 22mm and 40mm (+/- 3mm) used for the project. All rods cut to length using an angle grinder…everything 400mm in length.

To manage the variance in diameter at the connection ends, the bamboo rod ends are shaved down to create end diameters close to the 3 sizes described above (+/- 0.5mm)

The nodes along the bamboo rods were also shaved down with a knife and sanded to make smoother. The rods were scorched to release oils and make a nice surface finish as well as promote hardening…
All the bamboo rods for the CoreXY mechanism ready for assembly…

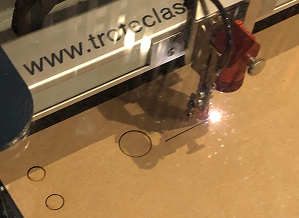
Laser Cutting
The Y-Plate serves both as the primary linkage between the X and Y Rail Assemblies and connector plate for several sub-components.

The plate was 3D modeled in Fusion 360, projected to a 2D image and exported as a DXF file for use by the laser cutter. We chose to cut 2 pieces of the Y-Plate out of 4mm MDF…with plans to stack them to create an 8mm thick component.
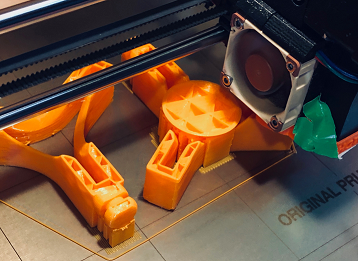
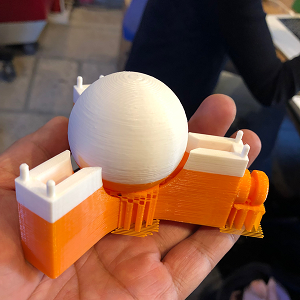
The Assembly
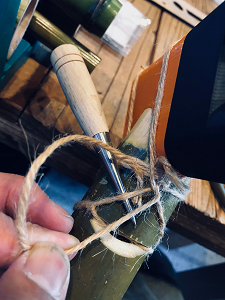
All the’New School’ man-made parts 3D printed or laser cut. All the ‘Old School’ bamboo parts cut, finished and prepped for connection. It is time to assemble. The ‘Old School’ and ‘New School’ components were slotted into one another
…or literally tied together with natural twine.
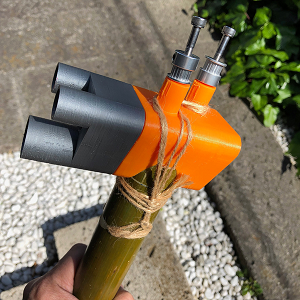
The end result looks like some prehistoric tool…(here in the hands of a Neanderthal).

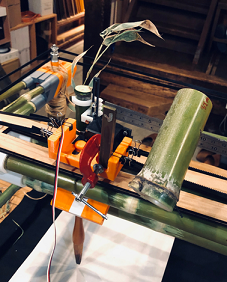
All the rail sub-assemblies put together…

And the finished machine with the CoreXY mechanism raised, the End Effector assembly installed, and electronics wired in…

Testing the mechanism by hand…
Testing the electronic control system…
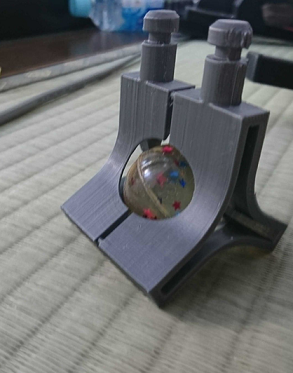
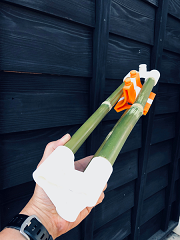
Detail shot of the End Effector assembly…
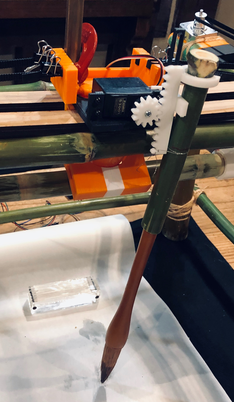
…and the counter-balancing system created on-the-fly (a bamboo tube filled with ball bearings riding a metal rail to offset the front heavy End Effector)
The very first painting of the Kura CoreXY BPM!!! Beautiful brush strokes achieved…control still needs work.

Machine and Mechanical issues to be corrected for final presentation
-
Stepper Motor Mount (SMM) part does not hold the motor in place. The current design does not allow sliding in of motor as expected, the connector tab at the bottom rear of the motor making it difficult. I reluctantly cut a slot from the back of the mount part…knowing it would significantly reduce the structural integrity of the motor capture frame. Sure enough…when the drive belt was tightened, the motor tilts forward from the belt tension. Redesign needed…
-
The Lateral Braces (LB) of the main support frame doesn’t function well. Admittedly, the lateral bracing of the lower frame was a bit of an after thought…a solution that happened “on the fly” during frame assembly. The lateral braces were lasted to the primary vertical supports with twine…which does not do an adequate job of preventing movement under structural stress. A better solution needed…
-
All the Ball Bearing Assemblies (BBA) tilts undesirably during CoreXY movements. Actually, I anticipated this problem and designed glides to attach to the BBA and ride on top of the top rails (add pic) to prevent axial rotation of the BBA. It was discovered during assembly that it could not be inserted into the BBA easily and redesign and reprint time didn’t exist…so it was left off the machine. Redesign needed…
-
The Rail End Capture’s (REC) rail capture tubes…are dangerously weak at it’s interface to its bottom plate. With a bamboo rail inserted…even a slight levering force will snap the rail capture tubes from its base…because it is attached only by the thickness of its walls (2mm). While levering force will only be felt during assembly, it is a significant machine failure weakness that needs to be fix. Redesign needed.
-
The Belt Capture Attachment (BCA) to the X-Movement/End Effector Mount Plate needs to be design adjusted. The belt capture slot height is about 10mm higher than the spindles feeding the belt to it. This resulted in an upward rising diagonal arrangement of the belt which distorts the X-Plate movement.
-
Belt tension tuning is lacking. Can it be designed as an improvement to a current part?
Redesign/Replacement Part Print List:
- 2x Y-Rail End Capture (REC)…3hrs needed for a pair…completed.
- 2x Servo Mount (SM)…6hrs needed for a pair…completed.
- 2x Y-Rail Glide (YRG)…20mins needed…completed
- 1x X-Rail Glide (XRG)…20mins needed…completed
- 1x Belt Capture Attachment (BCA)…40mins needed…completed
- Belt tension adjuster…pending
Week 17 - Learning Outcome
- What was I thinking…not building this machine with off-the-shelf parts!!! Reinventing the wheel in 2 weeks was not such smart thinking (Spiral gone wild)
- That said, the machine design from scratch process proved to be very instructive…many of the mechanical issues that Neil talked about…I encountered in some form while thinking thru the design of this machine using a combination of irregular natural material (bamboo), not-so-perfect fabricated parts (3D printing), and industrial quality, off-the-shelf parts.
- 3D printing speed can be significantly increased with “feed and speed” type of settings adjustments…at the cost of structural strength…but generally enough for ‘form and shape’ prototyping
- Different materials required different design considerations…each have strengths and weaknesses and unique mechanical and structural properties.
Week 17 - Future development
The Kura BPM worked in the end…but not really to everyone’s expectations. But overall we achieved the objective of sourcing local, sustainable materials to be meaningful in the machine construction. We also succeeded in combine some traditional techniques with technologically advanced ones.
In that respect, there is an opportunity to create even better, straighter rails with bamboo…borrowing from techniques utilized by Japan’s tradtional archery arrow makers. In Japan, there remain craftsmen who are expert with the techniques to make bamboo arrows for use by traditional Japanese archery practitioners.
A video going into detail about this still living traditional arrow making technique is here. What these craftsmen can do…is to straighten small diameter bamboo rods…using heating and bending techniques.
It is my thought that the precision of machines built with bamboo rods can be improved if we are able to apply this technique.