Final project
Assignment
- Complete your final project.
Learning outcomes
- Create your own integrated design.
- Demonstrate 2D & 3D modelling capabilities applied to your own designs.
- Select and apply appropriate additive and subtractive techniques.
- Demonstrate competence in design, fabrication and programming of your own fabbed microcontroller PCB, including an input & output device.
Have you
- Made your slide: 1280 x 1024 pixels with your name, project name, Fab Lab name, a photo/render/sketch of your project, a brief description of what your project is/does.
- Made a ~1 minute (10MB/1080p/720p) video of you explaining your project.
- Made a separate Final Project page that briefly summarises your project and included the BOM (Bill of Materials) for your project.
- Linked from this page to any weeks that you worked on your final project.
- Linked to your presentation.png and presentation.mp4.
- Included all of your original design files in the archive (2D & 3D, board files & code) No external hosting of final project files - discuss file sizes with your instructor.
- Included the license you chose.
- Acknowledged work done by others.
Hardware

Computer
Mobile

Files

buttons board 1 kiCAD files
buttons board 2 kiCAD files
CRduino board kiCAD files
Small button openSCAD file
Large button openSCAD file
Box model openSCAD file
Box model openSCAD file for SVG export
Box svg model makercase.com file for laser cut
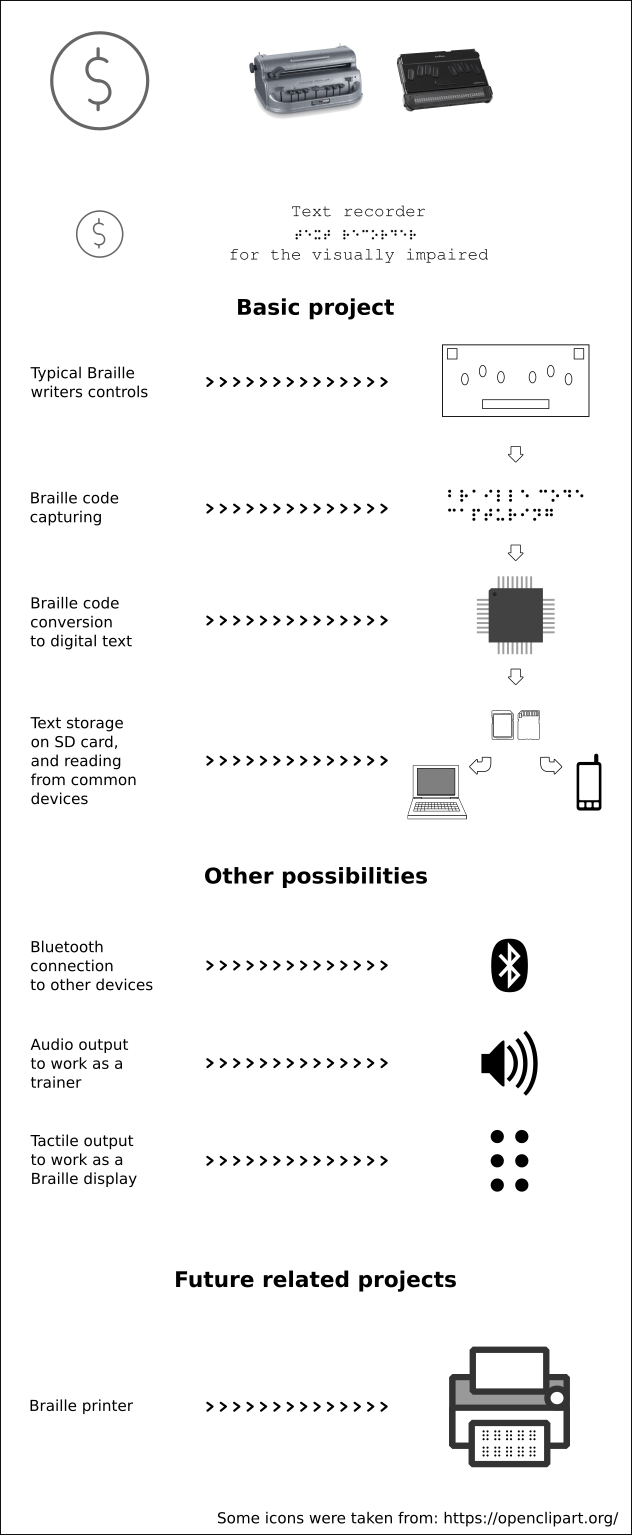
Digital Braille writer (DBw) (C)
- The Digital Braille writer (C) aims to be a cheap alternative to the common Braille writers, portable engravers and digital Braille note takers.
Digital Braille writer (C)
is a cheap digital Braille text recorder that allows to capture text from a Braille-type keyboard, and save it to an SD card for later reading from a common electronic device like an smarthphone or a personal computer.- For school and high school students, this machine can represent an affordable way to take notes in class, with a device that is small, silent and lightweight. In some cases this can be the main note-taking device, or even replace the Perkins Braillers, which can be uncomfortalbe to carry around.
- Also, this device, with some modifications to be made in the future, can work as a Braille trainer, Braille usb keyboard for the computer or Braille wireless keyboard for smartphones.

Bill of materials
The working model that can be seen in the previous video has a total approximate cost of $25.
- This is the list of materials, components and prices:
Bill of materials
| Quantity | Description | Price |
|---|---|---|
| 1 | ATmega328p | $2,25 |
| 1 | Crystal | $0.53 |
| 2 | 22 pF capacitor | $0.18 |
| 12 | 1206 resistors | $0.10 |
| 14 | 1206 capacitors | $0.19 |
| 1 | 1206 LED | $0.34 |
| 11 | Push buttons | $1.96 |
| 3 | Copper boards (10cm x 13cm) | $1.00 |
| 20 | Jumper wires | $1.00 |
| 2 | Pin headers lines | $0.75 |
| 1 | SD Card | $8.00 |
| 1 | SD module | $5.00 |
| MDF | $2.00 | |
| PLA | $2.50 | |
| Total | $25.80 |
Buttons (3D design)
-
I designed and printed the buttons. They are very simple openSCAD files:

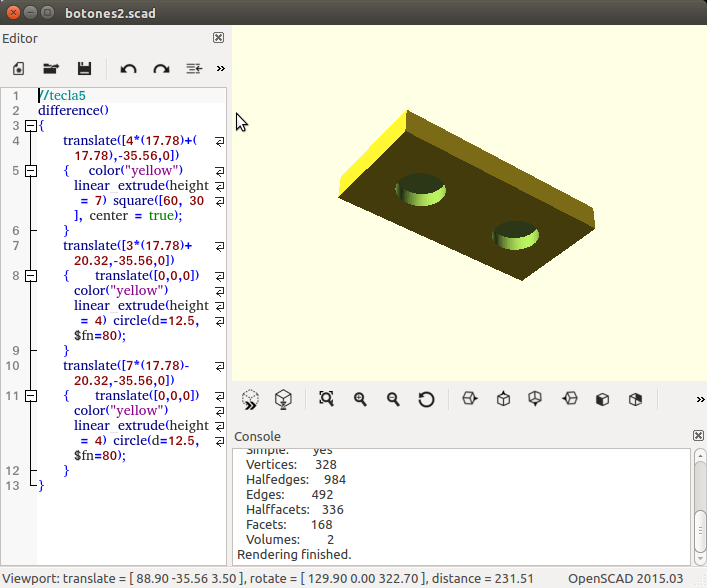
Casing
-
The case for this prototype is very simple. I designed it with two tools: openSCAD and makercase.com.
For the cutting file, I just added the buttons position to the box plans.


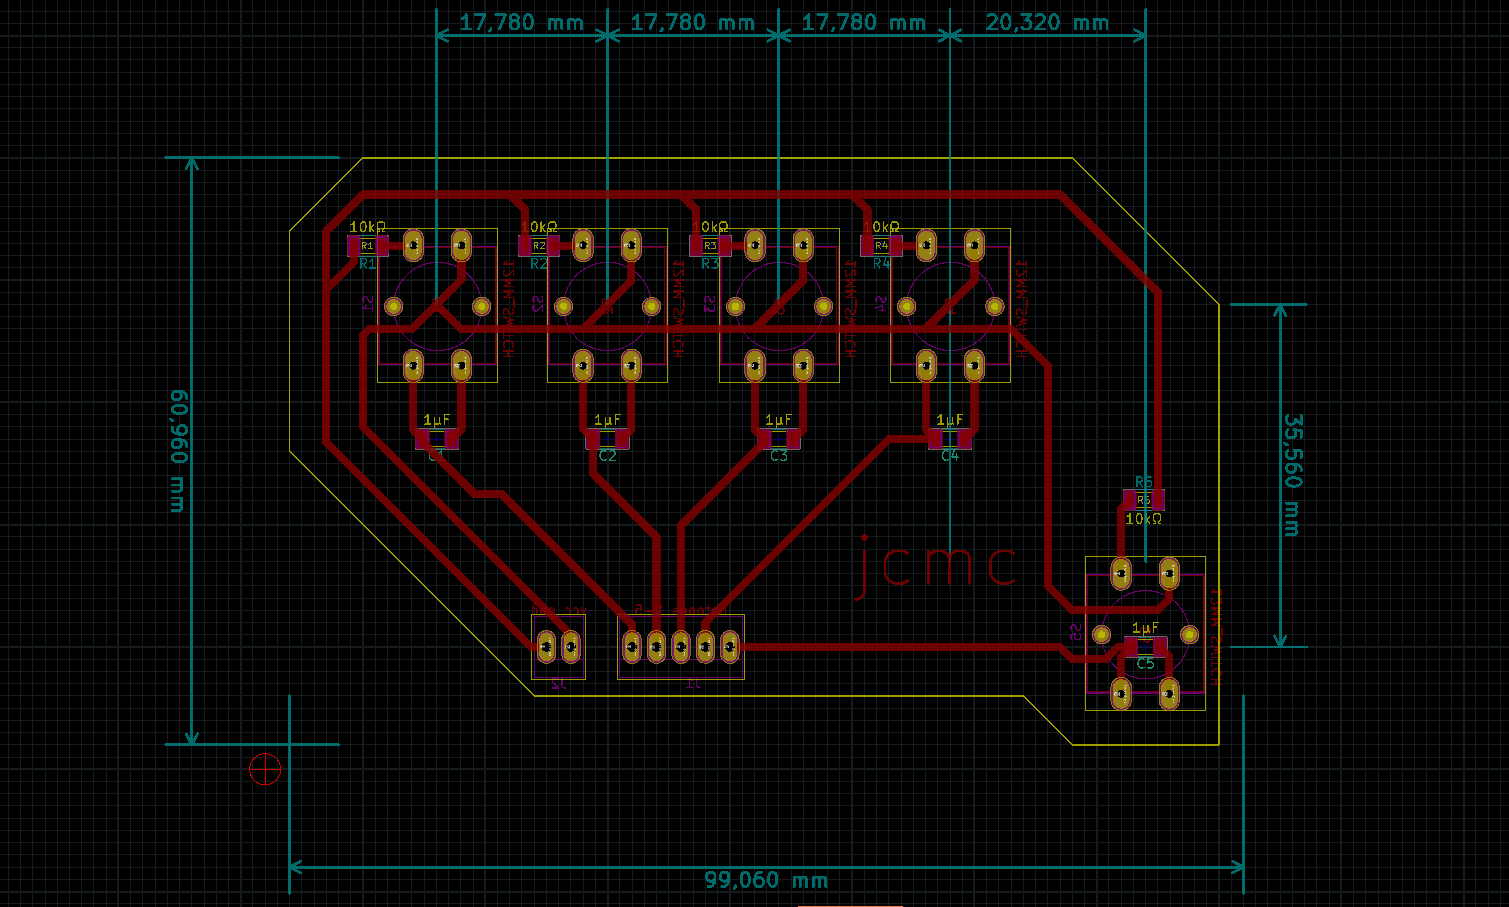
Buttons boards
There are two button boards in the DBw (C). One for each hand of the user. The model has four buttons on each board. Three buttons for writing, one for space and one extra key for future functions (these are not yet programmed nor defined).
Each button has a debounce circuit, as explained on the documentation for week13.
Each buttons has a pull-up resistor, this means that the microcontroller senses button inputs when that input is LOW.
This boards are connected with jumper wires to the microcontroller board.
Code for the buttons:
-
The code is set to stop and wait while there is no input from the buttons. This was done with a 'while' control structure and 'AND' boolean operators.
Basically, while all buttons (all and each one of them) are in HIGH state (this means 'not pushed'), the program does nothing.
while ( digitalRead(buttonArray[0]) == HIGH &&
digitalRead(buttonArray[1]) == HIGH &&
digitalRead(buttonArray[2]) == HIGH &&
digitalRead(buttonArray[3]) == HIGH &&
digitalRead(buttonArray[4]) == HIGH &&
digitalRead(buttonArray[5]) == HIGH &&
digitalRead(buttonArray[6]) == HIGH &&
digitalRead(buttonArray[7]) == HIGH &&
digitalRead(buttonArray[8]) == HIGH )
{
//while all the buttons are released, wait
} -
Then, another 'while' structure with 'OR' boolean operators, register which buttons are pressed. From the moment one button is pressed, and while any button remains pressed, the code registers inputs on an String array. Only after all buttons are released (go back to HIGH), the code compares the inputs to the letter patterns and waits for a new input from the keyboard.
while ( digitalRead(buttonArray[0]) == LOW ||
| digitalRead(buttonArray[1]) == LOW ||
digitalRead(buttonArray[2]) == LOW ||
digitalRead(buttonArray[3]) == LOW ||
digitalRead(buttonArray[4]) == LOW ||
digitalRead(buttonArray[5]) == LOW ||
digitalRead(buttonArray[6]) == LOW ||
digitalRead(buttonArray[7]) == LOW ||
digitalRead(buttonArray[8]) == LOW )
{
if(digitalRead(buttonArray[0]) == LOW) {stringArray[0] = digitalRead(buttonArray[0]);}
if(digitalRead(buttonArray[1]) == LOW) {stringArray[1] = digitalRead(buttonArray[1]);}
if(digitalRead(buttonArray[2]) == LOW) {stringArray[2] = digitalRead(buttonArray[2]);}
if(digitalRead(buttonArray[3]) == LOW) {stringArray[3] = digitalRead(buttonArray[3]);}
if(digitalRead(buttonArray[4]) == LOW) {stringArray[4] = digitalRead(buttonArray[4]);}
if(digitalRead(buttonArray[5]) == LOW) {stringArray[5] = digitalRead(buttonArray[5]);}
if(digitalRead(buttonArray[6]) == LOW) {stringArray[6] = digitalRead(buttonArray[6]);}
if(digitalRead(buttonArray[7]) == LOW) {stringArray[7] = digitalRead(buttonArray[7]);}
if(digitalRead(buttonArray[8]) == LOW) {stringArray[8] = digitalRead(buttonArray[8]);}
}
Microcontroller board
On week15 I designed and built two fabduinos. The second one was used for this model. I called it CRduino (CR for Costa Rica). CRduino is Arduino compatible, so, the code I wrote on previous weeks for Arduino boards, works whit the CRduino.
The CRduino uses the ATmega328p microcontroller, and has pins for all the digital and analog pins, also for the ADC and AREF pins. It also has several VCC and GND pins, wich I needed for the DBw (C).
Code for the letters:
-
On week16 I implemented a code to interpret each combination of keys. This code reads the String array after each input is made by the user. If the positions registered form the keys correspond to a letter, that letter is written.
If, for example, the user pushed the buttons 1, 2, 4, 5 (according to the image),

the letter 'h' must be written. The code for this is as follows:
if
(
stringArray[0] == "1" &&
stringArray[1] == "1" &&
stringArray[2] == "0" &&
stringArray[3] == "1" &&
stringArray[4] == "1" &&
stringArray[5] == "0" )
{
Serial.println("h");
myFile.print("h");
myFile.close();
}
-
The line "Serial.println" is for debugging purposes, so I can see the input on the serial monitor. The line "myFile.print("h");" adds the letter to the end of the txt file, where all the text is recorded.

License
-
License for the DBw (C) Juan Carlos Miranda Castro 2017
This work may be reproduced, modified, distributed, performed, and displayed for non commercial purposes, but must acknowledge "Digital Braille Writer (C)". Copyright is retained and must be preserved. The work is provided as is; no warranty is provided, and users accept all liability.
Sources of information
-
For this project, I used the following sources of information and resources:
Button code
Map of Perkins machine keys
-
Braille code basic symbols
-
Case for the first prototype
Software and sites used for this project
Fab Academy course (course site)
Inkscape (vector graphics)
Gimp (raster graphics)
kiCAD (Open Source electronics design automation suite)
FlatCAM (free and open-source PCB CAM)
openSCAD (3D CAD modeller)
FreeCAD (open source parametric 3D modeller)
LibreCAD (Open Source CAD)
Shutter (screenchot tool)
kdenlive (non linear video editor)
Google (search engine)
Firefox (web browser)
Cura (3d slicing software)
Thanks
-
I would like to thank:
Neil Gershenfeld
St. Jude School
Universidad Veritas
My classmates
Esteban Castro
Esterlyn Quesada
Esteban Oreamuno
Montserrat Ciges
Alberto Raygada
Damaris Cotto
Luis Castillo
Iván López
Carlos Valladares
César Cruz
Robert Garita
Back