
To do this assignment I saw several academy's assignment and the Silvia Palazzi was very useful and directed to others interesting academy links as Simone Guercio, Flavio Lampus, Linda Wanders, Sigridur Helga , Jaseel, Charlie Banthorpe,Sabina Barcucci and the site Physical Computing.
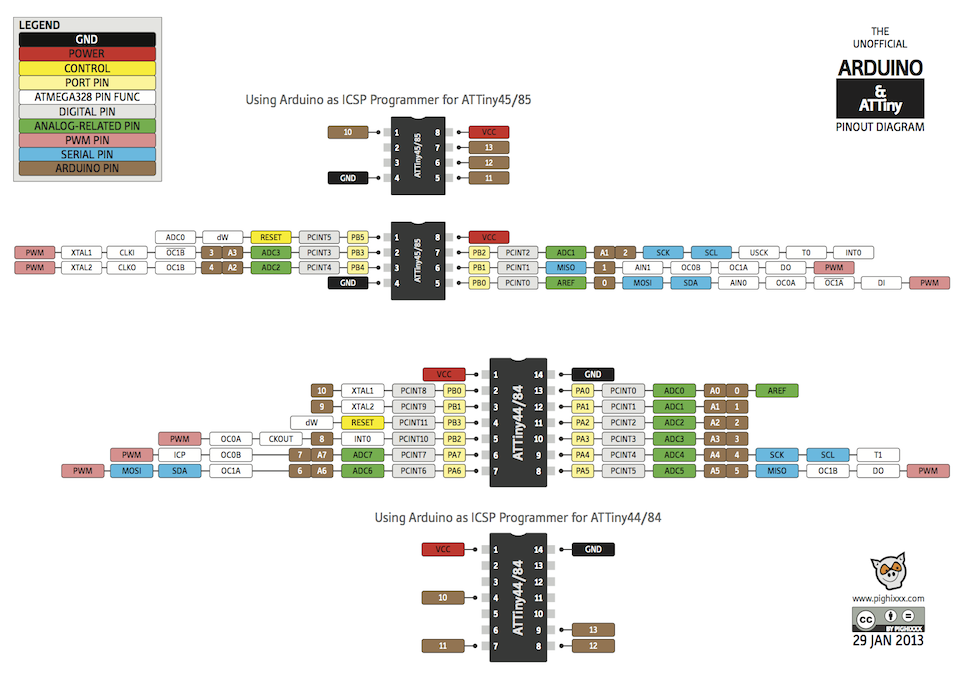
First, I used the high low tech tutorial to install the Arduino software support to program ATtiny microcontroller, and this pinout diagrams/pin mapping from Pighixxx.com to know the PIN description and functions.

Programming with Arduino software / Blink test.
I opened the Blink example and changed the pins numbers (LED in my board - PIN 7) using the pinout diagrams/pin mapping.

Process .
Board -> ATtiny Processor -> ATtiny44 Clock -> 20 MHZ(because I am using 20 MHZ Resonator in my Board) Programmer -> USBTinyISP (because I am using FabTinyISP) Then Connect FabISP with ATtiny Board -> Burn Bootloader -> upload Blink.
Blink test/ from Alex Angelo on Vimeo.
Programming with Arduino software / Button test.
I opened the Button example and changed the pins numbers (button in my board PIN 3/LED PIN 7) using the pinout diagrams/pin mapping.

Process .
Board -> ATtiny Processor -> ATtiny44 Clock -> 20 MHZ(because I am using 20 MHZ Resonator in my Board) Programmer -> USBTinyISP (because I am using FabTinyISP) Then Connect FabISP with ATtiny Board -> Burn Bootloader -> upload Blink.
Button test/ from Alex Angelo on Vimeo.
Second language - C
In my case my board has the LED at the PA7 and the button at PA3

My first doubt when I saw the PINs was: Why this descriptions A,B, DDRA, DDRB, PORTA,PORTB, PINA, PINB etc? Well, Jaseel and Sigridur Helga pages have some descriptions of it.
Programming in C /turn on the LED.
Process
Step 1
To program we need two files, (.c and .c.make) for example: "Lightup.c" and "Lightup.c.make" in the same folder.
Step 2
Write the code and save as ".c" file. In my case, I opened Gedit (Linux text editor) wrote the code (I modifying Charlie code) and saved it.

Step 3
Updating the project name in the ".c.make" file from Neil hello.ftdi.44.echo file.Again I used Gedit ( text editor)

Step 4
Using terminal I enter in the project folder ( where was the two files .c and .c.make) and run:
make -f Yourproject.c.make
  alex@alex-V5-171:~/.../Light_LED$ make -f Lightup.c.make
  ]avr-gcc -mmcu=attiny44 -Wall -Os -DF_CPU=20000000 -I./ -o Lightup.out Lightup.c
  Lightup.c: In function ‘main’:
  Lightup.c:9:1: warning: control reaches end of non-void function [-Wreturn-type]
  }
  ^
  avr-objcopy -O ihex Lightup.out Lightup.c.hex;\
  avr-size --mcu=attiny44 --format=avr Lightup.out
  AVR Memory Usage
  ----------------
  Device: attiny44

  Program:      62 bytes (1.5% Full)
  (.text + .data + .bootloader)

  Data:          0 bytes (0.0% Full)
  (.data + .bss + .noinit)
make -f Yourproject.c.make program-usbtiny-fuses
 alex@alex-V5-171:~/.../Light_LED$ make -f Lightup.c.make program-usbtiny-fuses
 avr-objcopy -O ihex Lightup.out Lightup.c.hex;\
 avr-size --mcu=attiny44 --format=avr Lightup.out
 AVR Memory Usage
 ----------------
 Device: attiny44
 Program:      62 bytes (1.5% Full)
 (.text + .data + .bootloader)

  Data:          0 bytes (0.0% Full)
 	(.data + .bss + .noinit)


 avrdude -p t44 -P usb -c usbtiny -U lfuse:w:0x5E:m

 avrdude: AVR device initialized and ready to accept instructions

 Reading | ################################################## | 100% 0.01s

 avrdude: Device signature = 0x1e9207
 avrdude: reading input file "0x5E"
 avrdude: writing lfuse (1 bytes):
 Writing | ################################################## | 100% 0.00s

 avrdude: 1 bytes of lfuse written
 avrdude: verifying lfuse memory against 0x5E:
 avrdude: load data lfuse data from input file 0x5E:
 avrdude: input file 0x5E contains 1 bytes
 avrdude: reading on-chip lfuse data:
 Reading | ################################################## | 100% 0.00s

 avrdude: verifying ...
 avrdude: 1 bytes of lfuse verified

 avrdude: safemode: Fuses OK (H:FF, E:DF, L:5E)
 avrdude done.  Thank you.
make -f hello.ftdi.44.echo.c.make program-usbtiny
 alex@alex-V5-171:~/.../Light_LED$ make -f Lightup.c.make program-usbtiny
 avr-objcopy -O ihex Lightup.out Lightup.c.hex;\
 avr-size --mcu=attiny44 --format=avr Lightup.out
 AVR Memory Usage
 ----------------
 Device: attiny44
 Program:      62 bytes (1.5% Full)
 (.text + .data + .bootloader)

 Data:          0 bytes (0.0% Full)
 (.data + .bss + .noinit)

 avrdude -p t44 -P usb -c usbtiny -U flash:w:Lightup.c.hex

 avrdude: AVR device initialized and ready to accept instructions

 Reading | ################################################## | 100% 0.01s

 avrdude: Device signature = 0x1e9207
 avrdude: NOTE: "flash" memory has been specified, an erase cycle will be
 performed
        To disable this feature, specify the -D option.
 avrdude: erasing chip
 avrdude: reading input file "Lightup.c.hex"
 avrdude: input file Lightup.c.hex auto detected as Intel Hex
 avrdude: writing flash (62 bytes):

 Writing | ################################################## | 100% 0.11s

 avrdude: 62 bytes of flash written
 avrdude: verifying flash memory against Lightup.c.hex:
 avrdude: load data flash data from input file Lightup.c.hex:
 avrdude: input file Lightup.c.hex auto detected as Intel Hex
 avrdude: input file Lightup.c.hex contains 62 bytes
 avrdude: reading on-chip flash data:

 Reading | ################################################## | 100% 0.12s

 avrdude: verifying ...
 avrdude: 62 bytes of flash verified

 avrdude: safemode: Fuses OK (H:FF, E:DF, L:5E)

 avrdude done.  Thank you.
More info about the commands see Charlie page.
I did the same process blinking the LED and controlling it with the button ( see the video) and the the C language files. I had a problem with my board (a damaged trace) and needed to do a new connection (blue cable) and the board is working well
Button C language from Alex Angelo on Vimeo.