ATtiny44A
The documentation for Atmel’s ATtiny44A MCU is a whopping 286 page pdf. I dived in to find out what the chip can do and how it works.
Some headline specs for the ATtiny44:
- 4kB Flash Memory
- 256 Bytes EEPROM
- 256 Bytes SRAM
- 12 Programmable I/O Lines
- 0 - 20 MHz @ 4.5 - 5.5 V
- Low Power Idle, ADC Noise Reduction, Standby and Power-down Modes
- Programmable Brown-out Detection Circuit with Software Disable Function
- Internal Calibrated Oscillator
- On-chip Temperature Sensor
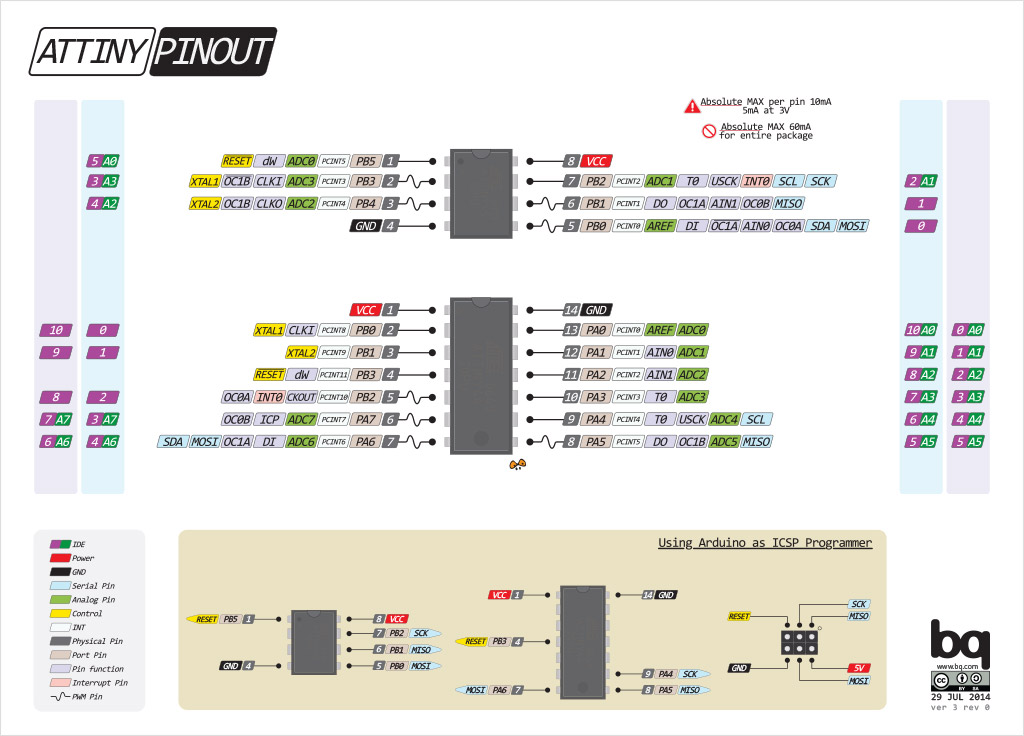
There is really a lot of information in the rest of the datasheet. Too much for a beginner like me to actually get into unless I know what I’m looking for. The Pin Configuration and Pin Descriptions in Section 1 are important - PighiXXX has created very nice colour-coded pinout diagrams for many processors including the ATtiny family, including pin mapping for the Arduino IDE:
The package dimensions in Section 25 were also important for me in the Electronics Design exercise for specifying the correct pad sizes in 123D Circuits.
Programming the MCU
My first step was to make sure I had the necessary toolchain for programming the chip - avr-gcc and avrdude.
Using homebrew on Mac OSX, pull avr-binutils and avr-gcc:
brew tap osx-cross/avr
then install avr-libc:
brew install avr-libc
and avrdude
brew install avrdude --with-usb
Now I could go ahead and program the microcontroller. As a first test, I downloaded Neil Gershenfeld’s hello echo example C and makefile code, and followed this tutorial to compile the code, set the fuses and program the board.
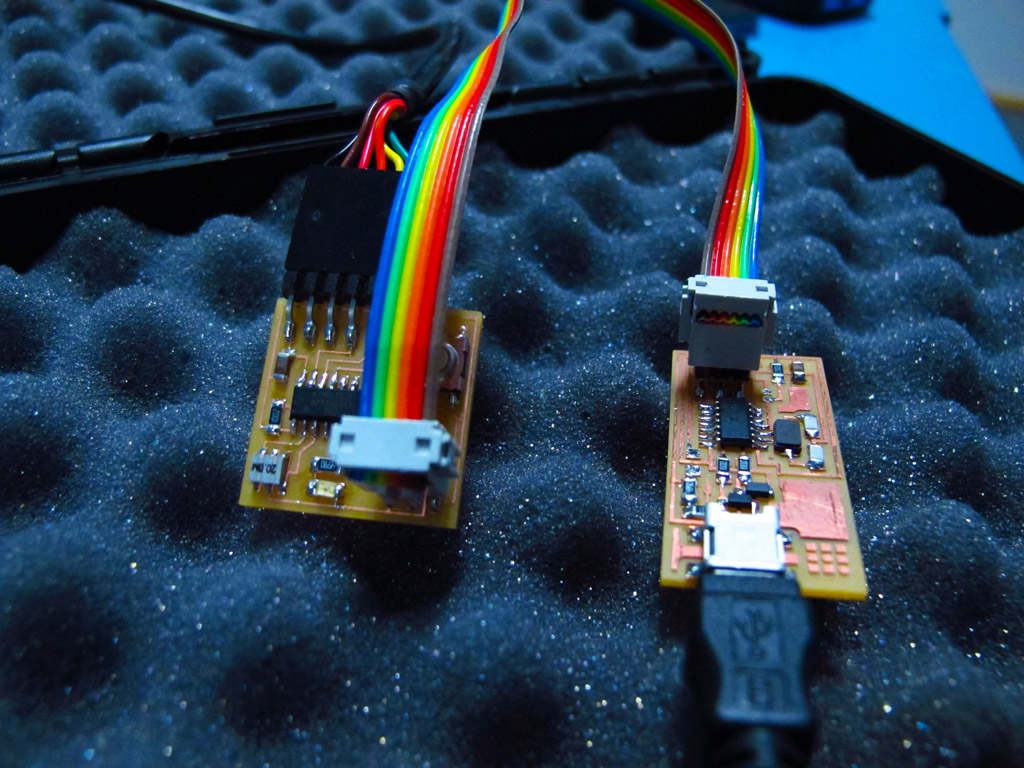 The Hello Echo and FabISP boards connected together and to a computer with USB and FTDI
With both the C code and makefile in my root directory, I compiled the code:
make -f hello.ftdi.44.echo.c.make
then setting the fuses, to set the clock to 20MHz using the external crystal:
make -f hello.ftdi.44.echo.c.make program-usbtiny-fuses
and programmed the microcontroller:
make -f hello.ftdi.44.echo.c.make program-usbtiny
I spent a few hours trying to get term.py installed with pip, so I could test if the board was working as expected. In the end, I opened up the Arduino IDE, selected /dev/cu.usbserial-FTFA7VQO as the serial port and opened up the Serial Monitor with a 115200 baudrate.
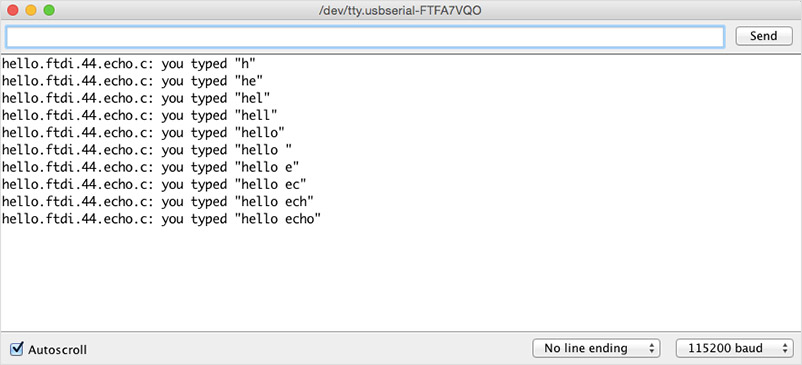 Here’s the board echoing back to the serial monitor
Programming an AVR in C
I looked at examples from Fab Academy students from previous years including Massimo Menichinelli and Sabina Barcucci. This post by Mayank on maxembedded.com was also helpful. Drawing from these and referencing stack overflow occasionally, I wrote the following code to turn on the LED:
#include <avr/io.h>

#define led_pin PB2           // pin for LED

int main(void)
{
  DDRB |= (1 << led_pin);     // set LED pin as output
  PORTB |= (1 << led_pin);    // turn LED on
}
I modified the hello.ftdi.44.echo makefile, removing unnecessary programmer code and updating the project name:
PROJECT=led-on
SOURCES=$(PROJECT).c
MMCU=attiny44
F_CPU = 20000000

CFLAGS=-mmcu=$(MMCU) -Wall -Os -DF_CPU=$(F_CPU)

$(PROJECT).hex: $(PROJECT).out
  avr-objcopy -O ihex $(PROJECT).out $(PROJECT).c.hex;\
  avr-size --mcu=$(MMCU) --format=avr $(PROJECT).out

$(PROJECT).out: $(SOURCES)
  avr-gcc $(CFLAGS) -I./ -o $(PROJECT).out $(SOURCES)

program-usbtiny: $(PROJECT).hex
  avrdude -p t44 -P usb -c usbtiny -U flash:w:$(PROJECT).c.hex

program-usbtiny-fuses: $(PROJECT).hex
  avrdude -p t44 -P usb -c usbtiny -U lfuse:w:0x5E:m
I was able to compile my code and program the microcontroller with:
make -f led-on.c.make
make -f led-on.c.make program-usbtiny
… but the light refused to turn on!
After a few frustrated minutes of trying to debug the minimal code, I checked the hardware and noticed that the LED was soldered in the wrong direction! After desoldering and resoldering the correct way round, I plugged the board back in and hey-presto!
 Let there be light!
Next, I tried making the LED blink:
#include <avr/io.h>
#include <util/delay.h>           // for _delay_ms()

#define led_pin PB2               // pin for LED

int main(void)
{

  DDRB |= (1 << led_pin);         // set LED pin as output

  while(1)
  {
      PORTB |= (1 << led_pin);    // turn LED on
      _delay_ms(50);              // wait 500 milliseconds

      //LED off
      PORTB &= ~(1 << led_pin);   // turn LED off
      _delay_ms(50);              // wait 500 milliseconds
  }
}
and then, used the button to change the LED blink speed:
#include <avr/io.h>
#include <util/delay.h>           // for _delay_ms()

#define led_pin PB2               // pin for LED
#define button_pin PA2            // pin for button

#define blink_fast 10             // delay for fast blink
#define blink_slow 50             // delay for slow blink

int main(void)
{

  DDRB |= (1 << led_pin);         // set LED pin as output
  PORTA |= (1 << button_pin);     // set pullup resistor for button pin

  while(1)
  {
    if(PINA & (1 << button_pin))  // if button is not pressed
    {
      PORTB |= (1 << led_pin);    // turn LED on
      _delay_ms(blink_slow);     // wait 500 milliseconds

      //LED off
      PORTB &= ~(1 << led_pin);   // turn LED off
      _delay_ms(blink_slow);     // wait 500 milliseconds
    } else {
      PORTB |= (1 << led_pin);    // turn LED on
      _delay_ms(blink_fast);     // wait 500 milliseconds

      //LED off
      PORTB &= ~(1 << led_pin);   // turn LED off
      _delay_ms(blink_fast);     // wait 500 milliseconds
    }
  }
}
For each iteration, I created a new makefile with an updated project name to make the filename.
AVR x Arduino IDE
A bit of setup is needed before you can program an AVR microcontroller with the Arduino IDE. Following this tutorial on hightechlowtech.org, I installed the ATtiny board extensions for Arduino, and set my configuration under Tools to:
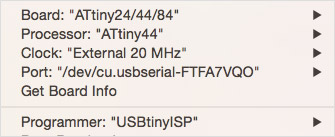 My arduino configuration for programming an ATtiny44 using a USBtinyISP
I then wrote an Arduino sketch with similar functionality to my LED Button example, but with a fast blink speed when the button is not pressed, and a slow blink speed when it is:
const int ledPin = 8;
const int buttonPin = 2;

int blinkSpeed;
const int blinkFast = 10;
const int blinkSlow = 50;

void setup() {
  pinMode(ledPin, OUTPUT);
  pinMode(buttonPin, INPUT_PULLUP);
}

void loop() {
  if(digitalRead(buttonPin) == LOW)
  {
    blinkSpeed = blinkSlow;
  } else {
    blinkSpeed = blinkFast;
  }

  digitalWrite(ledPin, HIGH);
  delay(blinkSpeed);
  digitalWrite(ledPin, LOW);
  delay(blinkSpeed);
}
Programming with Arduino was much more familiar and faster for me, and the code was a bit neater as I could specify a variable for the delay time.
Files
LED On C code (457 bytes) - led-on.c
LED On makefile (525 bytes) - led-on.c.make
LED Blink C code (457 bytes) - led-blink.c
LED Blink makefile (525 bytes) - led-blink.c.make
LED Button C code (1kB) - led-button.c
LED Button makefile (526 bytes) - led-button.c.make
LED Button Arduino Sketch (427 bytes) - led-button-arduino.ino
TODOs
☑ Read an AVR microcontroller datasheet
☑ Program a microcontroller
☑ Document the programming process
Links
Fab Academy 2016 - Embedded Programming