WEEK|08
Embedded Programming
For this week's assignments, we have to program the board we made on Week6, using the FabISP we made on Week4 and/or every other programmers we have in our hands.
Did I do that elsewhere ?
Here is the assignements where I had to use these skills :
Software used
Source files
Burning the silicium
As you may remember, on Week 6, I got some troubles with my FabISP unable to communicate with my board.
I tested some combo :
- My FabISP with another student's cable (fail)
- Another student's FabISP with my cable (fail)
- Another student's FabISP with his cable (fail)
- AVRISP MkII with his cable (success)
- AVRISP MkII with my cable (success)
- My FabISP with AVRISP's cable (fail)
My neurons was on fire, it wasn't logical at all.
Here is the log of programming the board with the AVRISP MkII using the cable I made for the my FabISP, and the programming was OK, so the cable was not faulty.
Right now, it's a mystery.
$ sudo make program-avrisp2
avr-gcc -mmcu=atmega328 -Wall -Os -DF_CPU=8000000 -I./ -o dont_blink.out dont_blink.c
avr-objcopy -O ihex dont_blink.out dont_blink.c.hex;\
avr-size --mcu=atmega328 --format=avr dont_blink.out
AVR Memory Usage
----------------
Device: atmega328

Program:     180 bytes (0.5% Full)
(.text + .data + .bootloader)

Data:          0 bytes (0.0% Full)
(.data + .bss + .noinit)


avrdude -p atmega328p -P usb -c avrisp2 -U flash:w:dont_blink.c.hex

avrdude: AVR device initialized and ready to accept instructions

Reading | ################################################## | 100% 0.01s

avrdude: Device signature = 0x1e950f
avrdude: NOTE: "flash" memory has been specified, an erase cycle will be performed
         To disable this feature, specify the -D option.
avrdude: erasing chip
avrdude: reading input file "dont_blink.c.hex"
avrdude: input file dont_blink.c.hex auto detected as Intel Hex
avrdude: writing flash (180 bytes):

Writing | ################################################## | 100% 0.07s

avrdude: 180 bytes of flash written
avrdude: verifying flash memory against dont_blink.c.hex:
avrdude: load data flash data from input file dont_blink.c.hex:
avrdude: input file dont_blink.c.hex auto detected as Intel Hex
avrdude: input file dont_blink.c.hex contains 180 bytes
avrdude: reading on-chip flash data:

Reading | ################################################## | 100% 0.08s

avrdude: verifying ...
avrdude: 180 bytes of flash verified

avrdude: safemode: Fuses OK (E:07, H:D9, L:62)

avrdude done.  Thank you.
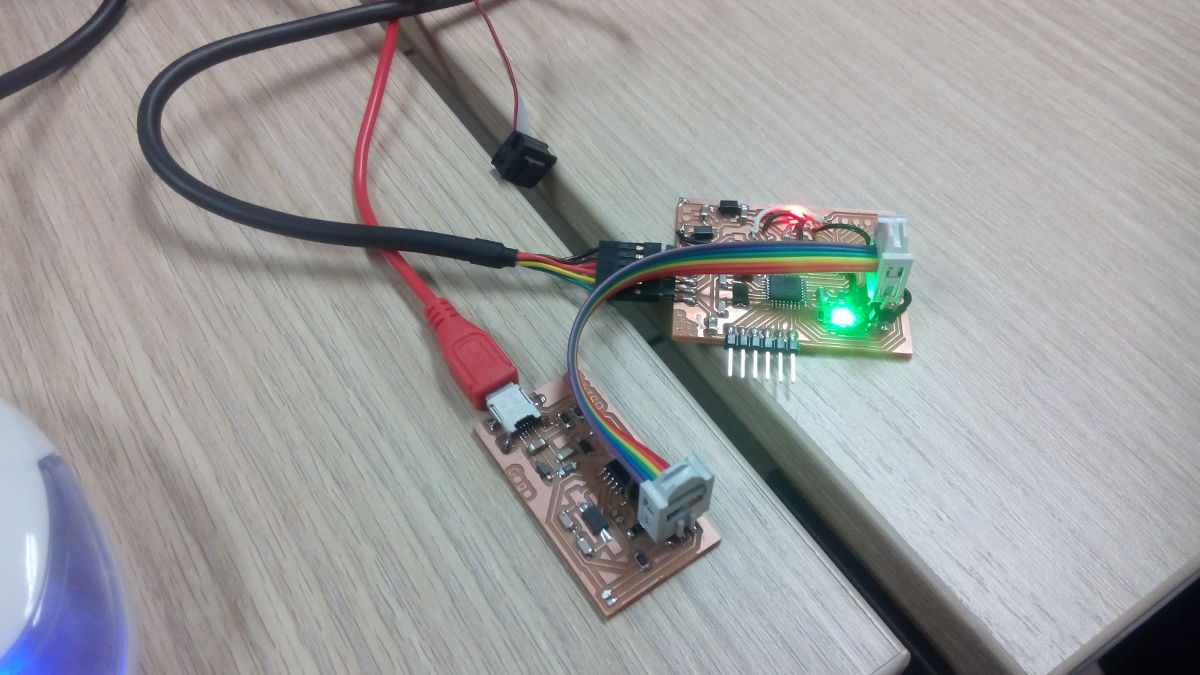
After almost two hours diggling with this problem, it turns out that it was because I made one of my best mistake since the begining of the FabAcademy !
My little green LED is now successfully blinking.
Note : At this time, I still didn't burn the fuses, so the microcontroller still works on his internal clock
OK, that was for the "burning" side, now go on the programming phase.
Setting up the environment

As stated at the begining, I wanted to use Code::Blocks for this week assignment, so I installed it along with avr-gcc and avr-libc.
I face some trouble, mainly focused about the Makefile, but as soon as I checked the "use custom Makefile" in the build options of C::B, the problem was gone and I could build and upload to my board successfully, once I added the correct target in Code::Blocks "build targets" configuration.
Coding
By lack of imagination, I decided to code a few "blink" code, using different methods, growing in complexity
- Blink01 - "arduino style" / blocking method
- Blink02 - timer interrupt
- Blink03 - sleep/wakeup method
Fuses
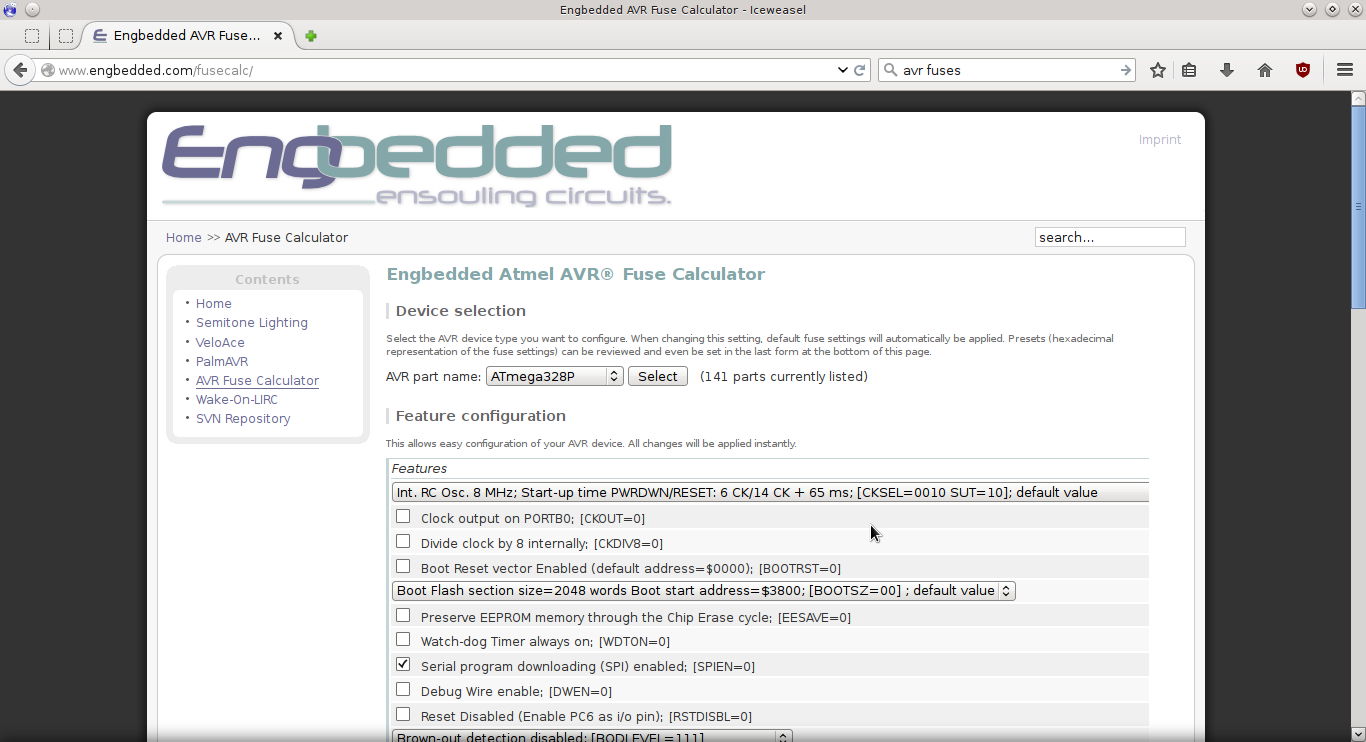
By default, ATMega328P fuses are set so the internal osc. @8MHz is used, AND his frequency divided by 8 (CKDIV8 fuse is set).
For the test, I just wanted to use internal oscillator, but at full speed. So I needed to set the fuses accordingly.
According to the datasheet, CKDIV8 is a "low fuse", instead of calculating by hand the new value and to avoid any critical error, I used the Engbbeded's AVR fuses calculator, witch is simple, great and very efficient, and he gives the copy-paste-ready command line argument to set the fuses with AVRDude.
Blink 01 - "Arduino style"
I'm using Code::blocks for coding, I never used it, so I face some troubles at the begining, like this error after creating the first project :
SquirrelFunction<> call failed
AN ERROR HAS OCCURED [the index 'Item' does not exist]

CALLSTACK
*FUNCTION [GetFuseBytes()] /usr/share/codeblocks/templates/wizard/avr/wizard.script line [325]
*FUNCTION [GetGeneratedFile()] /usr/share/codeblocks/templates/wizard/avr/wizard.script line [346]

LOCALS
[i] 0
[fuses] INSTANCE
[parts] INSTANCE
[part] INSTANCE
[this] TABLE
[file_index] 1
[this] TABLE
This is a known (and fixed) bug, unfortunatly, I'm using Debian, so the Code::Blocks version is a bit outdated (13.12 build on May, 20 2015.).
Anyway, it doesn't seems to be a problem.
The C code for this example is very simple. First, we include some files
#include <avr/io.h>
#include <util/delay.h>
Then, we declare the LED constant - its not strictly necessary but "LED" is more convenient than "PINB5"
#define LED PINB5
Then come the main() function, in the beginig of witch I set some registers (DDRB and PORTB)
int main()  {
   DDRB |= (1 << LED);  // setting only bit 5 as output, keeping other pin unchanged with a OR
   PORTB = 0;
And then, we enter the infinite loop where we switch between led ON/OFF
   while(1)
   {
   PORTB = (1 << LED);
   _delay_ms(250);
   PORTB = (0 << LED);
   _delay_ms(250);
   }
   return 0;             // Should never happen
}
Simple and effective, and pretty useless. But it works.
Timer interrupt method
This blink example uses timer interrupt to work. Doing so, the controller doesn't waste any clock cycles in any "delay()".
I used this website as a help for calculating prescaler value depending on the clock source.
For a self-clocked AVR (8MHz), setting the CS02:0 bit register in TCCR0B to 0x04 will set the prescaler for Timer0 to Fclk/256 Datasheet page 108.
Doing this, a timer0 overflow will take approx. 8ms to arise, this will be our time resolution. If we need to wait for 800ms, we just need to count 100 overflows and take any action, not forgetting to reset the counter after that.
The key parts for this program are the interrupt routine :
ISR(TIMER0_OVF_vect) {
    count += 1; // count is declared as volatile because the variable is used in an interrupt
}
And the part that sets the registers bits :
// _BV(CS02) is a macro doing the same thing than (1 << CS02) but more readable and more error-proof
TCCR0B |= _BV(CS02);     // prescaler sets to Clk/256.
TIMSK0 |= _BV(TOIE0);    // enable the overflow interrupt
sei();                   // Set enable interrupt
Of course, the clock and prescaler settings shown above are for 8MHz internal clock without CLKDIV8 enabled, they need to be modified if another clock source/Speed is used.
Therefore, for highter frequencies, the Timer0 may not be adequate, because it's a 8 bit timer and his overflow rate would be really high at 16MHz.
And then :
    while(1)             // Loop indefinitely
    {
        if (count >= max_overflow) {
            cli();                      // clear interrupt to avoid some interrupt overlap (shouldn't happens in this code)
            PORTB = (state << LED);     // set the LED pin according to "state" bool value
            state = !state;             // swap state
            count = 0;                  // reset counter for another run
            sei();                      // enable interrupt again, and go on.
        }

        // and here, we can do all we want, blinking of our LED didn't slow down the rest of the code
    }
    return 0;             // Should never happen
Power management method
This method use the watchdog timer to wakeup the AVR at given intervals, doing some blinks, and then go to sleep again.
It has the benefit of being low consumption method, because the MCU is in "power down" mode between two blinks, meaning it has almost no functions consuming power (according to Datasheet page 2, power consumption in power down mode is 0.1µA).
Before making the MCU enter in power down mode, we must set the watchdog timer to generate an interrupt, witch will wakeup the MCU. To do this, the WDTCSR->WDIE bit need to be set to 1 Datasheet page 54
to make the MCU enter in "power down" mode, we just need to set SMCR->SM1 and the SMCR->SE bits to 1 and call the SLEEP instruction Datasheet page 44.
But, I used avr-libc, so I just included avr/sleep.h and avr/wdt.h and used available functions/macro wdt_enable(), set_sleep_mode(), sleep_enable(), sleep_mode() and sleep_disable()
    // Enable the watchdog timer interrupt with approx. 250ms interval
    wdt_enable(WDTO_250MS);
and then :
    while(1)             // Loop indefinitely
    {
    set_sleep_mode(SLEEP_MODE_PWR_DOWN);     // set power down mode, most power saving
    sleep_mode();                            // go to sleep, little piece of silicium

    sleep_disable();                        // wake up from here on watchdog interrupt
    cli();                                  // disable interrupt to play with IO registers
    PORTB = (state << LED);                 // set the LED pin according to the "state" bool value
    state = !state;                         // swap update

    }
    return 0;             // Should never happen
Obviously, we can't see it, but the green LED is blinking :-)
My mistakes
Fuses
For my early tests, I forget to set the CKDIV8 fuse, so the AVR was running at 8MHz/8 = 1Mhz, giving some weird results.
The dumbest one
So, after two wasted hours, I just tried to invert my cable and the programming of the board was OK.
I just have any word right now to describe how dumb I feel.
$ sudo make program-usbtiny
avr-objcopy -O ihex dont_blink.out dont_blink.c.hex;\
avr-size --mcu=atmega328p --format=avr dont_blink.out
AVR Memory Usage
----------------
Device: atmega328p

Program:     180 bytes (0.5% Full)
(.text + .data + .bootloader)

Data:          0 bytes (0.0% Full)
(.data + .bss + .noinit)


avrdude -p atmega328p -P usb -c usbtiny -U flash:w:dont_blink.c.hex

avrdude: AVR device initialized and ready to accept instructions

Reading | ################################################## | 100% 0.01s

avrdude: Device signature = 0x1e950f
avrdude: NOTE: "flash" memory has been specified, an erase cycle will be performed
         To disable this feature, specify the -D option.
avrdude: erasing chip
avrdude: reading input file "dont_blink.c.hex"
avrdude: input file dont_blink.c.hex auto detected as Intel Hex
avrdude: writing flash (180 bytes):

Writing | ################################################## | 100% 0.34s

avrdude: 180 bytes of flash written
avrdude: verifying flash memory against dont_blink.c.hex:
avrdude: load data flash data from input file dont_blink.c.hex:
avrdude: input file dont_blink.c.hex auto detected as Intel Hex
avrdude: input file dont_blink.c.hex contains 180 bytes
avrdude: reading on-chip flash data:

Reading | ################################################## | 100% 0.20s

avrdude: verifying ...
avrdude: 180 bytes of flash verified

avrdude: safemode: Fuses OK (E:07, H:D9, L:62)

avrdude done.  Thank you.
Nothing more to say.