Week 5 - CAD-design and 3D-printing, and skanning
This weeks task were to:
1. Design and 3D-print something that can not be manufacture by milling or CNC-machining.
2. Scan something and if time permits 3D-print it.
3. Group assignment: Test 3D-printers capacities
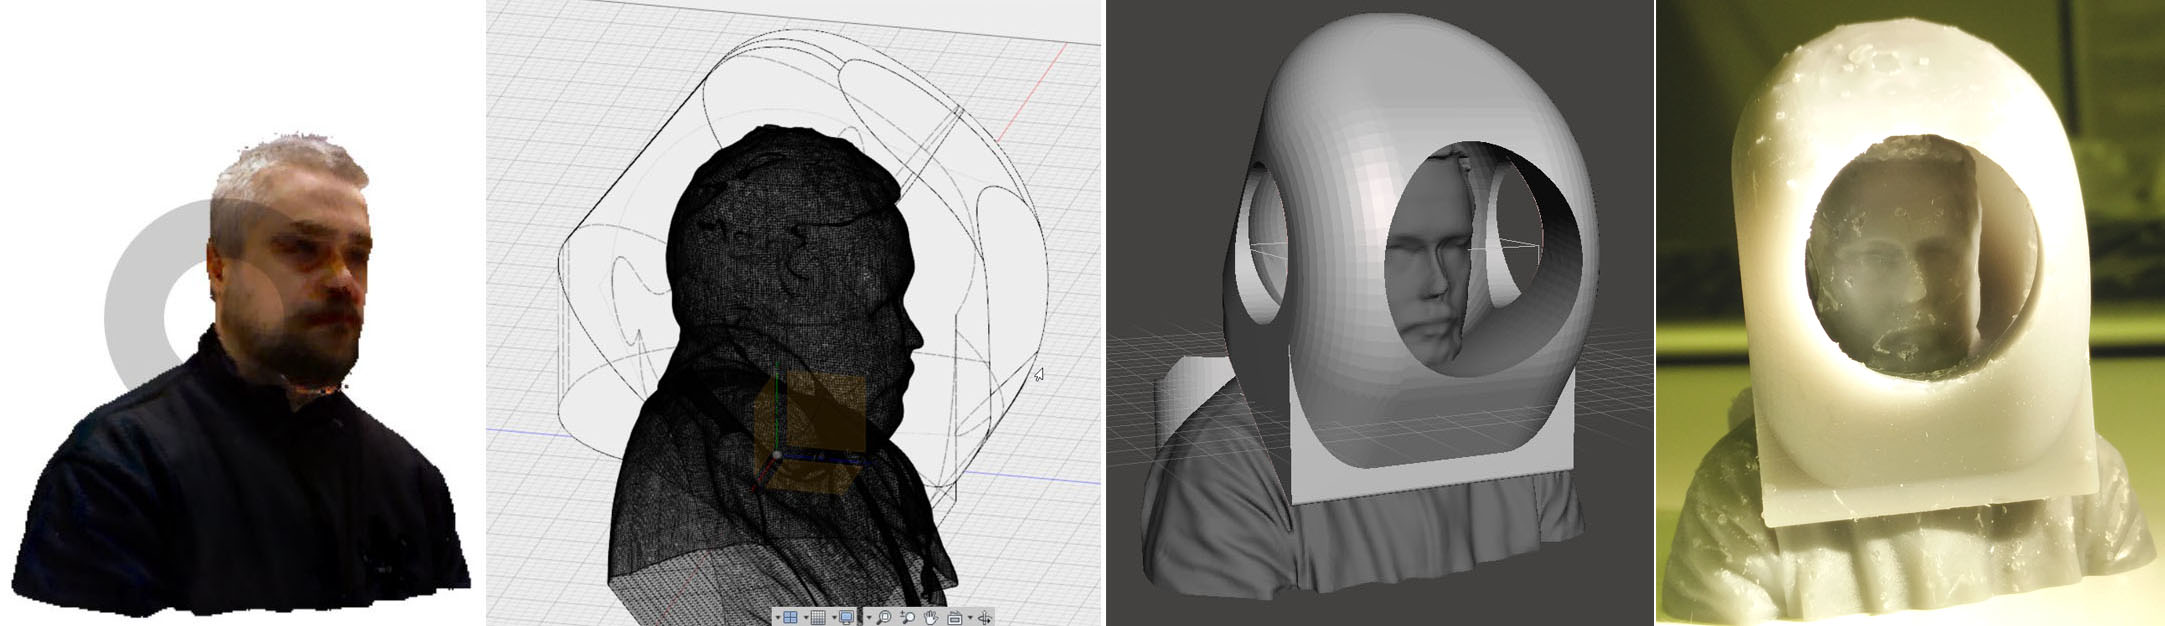
We tested the 3D-printers first but I present the results last. My 3D-desing and printing recuired a 3D-scan, so I did scanning first and 3D-design and printing last. I will present these in this order. The master plan was to scan myself and use Autodesk Fusion 360 to create a space helmet for myself and print that as 3D figure.
3D Scanning
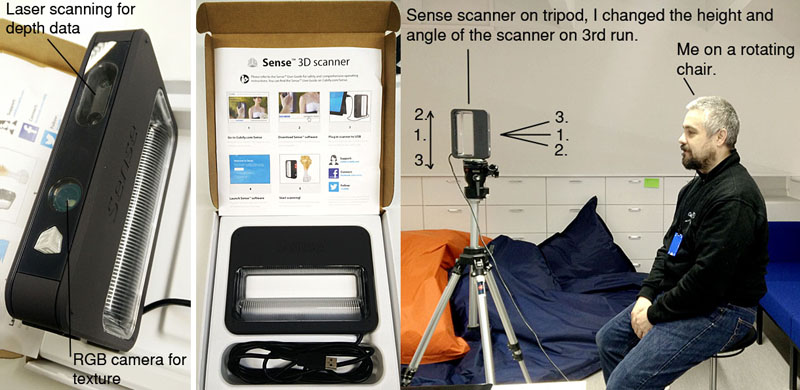
I started by scanning myself using FabLab scanner Sense. It was quite straing forward process. Due to scanner type it would have been best to let someone else do the scanning of me, but at the end I used tripod and rotating chair to make the scan myself. Here is the setup.
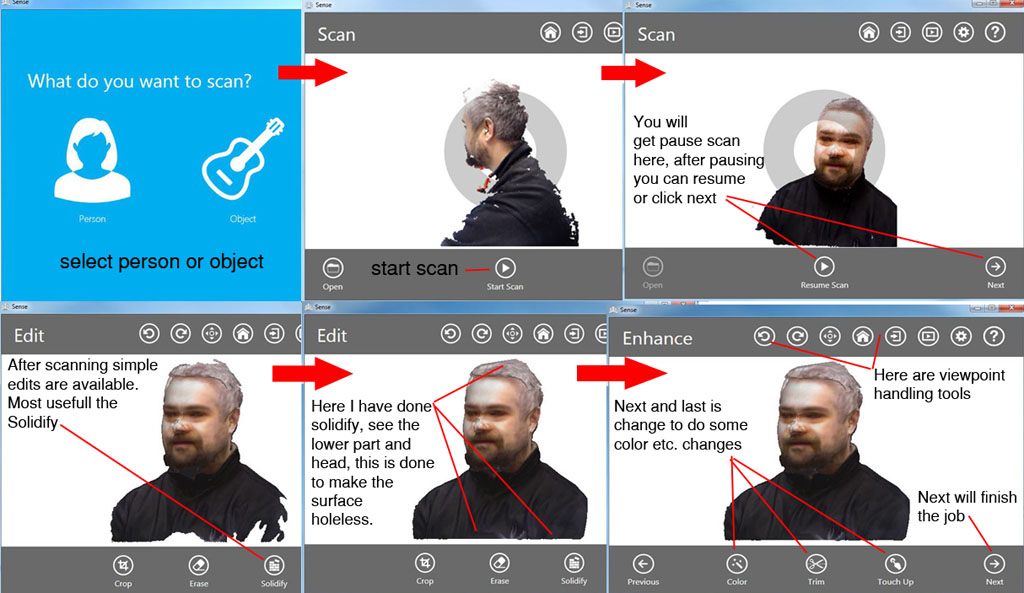
Scanning happens using dedicated software. There is not that many options in the process, first you just make the scan, make some minor improvements like closing surfaces etc. and finally save it as .obj-format.
After making few tests, one done by an assistant, I got these three scans.
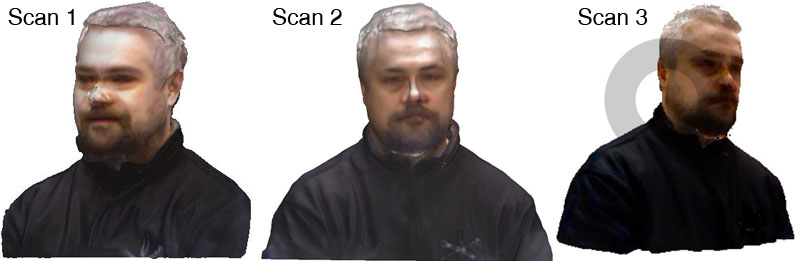
On the last one I did 3 scans and adjusted the scanner in three separate elevations and angles. It is not clear to me if it made any real improvement but I chose the last scan to work with. Time to do some 3D-design.
CAD-desing a part not possible with subtracting processes
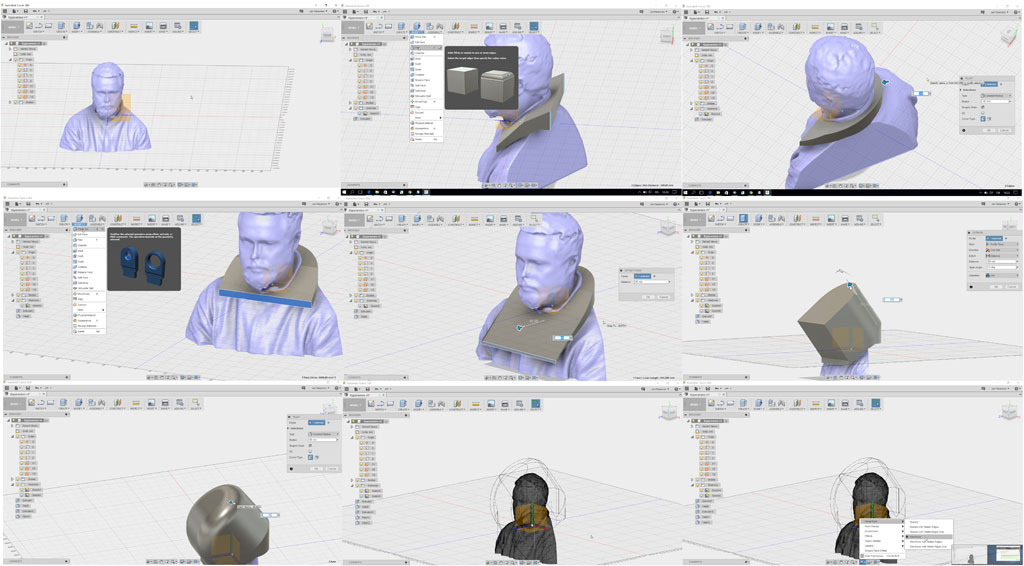
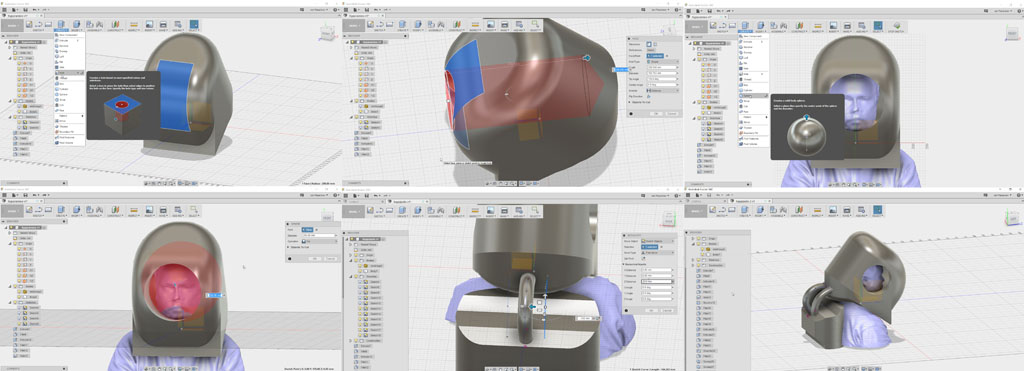
To do a design that can not be made by subtracting process, I made this figure of my head inside a "space helmet". The design in not possible to be accomplised in one peace except by additive process. My scanned head has details on every side and by building the helmet over it means that there are details that have to be generated inside the helmet. Especially details on the back of my head inside the helmet could not be created by conventional subtractive methods.
From .obj-scan to printable .stl file.
From the scanner I had an .obj file. Fortuntely Autocad Fusion 360 was able to import it.
After importing I designed the helmet using a wide set of design tools in Fusion. Main ones were:
1. sketch
2. extrude
3. press pull
4. fillet
5. Offset plane
and many more.
After creating the design, I found I had a problem. I could not export single .stl file that would have my in Fusion imported self image and the helmet contraption I designed. It did not help to save them in native Fusion format (.f3d) and re-open, or any other way I could come up with. I only managed to export them as separate .stl objects. Thats no good as in Repetier sofware that I use to print the end product I can not orient them so that they would be on top of each other. And I did not consider it a good solution in any case.
What I came up with, was to install a new program Autodesk Meshmixer. At first as I imported the separate files, they where all over the place. But at import you need to take a import property setting off, where the program wants to flip axes (who knows why?). Well so good so far. Now I realized I funny thing. The model was huge! I did not realize it in Fusion, but my head was maybe 30cm diameter. I would be nice to print such a big head (almost real size) but maybe I would leave that for later.
So if Meshmixer I did:
1. scale to models to 0.1 of the original
2. Align them correctly, thought that was not a problem at the end
3. Joined them to be one object
4. Made a solid object from the single object. This is due to I test in Repetier (printer software) complaining that the model was not closed
5. Exported the final design as .stl file.
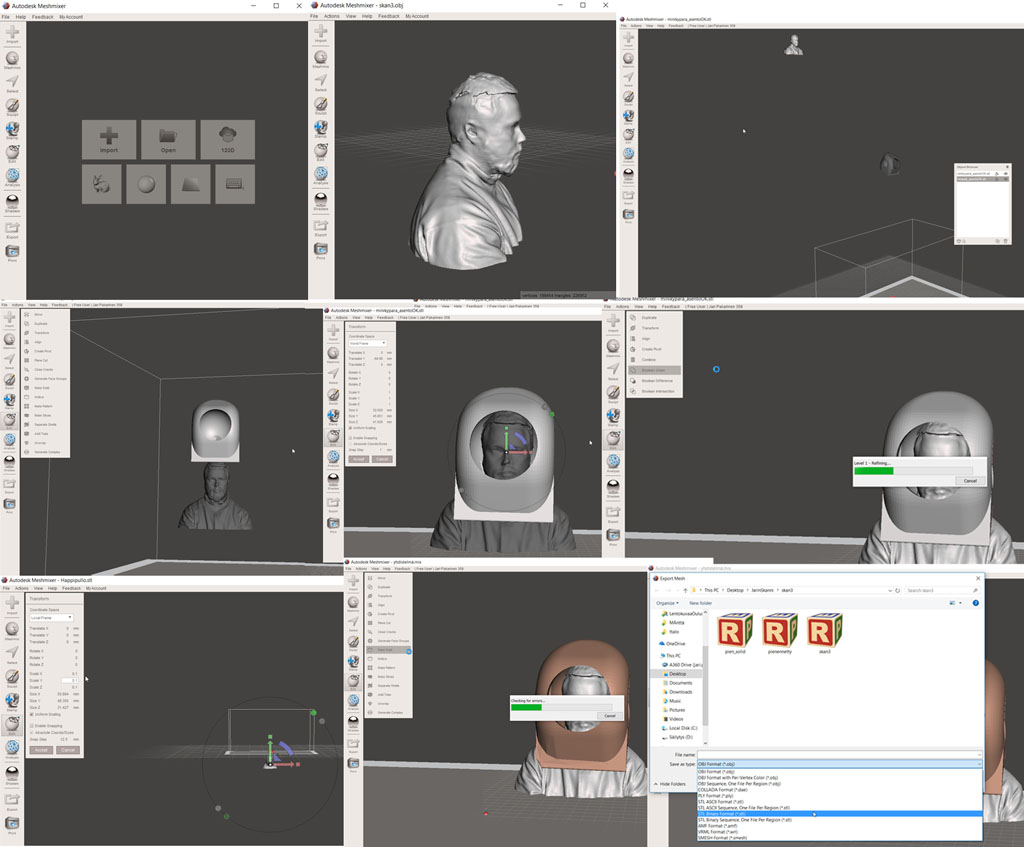
Now I was ready for printing.
Printing the model
I did two prints with two different printers. The filament print was scaled down in the Repetier to make the printing faster. It took about 40 min to print this. The other print was done with Formlabs Form 2 printer. The resolution is much better and the I did printed a bigger version of it. The print had 4 separate object and took 9 hours to finish. To print only my model would have taken about 6 hours.
Leapfrog Creatr
Repetier is the free software used for printing with our labs Leapfrog 3D-printer. I downloaded it to my own computer so I could easily test the .stl files. If they were accepted by the printer and how long it would take. I have explained the Repetier software UI at the group assignment part at the end. Visit that part for details of printing process.
Formlabs Form2
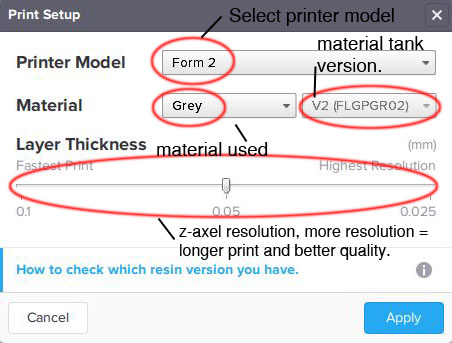
To print with Formlabs I used program called Preform. I installed this program to my own computer as well to test my prints before actually goint to the lab. Starting the program, you must select the printer in use, material in use and z-axis resolution. These can be changed later on. Here is the start window.
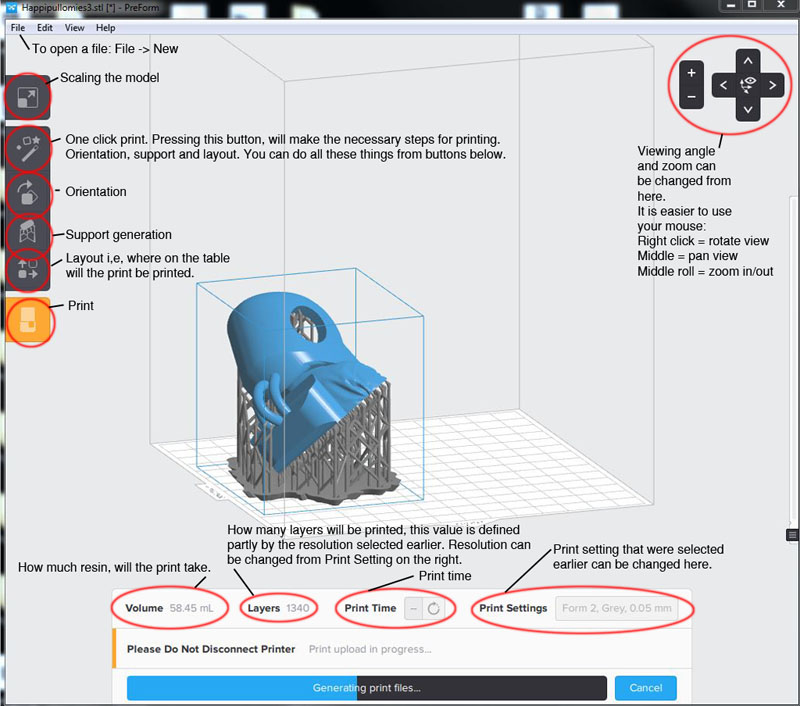
Click Apply button and you will be taken to the Preform main window. Making file ready for print will be done here. See the picture. Easiest way to go is to click "One click print"-button. This will get you through all the steps needed. If you go thought the steps one by one, first is the Orientation. Software will calculate different orientations for the object so that the liquid resin is free to flow downward when printing. This is needed in this type of printing process. After orienting support structure needs to be generated. Again it is calculated by the program. NOTE: If after support generation you get red areas on your print, they are areas that might not get printed well. Then you need to re-orient the object and re-calculate support. You can also try to change the support stucture setting to get rid of this problem. After getting good orientation and support stucture, Layout button will let you move the object around the print table. If you print multible object here you fit them on the table. If there is only one print, just put it somewhere. It might be good idea to change the spot from print to print. This will wear the printer surfaces evenly. Finally press the Print button and the file will be send to printer. You can select to follow the print from computer but it is not needed and for the printer to print, Preform does not need to be running. So if you want, you can close the program after file has been send to printer.
Now that you have send the file to the printer, the printing process has to be started from the printer itself. From printer front panel select your print. The printer does not need to be monitored while it is working. After printing is finished, remove the print table from printer, remove your models, clean the print table and but it back. Now you just need to clean the models from print residue. This will happen by submerging them into isopropanol. We hve two tanks. 10 minutes in first one and 10 in second and you are done. Isopropanol will evaporate easily but I like to wash the parts with water after.


Now you just need to remove the support structure with side cutters or a knife and you are done.

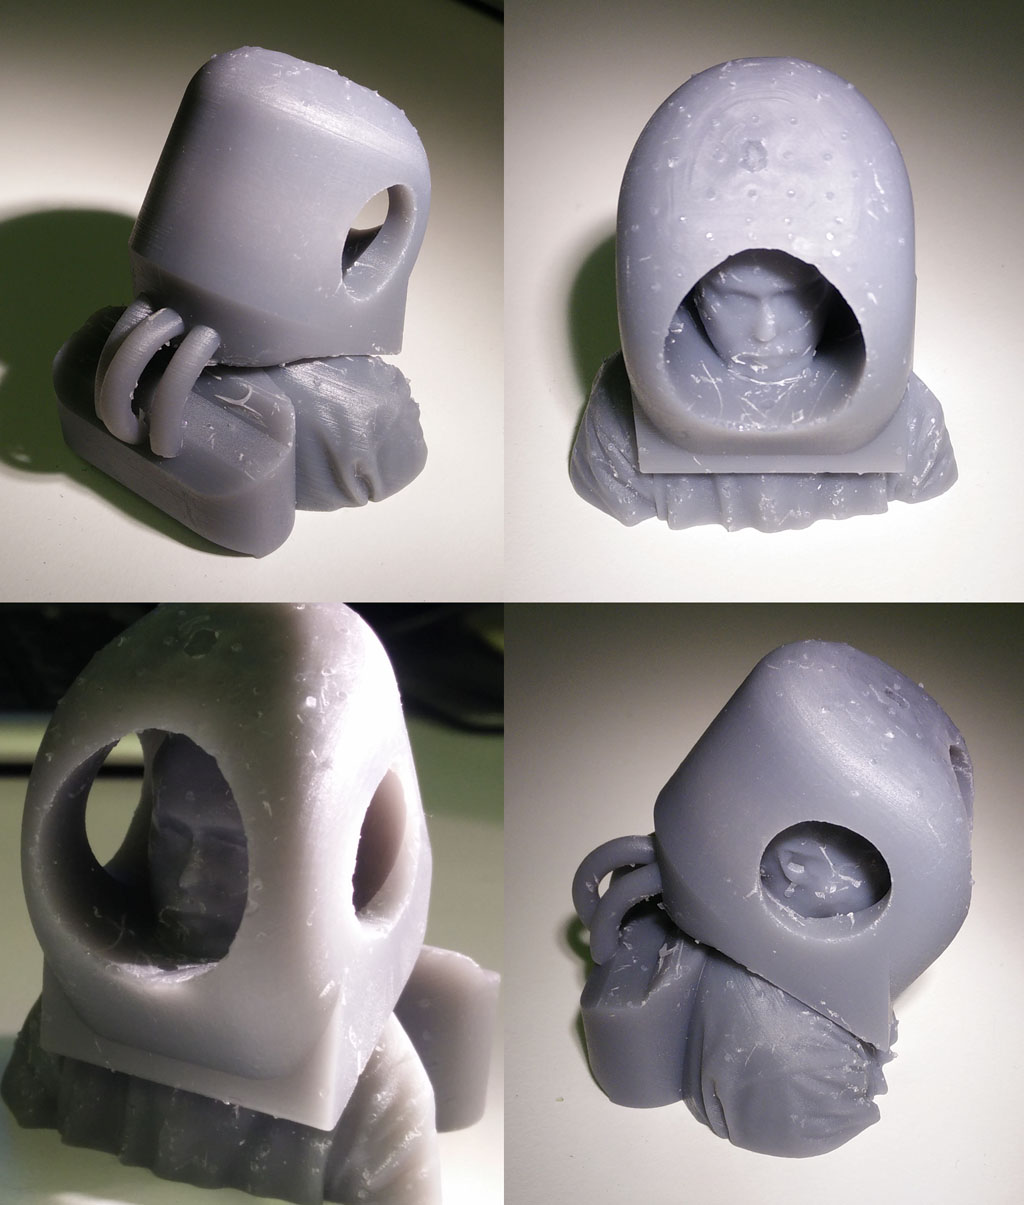
Here is the ready made print. Removing suppport leaves small residual on the final product.
Personal protection when using resin printer
When using the resin printer, it is good to use protective cloves (nitrile or vinyl) and protective eye classes.
Group assingment - test the 3D-printer.
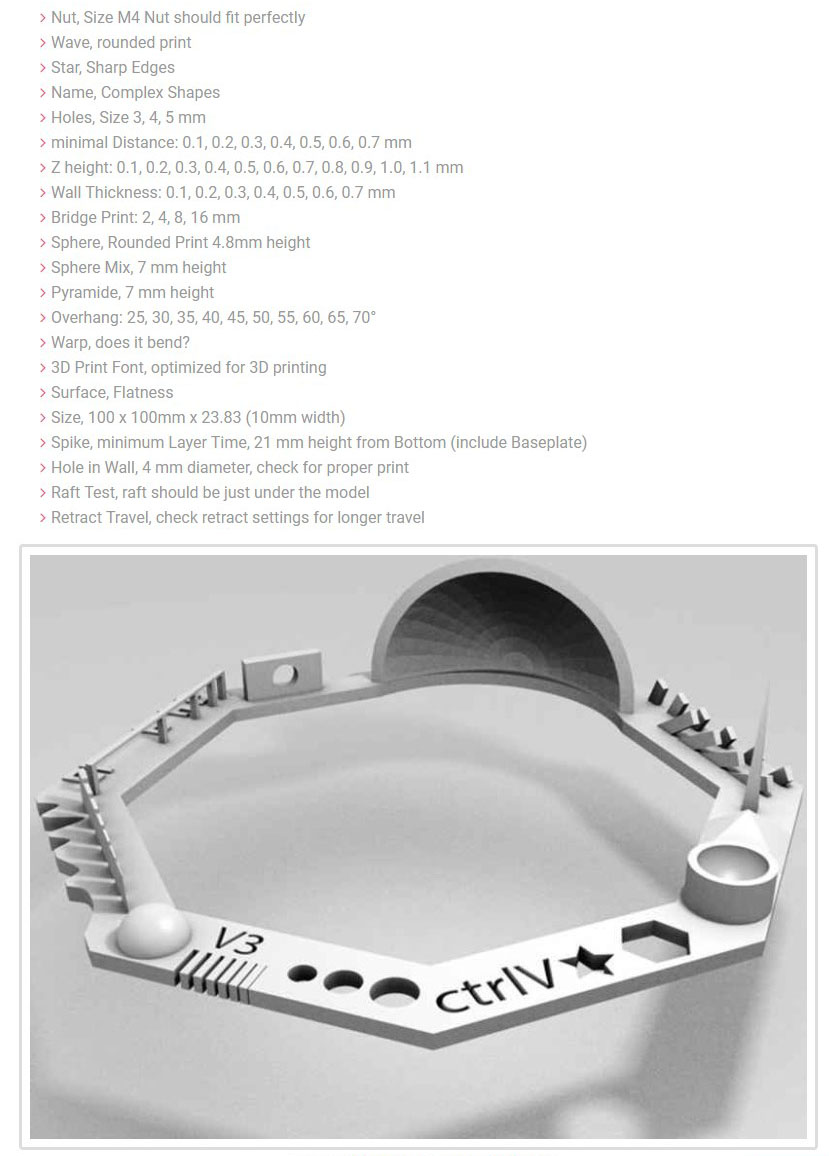
For the group assignment, we tested 3 3D-printers at our FabLab. Fourth one was broken and one of the testes was made by one student of our Fab Academy group. We selected one test print from Thingiverse called Test your 3D printer! V3 and printed it on all the tree working printers.
Things to do to print:
1. Get the file for printing
2. Import the file to the Leapfrog
3. Examine the file
4. Set the printing parameters, or use ready set ones that you know work
5. Slice the file for printing
6. Examine the slices.
7. Turn on the Printer and connect to software
8. Start printing
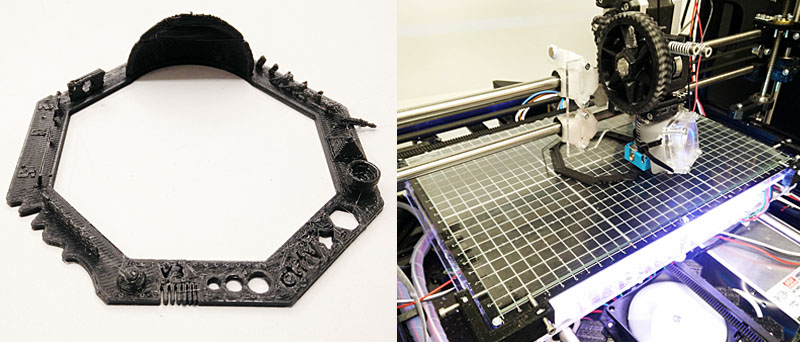
Here are our three working printers.
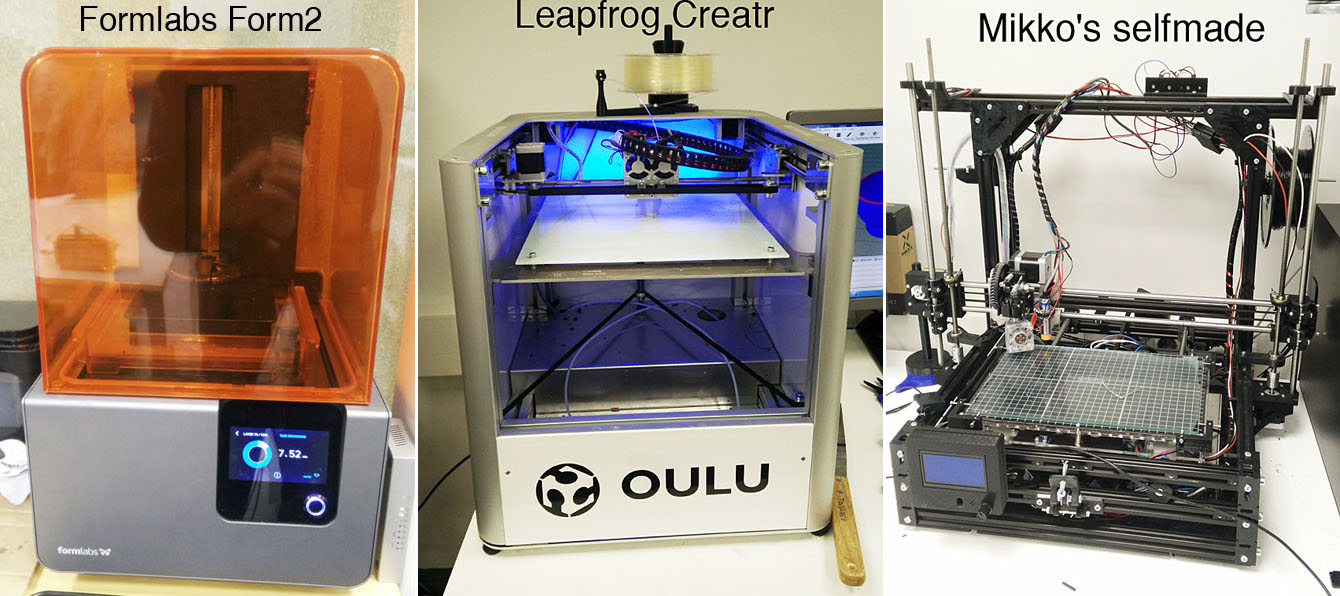
First printer Leapfrog:
First printer we tested is Leapfrog filament printer using PLA-filament. Most of the setting are pre-set and tested and proven but I will go through them here. The program used to control the printer is Repetier-Host V1.6.2.
1. We downloaded the files from Thingiverse .File is Test your 3D printer! V3_04mm.
2. I downloaded the 3D-printer software to my own computer as it was freeware and it is easy to test if 3D-files work in printers software environment. It also tells you how long it takes to print the part and so on. The software can be downloaded from their www-page Repetier.com. Here is the starting screen.
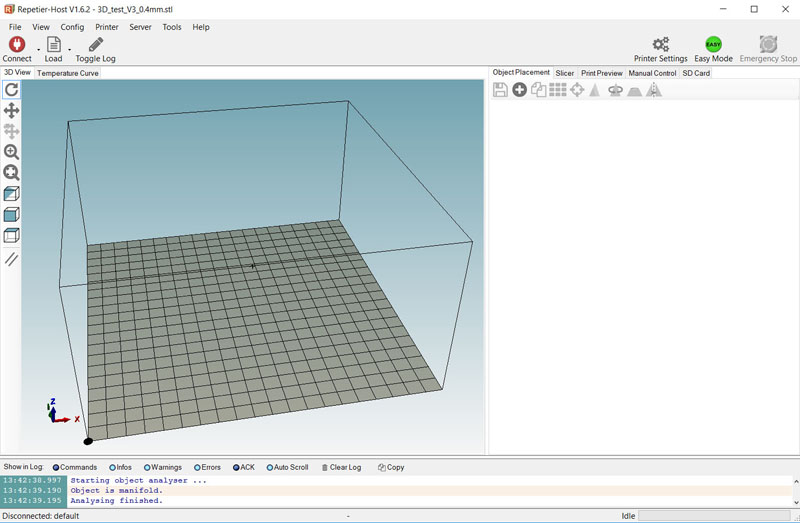
Now that we have the file to print and the software, lets start by selecting File->Download, and select the .stl file for printing. It will be opened and can be seen here at the print table.
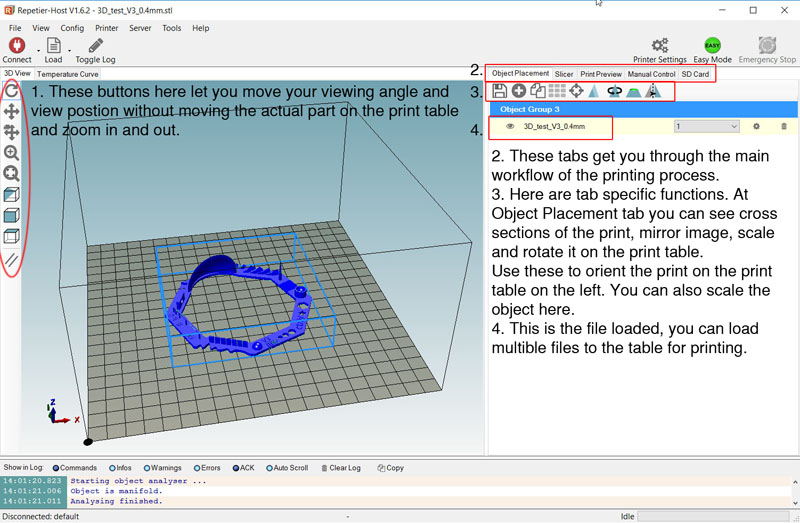
Lets go through the basic functions of the sofware interface.
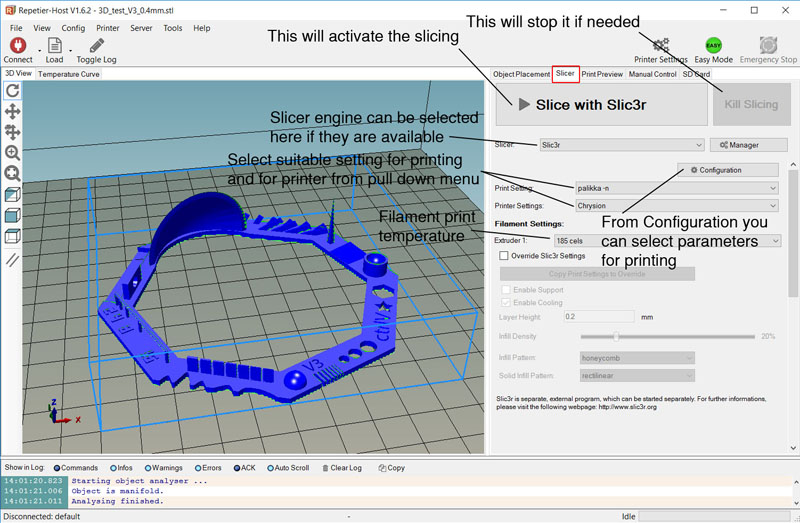
Now that the object is placed select the Slicer tab and we are in Slicer menu, lets see some of the options there. Some setting has to be selected here for the slicing but I will not go through all options here. Usually they are pre-set at the lab so there is no need to change them. I have selected "palikka -n" and "Chrysion" settings here as they were used when we printed the test.
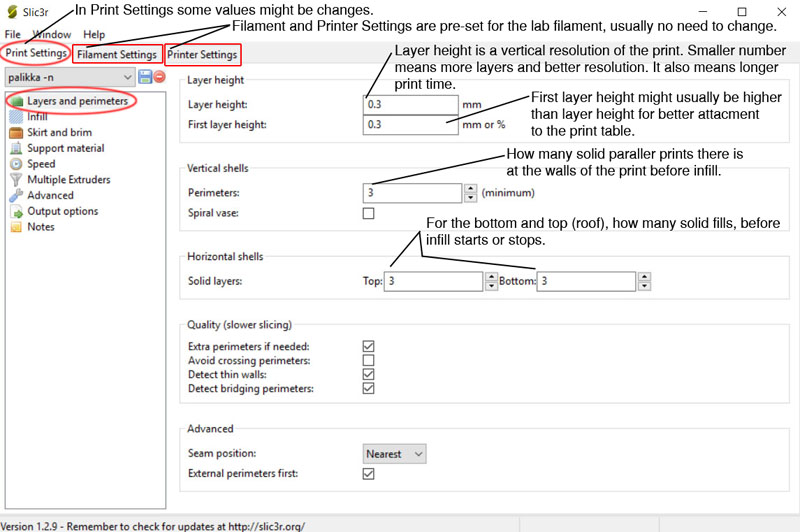
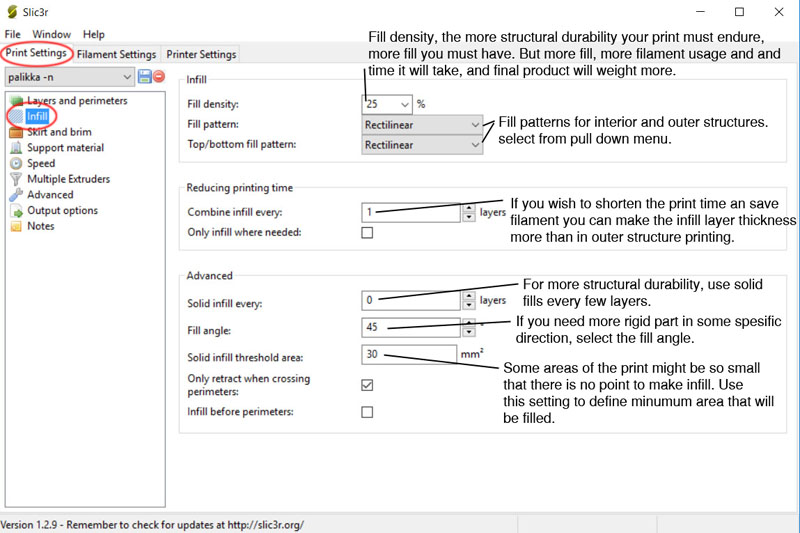
After selecting the values above we could start the slicing process but lets go through some Configuration options just to see what is set there before hand. Here is the starting window for Configuration - Print settings tab.
In the Configuration - Infill setting you can set parameters for infill. Infill is the way printer fills insides of the print. There is no point of making prints totally filled as it takes time and material. So to make printing faster and less filament consuming printer will print interiors of the print with some sort of infill pattern. You can select from multible patterns.
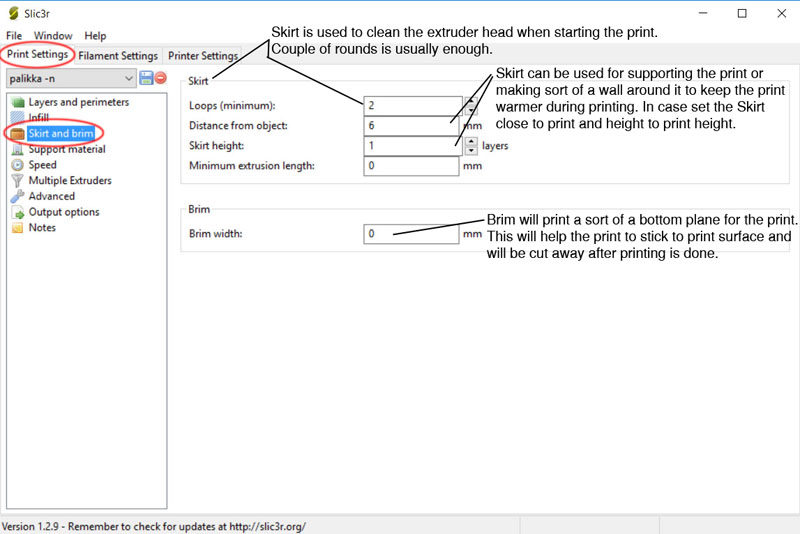
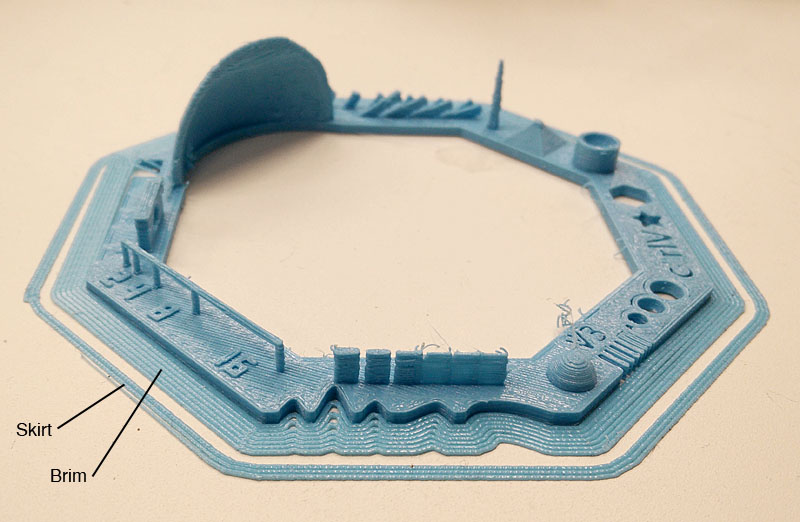
In Configuration - Skirt and brim you will set the printer head cleaning that will be done before printing and if you need support wall or want to keep the part better heated when printing, here are the options to do so.
Rest of the settings are mostly left alone. If you have big overhanging parts i.e. printer needs to print over air, in Support material you can select to print supports using the same PLA that is used to printing the actual part. If the printer would have separate support material then setting for that would be specified there.
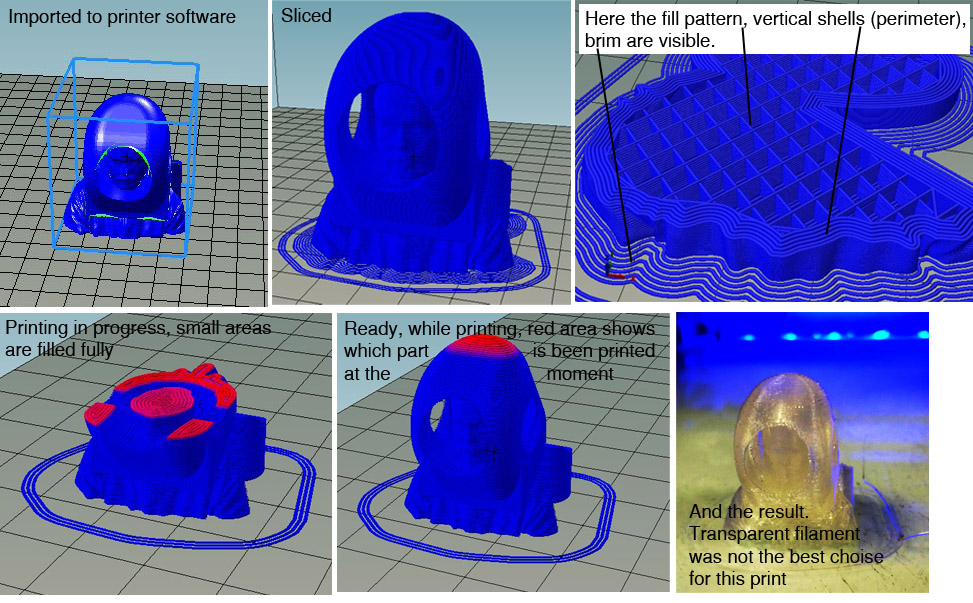
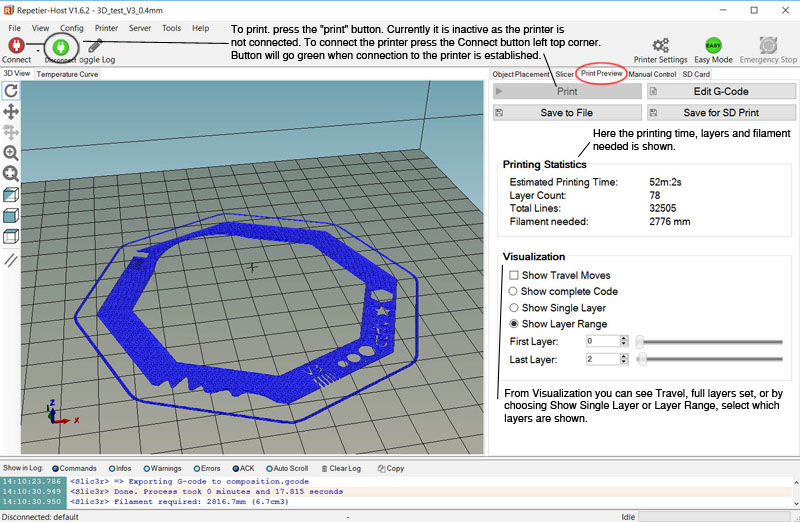
Now we have set up the printer and slicing options, it is time to slice the part into small printable layers. This is done by just pushing the big Slice with Slic3r -button. This is the result. We can look into print time, filament usage and separate layers that will be printed.
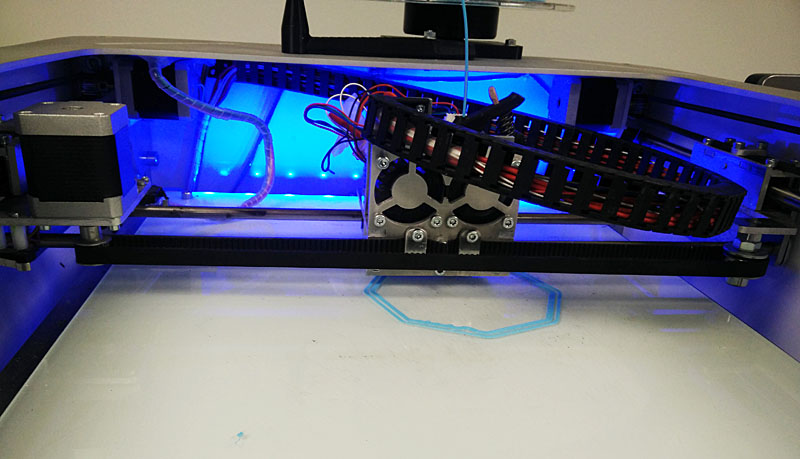
After connecting the printer, just hit the print-button. It will take some time for printer to start as first it heats the print surface to corrent temperature and after this is reached, the extruder head is heated. Only after this the printer will start to print. Here is a picture of first few layers while printing.
After hour of printing here is the result. You can see the Brim and Skirt clearly on the picture.
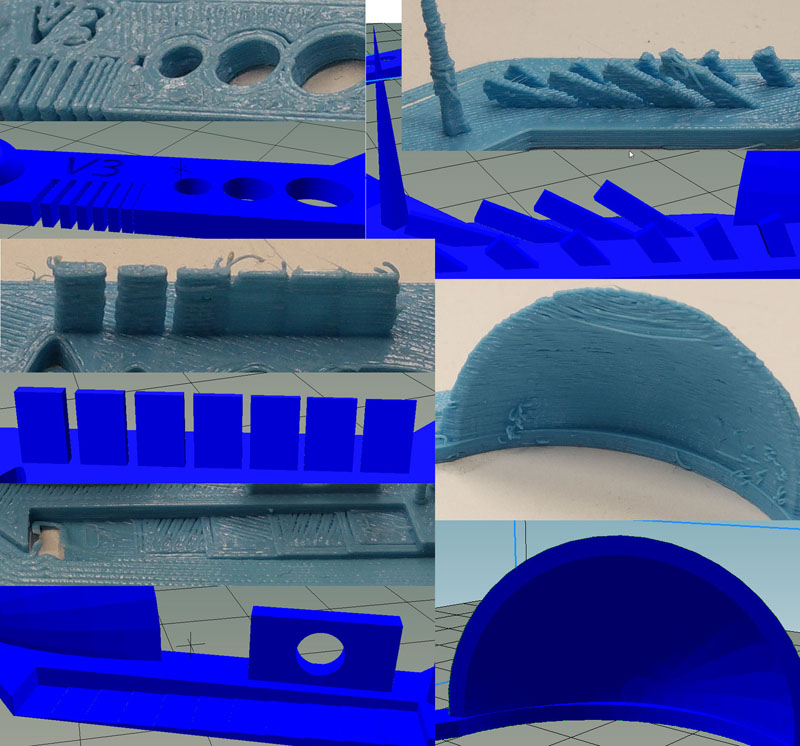
Here is some features from the print details. It cleary shows that many of the small details are not achievable with this printer resolution.
Second printer Mikko's own design:
We also tested the other filament printer made by Mikko. The printer is still in develompent and the results were not that good as with the Leafrog. Here is one test print with Mikko's machine.M Mikko's machine uses the same program as leapfrog, so the process there is the same.
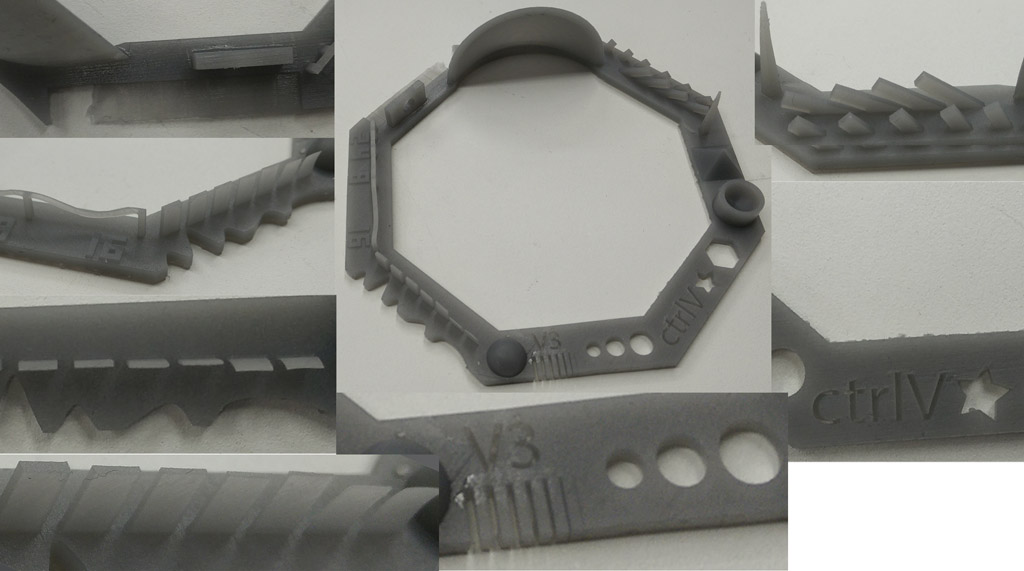
Third print was done with Formlabs Form 2 printer
Formlabs had the best resolution but longest print time. Resulting print has most of the test files features in place.
Comparison of the prints
Nataliya made a beautiful summary of the prints and how they succeeded. Here is a copy of her work with permission. See the original on her page.
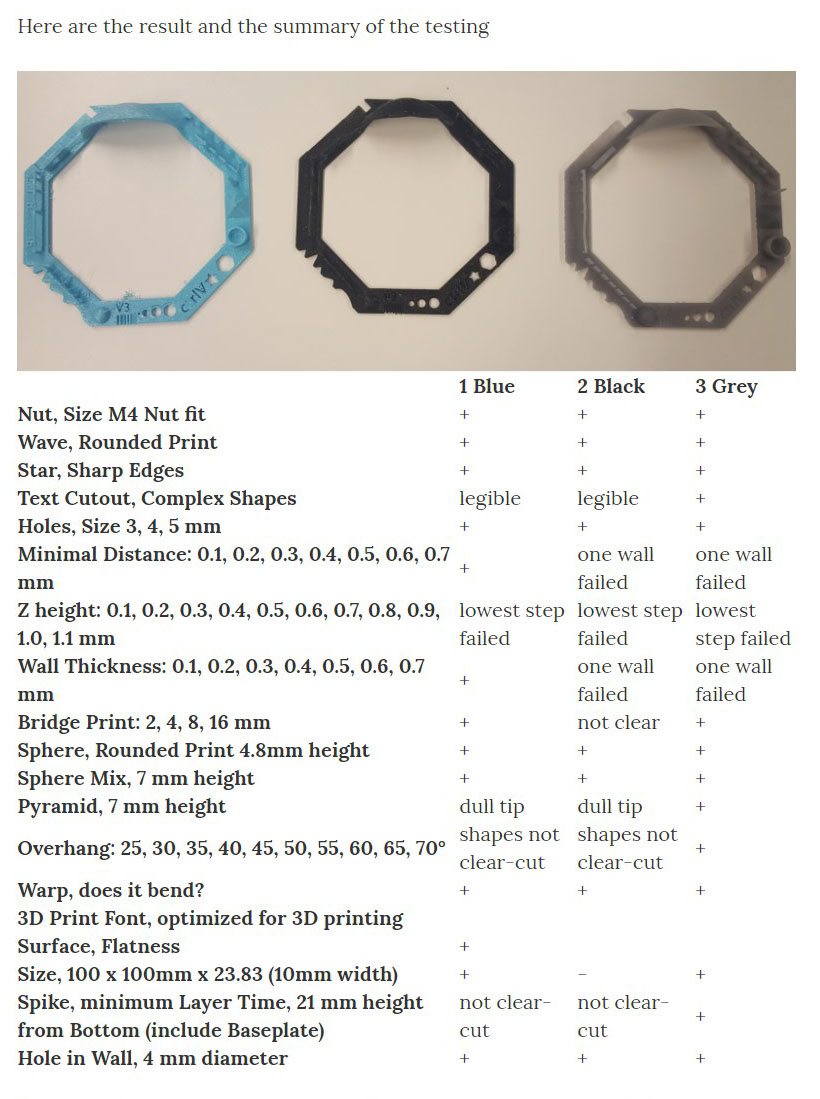
Also Ivan listed the test print subject properties nicely on his page. Again borrowed from there with permission.
Learnings from printer tests
As seen from all above there are quite a big diffences between the printers. Resin printer makes a really nice quality print compared to filament printers. Most of the test print details came out good of perfect. On the filament printers, the general quality is much worse and many small features did not come out at all.
In retrospect I have had a change to print with our labs fourth printer Stratasys that was broken at the time. I am sure it would have made much better results that other two filament printers. Of course it is much more expensive model.
To make nice fine detail prints, I would be using resin printer. For much wider material options filament printer is better option but it needs much more care and fine tunign to work fine.
This weeks dokuments:
Some of the files are quite large. For example the the .stl file is almost 12Mb. Link is to my dropbox and smaller one will be available later on, that will be uploaded to repository.
Original big .stl file for model of myself in with helmet.
Reduced .stl file of myself with the helmet
Original scanned .obj file.
Autodesk Fusion 360 file.