16th Assignment
Interface and Application Programming
This assignment is about writing an application that interfaces with an input and/or output device that I've made.
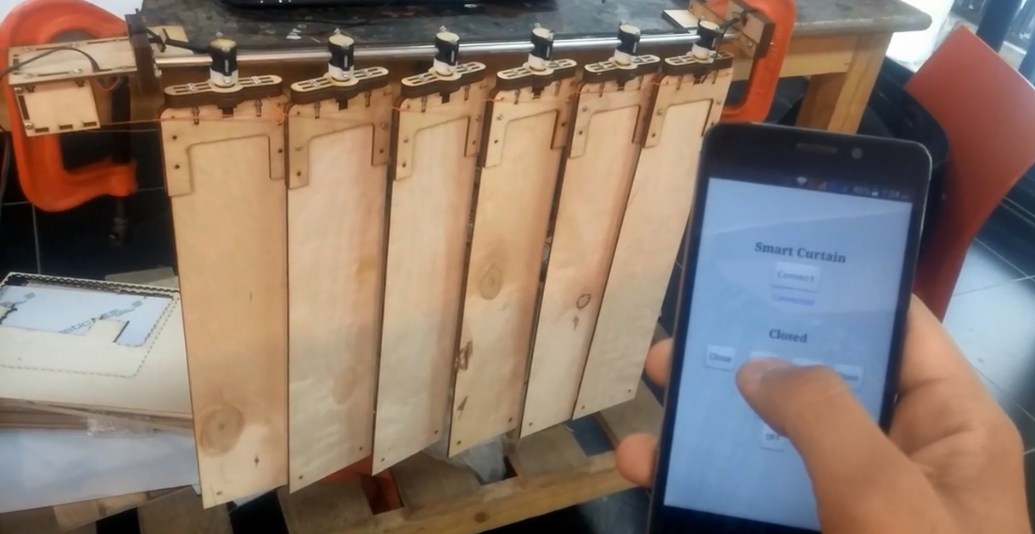
Android and Stepper motor
In this assignment I will be working on a mobile application which sends orders to the Attiny in the Stepper driver board which I've made in
assignment No.13 (Output Devices).
This application will be made by MIT App Inventor.
the orders will be send via bluetooth through the bluetooth module HC-05 .
"
MIT App Inventor
App Inventor for Android is an open-source web application originally provided by Google, and now maintained by the Massachusetts Institute of Technology (MIT).
It allows newcomers to computer programming to create software applications for the Android operating system (OS).
It uses a graphical interface, very similar to Scratch and the StarLogo TNG user interface, which allows users to drag-and-drop visual objects to create an application that can run on Android devices.
In creating App Inventor, Google drew upon significant prior research in educational computing,
as well as work done within Google on online development environments.

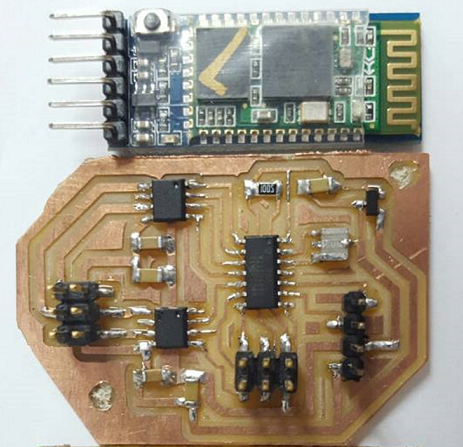
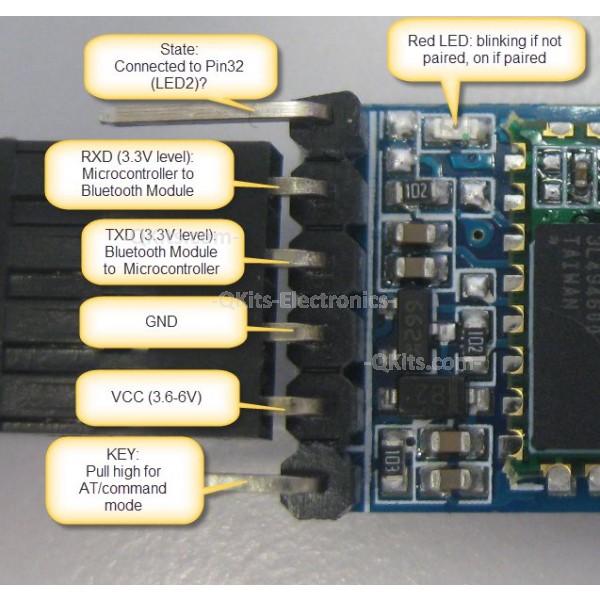
Connecting The Bluetooth Module HC-05
usually we use only VCC for 3.3Volts, GND, TX and RX for communication with microcontroller.
The main idea of MIT app inventor
the main idea of using bluetooth module or interfacing is waiting a certain letter, number or array which is assigned in the code for a certain loop, and in the mobile application or the GUI you are meant to assign this number, letter or array to certain button or a set of buttons to send this order to your microcontroller.
The burnt code on the microcontroller
Briefly, the code is about controlling the angle of the stepper motor which controls the angle of the blinds.
if we divided the angle between fully closing the blinds and fully opening them by four, we will have 4 positions, Each position has its coressponding number of steps moved by the stepper motor.
So, I've assigned four numbers for these positions. and each number has its own steps which should be moved by the stepper motor.
#define close_id    '2'
#define low_avg_id  '3'
#define high_avg_id '4'
#define open_id     '5'
you can check the whole code from HERE
or check The last step in this assignment
Next Step
After writing all these lines of the code I have to send the numbers that makes the loops begin, I can do it by any simple serial communication app(from mobile like
Bluetooth Terminal
) or software (from pc like Termite).
but we need something having GUI and user friendly that's why I decided to make a mobile app by MIT App inventor.
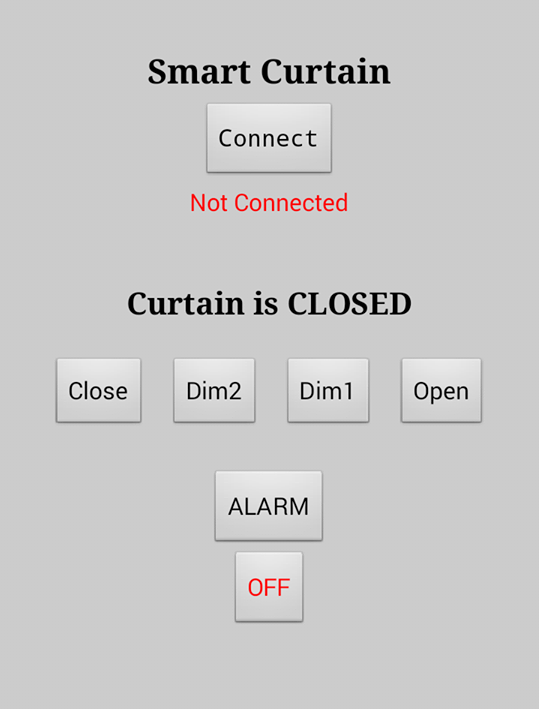
this app has 7 buttons:-
1-(Connect) for connecting to bluetooth, after you click on it the paired devices will show up and then you have to select the bluetooth module HC-05.
then you will find the red "Not Connected" word will be a blue "Connected" word.
2-(Close) for fully closing the Curtain.
3-(Dim2) it dims the light in the room (Darker than Dim1)
4-(Dim1) it dims the light in the room.
5-(Open) to fully open the curtain.
6-(Alarm) for selecting the time you would like the curtain to open at.
7-(OFF) to make the Alarm operate at the selected time.
after pressing it it will turn to be blue "ON"
A tour in MIT app inventor
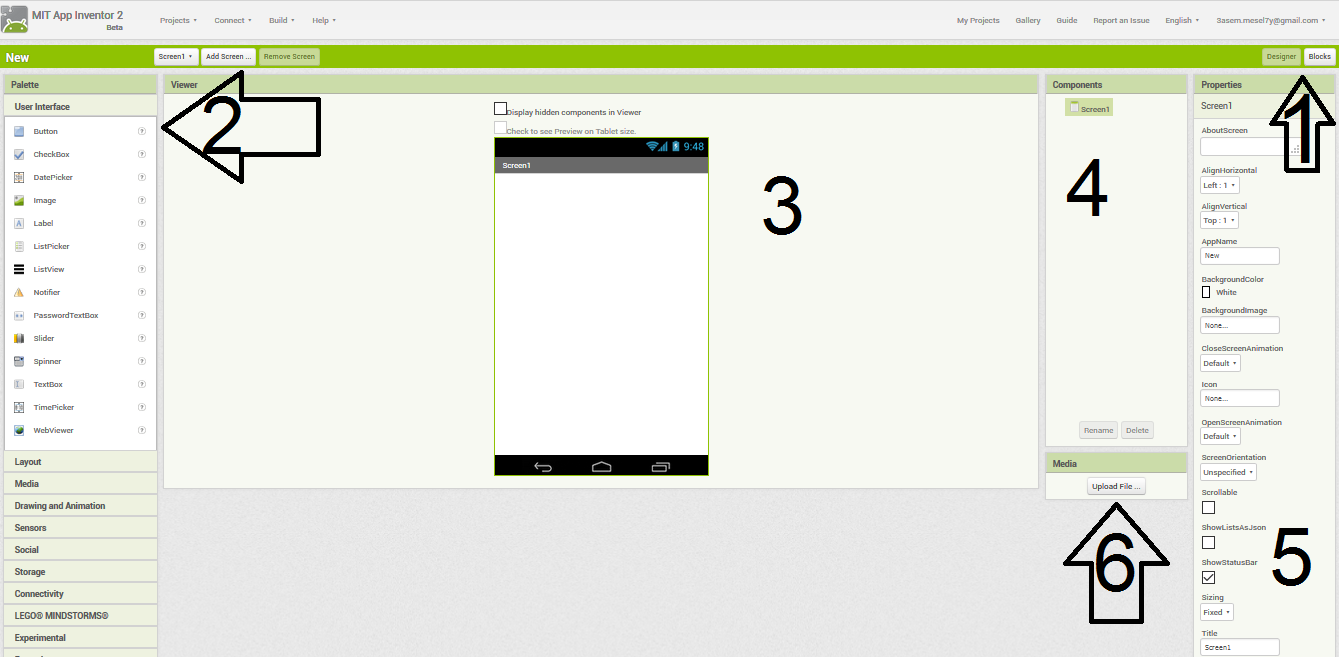
after selecting the name of your project after selecting Create Apps from the top right of the website and after signing up you will find it like this:-
1-you can switch between Designer and blocks view, In designer view you can make the shape and the design of your app, In blocks view you can make the functions of your app.
2-from the palette you can add components to your website either for organizing it or to add buttons or hidden components to be used in the blocks like the clock or the bluetooth.
3-from the viewer you can view the changes you did, you have to connect your device to the website by this way to see the changes on your device and how do they exactly look like.
4-in the components menu you can reach the added components to your app and you can change their properties by clicking on them and changing them from properties menu.
5-properties menu you can change how the components look and change their options.
6-you can upload media to be used in the app as sounds, pictures or videos.
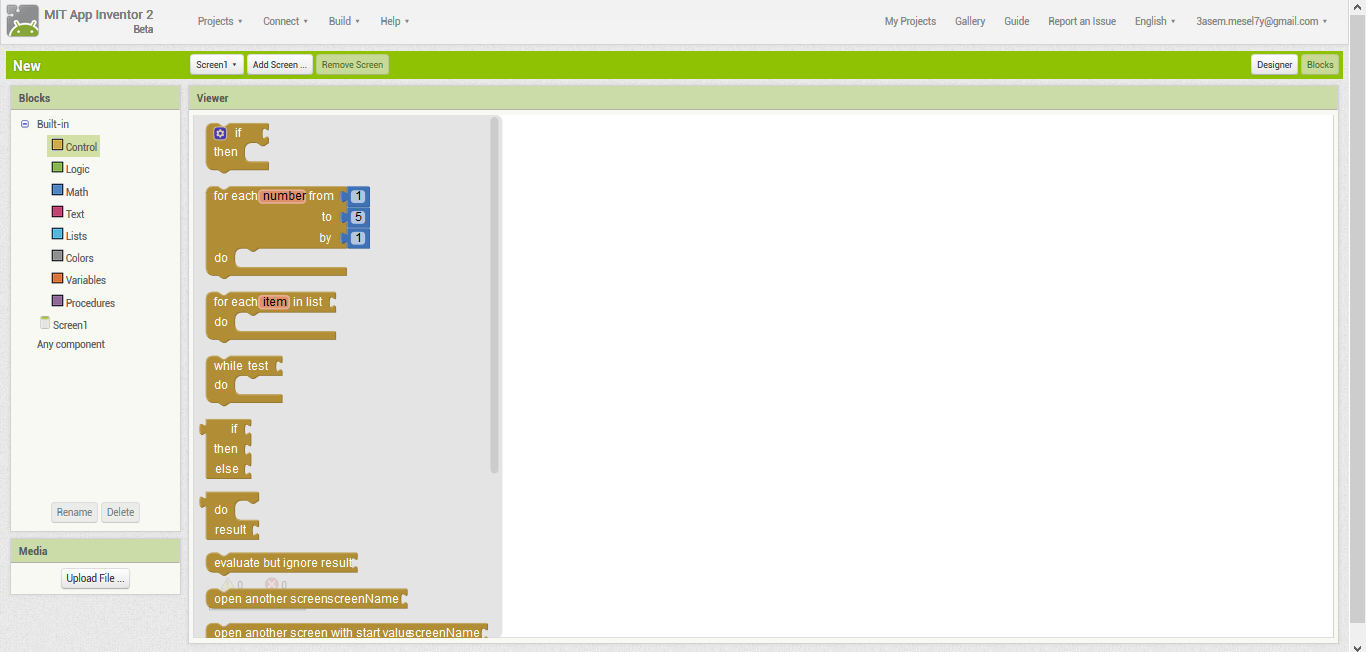
The Blocks view
In the blocks view as I said it can be used in making the code of your app, it's something more like Scratch.
these blocks holds the functions like if and while which are in the control branch, there are also math calculations, logic questions like and, or and so on.
every added components has also its functions like the orders that makes bluetooth on or off and so on.
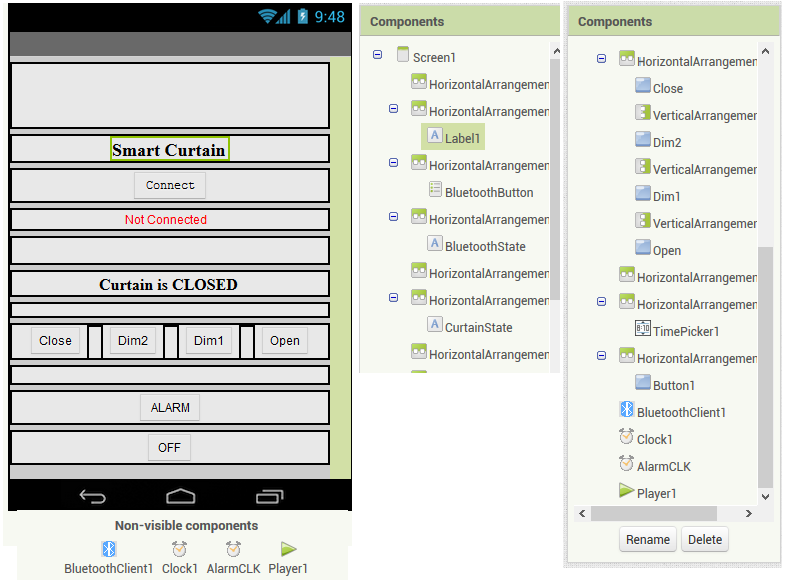
My app
In this photo you can see how my App looks in designer view after adding the components and changing their options from properties menu.
In screen1 (the only screen in my app) I added:-
1-horizontal arrangement to make a free space in the top of my app and selected its dimensions from properties menu.
the arrangements can be brought from layout sub-menu from palette menu.
2-horizontal arrangement which contains
a-a label (The name of the app), labels can be brought from user interface sub menu from palette menu.
3-horizontal arrangement which contains
a-a button (bluetoothbutton), buttons can be brought from user interface sub menu from palette menu.
and so on , I also added clock from sensors and player for playing a ringtone when the alarm works.
The app code
the code is so simple and learning it so easy, you will find some good tutorials on their website and alot of helpful videos on Youtube.
This is how it looked after adding the coding blocks in the block view to make it does the required functions.
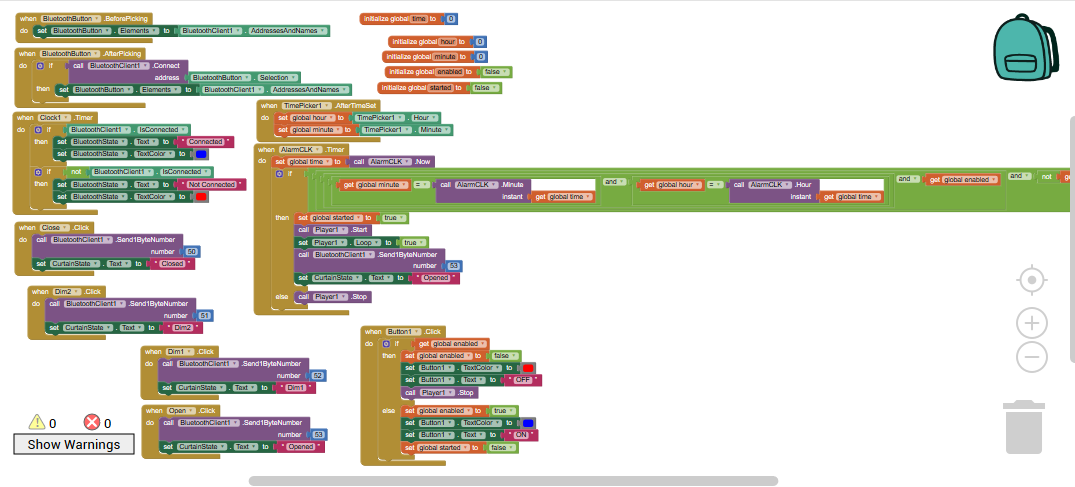
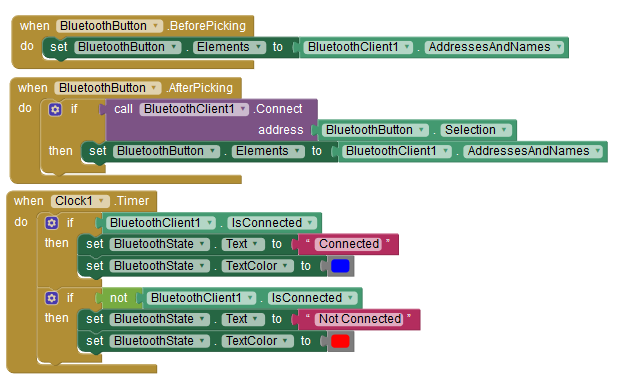
The first three sets of blocks
These combinations of blocks are responsible for bluetooth connectivity.
the first one is about showing the adresses of the paired near devices.
the second one is about selection.
the third one is about the label that showing the bluetooth current state and its color.
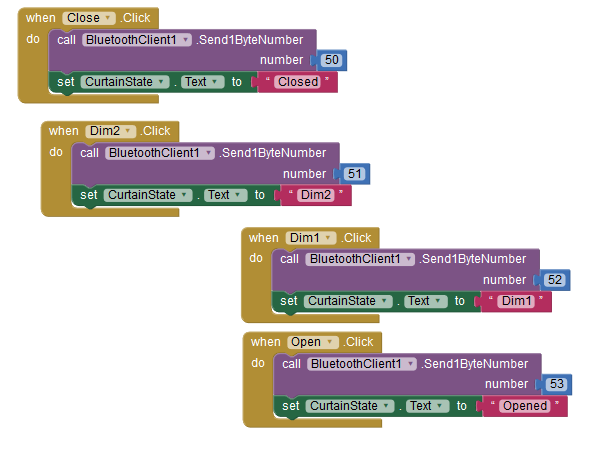
The second four sets of blocks
These combinations of blocks are responsible for sending the orders to the stepper driver.
note that when the app sends 48 it means 0 and 49 = 1 and so on
it also changes the label showing the current curtain state.
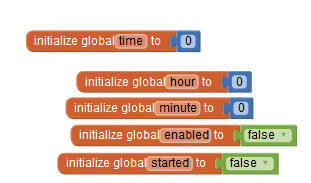
The next blocks
these blocks are there for assigning some initial values.
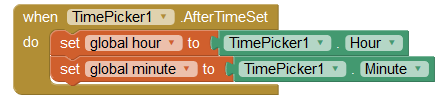
The next set of blocks
these blocks are responsible for the time picker and selecting the time of the alarm.
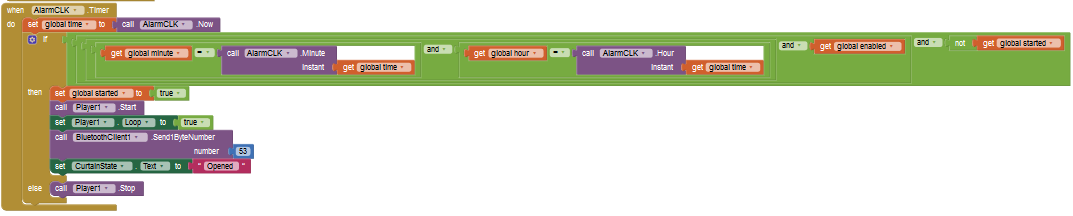
The next set of blocks
This huge set of blocks is checking if the the current time is the same selected time for the alarm or not, if yes, it turns on the sound uploaded to the app and sends the number that turns on the curtain. if not it does nothing.
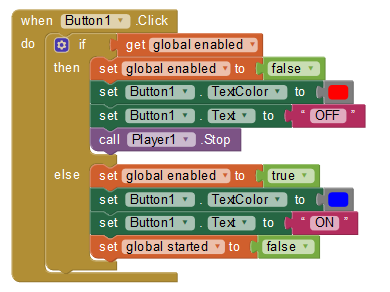
The Final block
the final block is responsible for the button which turns the alarm function ON or OFF.
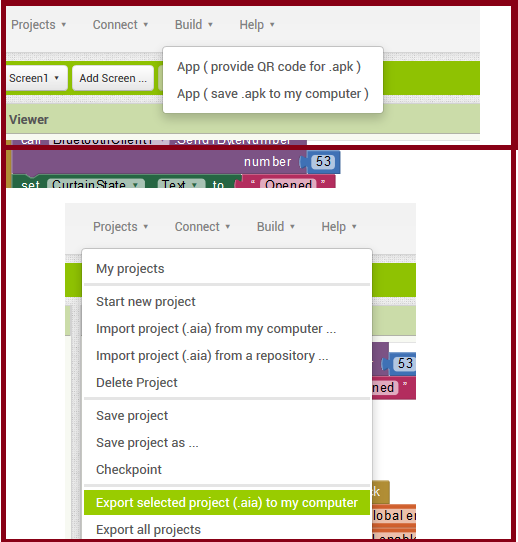
Exporting the app
after checking that your app is working properly you can download it or share it with others by downloading at as .apk
or you can share it to be worked on as .aia file.
here there are the downloadable files.
the .aia file
the .apk file
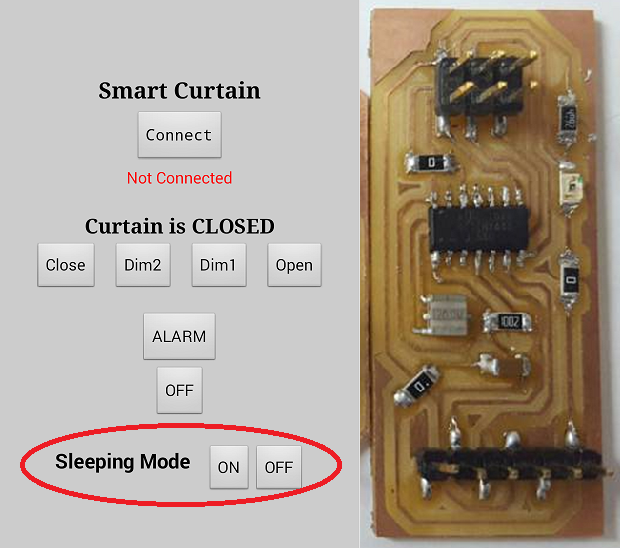
The app in action
The Uploaded Code On the Stepper driver
Update
Adding light sensor
I added a to this project which was made in Assignment 11.
and added two buttons of sleeping mode as the same of the previous buttons in the mobile app.
the new .aia file
the new .apk file
the bluetooth module sends data to the sensor and the sensor sends to the driver board.
The uploaded code on the Light sensor board
Exploring the update
to know more about the wiring go to final project electronics section.