This week is about getting familiar with a range of different sensors and how to make use of them. Sensors are electronic devices used to sense/measure quantities like heat, pressure, movement, speed, etc. You can see that some of these attributes are correlated like distance and speed are related which means that the same sensor could be used to measure both. So these are the things to be explored this week.
Bouncing and debouncing
Bouncing is a phenomenon seen with mechanical switches. You will observe that when a button is pressed and that change is state is not all f a sudden but a gradual ones starting with random states and finishing in a stable one. Mechanical switches when pressed/switch will rebound a few times before resting into a state. The process off eliminating bouncing is called debouncing. Their are two ways of debouncing
- Hardware debouncing: where things like logic circuits are used to nullify bouncing or using simple passive circuits like RC circuit.
- software debouncing: where software algorithms are used to detect and overcome the bounces. These can become complex when there are multiple switches.
A bit about the sensors
Photo transistor
It is essentially a semiconductor transistor with a transparent cover. It gives better sensitivity than photodiode. It provides better gain and is cheap making it quiet popular. The transistor operates in the active region and usually base in left disconnected. The exposure to light at the base area due to the transparent sheild causes base current and thus the biasing.
Thermistor
The name itself gives good idea about the device. It is a thermally sensitive resistor, it changes the resistance according to the surrounding temperature. There are of two kinds
- NTC: Negative temperature coefficient, the resistance will reduce with increase in temperature.
- PTC: Positive temperature coefficient, the resistance increases with increase in temperature.
This could be used as a branch of an electronic bridge so as to measure the changes.
Neils Examples
Neil has listed out quiet a few number of sensors as part of this weeks study material. He went through it one by one in his lecture. I have worked with some of the sensor like the sound, heat etc. I always liked to play with visible light so decided to work on a light sensor.
Light Sensor
For this I considered Neils light sensing boards. Keeping the original board as reference I drew a new circuit in Eagle and milled using modella and soldered in the lab itself. 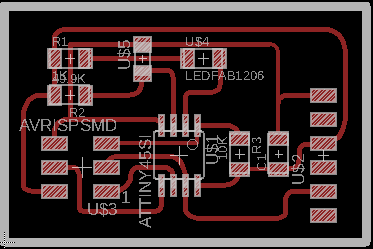 After all that I when I tried to program it it showed multiple errors.
Trouble shooting
- First of all I checked whether the cables where connected correctly.
- Then I cross checked the design I made and found out that I missed to connect reset pins of the ISP programmer and ATtiny45. So I had to connect a jumper to solve it !. When tried to program after this everything worked fine.
I had a green LED as light source which turned out to be not bright enough. Planning to swap it for red/orange LED.
Programming
Their is Neil’s code available for testing out. I downloaded the C-code and then there is a visual interface for showing the detection of light. The interface is done in python which uses PySerail for serial communication to the board via FTDI. You can get the code here.
It was a bit confusing at the first time as I had some issues as my default Python version is 3 and the code is written for 2. Then there was the issue of arguments, where we are supposed to give the path to the USB we are using as argument to the code while executing which I figured out after reading through the code. So after all this it finally worked.
1 | // |
The files of light sensor - light_sensor

Temperature Sensor
Moving further on, in week 13 I decided to combine an input and output device to make something. I planned to make a wrist watch/bracelet which can detect and sound an alarm during hypothermia. Please take a look into my Output Devices documentation for details.