WEEK 16 - Interface & Applications Programming
TASK:
Write an application that interfaces with an input &/or output device that you made,
comparing as many tool options as possible.
Objectives:
- Use an input device, program it to send signal
- Program an application to receive signal and execute graphical representation
Use an input device, program it to send signal
Programming files:
hello.reflect.45.c
makefile
hello.reflect.45.c.hex
hello.reflect.45.out
hello.reflect.45.make
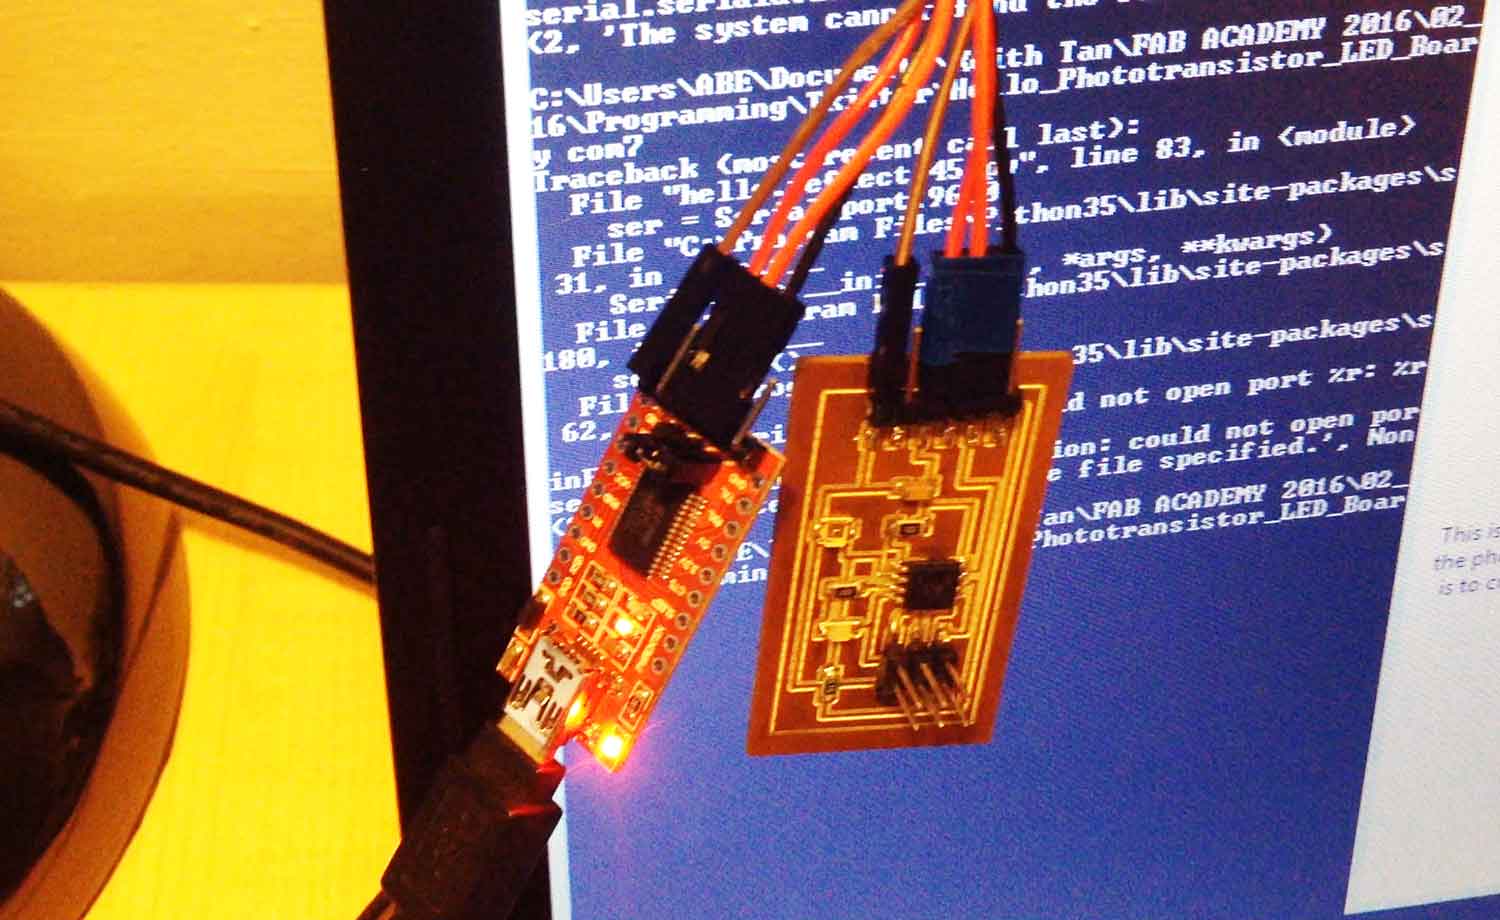
For this particular week, one of the main challenges was to ensure that the
input device, which is essentially a phototransistor board completed during
week 11,
was capable of sending constant signal out to be received by the
serial port on the computer. Some of the initial experiments were done on
the servo board, completed during week 13, but none of the tests done were
successful as it requires deeper coding to work.
To ensure that the Photosensor board sends out constant signal to be received
via serial port on the computer, the following was carried out:
- Download light sensor makefile & c-code from Fabacademy week 11: Input Devices
- Activate command prompt (windows) and makefile
- Next, amend pin numbers (line 34 & 38) for phototransistor and LED in c-code
- Flash ATtiny 45 using c-code
Reference to command prompt codes:
cp hello.reflect.45.make makefile [press enter]
make [press enter]

[System generated message]
avr-gcc -mmcu=attiny45 -Wall -Os -DF_CPU=8000000 -I./ -o hello.reflect.45.out hello.
reflect.45.c
avr-objcopy -O ihex hello.reflect.45.out hello.reflect.45.c.hex;\
        avr-size --mcu=attiny45 --format=avr hello.reflect.45.out
AVR Memory Usage
----------------
Device: attiny45

Program:     530 bytes (12.9% Full)
(.text + .data + .bootloader)

Data:          0 bytes (0.0% Full)
(.data + .bss + .noinit)


avrdude -P com6 -c stk500v1 -b 19200 -p t45 -U flash:w:hello.bus.45.c.hex [press enter]

[System generated message]
avrdude: please define PAGEL and BS2 signals in the configuration file for part
ATtiny45
avrdude: AVR device initialized and ready to accept instructions

Reading | ################################################## | 100% 0.07s

avrdude: Device signature = 0x1e9206
avrdude: NOTE: FLASH memory has been specified, an erase cycle will be performed

         To disable this feature, specify the -D option.
avrdude: erasing chip
avrdude: please define PAGEL and BS2 signals in the configuration file for part
ATtiny45
avrdude: reading input file "hello.reflect.45.c.hex"
avrdude: input file hello.reflect.45.c.hex auto detected as Intel Hex
avrdude: writing flash (530 bytes):

Writing | ################################################## | 100% 0.93s

avrdude: 530 bytes of flash written
avrdude: verifying flash memory against hello.reflect.45.c.hex:
avrdude: load data flash data from input file hello.reflect.45.c.hex:
avrdude: input file hello.reflect.45.c.hex auto detected as Intel Hex
avrdude: input file hello.reflect.45.c.hex contains 530 bytes
avrdude: reading on-chip flash data:

Reading | ################################################## | 100% 0.67s

avrdude: verifying ...
avrdude: 530 bytes of flash verified

avrdude: safemode: Fuses OK

avrdude done.  Thank you.
Program an application to receive signal and execute graphical representation
Python 3.5.1: Download
Python file for Tkinter: hello.reflect.45.py
Reference tutorials: www.lynda.com
Reference forums: Add "Quit" button Add image/ logo & descriptions
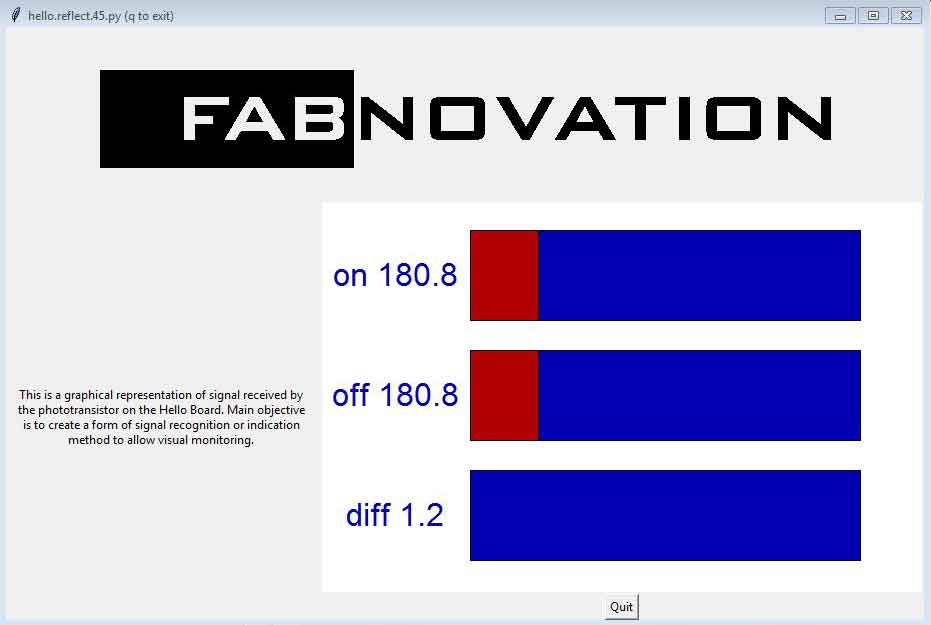
To execute graphical representation of signal transmitted from Phototransistor board, Tkinter was chosen ( as a start) due to it's simplicity and availablity of tutorials and working presets from Fab Academy. This really helped in speeding up the learning process.
Tkinter is considered as Python's, and included in the latest Python 3.5.1 software, de-facto standard GUI (Graphical User Interface) package. The interface overlays on top of Tcl/Tk, which is essentially dynamic programming language.
As a start, Python 3.5.1 was downloaded and installed for a very practical reason eventhough Python 2.7 was already previously installed. The new version includes Tkinter and pip and this should garantee a trouble-free and more assured installation. To install, ensure the following:
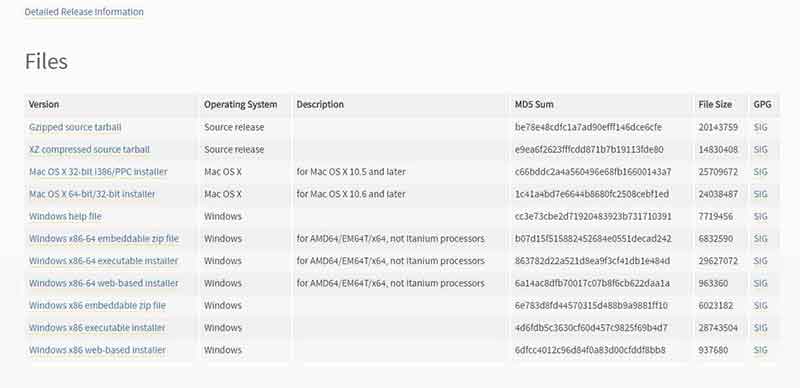
1) Go to: https://www.python.org/downloads/release/python-351/. Download the installer specific to your computer specifications. Go straight for the executable installer.
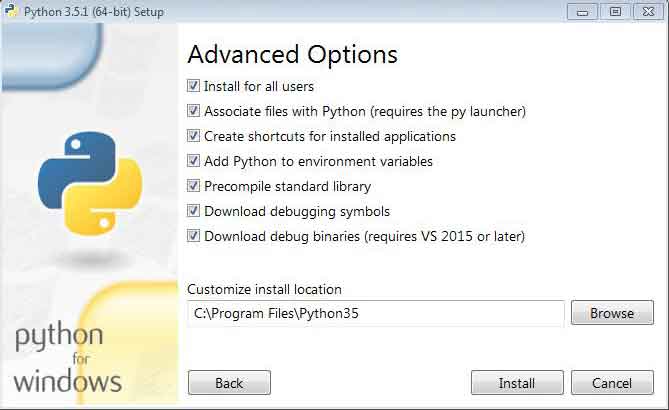
2) During the installation process, ensure that all boxes are checked. Failure to do so will result in missing functions. Several installation attempts too place during the process due to the unchecked boxes. For instance when executing from serial import * or tkinter import * the following error was discovered: "ImportError: No module named tkinter".

3) Finally, specify the directory path and check all boxes.
Next, the hello.reflect.45.py python file was downloaded from Fab Academy as point of reference. By default, the code works on an earlier version of Python and this means that there are several items that needed to be looked at. Through the online tutorials (based on the new version) and forums, below is the amended version of hello.reflect.45 Tkinter code which also included tools for:
All amendments are displayed in red.
from tkinter import *
from tkinter import ttk
from serial import *

def close_window():
    root.destroy()  # destroying the main window

WINDOW = 600 # window size
eps = 0.9 # filter time constant
filter = 0.0 # filtered value
nloop = 100.0 # number of loops accumulated
amp = 25.0 # difference amplitude

def idle(parent,canvas):
   global filter, eps
   #
   # idle routine
   #
   byte2 = 0
   byte3 = 0
   byte4 = 0
   ser.flush()
   while 1:
      #
      # find framing
      #
      byte1 = byte2
      byte2 = byte3
      byte3 = byte4
      byte4 = ord(ser.read())
      if ((byte1 == 1) & (byte2 == 2) & (byte3 == 3) & (byte4 == 4)):
         break
   on_low = ord(ser.read())
   on_high = ord(ser.read())
   on_value = (256*on_high + on_low)/nloop
   x = int(.25*WINDOW + (.9-.25)*WINDOW*on_value/1024.0)
   canvas.itemconfigure("text_on",text="on %.1f"%on_value)
   canvas.coords('rect1_on',.25*WINDOW,.05*WINDOW,x,.2*WINDOW)
   canvas.coords('rect2_on',x,.05*WINDOW,.9*WINDOW,.2*WINDOW)
   off_low = ord(ser.read())
   off_high = ord(ser.read())
   off_value = (256*off_high + off_low)/nloop
   x = int(.25*WINDOW + (.9-.25)*WINDOW*off_value/1024.0)
   canvas.itemconfigure("text_off",text="off %.1f"%off_value)
   canvas.coords('rect1_off',.25*WINDOW,.25*WINDOW,x,.4*WINDOW)
   canvas.coords('rect2_off',x,.25*WINDOW,.9*WINDOW,.4*WINDOW)
   filter = (1-eps)*filter + eps*amp*(on_value-off_value)
   x = int(.25*WINDOW + (.9-.25)*WINDOW*filter/1024.0)
   canvas.itemconfigure("text_diff",text="diff %.1f"%filter)
   canvas.coords('rect1_diff',.25*WINDOW,.45*WINDOW,x,.6*WINDOW)
   canvas.coords('rect2_diff',x,.45*WINDOW,.9*WINDOW,.6*WINDOW)
   canvas.update()
   parent.after_idle(idle,parent,canvas)
#
#  check command line arguments
#
if (len(sys.argv) != 2):
   print ("hello.light.45.py")
   sys.exit()
port = sys.argv[1]
#
# open serial port
#
ser = Serial(port,9600)
ser.setDTR()
#
# set up GUI
#
root = Tk()

logo = PhotoImage(file="C:/Users/ABE/Documents/Keith Tan/FAB ACADEMY 2016/02_DOCS/Course Materials/Week 16/Videos & Pics/Cover.gif")
w1 = Label(root, image=logo).pack(side="top")
explanation = """
This is a graphical representation of signal received by
the phototransistor on the Hello Board. Main objective
is to create a form of signal recognition or indication
method to allow visual monitoring. """
w2 = Label(root,
           justify=CENTER,
           padx = 10,
           text=explanation).pack(side="left")

root.title('hello.reflect.45.py (q to exit)')
root.bind('q','exit')

canvas = Canvas(root, width=WINDOW, height=.65*WINDOW, background='white')
#
canvas.create_text(.125*WINDOW,.125*WINDOW,text=".33",font=("Helvetica", 24),tags="text_on",fill="#0000b0")
canvas.create_rectangle(.25*WINDOW,.05*WINDOW,.3*WINDOW,.2*WINDOW, tags='rect1_on', fill='#b00000')
canvas.create_rectangle(.3*WINDOW,.05*WINDOW,.9*WINDOW,.2*WINDOW, tags='rect2_on', fill='#0000b0')
#
canvas.create_text(.125*WINDOW,.325*WINDOW,text=".33",font=("Helvetica", 24),tags="text_off",fill="#0000b0")
canvas.create_rectangle(.25*WINDOW,.25*WINDOW,.3*WINDOW,.4*WINDOW, tags='rect1_off', fill='#b00000')
canvas.create_rectangle(.3*WINDOW,.25*WINDOW,.9*WINDOW,.4*WINDOW, tags='rect2_off', fill='#0000b0')
#
canvas.create_text(.125*WINDOW,.525*WINDOW,text=".33",font=("Helvetica", 24),tags="text_diff",fill="#0000b0")
canvas.create_rectangle(.25*WINDOW,.45*WINDOW,.3*WINDOW,.6*WINDOW, tags='rect1_diff', fill='#b00000')
canvas.create_rectangle(.3*WINDOW,.45*WINDOW,.9*WINDOW,.6*WINDOW, tags='rect2_diff', fill='#0000b0')
canvas.pack()
#

frame = Frame(root)
frame.pack()
button = Button(frame)
button['text'] ="Quit"
button['command'] = close_window
button.pack()

#

# start idle loop
#
root.after(100,idle,root,canvas)
root.mainloop()
It took a while to realize that in order to run the prepared GUI, the python code needs to be executed in command prompt instead of Python IDLE. Once command prompt is called up, connect the Phototransistor board to USB to FDTI board and run the following command:
python Hello.reflect.45.py com7

python [py file name] (serial port number]
Here's the final GUI application design.
Reflections
This week has been challenging due to the missing links and incomplete tutorials, partially due to the new versions of softwares. Surprisingly the online forums had been very helpful although a lot of time was spend combing through the appropriate tips. A big part of the delay was contributed by incomplete installation of Python as it resulted in having to narrow down issue by troubleshooting. All-in-all, it's been an interesting week, being able to visualize the signal from the boards is quite a treat.

Related Projects