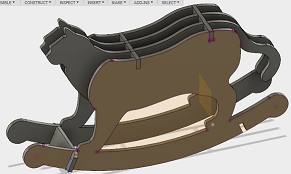
I thought of making rocking horse at first, but soon changed my mind: instead of rocking horse, let's make a rocking cat! (My son loves cats in the real world, and also in the stories.)
It looked nice in fusion 360:
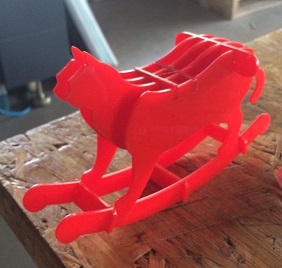
but in real, it didn't look as nice as I expected. The head was so small that it looked like a cheetah, not a cat. I didn't want to have a huge toy like this when it is not very attracting. So I changed the design.
(used 3mm acryl+laser cutter. kerf=0.45. Instead of parametrizing the design, I simply rescaled it. In the calculation, speed=10, power=80~85%)
2. Desk
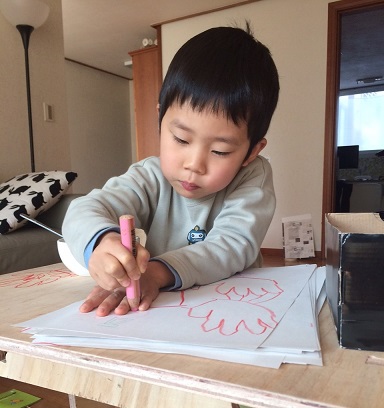
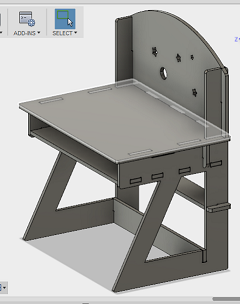
I promised to make something for my son, so even after giving up the rocking cat, I still wanted to design for him. Since he draws a lot of pictures these days, I designed this desk: The prototype was like this: Hmm.. looks a bit huge. It's for my little son, so I decided to make another little one. (BTW, I used wood : 3.9 thickness-0.5 kerf in laser cutter with speed=10, power 80~85%)
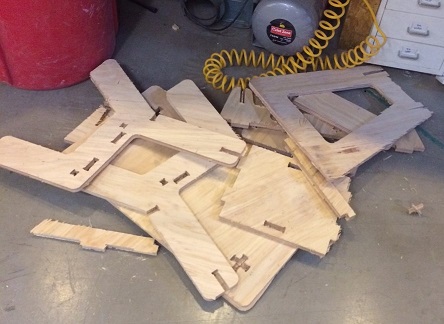
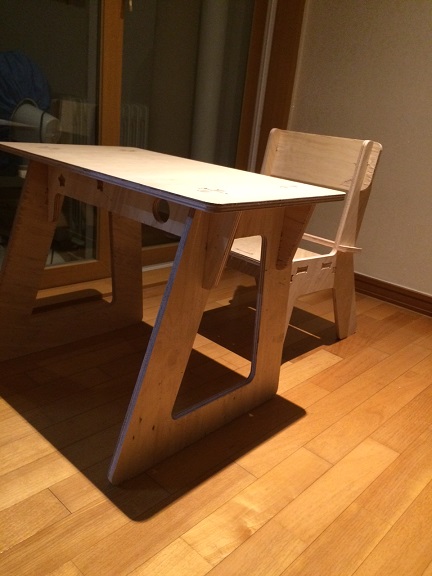
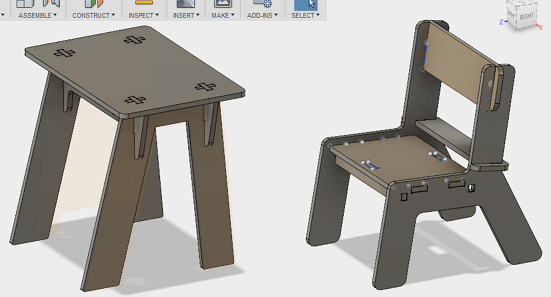
3. Small desk and chair
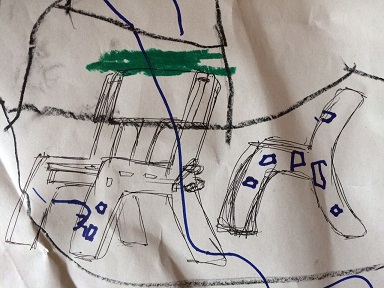
This time, I designed a desk with a chair and even with plus joints, it worked fine!
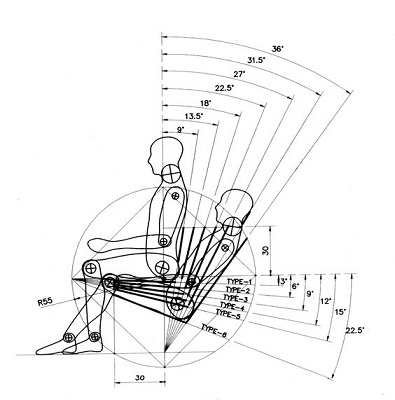
(By the way, I used this image from Kurina to determine the angle of the chair:)
Now, let's cut the parts with this file!
How to make the computer control this computer controlled machine?
Getting ready
1. Open VcarvePro shopbot.
2. Create new file, and then set up the dimension, unit, etc.
3. Import the design plan (.dxf)
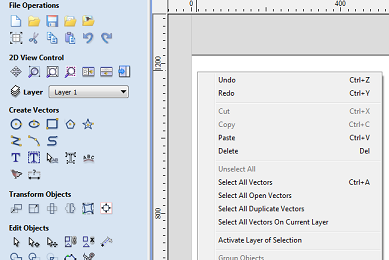
4. Click the right button, and check 'Select all open vectors': if there is any, close them. (Right click will show 'Join/close vectors with a straight line')
5. Also check 'Select all duplicate vectors': if there is any, just erase duplicated parts.
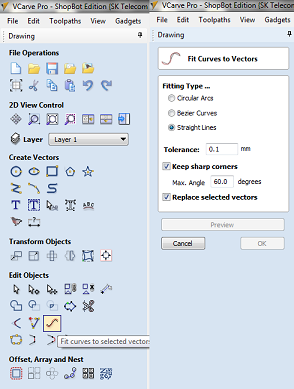
6. Sometimes the curves might have very bad properties. Try 'Fit curves to selected vectors' with the following settings. It will simplify the curve with simpler ones or even with lines.
7. I used automatic layout function. Before using it:
If any component has holes, then group the holes with the boundary ('Group selected objects') so that the layout function doesn't consider the holes as separate ones.
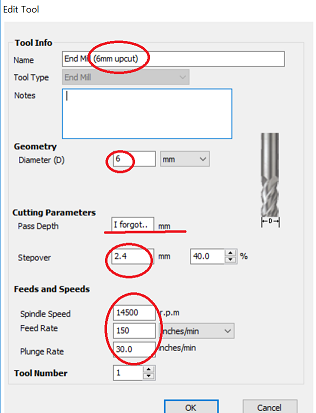
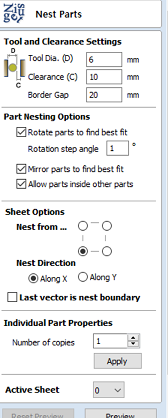
8. Click 'Nest Selected objects' in 'Offset and layout', and then fill out the following. (This time, we used only 6mm with one upcut flute) ('number of copies': I can select some parts, and include more than one copy.)
Note that this function did its job really well. At least much better than me. 9. 'Ungroup objects back onto their original layer'
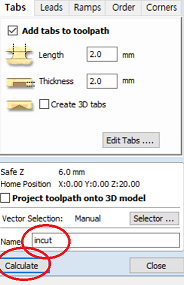
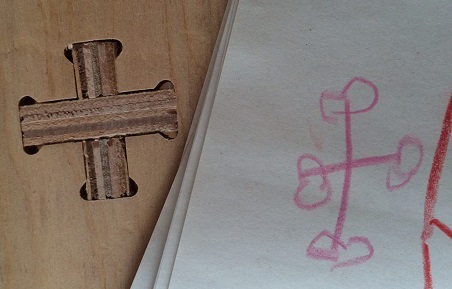
10. Add T bone or dogbone.('Create fillet')
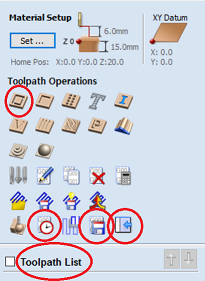
11. <DRAWING TAB up to here> Now switch to toolpaths tab!! 12. I used only profile toolpath. (no pocket toolpath)
(These are what I used.)
13. Choose the lines for which I will apply the same settings.(incut, outcut, conventional, climb, same endmill, same spindle speed, same feed rate, ...), and then click 'Profile toolpath'.
Note: I applied according to the test cut by other students. (for proper RPM, feed rate, climb vs conventional, etc.)
Also note that the cut depth~thickness+0.3/0.4.
For holes:, and for boundaries:. I added ramp for both.
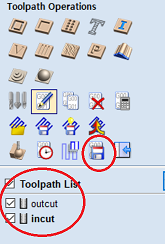
Note: for both holes and boundaries, edit tool and edit passes. 14. It is important to name the profile and then calculate. It will add this path to toolpath list. You can also change the cutting order with the arrow. (inside-->outside)
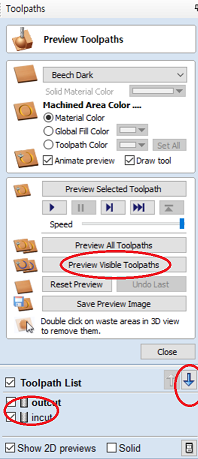
15. Close 'preview toolpath', and then save the toolpath file. (select only the profiles you want to cut.) 16. <TOOLPATH TAB up to here> Now ready to cut! close VcarvePro, and open Shopbot software.
Working with the real machine
(Update: Joinery test from Kurina)
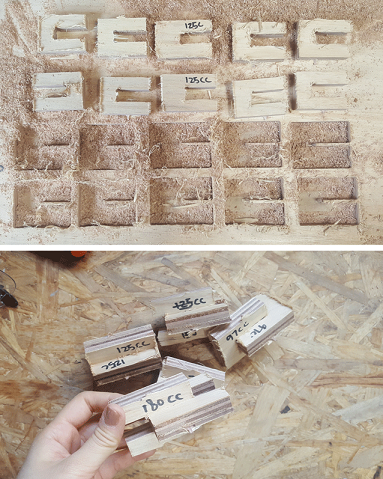
Since I did the test with Kurina, and she already uploaded the result, with her permission, I will just use her pictures and her result. Thank you Kurina!
Cutting type: Climb(c)/Conventional(cc)
Feed rate: 75, 97, 125, 150, 180
Spindle rpm: 18000
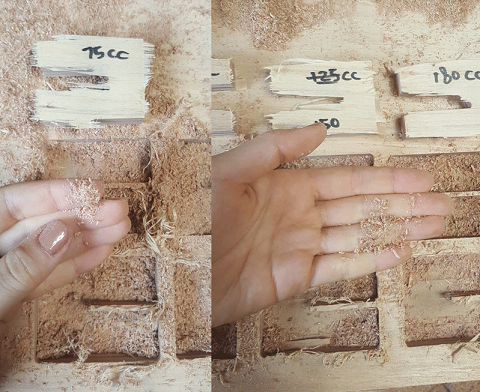
We should check 1. chips size: too fine chips means that we need higher feedrate, and 2. fit. 125 feed rate/convensional cut looked nice enough.
Finger test: Stop endmill completely after 1~2 min's cutting, and then feel the temperature of it. It was too hot in our case which means that we need more chip load to cool the endmill. So raised feed rate:125-->150 and reduced spindle RPM: 18000-->15000.
0. place the plate, screw at 6 distinct points (inside the border gap).
1. Warm up the machine.(for how long? just click the green start button?)
2. Open Shopbot software. Click the yellow ... (what?).
3. Send the endmill to the edge (x axis-long axis-first) so that the center of its diameter is right above the edge.
4. Close the part where we manipulated the endmill's movement. Click 'zero', and then set x zero.
5. Repeat the same process for y axis-short axis-after moving to positive x direction.
6. As for z! Automatic check using plate and aligator clip.(and then remove them)
7. Always check whether there is any thing hard on the plate that can be thrown into the air by the endmill. It's dangerous.
8. Turn on the vacuum.
9. Click 'cut parts', 'enter', and then push start button in the machine, then click ok in the computer.
10. Listen carefully to see if the sound is okay.
<
Note: the endmill will quickly come back to the origin for each toolpath. Don't stay nearby even when it is far from the origin for now. 11. After the milling is over, move the endmill to the side so that I can unscrew the board, and take the parts out. Clean the area.
Outcome
Uncut layer at the bottom
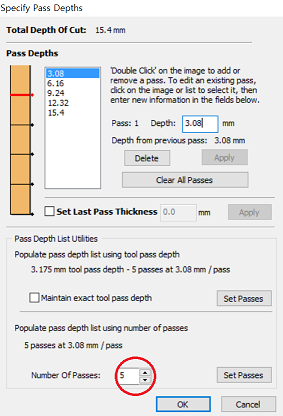
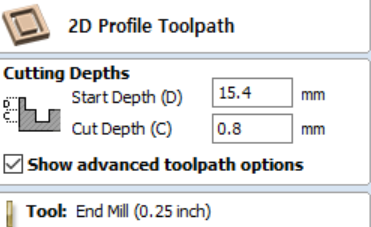
- modify the file in VcarvePro: Cut depth in the first cut was 15.4. Now start depth=15.4, and I needed to cut just a little more, so let new cut depth be 0.8.
- left the holding tab setting unchanged. If the endmill hit and break it, then I was supposed to pause, remove it, and then resume. But it didn't happen.
- don't set the origin again. Just run the machine.
The outcome was... quite okay although the last layer wasn't cut properly even after the second cut and the joint was a bit loose.
(Download files HERE!)
Update: My son is trying to understand how it works! And he likes them!
One last thing to remember about sanding: Fold the half of the sanding paper several times (depending on the size) so that it becomes about mobile phone size. Use it at 45 degree. Use moderate one (I used 150).
What I learned from mistakes. And misc.
- Test cut to get proper feed rate and tolerance. You can see which would work best from feeling the 1. temperature of endmill (after 1min of running) / 2. chip size (if it is too fine, it means, feed rate is too slow.) / 3. touch of layer / 4. the firmness of joints.
(I used the result from others, and except the plus joints, everything was loose. I can apply some masking tape around the joint, and then it is less loose now.) - check the thickness of the plywood at 6 points, and use the thickest one. (it is more uniform in birchwood plywood, or metal)
(So, this was another reason for having loose joints. Or maybe the main reason. In my case, the thinnest part was 14.65mm thick, and the thickest part was 15mm thick. My biggest mistake was to put the thinner side near the origin wasting the thickest part. - Check 1. which side of the wood is prettier, 2. if all the pairs of legs (desk legs, chair legs) were put in the same orientation(? I mean, if they are not from mirror image of each other.). Every leg has the same prettier side on one side, and less pretty side on the other side, which is not good. - Never touch computer while the machine is running.
- emergency stop button: it stops immediately, but will cancel the work, so it is hard to continue. Meanwhile space bar works as a pause button (or clicking with a mouse). It will take a couple of seconds to stop, but I can resume.
Break the tap, not lift the tap. Lifting might damage the parts. Aircut is good to see the trajectory before milling begins, but preview function was also good enough.
From the meeting:
- End mill holder, 'collet': unlike small milling machine, it keeps the endmill at exact center. Keep it very clean
- drill bits: ONLY for holes! Don't use for the horizontal cut--->never with CNC. / CNC end mill is much heavier.
- Cut length should be longer than thickness. (this is the part that takes chips out)
- Diameter of cutting part (more various) is not the same as the diameter shank (less various). - If the end mill cuts beyond its cut length, the thicker part might cause quite messy cut.(that's what happen to my PCB) - longer endmill-easy to break, but shouldn't be short either
- end mill: always turn clockwise (from up)
- From easy to difficult:
1) straight:not very fast. -->
2) up:cut fast, lift the material up, tough upper surface. -->
3) down:slow. Don't use to make a hole (friction), push material down -->
4) compression:center-cut endmill
- flute: number of cutting knife
- Flat cutter: faster. So, first use flat cutter-->change to round endmill to finish (adjust the distance between circles)
- V cut: it's like engraving in laser cutter.
- spoil board cutter: flattening surface (do this for sacrificial board every couple of months)
- end mill: bigger is better. diameter:twice smaller--> time:three times
- if the chips become dust-->feed rate (horizontal speed of flute) is too slow.
- more flute (good for smoothness, hard material)-->but speed should be fast enough to feed all the flute
- coated end mill: don't choose the same material as the plate->melt down
- need to choose proper spindle speed, feed rate,
- Golden Rules
1) cut depth~tool diameter/2
2) step-over~tool diameter/2
3) chip load: 0.001~0.010"=feed rate(inch/min)/(RPM*number of flutes)
(amount of dust I'm making=chip load)
example)mid point:0.005=feed rate/(18000(RPM)*1)==>feed rate=90(inch/min!!!!)--->test cut! with different RPM, different chip load
- conventional vs. climb: Climb is much common now. Conventional is no more conventional since motor is really strong now.
But for really strong hard material and really soft(compressible) material->conventional
Up to 3/4 of cutter diameter(?), any method is okay
- Feed rate: if too slow, burn the material. Feeding helps cooling (by dissipating the heat through the chips)
- incut/outcut: cut very precisely.
- cut depth=thickness of thickest part+0.4
 but in real, it didn't look as nice as I expected. The head was so small that it looked like a cheetah, not a cat. I didn't want to have a huge toy like this when it is not very attracting. So I changed the design.
 (used 3mm acryl+laser cutter. kerf=0.45. Instead of parametrizing the design, I simply rescaled it. In the calculation, speed=10, power=80~85%)
 Hmm.. looks a bit huge. It's for my little son, so I decided to make another little one. (BTW, I used wood : 3.9 thickness-0.5 kerf in laser cutter with speed=10, power 80~85%)

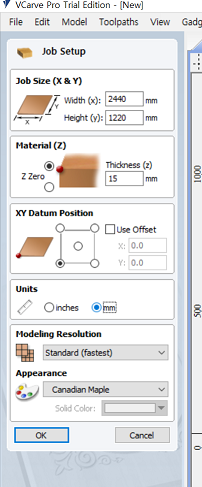 Create new file, and then set up the dimension, unit, etc.
 ('number of copies': I can select some parts, and include more than one copy.)
 (These are what I used.)
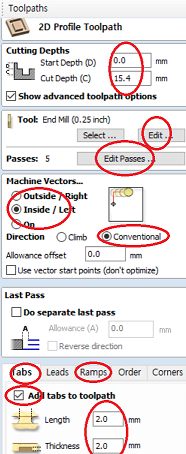 , and for boundaries:
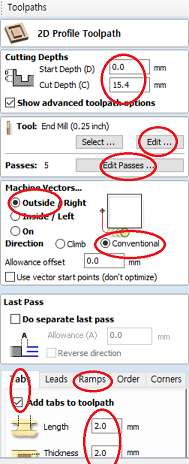 . I added ramp for both.