Whale's Voice
My initial Idea was to make a Flogo machine, but due to the time limitation I was not able do many experiments to figure out the mechanism of that machine, so I decided to keep the same concept of the flogos (floating Helium) and re-purpose it in a different device,, That’s when Whale's Voice toy has been invented : )
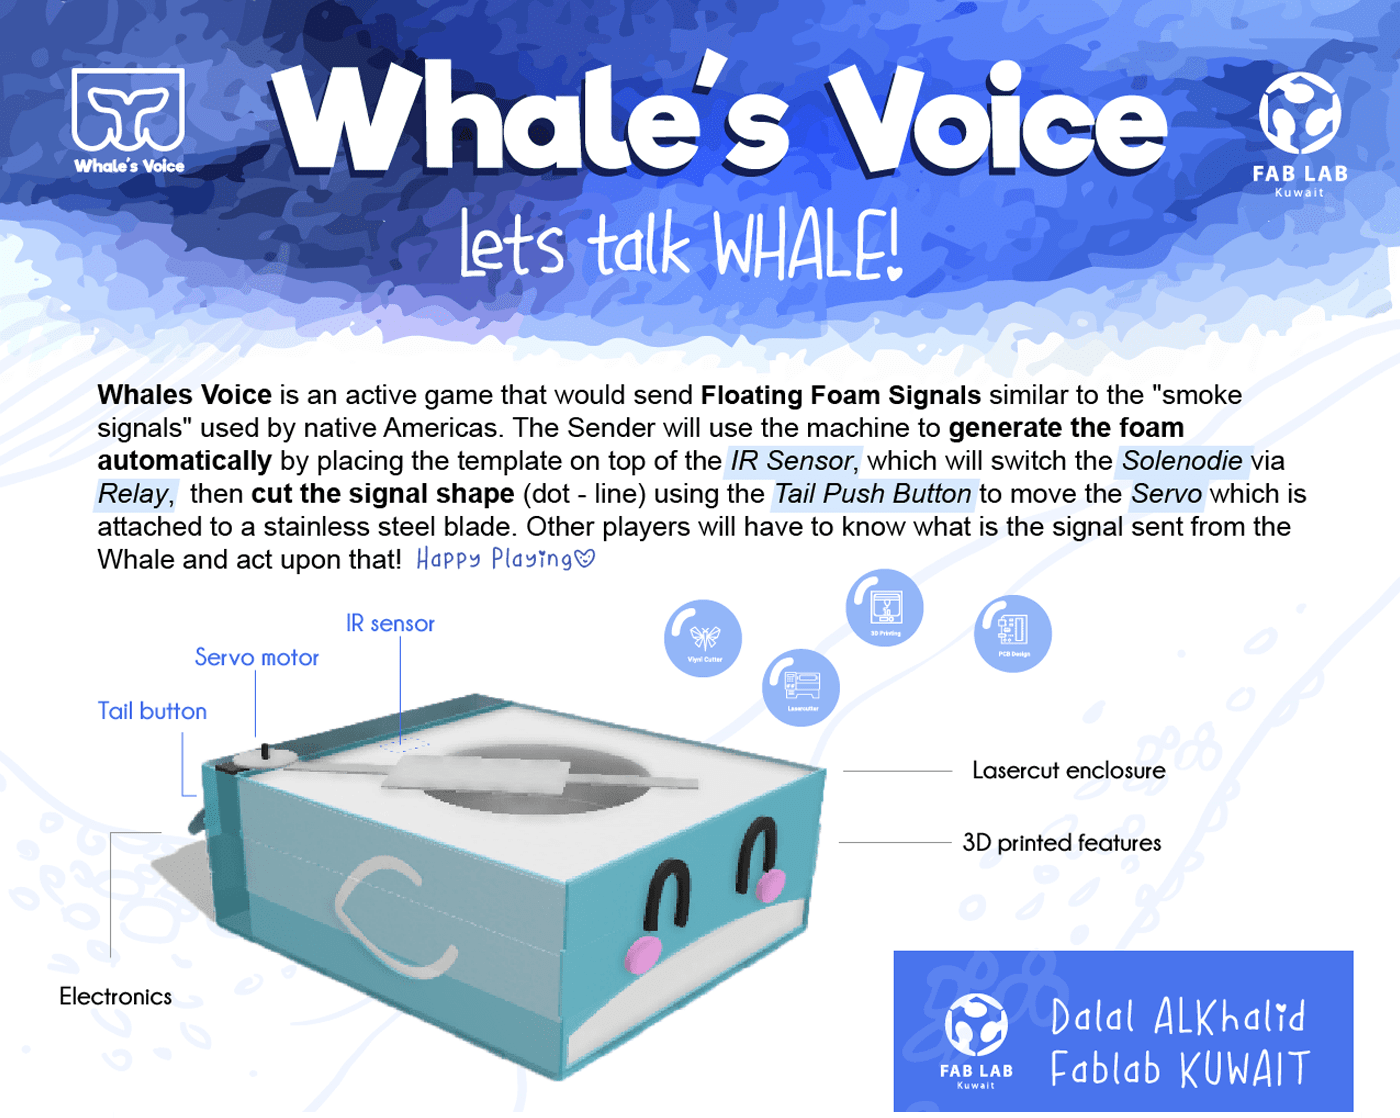
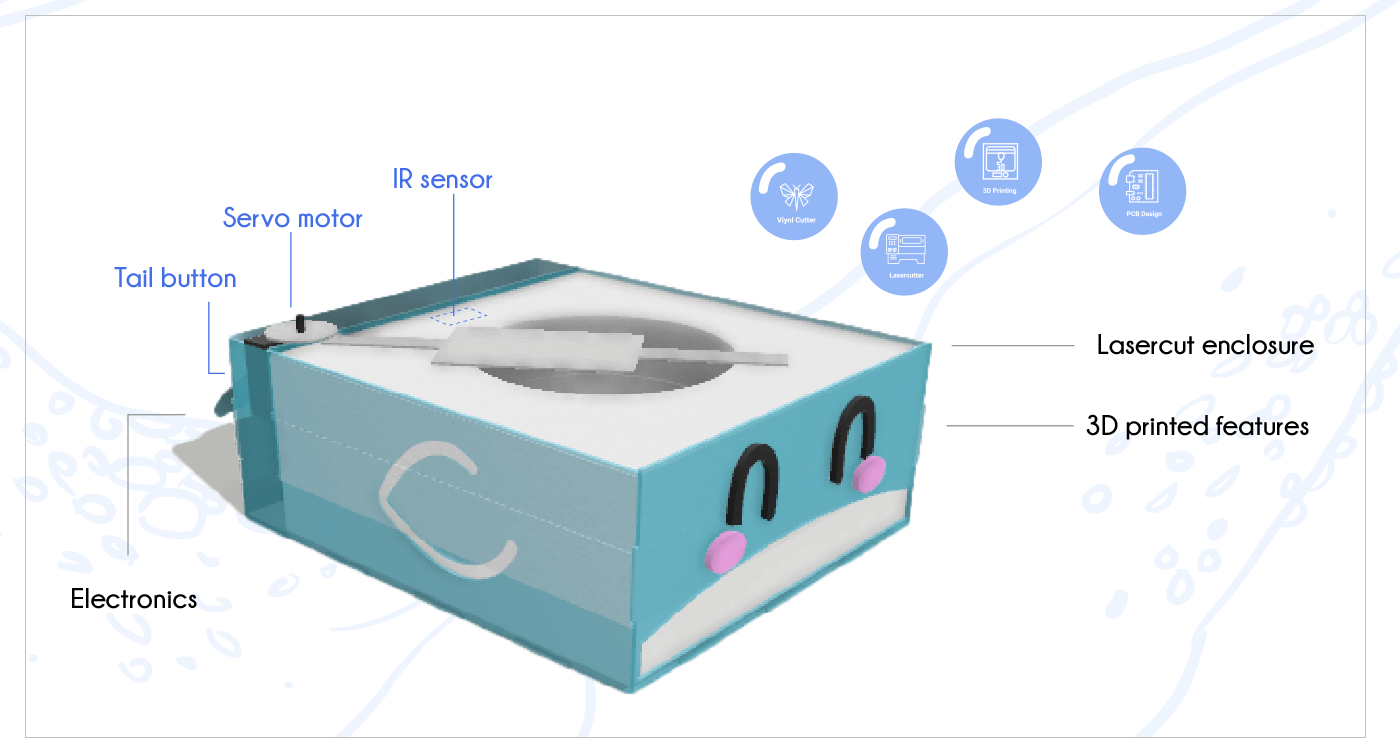
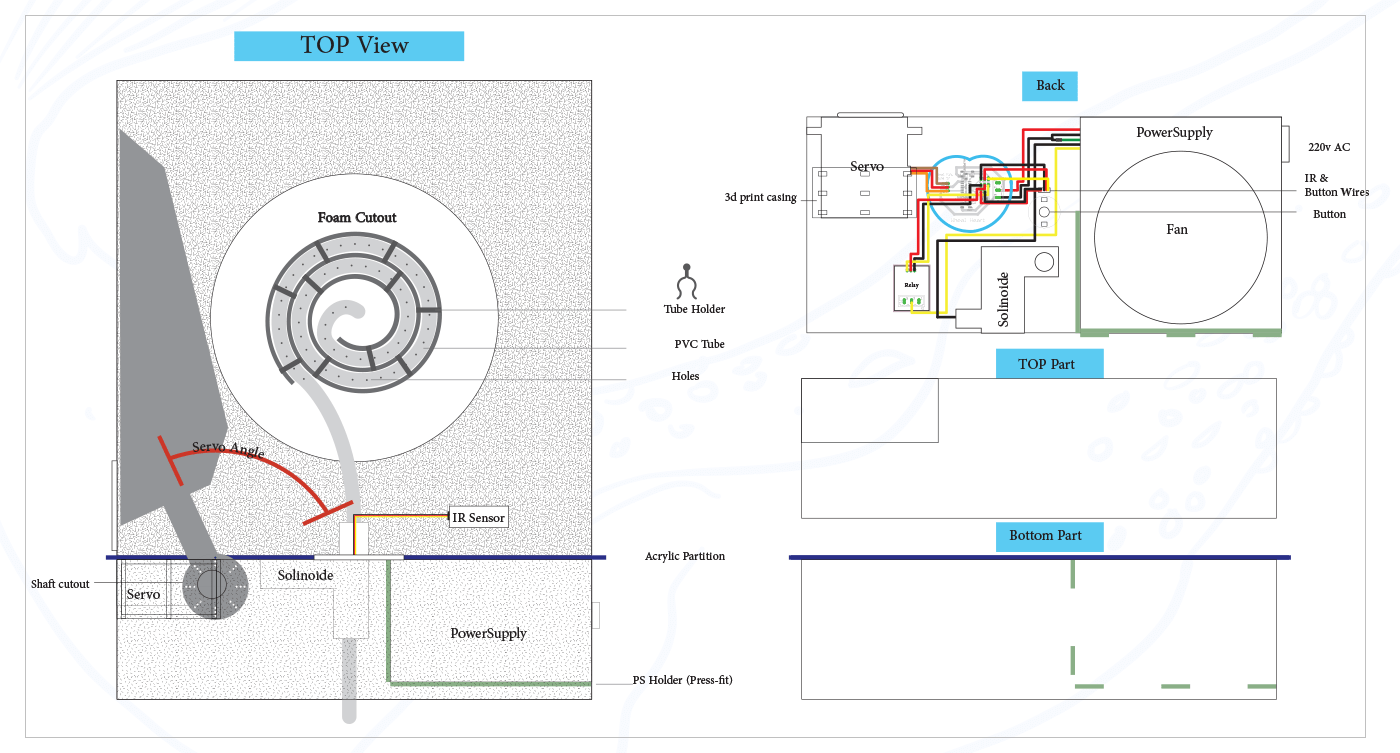
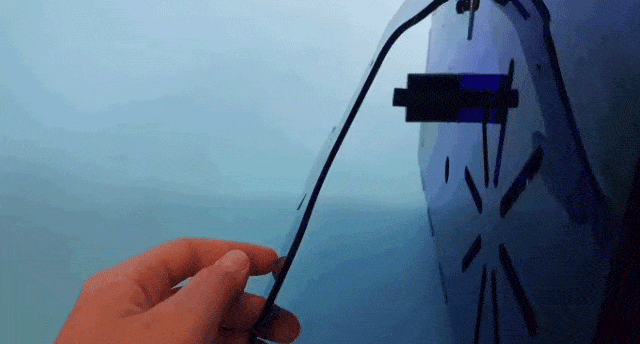
Whale's Voice is an active game that would send Floating Foam Signals similar to the "smoke signals" used by native Americas. The Sender will use the machine to generate the foam automatically by placing the template on top of the IR Sensor, which will switch the Solenoid via Relay, then cut the signal shape (dot - line) using the Tail Push Button to move the Servo which is attached to a stainless steel blade. Other players will have to know what is the signal sent from the Whale and act upon that!
Presentation Video
In Short, Floating Foam are shapes made out by pushing Helium into liquid soap solution.. the Helium will generate the bubbles then it will fly because of the Helium light weight.
My Process:
Designing the Toy
This is the part that took most of my time, as I wanted my project a "product" feel,, where all components would have their home area, all wires are arranged nightly in one place, Safety, usability, and overall aesthetics ..
After many Errors,, I have remembered an Arabic Saying that states "Planning is Half the work!", So I started to PLAN my work in order to visualize and minimize the chances of mistakes
in the image above, I have almost included ALL my ideas regarding Containers, Placement, Connections, movement, press-fit that I will choosing from to use in my project
I have also included many 3d printed parts that will help in organizing the placement and shape of the toy, but unfortunately I could not implement All of them due to the time limitation..
Outer enclosure- Laser cutter
I have started with Adobe illustrator to draw the Acrylic box that would contain my project using Laser cutter-Press Fit technique .. Press Fit was very easy to design at the time we were introduced to, as I have made a simple 3*3 Joint, then using my calculation (Males +0.2, Females -0.2) the Joint was PERFECT and it is still holding until this day.. but when I have applied the same technique to other size joints (eg. 34*3) I was not been able to get it correctly! its would be either too loos, or very tight that would break the slot!
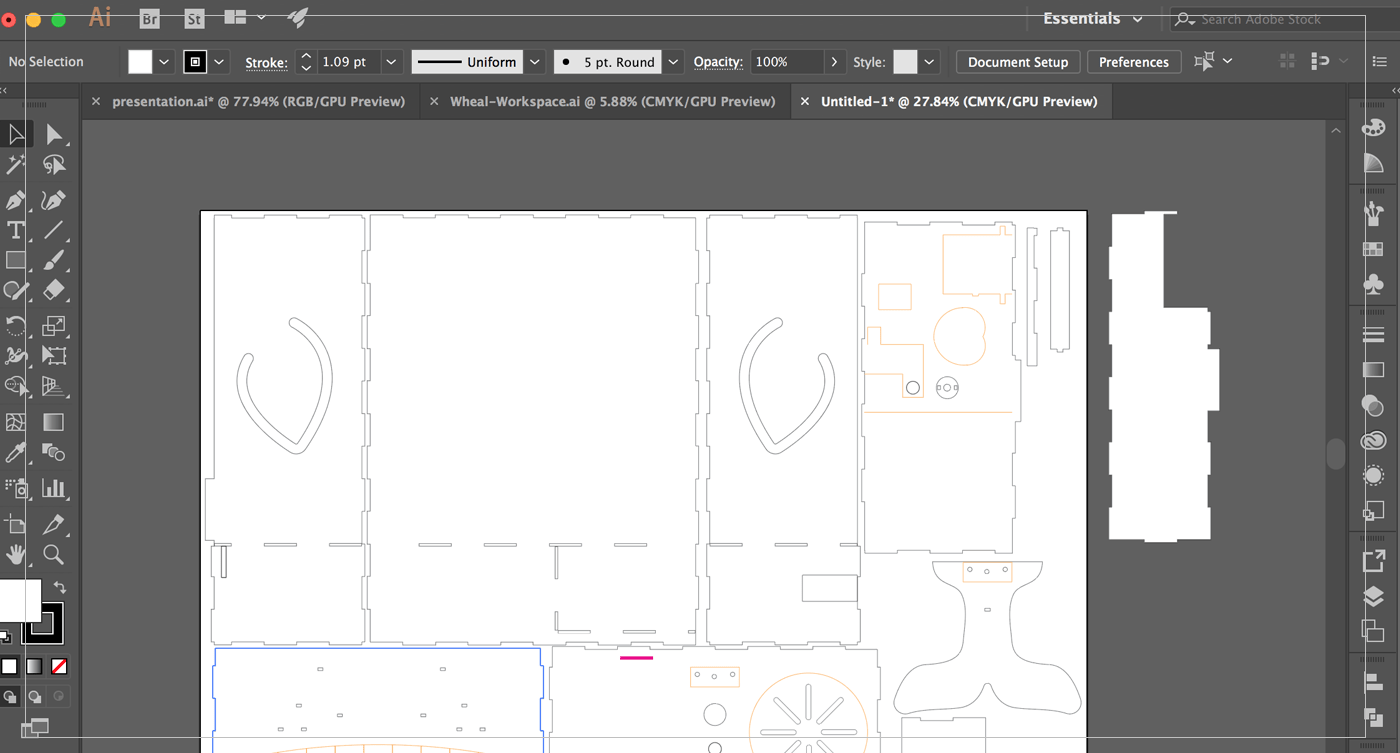 After Spending A LOT of time experimenting, I have figured out a new way of doing the offsets,, which is by only offsetting one part of the box, so when the Kerf burns the material out of the sides, they will fit perfectly on the bottom part,, and it worked just fine : )
After that I have used the loose pieces to test the design before cutting again,, one of the major areas I have struggled with was the Tail button the idea was very clear in my mind, but when I have implemented it was VERY DIFFERENT! I was imagining the tail to be pressed all the way down, but I the only spring push button I could find was about 2 cm tall!! but it worked fine ..
[ Source File - Ai file ]
3D Printing
But I could not resist tinkering that button and " Upgrading" it to be bigger ;),, so by using spring out of a ball-pen, and my small push button, I have designed a bigger button holder using Fusion 360 and printing it using 3d printer
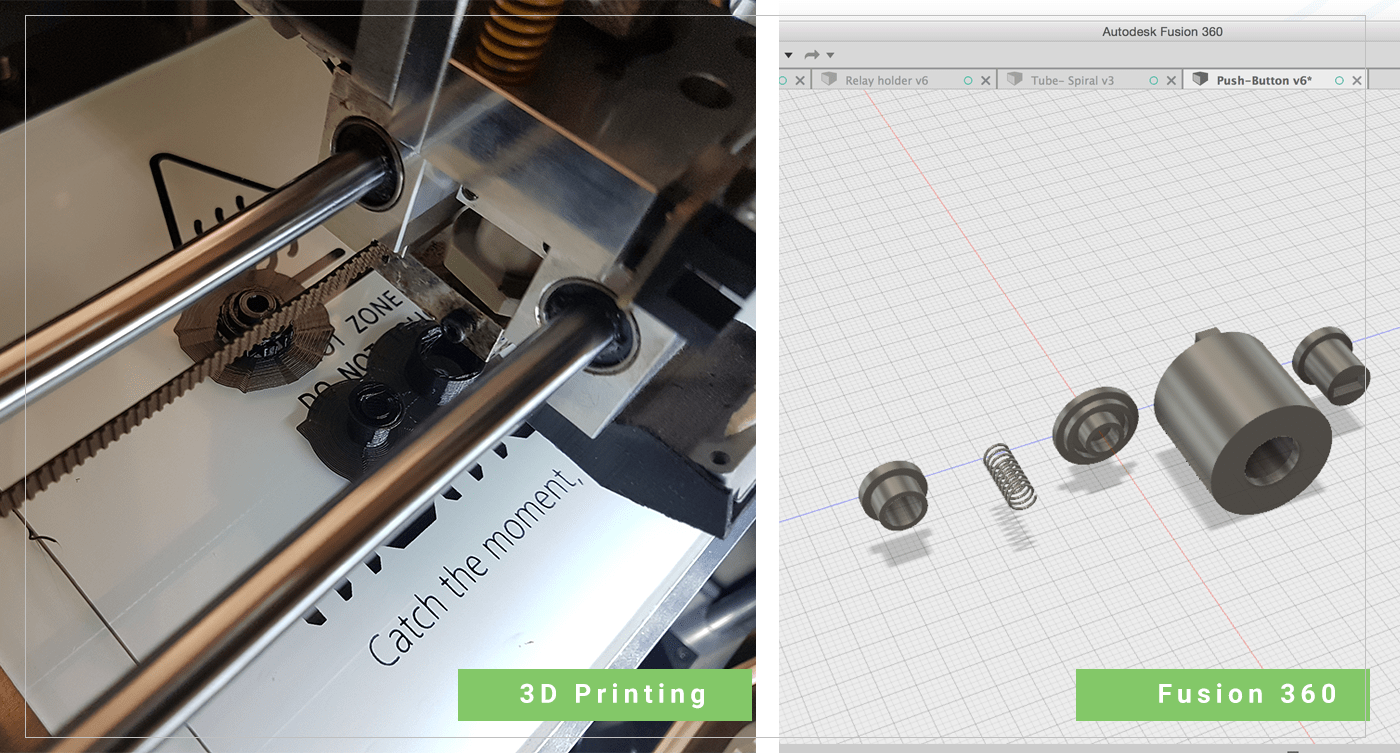
[ Source File - F3d file ]
[ Source File - DXF file part1 ]
[ Source File - DXF file part2 ]
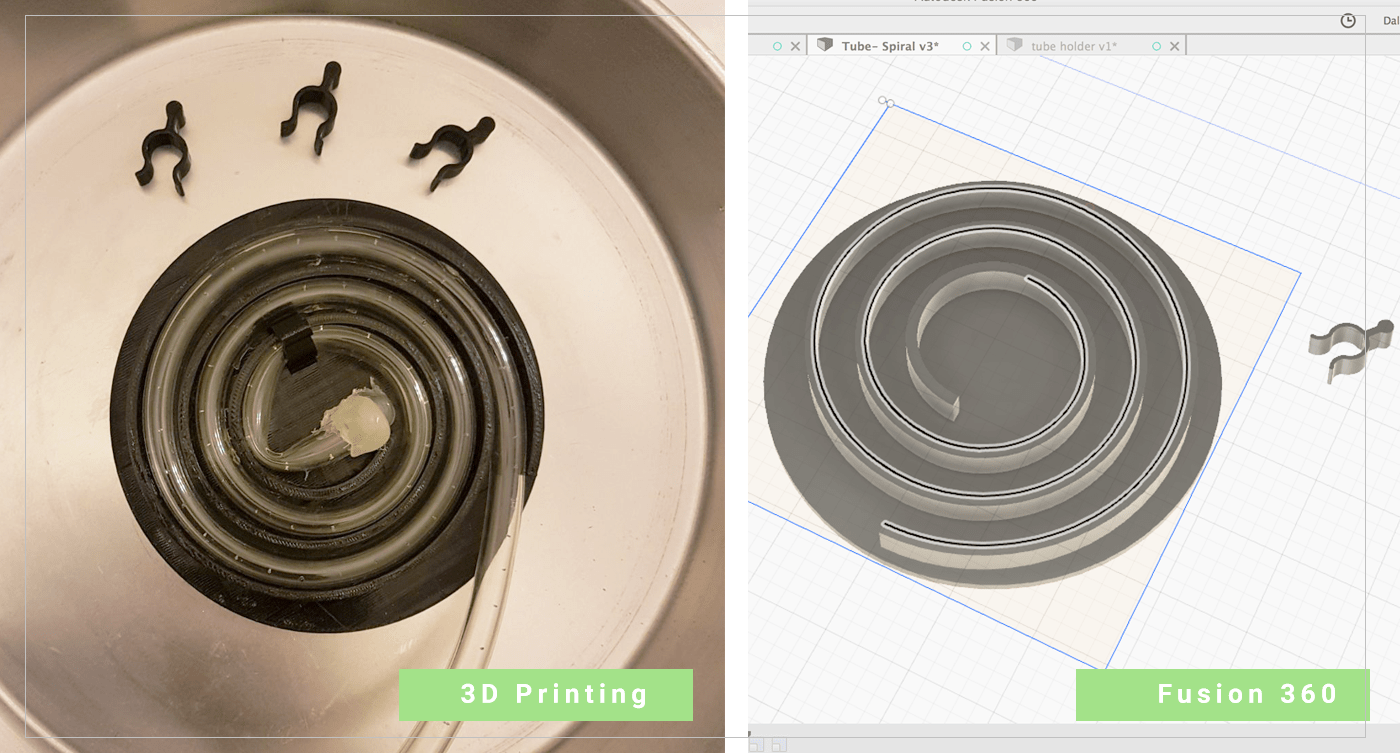
Another problem I was facing was with attaching the tube to the pan,, I was using Hot glue gun, which hold the tube fine for couple of uses,, then it will be removed easily,, So I decided to make a tube holder, that would maintain a spiral shape for the tube which will be result it evenly speeded bubbles, as well as beading able to attach the tube to the pan for long- uses by using clips that would keep the tube in their position even when pulling by mistake ..
[ Source File - Tube holder - F3d file ]
[ Source File - Tube holder - DXF file ]
[ Source File - Tube Clips - DXF file ]
[ Source File - Tube Clips - F3d file ]
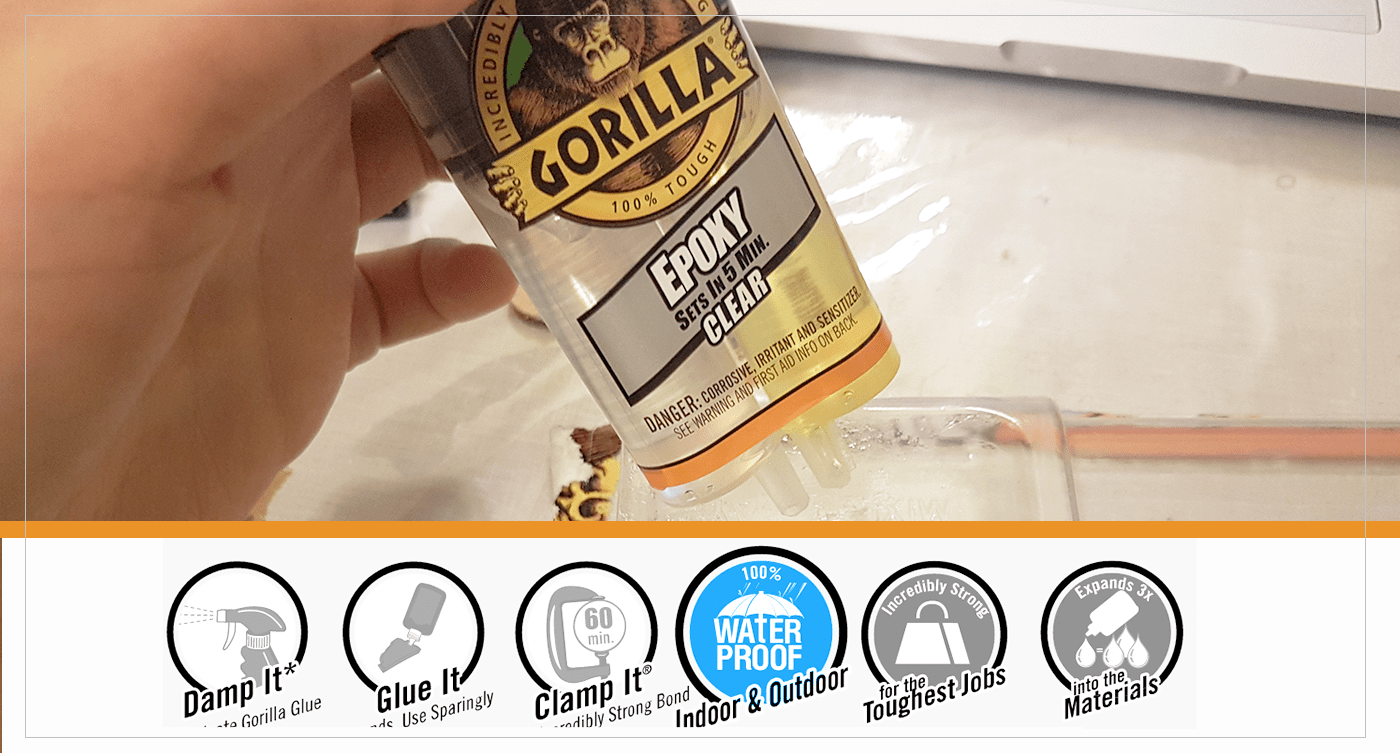
I have been searching for a water- resistant glue, that I can use to attach my holder to the pan,, and after a while, I found Gorilla Epoxy Resin, which claim to be water resistant,, I have spread a thin layer of glue after sanding the back of my holder, then place it on the pan, and put some weight above it to help it stick strongly,, I did not try it yet,, but I feeling positive about it ..
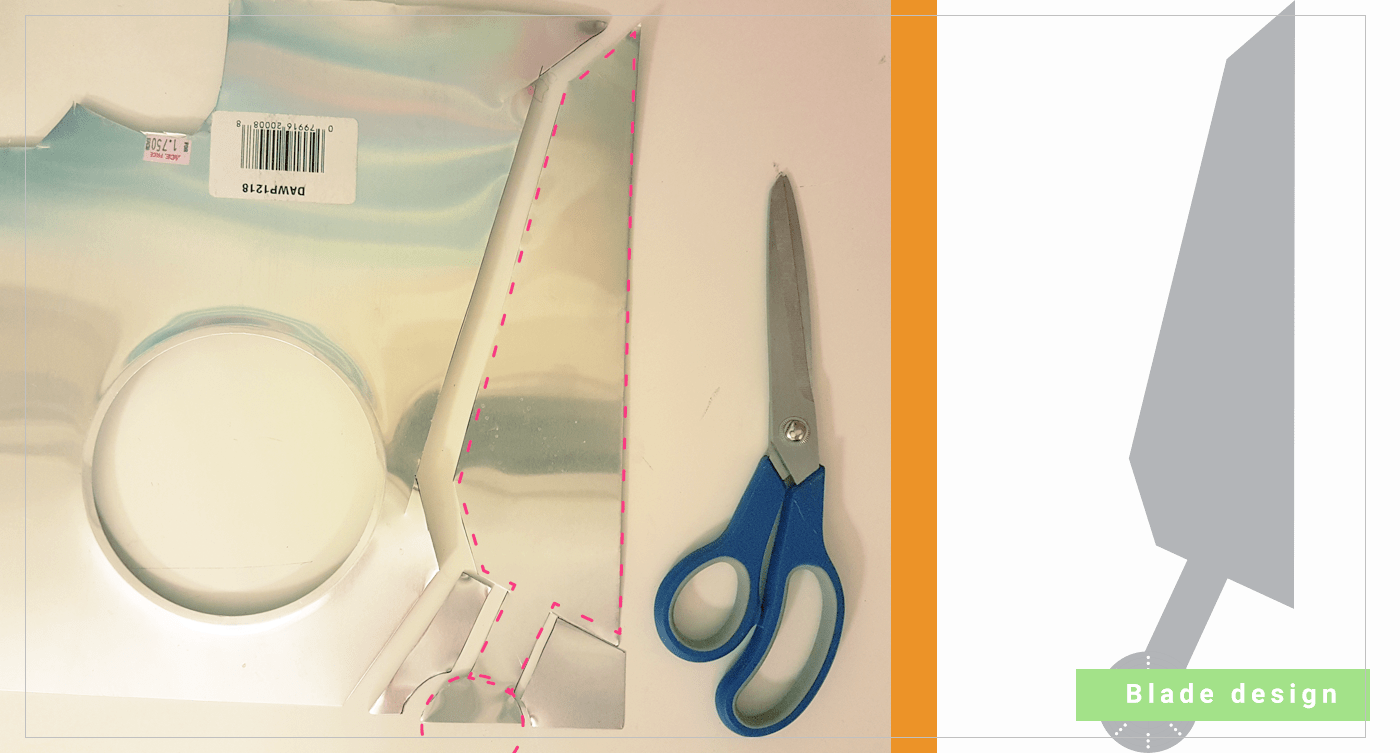
Knife / Blade ..
For the Knife, I have used a Stainless-Steel sheet, and cut it by hand using a strong scissors..
Viynl Cutter Stickers
I have used my Silhouette Cameo Viynl Cutter to create some stickers for my machine,, I have started by making some designs in Adobe illustrator by including My logo, CC licence and the teeth of the whale,, I am expecting to have dificulties with letter, but I will give it a shot ..
I have used teeths drawing I have created previously to make the stickers,, but I need to modify them and add borders,, the easies way was to create Offset Path
Go to Object>Path:Offset Path then experiment with the Offset valuse until you get the desierd thickness, then by using Devide Pathfiner I have easly merged and cut the rectangles in between ..
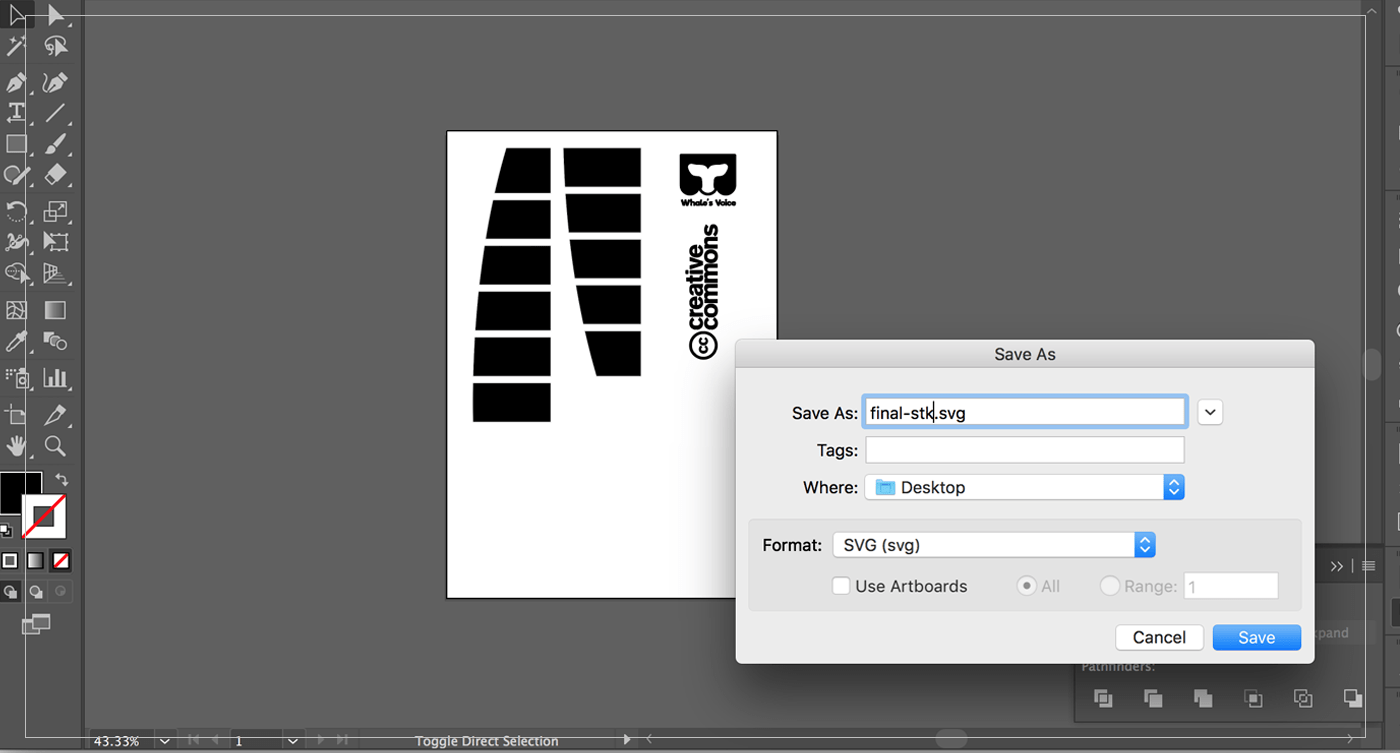
 After that I have exported the file as SVG, but you have you use Save As option not Export,, as exporing Svgs will not open in
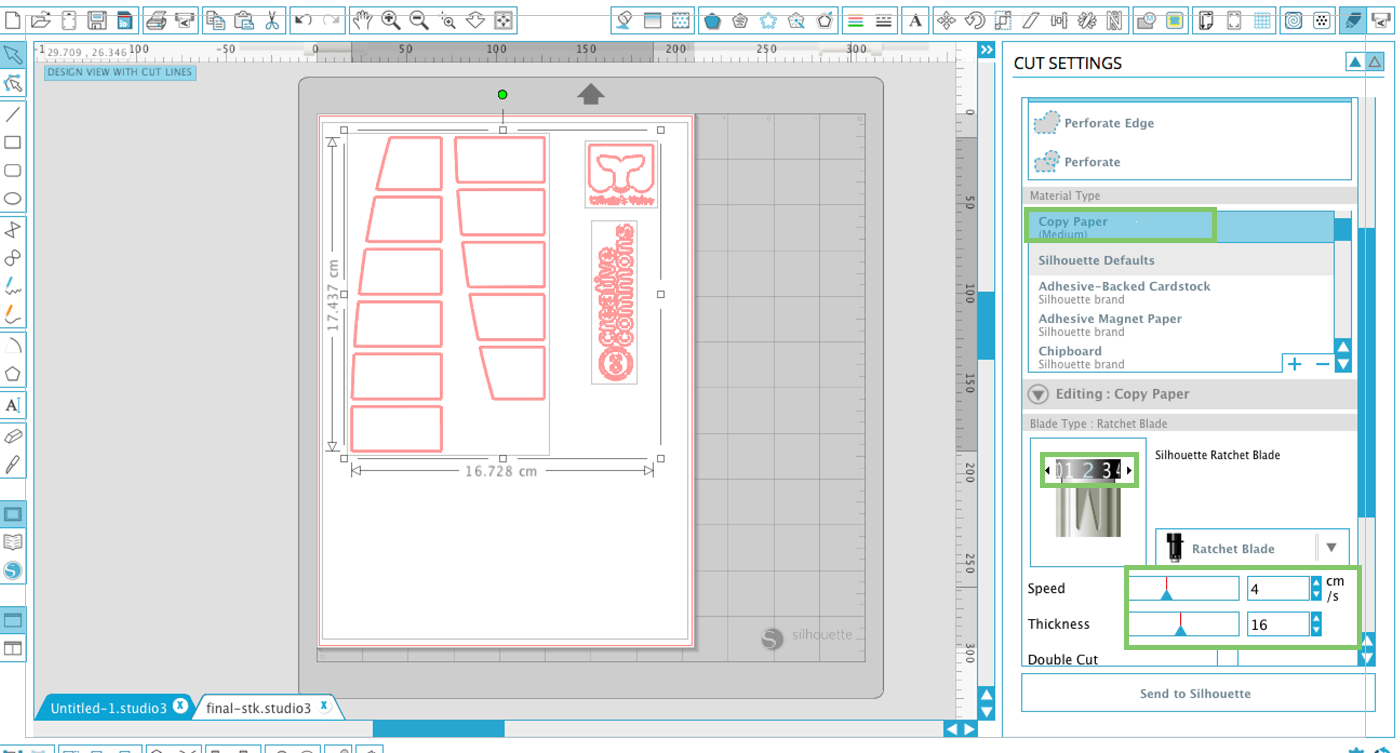
 The second setp was to open the files in Silhouette Studio to trace them and send them to cut,, I have used regualr stickers paper to cut white stickers.. I choose the following setting which have worked perfectly:
- Copy Paper ( almost similar settings to the sktickers).
- Blade size: 2
- Speed: 4 ( I have reduced the speed because in order to cut small letters)
- Thickness: 16
 After That I got very nice cut, but as expected,, small letters were not cut perfectly!
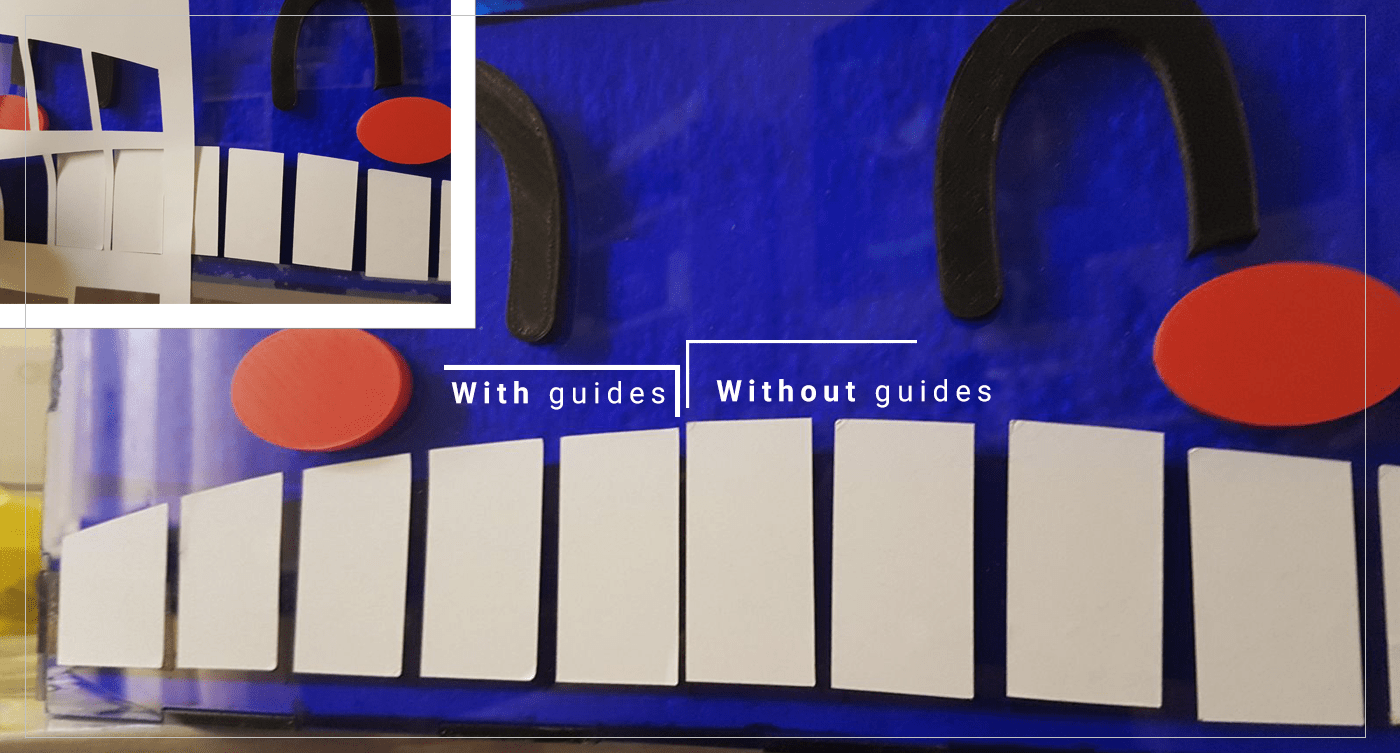
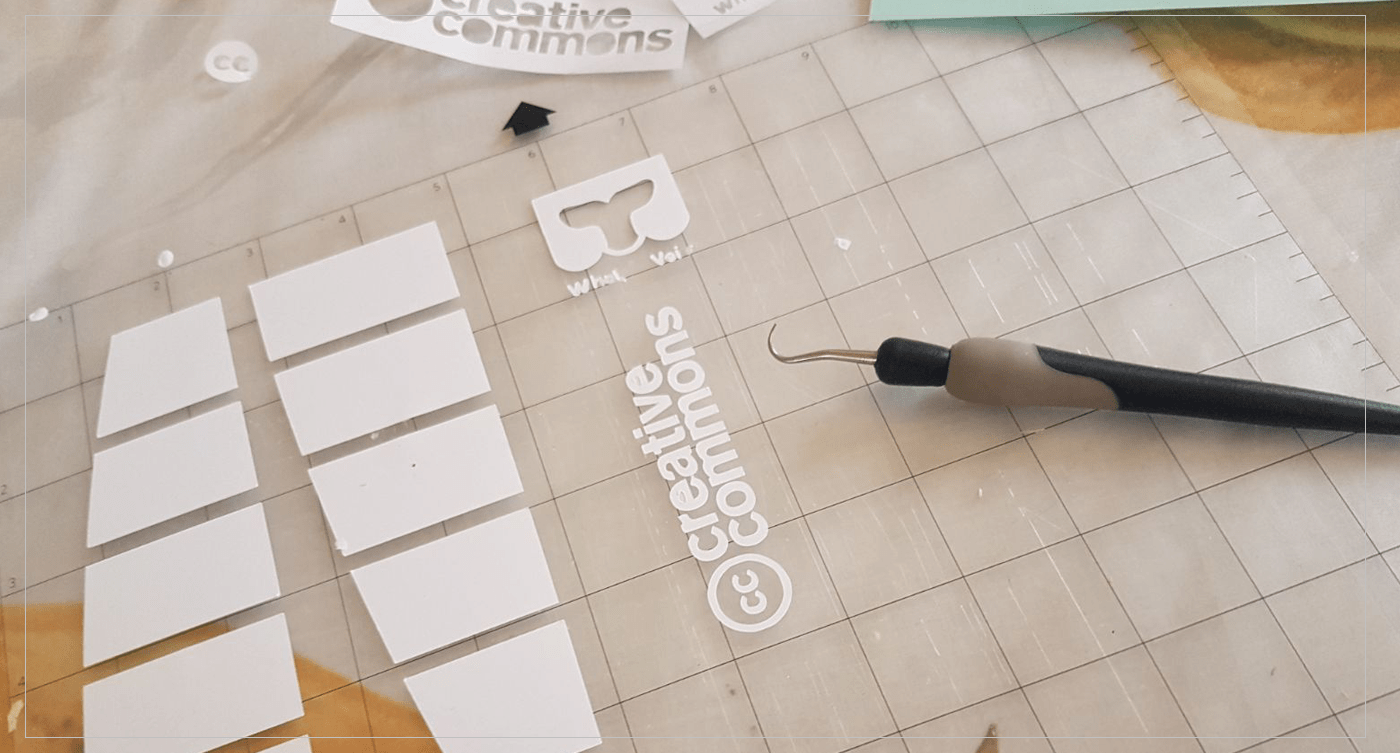 I have tried to place the teeth stickers without using any guides at first,, but it was very hard to do so while the box it assambled! so I have used the cut-out scrap as template which works fine,,
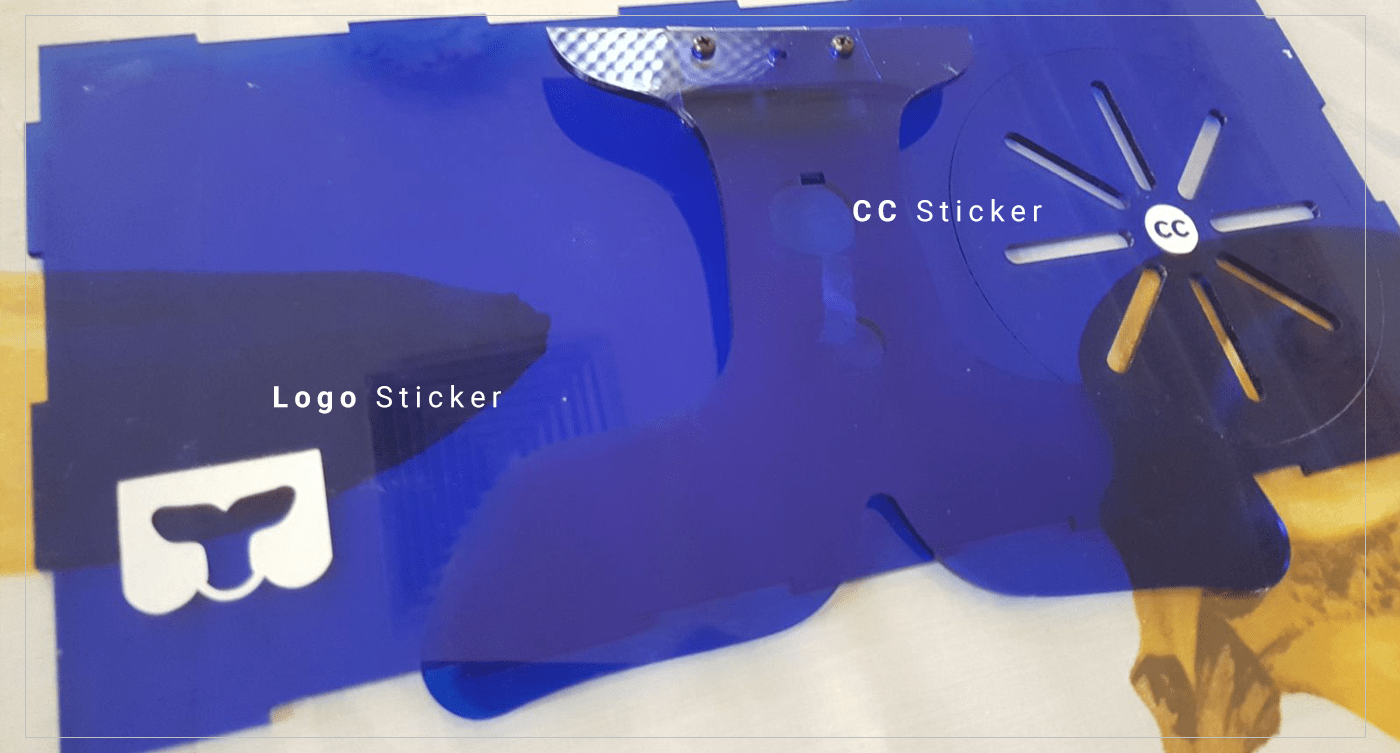
 Finally I have tried to use Scotch Removable tape to work as transfering tape, but it did not work!, and when I use regular clear teape it has ruined the sticker peices!! So I decided to keep it simple and use the big shapes only ( Logo part & CC) which looks good : )
[ Source File - SVG file ]
[ Source File - STUDIO3 file ]
![[ Source File - SVG file ]](src/final-stk.svg)
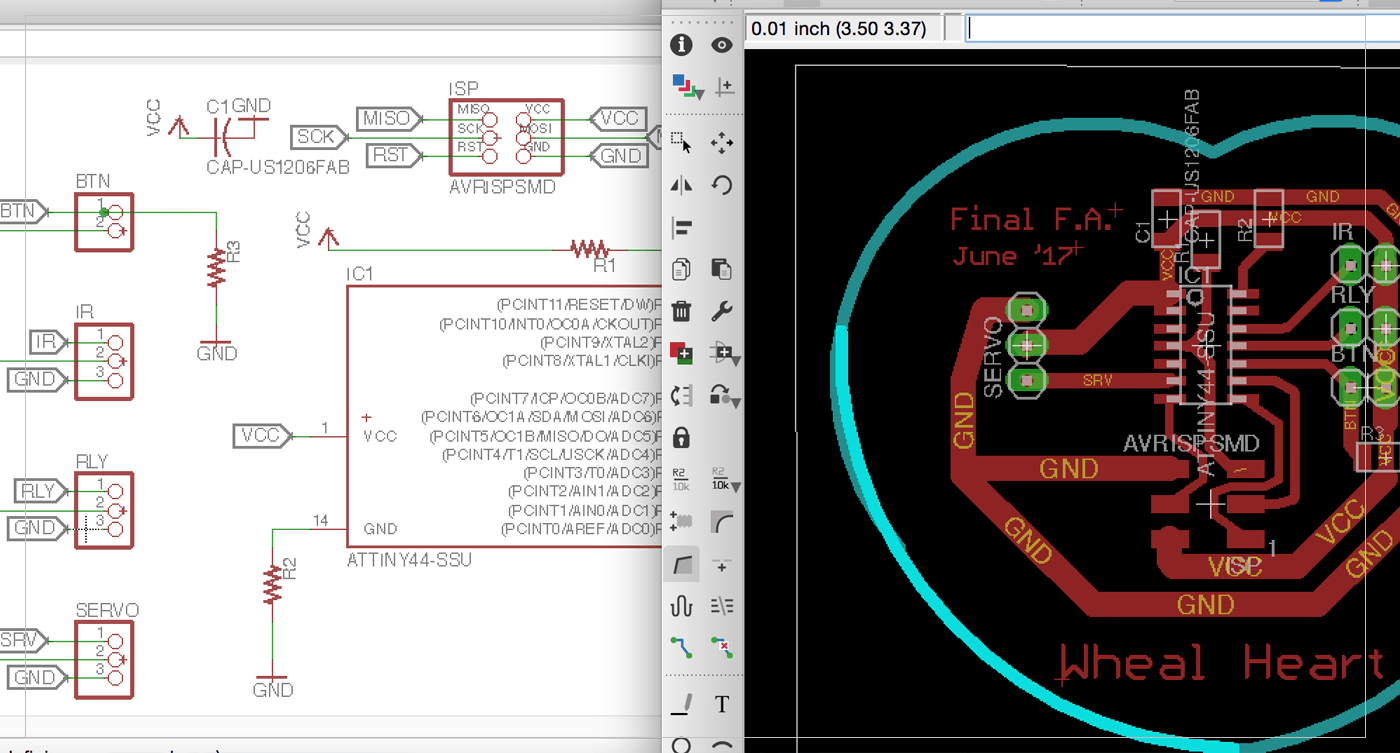
Designing & Milling the Board
Designing my board was fun & easy, All my components are regular components that will be attached using pin-head,, Pinheads give me more space to work on and not be limited with the shape/size of the SMD components.. So I decided to made my board looks like a Heart to complement with my whale's design ( it is the WHEAL'S Heart ; ) )..
Board Contents:
Inputs:
- IR sensor: to switch the Solenoide on and let the heleum pass through the bubble solution.
- PushButton:to turn the servo which is attached to knife to cut the foam cloud.
Outputs:
- Servo Motor: controls the blade movement.
- Solenoide: controls the Heleum pushed on the bubble solution
Milling & Soldering Processes were straight- forward, as I have just repeated what I have been doing in the past 6 months ..
[ Source File - BRD file ]
[ Source File - SCH file ]
Testing electronics:
This is where the final electronics will be placed ( the button will be placed of the outer frame, and I could not connect it while removing this peice)
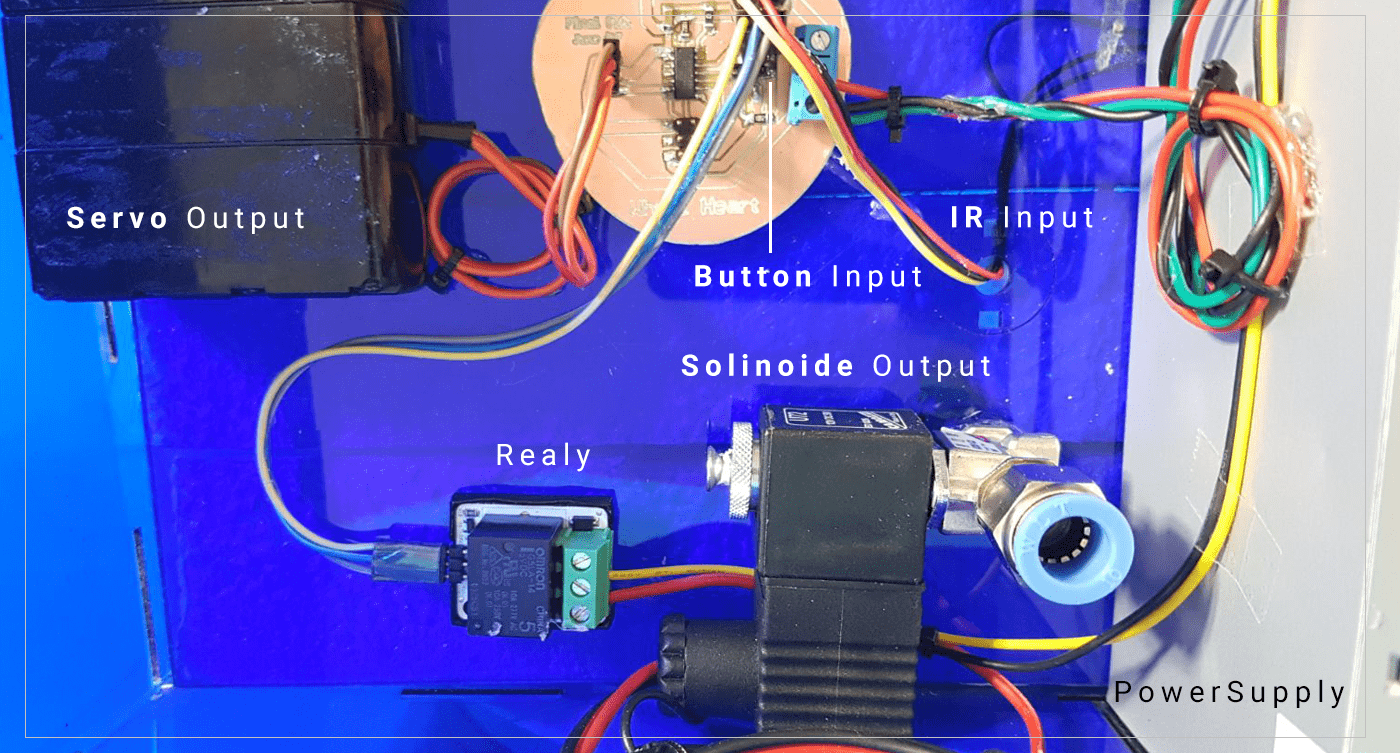 Testing the electronics ..
Power Source
I was planning to have an 5v AC power cable that would power my board,, but because I am using a Solenoid and a Servo, I will be using both 5 & 12 volts,, in my testing, I have used 2 of the lab station power supply’s that can produce intended power,, but as I have mentioned before,, I am going for a complete shelf-ready product,, this method will not work,, So I decided to repurpose a computer power supply, as it can generate both voltages, and can be enclosed nicely in my machine ..
it was easy to use,, I have firt neaten it up by cutting all the un-necessary wires, and only keep the once I will be using, which are:
- Geen+Black: Switch the machine one
- Red : 5v
- Yellow: 12v
- Black: GND

My Code ..
I have used very Simple code to program my machine,, When the template it placed correctly (on top of the IR) a Signal will be sent to the Solenoid via the relay to start pumping Helium into the Bubbles Solution, and when foam reached the desire height, the user will press the button which will send a signal to the Servo to rotate and cut the foam (by attaching a blade to the servo) in one direction then stops at the end of this movement,, then second time the button is pressed, the servo will go back to its original place ..
#include "SoftwareServo.h"

#define relay 2
#define ir    1
#define sw    3
#define ser   7

bool a = 0;
SoftwareServo myservo;
int x;
int pos = 0;

// the setup function runs once when you press reset or power the board
void setup() {
  // initialize digital pin 2 as an output.
  pinMode(relay, OUTPUT);
  pinMode(ir, INPUT);
  pinMode(sw, INPUT);
  pinMode(ser, OUTPUT);
  myservo.attach(ser);

}

// the loop function runs over and over again forever
void loop() {
  while (analogRead(ir) > 300) ; //wait till template is placed
  digitalWrite(relay, HIGH);//turn on Helium

  while (digitalRead(sw) == LOW) ; //wait till button is pressed
  StepForwardDefault();
  digitalWrite(relay, LOW);
}


void StepForwardDefault()
{
  if (a == 0) {
    a = 1;
    for (pos = 0; pos < 90; pos += 6)
    {
      myservo.write(pos);
      delay(15);
      SoftwareServo::refresh();
    }
  }
  else if (a == 1) {
    a = 0;
    for (pos = 90; pos > 0; pos -= 6)
    {
      myservo.write(pos);
      delay(15);
      SoftwareServo::refresh();
    }
  }
}
[ Source File - SoftwareServo.h file ]

Bill Of Materials..
* Container: 3$
* DishSoap: 3$
* Viynl Tube: 0.3$/meter
* Helium cylender: 50$
* Acrylic Sheet: 8$/ 90*60cm
* Stickers: 3$/ 10 pcs
* Servo motor: 10$
* Solenoid sensor: 60$
* IR Sensor: 0.7$
* Push Button: 1$
* 3d Filement: 10$/Spoil
Total: 150-250 $
CC License ..

You are free to:
Share — copy and redistribute the material in any medium or format
The licensor cannot revoke these freedoms as long as you follow the license terms.
Under the following terms:
Attribution — You must give appropriate credit, provide a link to the license, and indicate if changes were made. You may do so in any reasonable manner, but not in any way that suggests the licensor endorses you or your use.
NonCommercial — You may not use the material for commercial purposes.
NoDerivatives — If you remix, transform, or build upon the material, you may not distribute the modified material.
No additional restrictions — You may not apply legal terms or technological measures that legally restrict others from doing anything the license permits.
Notices:
You do not have to comply with the license for elements of the material in the public domain or where your use is permitted by an applicable exception or limitation.
No warranties are given. The license may not give you all of the permissions necessary for your intended use. For example, other rights such as publicity, privacy, or moral rights may limit how you use the material.
[Full license- found here]
Final words..
This course was fun to join, I have learned many many new stuff,, explored areas that I would never thought I would be able to make ( like mobile application, and Composites),, did things that I was frustrating to do for a VERY LONG TIME ( Documentation, and making video :"") ) !!
On the other hand, this course was very tuff to manage, as I was going to my daily work on the Mornings, and going to the lab on afternoon, then we have went through a holy Month of Ramadan in the final month of the academy, and our holily day of Eid AL Futur was just 2 days before the date of the final push!!
I have tried to do my best during the allowed time, and equipment’s,, and I hope to be able to implement this knowledge in my future projects : ) ..
THANKS !