This week our assignment is to write an application that can interface with an input or output device.
I'm very new to applications and can do only minimal coding, hence I plan to start with something simple. After Listening to Neil's lecture I decided to try out MIT App Inventor, processing and Python in that order. I have very little time to do this as this week was already delayed due to my trouble shooting efforts in the Previous (Networking) week. I will try to finish as much as I can.
I plan on using a Bluetooth module to turn on an LED on my board. I will do this by creating an app on my phone, and connecting it to a bluetooth module attached to my board. I plan on using the Satshakit I made in Inputs week as my board.
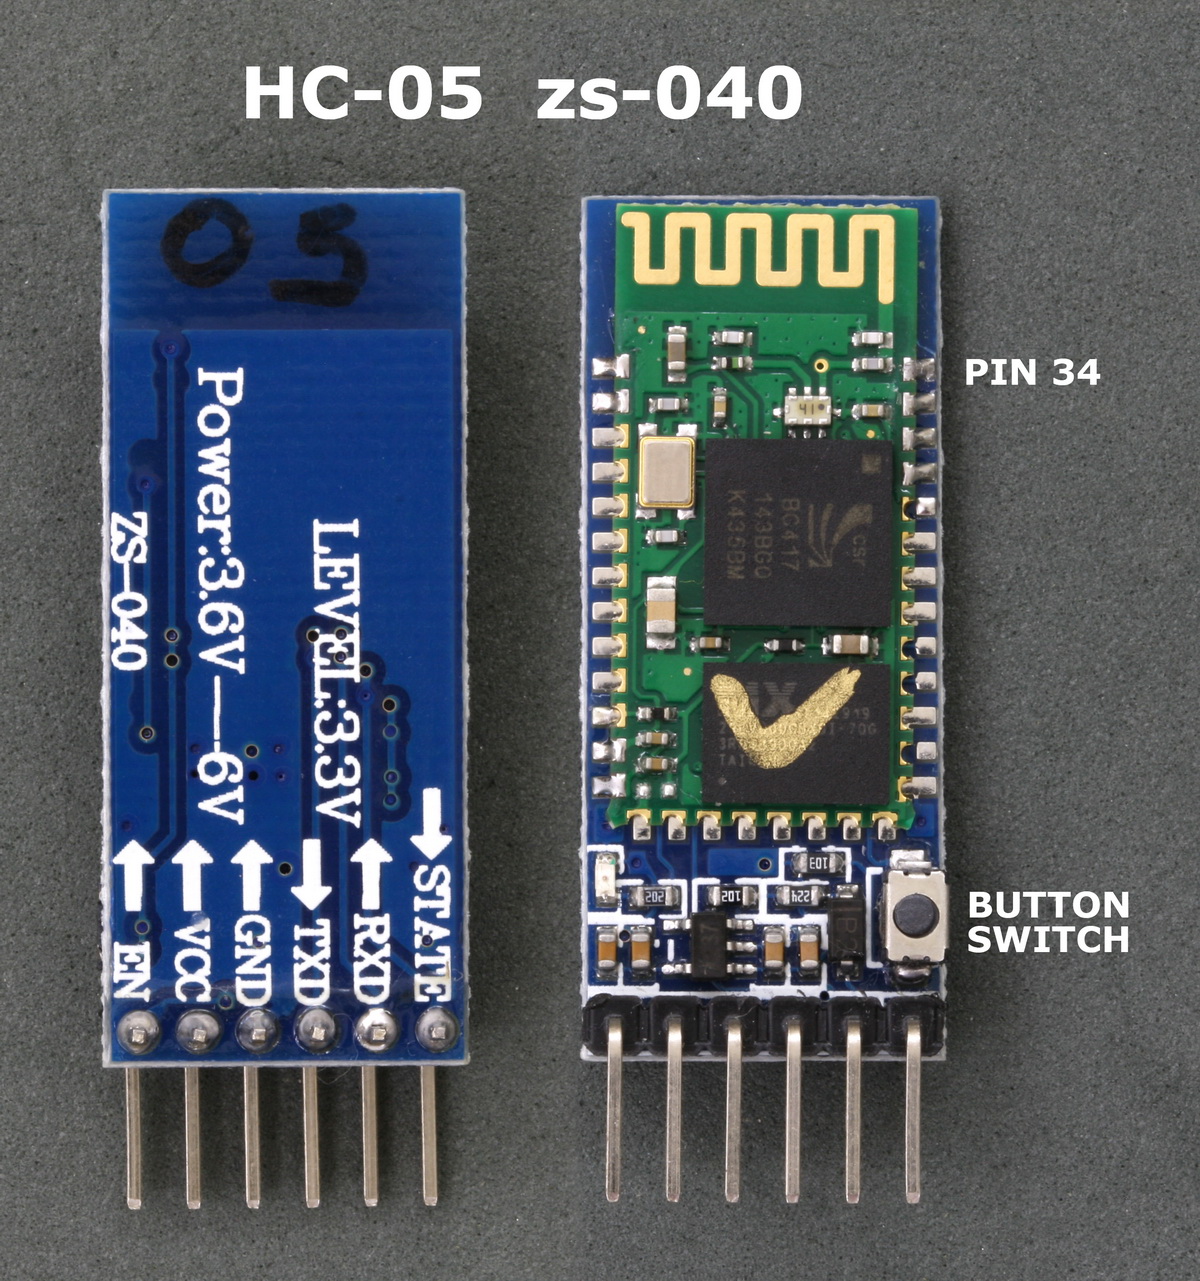
This module comes with everything you need to communicate via bluetooth. There are six pin outs from the board of which we will be using 4. Mainly VCC, GND, TX, RX
The Tx of the module is connected to the Rx of my board and vice versa.
App Invetor is an Open-source, Cloud based Web application that t allows newcomers to computer programming to create software applications for the Android. It uses a graphical interface, very similar to Scratch which allows users to drag-and-drop visual objects to create an application that can run on Android devices.
I found this application good for beginners, as it can be easily understood. After a couple of tutorials, you will be able to create a wide variety of apps. The UI is straight forward. There is no coding, but you program visually by dragging and dropping logic blocks like 'If else'.
I created my application after reading the work done by other in previous fabacademy. The logic is really simple. When I press the ON button the app should send a character through bluetooth, which will be received by my board. My board and the bluetooth module communicate via serial.
In my first attempt, I wanted to make an app with just one button visible at a time. That is when I press the On button, it would turn on the LED and automatically switch to the OFF button. So only one button will be visible at a time.

I played with a lot of settings to make this happen, at last what I did was make the On and the OFF button on two screens. And I made the code in such a way that when the On button is pressed, it turns on the LED and then it will switch over to the next screen.
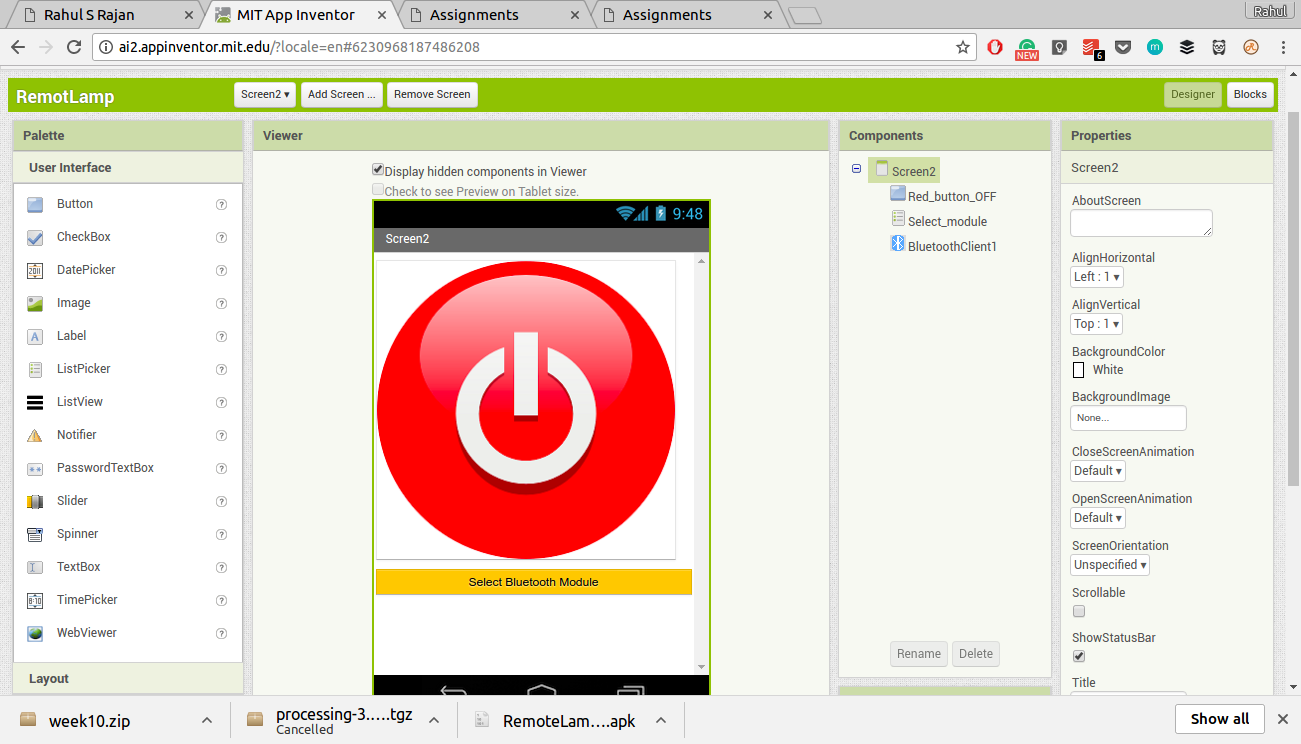
I build the .apk and installed it on my phone, but when i tested it out I found a major issue. The button works as I imagined, when I press the On it switched to the next screen. but the issue was that the when it switched to the next screen it lost the bluetooth connectivity.
This meant that I had to select the bluetooth module from the list, every time i switched screens. That was not practical, hence I dropped my plan and moved to one with both buttons on one screen.
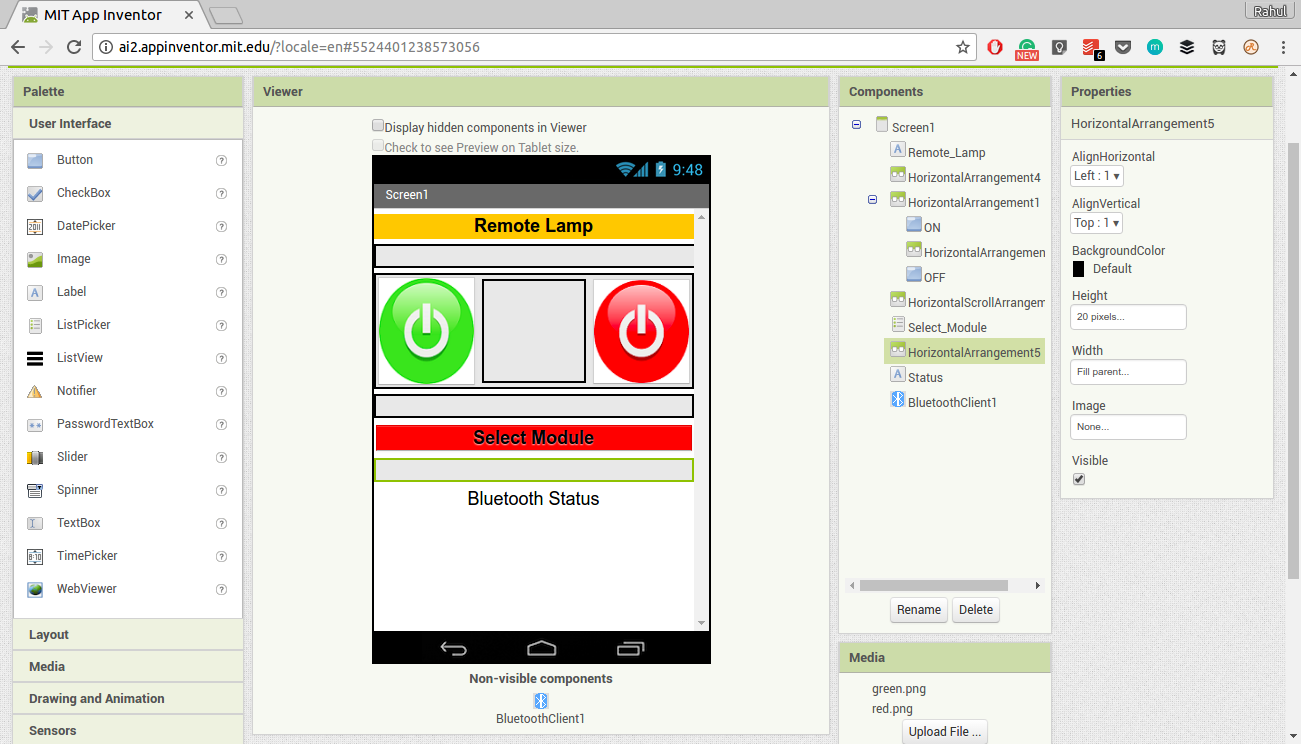
I used a label for making the Title of the App and the Bluetooth status bar, A Horizontal Arrangement to create some spacing and place the buttons side by side. A Listpicker is used to list out the Bluetooth module addresses and names.
After i was satisfied with the look of the App, it is time to add some functionality to it.
Blocks is a nice way to program your app. The logic is straightforward. Whichever functionality you need, just drag and drop the blocks into place.

The first block does the job of populating the list with the addresses and names of connected bluetooth devices.
The second module acts after you select one device from the list. It tells the bluetooth in my phone to connect to the device which i selected from the list. The sub functionality of it is to change the status of my label into "Bluetooth is Connected" and vice versa.
When I press the On button, it check if the bluetooh is connected, and if it is then the program will send the number "1" through bluetooth. Similarly when the OFF button is pressed, it will send the number "0".
This is the basic functionality of my app. To either send a "1" or "0" depend on which button I press. The next thing i need is a code that will run on my board, which will accept the data and turn on/off the LED.
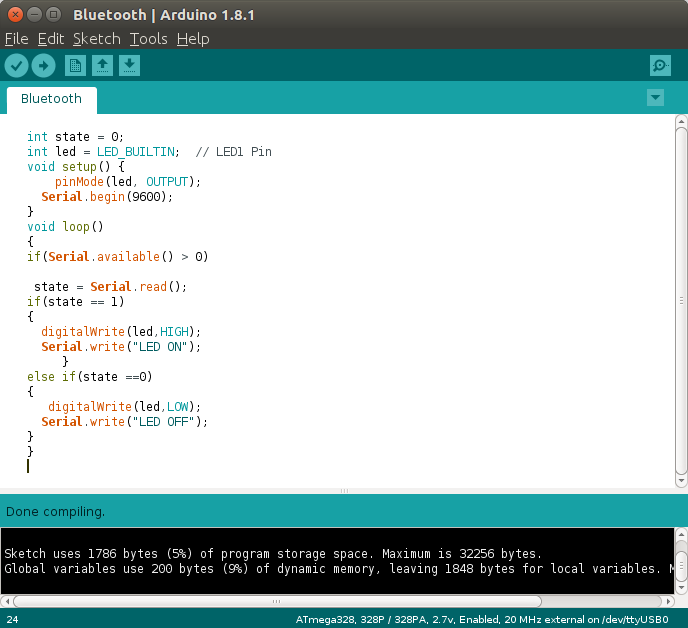
The code is simple. It check if serial connection is available and reads the data into a variable. This variable is then used to check the condition. If the data received is "1" then the program will tun on the on board LED. And if the data received is "0" then the program will turn off the led.
I spend more than three days with this program, no matter what I did I could not turn the lED on. I didn't knew if it was an issue with my app or my program or both. I tested my board to make sure it was working by writing a simple program that accepts serial input. I connected the board to my PC and used the serial monitor to send "1" and "0" to my board and this time it worked fine.
So I thought he issue must be with the app. I must have missed some important step. I was looking online for a solution and could not find one that related to my issue. I was not getting any data from the bluetooth module.
Around this time, my friend tried his program with the same bluetooth module and he also complained of the same problem. Then I sucpected that there might be something wrong with the bluetooth module.
I was able to pair with the module, Hence i did not suspect that it was damaged. But when I tried my code with another bluetooth module my friend has then I was able to get the code working.
The next issue was that the code is not perfect. There was some randomness in the results. Sometimes the LED might light up, and sometimes it might not. I checked for loose connection, but that was not the issue.
It seems that when you send just one byte of data, it might get lost in translation. I was sending just the number "1". This might be the issue. My friend suggested me to try sending characters instead of numbers. So instead of "1" I will be sending "ON" and insted of "0" I will be sending "OFF".
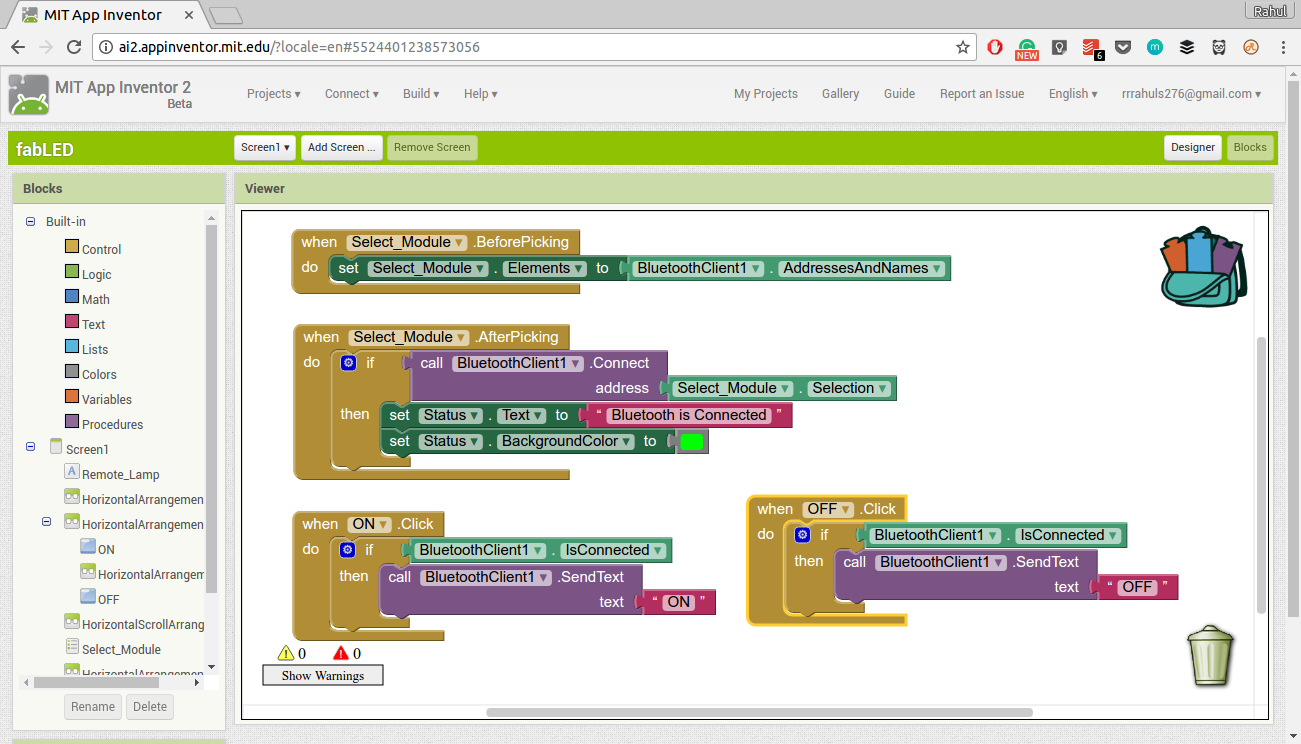
The main change was with the block pertaining to the bluetooth send, Now I change the module to send a text. When the On button is pressed, the bluetooth will send "ON" and similarly with Off button.
That was the only change necessary for the app, the rest of the functionality remains the same.
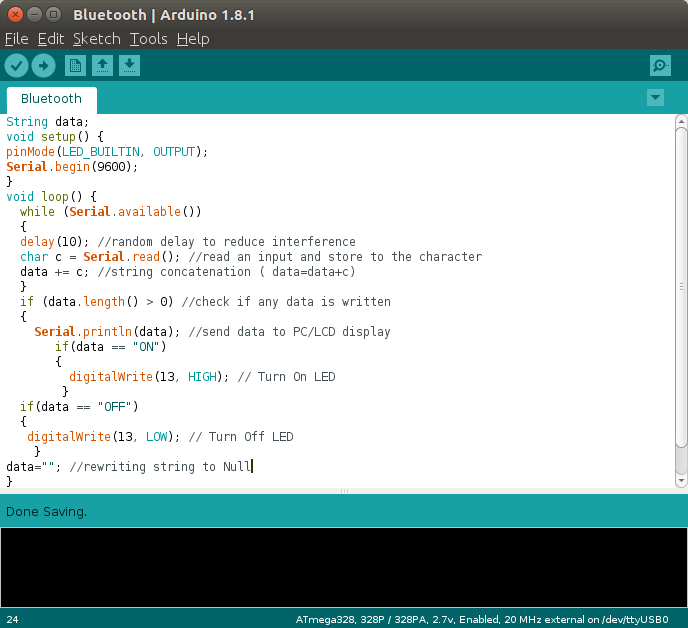
Here there is some change to the previous code. The code starts with a initializing a string variable to receive the text data. In the While (serial.available()) what we are trying to do is read each character as it is send and then write that value into the string.
Now we check if the string length is greater than zero, so that we know if some data is received. Then we do a comparison check to see what was received. And depending on the data, the LED is turned ON/OFF.
There was some problems when I firsted tried it with satsha kit, so I switched to arduino to make sure that the code and the App was working fine.
The App works well on Arduino, once I paired the Bluetooth module and clicked the On button, then the light turned On. The big while light is an LED connected to the pin 13 of the Arduino board. Now I will try it with my satsha kit.
The code worked fine this time. Might have been a connection issue the last time I tried it. It responds well to the code, same as that of the Arduino board. Here I'm lighitng up the internal LED of the Satsha Board.
rahulsrajan.com
rahulsrajan01@gmail.com
Trivandrum, Kerala ,
India.

Technopark, Kerala, India