Exercise 08 Embedded Programming
Requirement
- Read a microcontroller data sheet
- Program your board to do something, with as many different programming languages and programming environments as possible
Datasheet of Atmel Microcontroller
The microcontroller we are working to on is a Atmel ATtiny85 MCU.
To locate the datasheet of an MCU, go to the Atmel website >> Atmel AVR 8-bit and 32-bit Microcontrollers >> tinyAVR MCUs >> ATtiny85
ATtiny25/v/ATtiny45/v/ATtiny85/v Complete datasheet, 234 pages
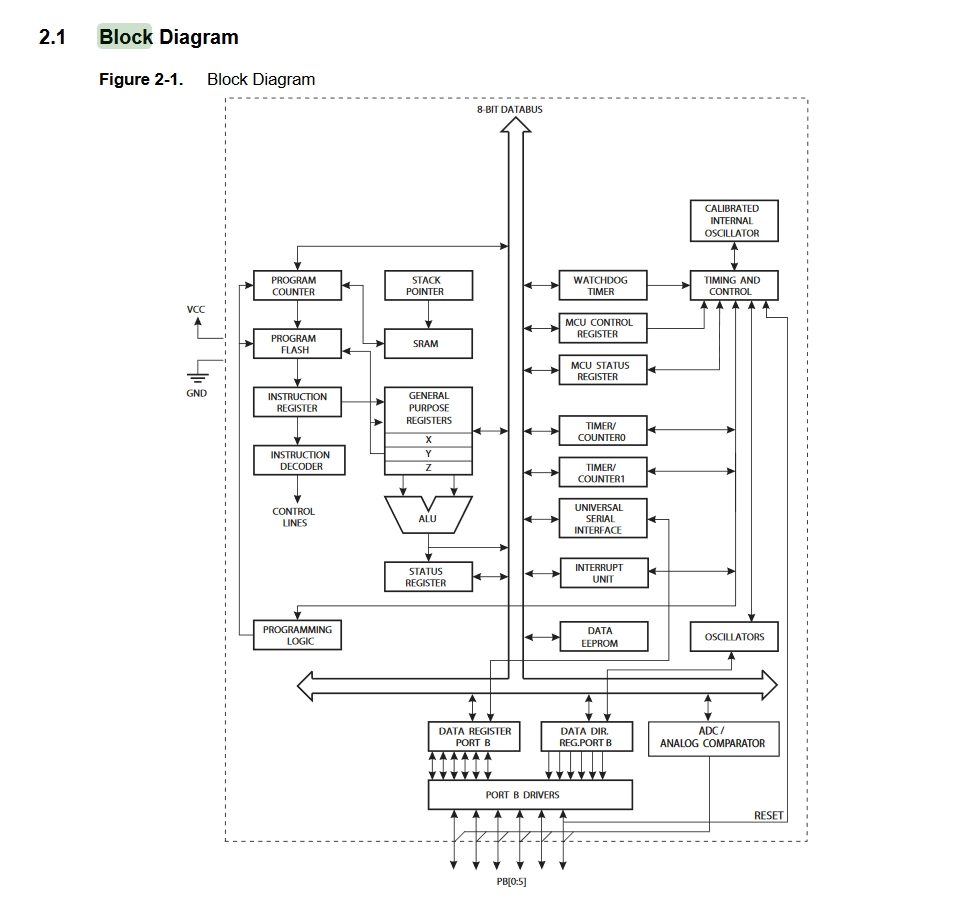
Reading thru the Datasheet, it shows plenty of information of the ATTINY85 which I used for the hello board.

It also shows the block diagram of the chip. I am actually quite surprise that such a small chip, and so many logic gates and components all cramped into one chip.
We can also check out the memory differences between Attiny45 and Attiny85
Interestingly, the chip has 6 I/O (Input Output) pins that we can configure and to play with.
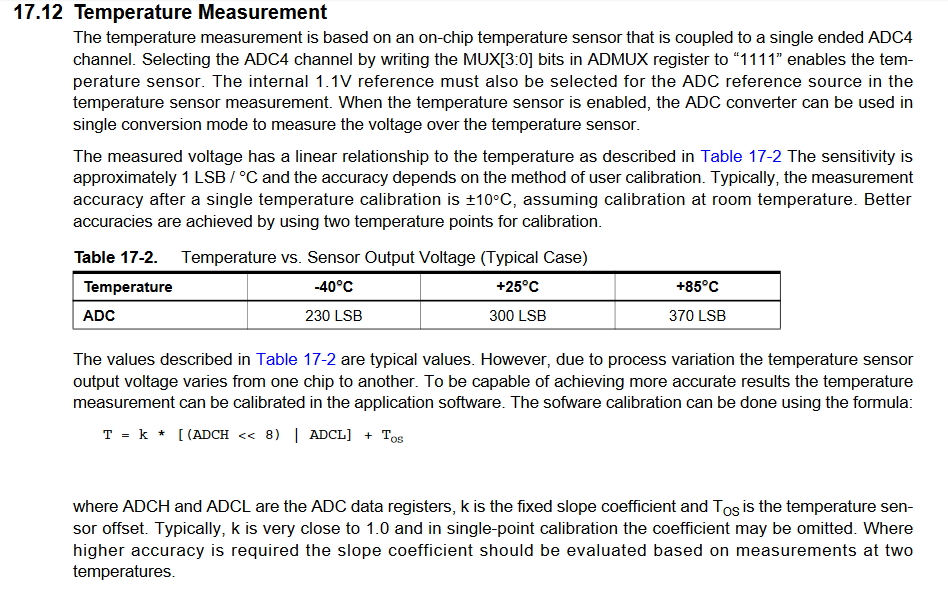
Based on the Datasheet it also says that ATTINY85 has a build in temperature sensor, and with some coding and lead assignment, I am able to activate the sensor.
The on-chip temperature sensor is selected by writing the code “1111” to the MUX[3:0] bits in ADMUX register when the ADC4 channel is used as an ADC input.
Difference between ATtiny85 and ATtiny85v
The difference between a ATtiny85v and a ATtiny85 is that the latter is an optimized version of the former. They are having the exact identical Eprom size of 512K but different in term of some electrical characteristics and clock speed.
- Operating voltage
- 1.8~5.5V for ATtiny25V/45V/85V.
- 2.7~5.5V for ATtiny25/45/85. - Speed Grade
- ATtiny 25V/45V/85V: 0~4MHZ @1.8~5.5V, 0-10MHz@2.7~5.5V.
- ATtiny25/45/85: 0~10MHz@2.7~5.5V, 0~20MHz@4.5~5.5V.
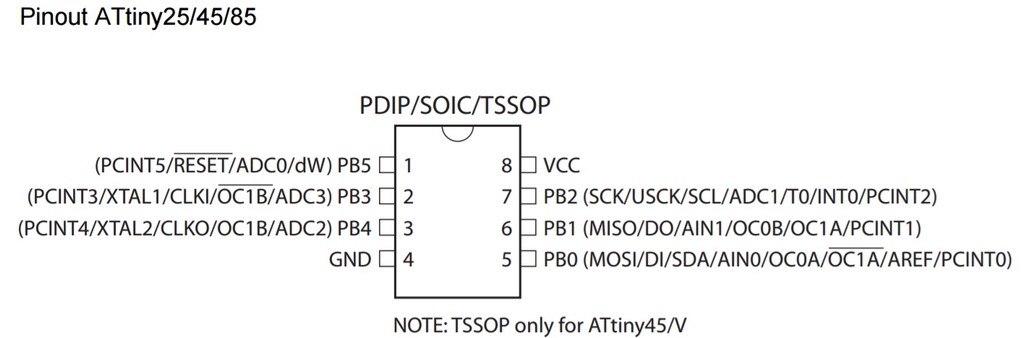
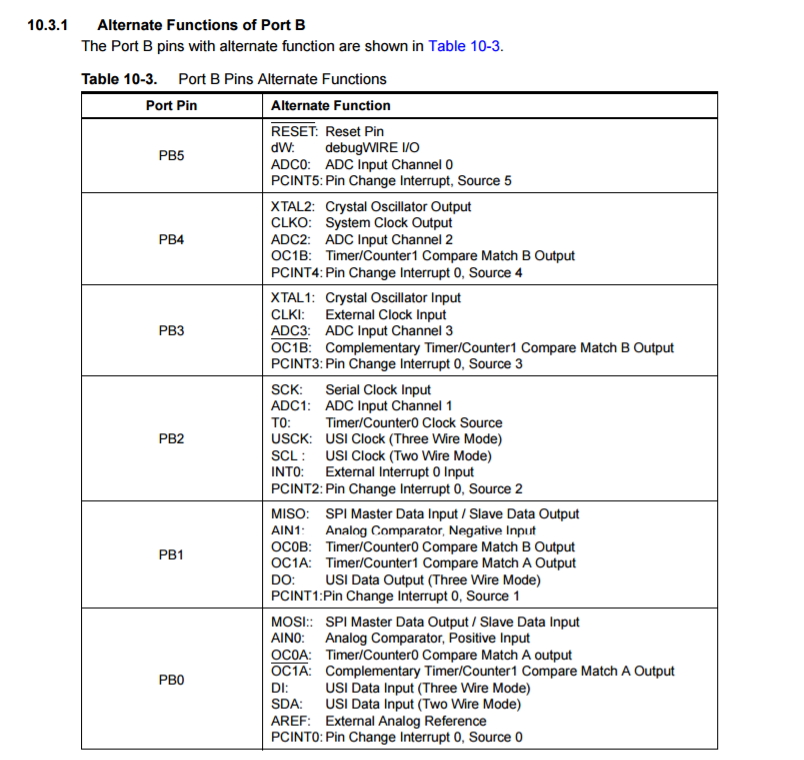
- There are 8 pins on this chip.
- VCC(pin8:) supplies voltage.
- GND(pin4:) ground.
- Port B (PB5:PB0) is a 6-bit bi-directional I/O port with internal pull-up resistors (selected for each bit). The Port B output buffers have symmetrical drive characteristics with both high sink and source capability. As inputs, Port B pins that are externally pulled low will source current if the pull-up resistors are activated. The Port B pins are tri-stated when a reset condition becomes active, even if the clock is not running.
- RESET (PB5): Reset input. A low level on this pin for longer than the minimum pulse length will generate a reset, even if the clock is not running and provided the reset pin has not been disabled.
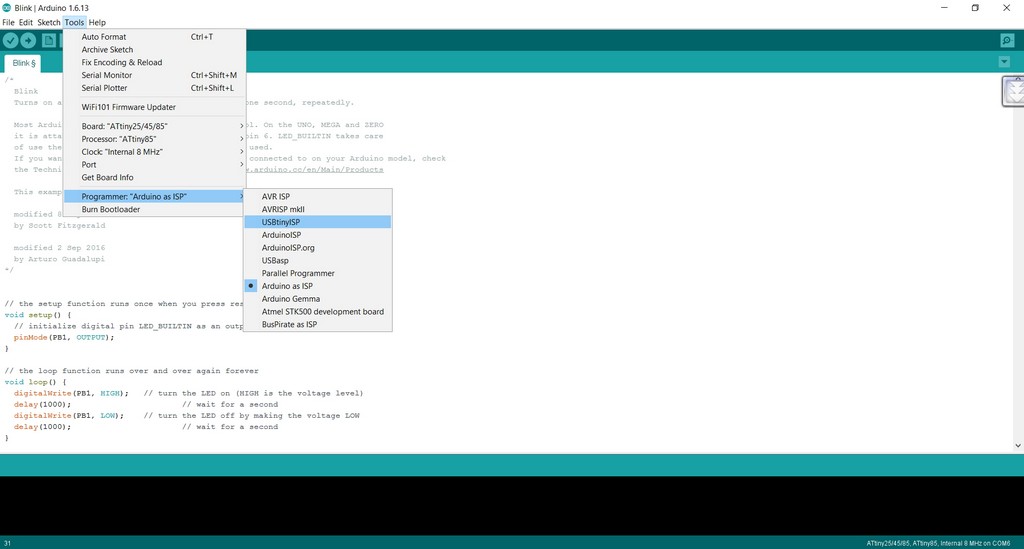
- Tools >> Board >> ATtiny25/45/85
- Tools >> Processor >> ATtiny85
- Tools >> Clock >> 8 MHz (Internal)
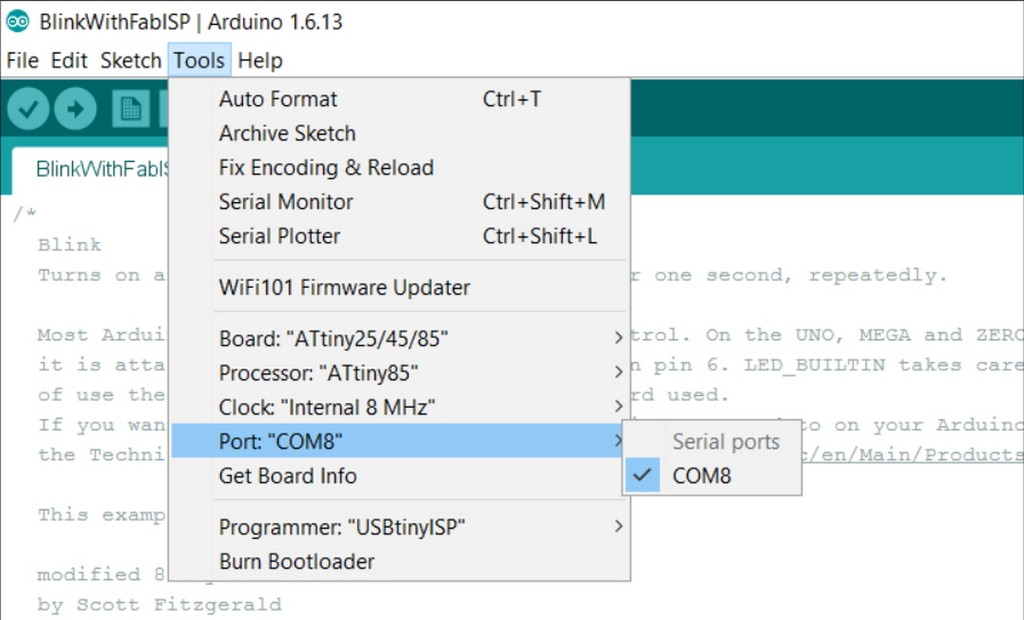
- Tools >> Port >> select the corresponding port connecting the board-COM8
- Tools >> Programmer >> USBtinyISP
- Burn Bootloader
Personnally, acronyms like PDIP/SOIC/QFN/MLF/VQFN can be really confusing for non electronic practising people like me- especially after graduated for so many years. I only remembered those are the "IC packaging name"; so it is good to recap what are those packagings acronym really are refer to. I refer to the following recap of IC packaging acronym to recap what IC Packaging exactly are those terms refer to.
Characteristics of the ATtiny85:
Programming of Microcontroller
To upload a program to a microcontroller (MCU) chip, an ISP programmer is required. In-system programming (ISP), also called In-Circuit Serial Programming (ICSP), is the ability of some programmable logic devices, microcontrollers, and other embedded devices to be programmed while installed in a complete system, rather than requiring the chip to be programmed prior to installing it into the system. For this week assignment our local instructor - Mr Steven Chew has instructed us to try to use the FabISP board we built in week4 assignment to programme the Hello board. created in week6 assignment. Both boards uses the AVR chip microcontroller with a modified Harvard architecture 8-bit RISC single-chip microcontroller; which was developed by Atmel in 1996. The AVR was one of the first microcontroller families to use on-chip flash memory for program storage, as opposed to one-time programmable ROM, EPROM, or EEPROM used by other microcontrollers at that time.
Using FabISP(USBTinyISP) as programmer in the Arduino IDE Environment
To begin with, I started by configuring my USBTinyISP as my progammer as shown in the following:
To test out whether the FabISP board I created in week4 could function as a programmer to progamme my hello board, I also selected the following setup in Arduino IDE:
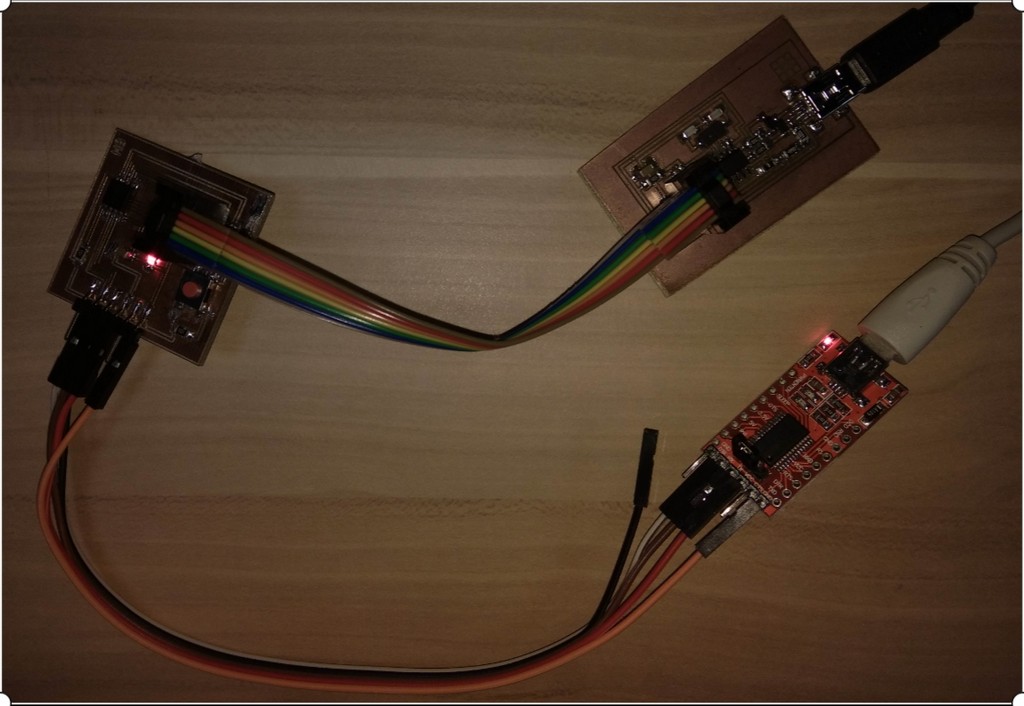
I then connected up My FabISP in the place of Arduino UNO as my programmer to my Hello board as shown in the following picture:
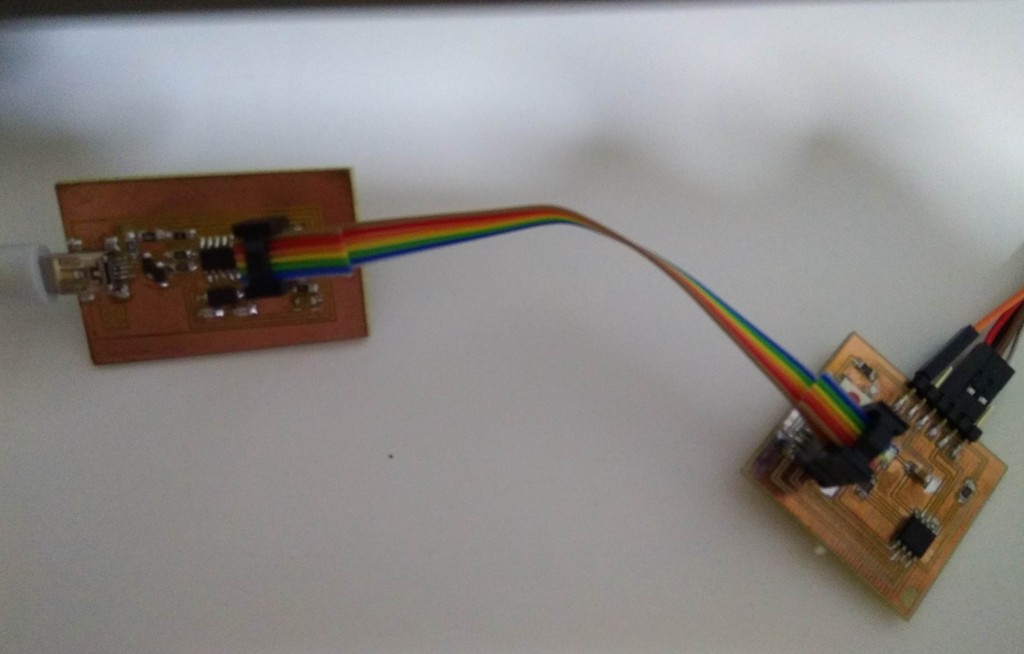
In short all the connection would be the same like week6 assignment, except FabISP is being used in the place of Arduino Uno as programmer.
Installing a Bootloader
The bootloader is basically a .hex file that runs when you turn on the board. It is very similar to the BIOS that runs on your PC. It does two things. First, it looks around to see if the computer is trying to program it. If it is, it grabs the program from the computer and uploads it into the ICs memory (in a specific location so as not to overwrite the bootloader). That is why when you try to upload code, the Arduino IDE resets the chip. This basically turns the IC off and back on again so the bootloader can start running again. If the computer isn’t trying to upload code, it tells the chip to run the code that’s already stored in memory. Once it locates and runs your program, the Arduino continuously loops through the program and does so as long as the board has power.
Programming the Hello board
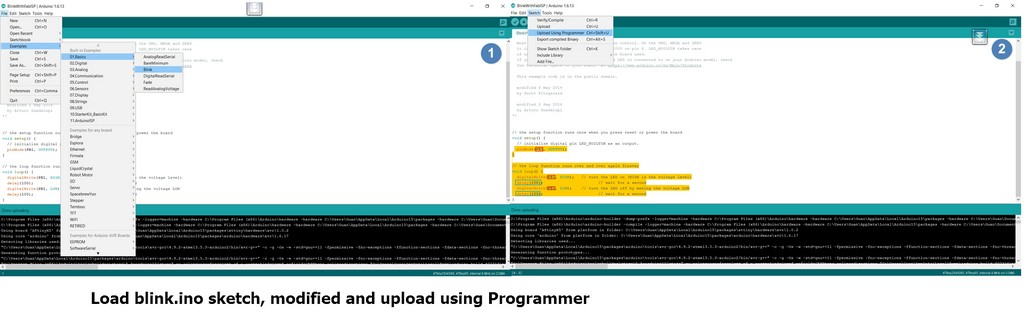
To start with, after burning the Bootloader, I proceed to loaded the blink.ino sketch from the examples within the Arduino IDE and did some modification of the programme to reflect on LED connected pin PB1 and proceed to upload the sketch using programmer as follow:
A record of the background processes is as recorded below:
Sketch uses 682 bytes (8%) of program storage space. Maximum is 8,192 bytes.
Global variables use 9 bytes (1%) of dynamic memory, leaving 503 bytes for local variables. Maximum is 512 bytes.
C:\Users\Guan\AppData\Local\Arduino15\packages\arduino\tools\avrdude\6.3.0-arduino8/bin/avrdude -CC:\Users\Guan\AppData\Local\Arduino15\packages\arduino\tools\avrdude\6.3.0-arduino8/etc/avrdude.conf -v -pattiny85 -cusbtiny -Uflash:w:C:\Users\Guan\AppData\Local\Temp\arduino_build_402314/BlinkWithFabISP.ino.hex:i

avrdude: Version 6.3, compiled on Dec 16 2016 at 13:33:19
         Copyright (c) 2000-2005 Brian Dean, http://www.bdmicro.com/
         Copyright (c) 2007-2014 Joerg Wunsch

         System wide configuration file is "C:\Users\Guan\AppData\Local\Arduino15\packages\arduino\tools\avrdude\6.3.0-arduino8/etc/avrdude.conf"

         Using Port                    : usb
         Using Programmer              : usbtiny
avrdude: usbdev_open(): Found USBtinyISP, bus:device: bus-0:\\.\libusb0-0001--0x1781-0x0c9f
         AVR Part                      : ATtiny85
         Chip Erase delay              : 400000 us
         PAGEL                         : P00
         BS2                           : P00
         RESET disposition             : possible i/o
         RETRY pulse                   : SCK
         serial program mode           : yes
         parallel program mode         : yes
         Timeout                       : 200
         StabDelay                     : 100
         CmdexeDelay                   : 25
         SyncLoops                     : 32
         ByteDelay                     : 0
         PollIndex                     : 3
         PollValue                     : 0x53
         Memory Detail                 :

                                  Block Poll               Page                       Polled
           Memory Type Mode Delay Size  Indx Paged  Size   Size #Pages MinW  MaxW   ReadBack
           ----------- ---- ----- ----- ---- ------ ------ ---- ------ ----- ----- ---------
           eeprom        65    12     4    0 no        512    4      0  4000  4500 0xff 0xff
           flash         65     6    32    0 yes      8192   64    128 30000 30000 0xff 0xff
           signature      0     0     0    0 no          3    0      0     0     0 0x00 0x00
           lock           0     0     0    0 no          1    0      0  9000  9000 0x00 0x00
           lfuse          0     0     0    0 no          1    0      0  9000  9000 0x00 0x00
           hfuse          0     0     0    0 no          1    0      0  9000  9000 0x00 0x00
           efuse          0     0     0    0 no          1    0      0  9000  9000 0x00 0x00
           calibration    0     0     0    0 no          1    0      0     0     0 0x00 0x00

         Programmer Type : USBtiny
         Description     : USBtiny simple USB programmer, http://www.ladyada.net/make/usbtinyisp/
avrdude: programmer operation not supported

avrdude: Using SCK period of 10 usec
avrdude: AVR device initialized and ready to accept instructions

Reading | ################################################## | 100% 0.00s

avrdude: Device signature = 0x1e930b (probably t85)
avrdude: NOTE: "flash" memory has been specified, an erase cycle will be performed
         To disable this feature, specify the -D option.
avrdude: erasing chip
avrdude: Using SCK period of 10 usec
avrdude: reading input file "C:\Users\Guan\AppData\Local\Temp\arduino_build_402314/BlinkWithFabISP.ino.hex"
avrdude: writing flash (682 bytes):

Writing | ################################################## | 100% 0.97s

avrdude: 682 bytes of flash written
avrdude: verifying flash memory against C:\Users\Guan\AppData\Local\Temp\arduino_build_402314/BlinkWithFabISP.ino.hex:
avrdude: load data flash data from input file C:\Users\Guan\AppData\Local\Temp\arduino_build_402314/BlinkWithFabISP.ino.hex:
avrdude: input file C:\Users\Guan\AppData\Local\Temp\arduino_build_402314/BlinkWithFabISP.ino.hex contains 682 bytes
avrdude: reading on-chip flash data:

Reading | ################################################## | 100% 0.80s

avrdude: verifying ...
avrdude: 682 bytes of flash verified

avrdude done.  Thank you.
Modifying the codes of example sketches
Blink at 1 second interval
  digitalWrite(PB1, HIGH);   // turn the LED on (HIGH is the voltage level)
  delay(1000);              // wait for a second
  digitalWrite(PB1, LOW);    // turn the LED off by making the voltage LOW
  delay(1000);
Blink Faster at 0.1 second interval
  digitalWrite(PB1, HIGH);   // turn the LED on (HIGH is the voltage level)
  delay(100);              // wait for a second
  digitalWrite(PB1, LOW);    // turn the LED off by making the voltage LOW
  delay(100);
LED turns off when button is pressed
  if (buttonState == HIGH) {
    // turn LED on:
    digitalWrite(ledPin, LOW);
  } else {
    // turn LED off:
    digitalWrite(ledPin, HIGH);
With the tests above, I can almost certain that my FabISP and Hello are almost completely functioning. Except one more area- Serial communication with computer through FTDI USB to TTL Serial coverter board. So next up I had connected the Hello board to FTDI USB to TTL Serial converter, and proceed with the testing in next section.
Connecting the Hello board to FTDI USB to TTL Serial Converter
A serial bus consists of just two wires - one for sending data and another for receiving. As such, serial devices should have two serial pins: the receiver, RX, and the transmitter, TX. It’s important to note that those RX and TX labels are with respect to the device itself. So the RX from one device should go to the TX of the other, and vice-versa. The transmitter should be talking to the receiver, not to another transmitter.

With the connection of hello to ftdi I then modified the skectch as follow to enable the display the state of LED on putty terminal via FTDI USB To TTL Serial Converter:
#include// constants won't change. They're used here to // set pin numbers: const int rx=PB3; const int tx=PB4; const int buttonPin = PB0; // the number of the pushbutton pin const int ledPin = PB1; // the number of the LED pin int val = 0; int old_val = 0; int state = 0; int flag = 0; SoftwareSerial mySerial(rx,tx); // variables will change: void setup() { mySerial.begin(9600); // initialize the LED pin as an output: pinMode(ledPin, OUTPUT); // initialize the pushbutton pin as an input: pinMode(buttonPin, INPUT); } void loop() { if(mySerial.available() > 0){ state = mySerial.read(); flag=0; } // read the state of the pushbutton value: val = digitalRead(buttonPin); // check if the pushbutton is pressed. // if it is, the buttonState is HIGH: // resets written counter to 0 if ((val == HIGH) && (old_val == LOW)) { state = 1 - state; flag = 0; delay(10); } old_val = val; if ((state == 1) && (flag == 0)) { digitalWrite(ledPin, HIGH); // turn the LED on (HIGH is the voltage level) mySerial.println("Switch pressed and LED on!"); flag = 1; } else if ((state == 0) && (flag == 0)) { digitalWrite(ledPin, LOW); mySerial.println("Switch pressed and LED off!"); flag = 1; } else { //do nothing } }
I then upload the skecth using the upload to programmer and open up putty to display the statement.
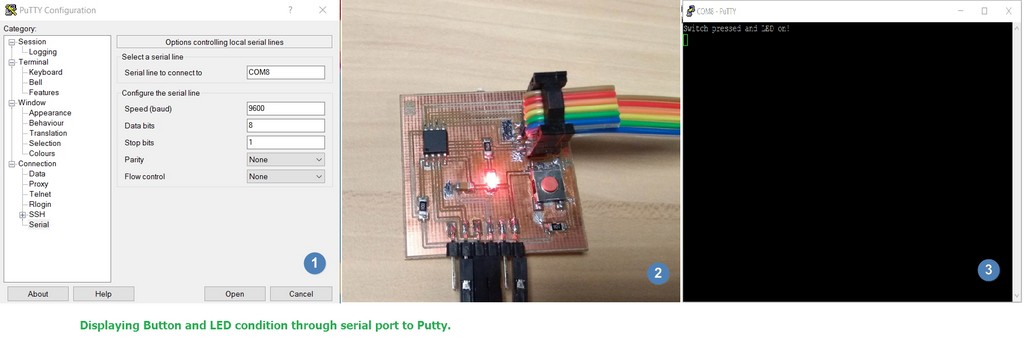
A video of the LED and Button pressed with display of the condition is also included as follow:
Similar display of switch and LED condition can also be achieved in serial monitor in Arduino IDE. Click at the top right hand corner in IDE as shown.

After comfirmed that the serial communication, Hello board and FabISB are functioning, I proceed to try out setup Atmel Studio7 in next section and the study of programming of my Hello board in C.
Programming in Atmel Studio 7
I began by downloading Atmel Studio 7 from the website and proceed to do the installation.
To find out how to use Atmel Studio, I began by watching the following video:
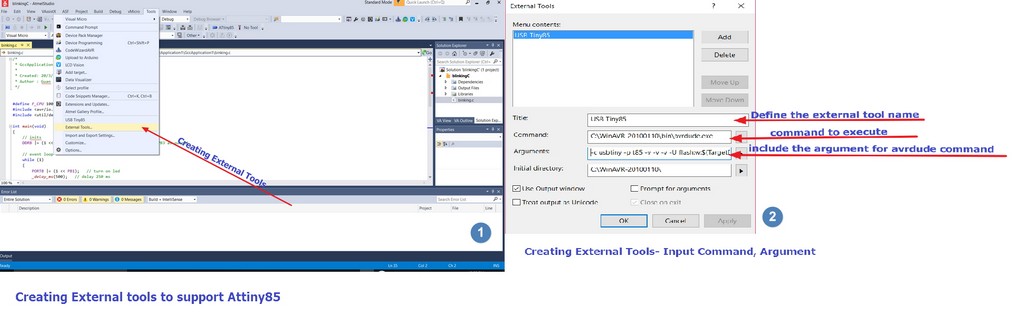
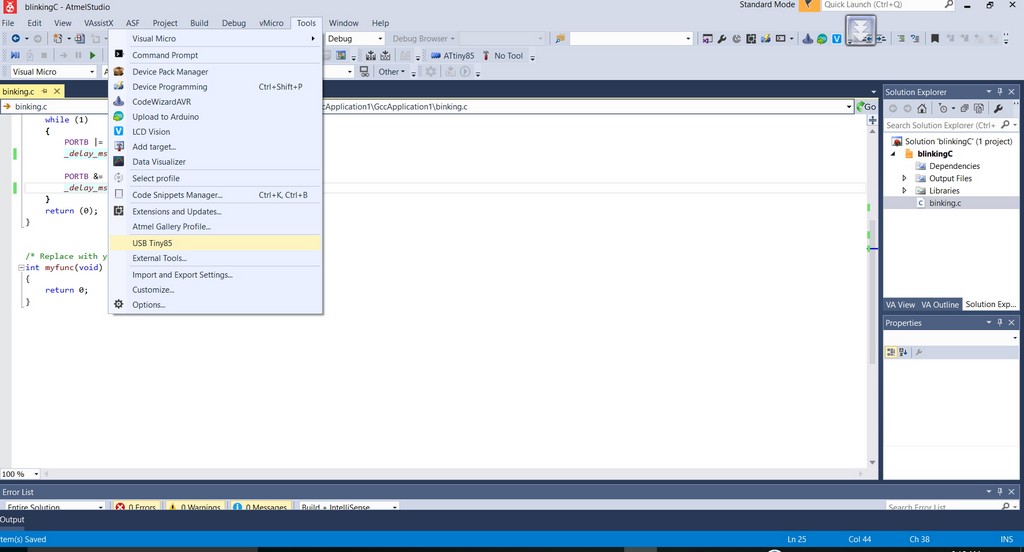
From the video, I leant to setup the external tools
Understanding c programming of ATtiny85 for LED blinking programme
As I don't have any prior experieince and programming knowledge in c, for a quick fix I search and found the the following which site provided almost identical source code which is good for the study that I was going to carry out.
AVR ATtiny85 Programming in Atmel Studio.
From the study, I proceed to modify the coding in c to suit to the pin number that I have assigned to lit up my LED: PB1. The coding is as indicated bellow:

For the very first time, I build my solution and upload the hex file generated at the back ground by Atmel Studio using the following steps:

From the output window of Atmel Studio7, we can observered what are the background processes involved and it is recorded as follow:
------ Build started: Project: blinkingC, Configuration: Debug AVR ------
Build started.
Project "blinkingC.cproj" (default targets):
Target "PreBuildEvent" skipped, due to false condition; ('$(PreBuildEvent)'!='') was evaluated as (''!='').
Target "CoreBuild" in file "C:\Program Files (x86)\Atmel\Studio\7.0\Vs\Compiler.targets" from project "C:\Users\Guan\Documents\Atmel Studio\7.0\GccApplication1\GccApplication1\blinkingC.cproj" (target "Build" depends on it):
	Using "RunCompilerTask" task from assembly "C:\Program Files (x86)\Atmel\Studio\7.0\Extensions\Application\AvrGCC.dll".
	Task "RunCompilerTask"
		Shell Utils Path C:\Program Files (x86)\Atmel\Studio\7.0\shellUtils
		C:\Program Files (x86)\Atmel\Studio\7.0\shellUtils\make.exe all --jobs 8 --output-sync
		Building file: .././binking.c
		Invoking: AVR/GNU C Compiler : 5.4.0
		"C:\Program Files (x86)\Atmel\Studio\7.0\toolchain\avr8\avr8-gnu-toolchain\bin\avr-gcc.exe"  -x c -funsigned-char -funsigned-bitfields -DDEBUG  -I"C:\Program Files (x86)\Atmel\Studio\7.0\Packs\atmel\ATtiny_DFP\1.2.118\include"  -O1 -ffunction-sections -fdata-sections -fpack-struct -fshort-enums -g2 -Wall -mmcu=attiny85 -B "C:\Program Files (x86)\Atmel\Studio\7.0\Packs\atmel\ATtiny_DFP\1.2.118\gcc\dev\attiny85" -c -std=gnu99 -MD -MP -MF "binking.d" -MT"binking.d" -MT"binking.o"   -o "binking.o" ".././binking.c"
		Finished building: .././binking.c
		Building target: blinkingC.elf
		Invoking: AVR/GNU Linker : 5.4.0
		"C:\Program Files (x86)\Atmel\Studio\7.0\toolchain\avr8\avr8-gnu-toolchain\bin\avr-gcc.exe" -o blinkingC.elf  binking.o   -Wl,-Map="blinkingC.map" -Wl,--start-group -Wl,-lm  -Wl,--end-group -Wl,--gc-sections -mmcu=attiny85 -B "C:\Program Files (x86)\Atmel\Studio\7.0\Packs\atmel\ATtiny_DFP\1.2.118\gcc\dev\attiny85"
		Finished building target: blinkingC.elf
		"C:\Program Files (x86)\Atmel\Studio\7.0\toolchain\avr8\avr8-gnu-toolchain\bin\avr-objcopy.exe" -O ihex -R .eeprom -R .fuse -R .lock -R .signature -R .user_signatures  "blinkingC.elf" "blinkingC.hex"
		"C:\Program Files (x86)\Atmel\Studio\7.0\toolchain\avr8\avr8-gnu-toolchain\bin\avr-objcopy.exe" -j .eeprom  --set-section-flags=.eeprom=alloc,load --change-section-lma .eeprom=0  --no-change-warnings -O ihex "blinkingC.elf" "blinkingC.eep" || exit 0
		"C:\Program Files (x86)\Atmel\Studio\7.0\toolchain\avr8\avr8-gnu-toolchain\bin\avr-objdump.exe" -h -S "blinkingC.elf" > "blinkingC.lss"
		"C:\Program Files (x86)\Atmel\Studio\7.0\toolchain\avr8\avr8-gnu-toolchain\bin\avr-objcopy.exe" -O srec -R .eeprom -R .fuse -R .lock -R .signature -R .user_signatures "blinkingC.elf" "blinkingC.srec"
		"C:\Program Files (x86)\Atmel\Studio\7.0\toolchain\avr8\avr8-gnu-toolchain\bin\avr-size.exe" "blinkingC.elf"
		   text	   data	    bss	    dec	    hex	filename
		     96	      0	      0	     96	     60	blinkingC.elf
	Done executing task "RunCompilerTask".
	Using "RunOutputFileVerifyTask" task from assembly "C:\Program Files (x86)\Atmel\Studio\7.0\Extensions\Application\AvrGCC.dll".
	Task "RunOutputFileVerifyTask"
				Program Memory Usage 	:	96 bytes   1.2 % Full
				Data Memory Usage 		:	0 bytes   0.0 % Full
	Done executing task "RunOutputFileVerifyTask".
Done building target "CoreBuild" in project "blinkingC.cproj".
Target "PostBuildEvent" skipped, due to false condition; ('$(PostBuildEvent)' != '') was evaluated as ('' != '').
Target "Build" in file "C:\Program Files (x86)\Atmel\Studio\7.0\Vs\Avr.common.targets" from project "C:\Users\Guan\Documents\Atmel Studio\7.0\GccApplication1\GccApplication1\blinkingC.cproj" (entry point):
Done building target "Build" in project "blinkingC.cproj".
Done building project "blinkingC.cproj".

Build succeeded.
========== Build: 1 succeeded or up-to-date, 0 failed, 0 skipped ==========
With the success in building of the simple LED blinking programme solution files and the blinkingC.hex file, I then proceed to upload the machine code to my Hello board using the step as shown in the follwoing picture:
Again, I captured the backgorund information from the output windows of Atmel Studio7 as follow: Similarly, at the background we are running avrdude.exe for uploading of the blinkC.hex file to my hello board.
avrdude.exe: Version 5.10, compiled on Jan 19 2010 at 10:45:23
             Copyright (c) 2000-2005 Brian Dean, http://www.bdmicro.com/
             Copyright (c) 2007-2009 Joerg Wunsch

             System wide configuration file is "C:\WinAVR-20100110\bin\avrdude.conf"

             Using Port                    : lpt1
             Using Programmer              : usbtiny
             AVR Part                      : ATtiny85
             Chip Erase delay              : 4500 us
             PAGEL                         : P00
             BS2                           : P00
             RESET disposition             : possible i/o
             RETRY pulse                   : SCK
             serial program mode           : yes
             parallel program mode         : yes
             Timeout                       : 200
             StabDelay                     : 100
             CmdexeDelay                   : 25
             SyncLoops                     : 32
             ByteDelay                     : 0
             PollIndex                     : 3
             PollValue                     : 0x53
             Memory Detail                 :

                                      Block Poll               Page                       Polled
               Memory Type Mode Delay Size  Indx Paged  Size   Size #Pages MinW  MaxW   ReadBack
               ----------- ---- ----- ----- ---- ------ ------ ---- ------ ----- ----- ---------
               eeprom        65     6     4    0 no        512    4      0  4000  4500 0xff 0xff
                                      Block Poll               Page                       Polled
               Memory Type Mode Delay Size  Indx Paged  Size   Size #Pages MinW  MaxW   ReadBack
               ----------- ---- ----- ----- ---- ------ ------ ---- ------ ----- ----- ---------
               flash         65     6    32    0 yes      8192   64    128  4500  4500 0xff 0xff
                                      Block Poll               Page                       Polled
               Memory Type Mode Delay Size  Indx Paged  Size   Size #Pages MinW  MaxW   ReadBack
               ----------- ---- ----- ----- ---- ------ ------ ---- ------ ----- ----- ---------
               signature      0     0     0    0 no          3    0      0     0     0 0x00 0x00
                                      Block Poll               Page                       Polled
               Memory Type Mode Delay Size  Indx Paged  Size   Size #Pages MinW  MaxW   ReadBack
               ----------- ---- ----- ----- ---- ------ ------ ---- ------ ----- ----- ---------
               lock           0     0     0    0 no          1    0      0  9000  9000 0x00 0x00
                                      Block Poll               Page                       Polled
               Memory Type Mode Delay Size  Indx Paged  Size   Size #Pages MinW  MaxW   ReadBack
               ----------- ---- ----- ----- ---- ------ ------ ---- ------ ----- ----- ---------
               lfuse          0     0     0    0 no          1    0      0  9000  9000 0x00 0x00
                                      Block Poll               Page                       Polled
               Memory Type Mode Delay Size  Indx Paged  Size   Size #Pages MinW  MaxW   ReadBack
               ----------- ---- ----- ----- ---- ------ ------ ---- ------ ----- ----- ---------
               hfuse          0     0     0    0 no          1    0      0  9000  9000 0x00 0x00
                                      Block Poll               Page                       Polled
               Memory Type Mode Delay Size  Indx Paged  Size   Size #Pages MinW  MaxW   ReadBack
               ----------- ---- ----- ----- ---- ------ ------ ---- ------ ----- ----- ---------
               efuse          0     0     0    0 no          1    0      0  9000  9000 0x00 0x00
                                      Block Poll               Page                       Polled
               Memory Type Mode Delay Size  Indx Paged  Size   Size #Pages MinW  MaxW   ReadBack
               ----------- ---- ----- ----- ---- ------ ------ ---- ------ ----- ----- ---------
               calibration    0     0     0    0 no          2    0      0     0     0 0x00 0x00

             Programmer Type : USBtiny
             Description     : USBtiny simple USB programmer, http://www.ladyada.net/make/usbtinyisp/
avrdude.exe: programmer operation not supported

avrdude.exe: Using SCK period of 10 usec
CMD: [ac 53 00 00] [00 00 53 00]
avrdude.exe: AVR device initialized and ready to accept instructions

Reading | CMD: [30 00 00 00] [00 30 00 1e]
CMD: [30 00 01 00] [00 30 00 93]
################CMD: [30 00 02 00] [00 30 00 0b]
################################## | 100% 0.00s

avrdude.exe: Device signature = 0x1e930b
CMD: [50 00 00 00] [00 50 00 e2]
avrdude.exe: safemode read 1, lfuse value: e2
CMD: [50 00 00 00] [00 50 00 e2]
avrdude.exe: safemode read 2, lfuse value: e2
CMD: [50 00 00 00] [00 50 00 e2]
avrdude.exe: safemode read 3, lfuse value: e2
avrdude.exe: safemode: lfuse reads as E2
CMD: [58 08 00 00] [00 58 08 df]
avrdude.exe: safemode read 1, hfuse value: df
CMD: [58 08 00 00] [00 58 08 df]
avrdude.exe: safemode read 2, hfuse value: df
CMD: [58 08 00 00] [00 58 08 df]
avrdude.exe: safemode read 3, hfuse value: df
avrdude.exe: safemode: hfuse reads as DF
CMD: [50 08 00 00] [00 50 08 ff]
avrdude.exe: safemode read 1, efuse value: ff
CMD: [50 08 00 00] [00 50 08 ff]
avrdude.exe: safemode read 2, efuse value: ff
CMD: [50 08 00 00] [00 50 08 ff]
avrdude.exe: safemode read 3, efuse value: ff
avrdude.exe: safemode: efuse reads as FF
avrdude.exe: NOTE: FLASH memory has been specified, an erase cycle will be performed
             To disable this feature, specify the -D option.
CMD: [a0 01 fc 00] [00 a0 01 ff]
CMD: [a0 01 fd 00] [00 a0 01 ff]
CMD: [a0 01 fe 00] [00 a0 01 ff]
CMD: [a0 01 ff 00] [00 a0 01 ff]
avrdude.exe: erasing chip
CMD: [ac 80 00 00] [00 ac 80 00]
avrdude.exe: Using SCK period of 10 usec
CMD: [ac 53 00 00] [00 ac 53 00]
avrdude.exe: reading input file "C:\Users\Guan\Documents\Atmel Studio\7.0\GccApplication1\GccApplication1\Debug\blinkingC.hex"
avrdude.exe: writing flash (96 bytes):

Writing | CMD: [4c 00 00 00] [40 4c 00 00]
#################################CMD: [4c 00 20 00] [cf 4c 00 20]
################# | 100% 0.09s

avrdude.exe: 96 bytes of flash written
avrdude.exe: verifying flash memory against C:\Users\Guan\Documents\Atmel Studio\7.0\GccApplication1\GccApplication1\Debug\blinkingC.hex:
avrdude.exe: load data flash data from input file C:\Users\Guan\Documents\Atmel Studio\7.0\GccApplication1\GccApplication1\Debug\blinkingC.hex:
avrdude.exe: input file C:\Users\Guan\Documents\Atmel Studio\7.0\GccApplication1\GccApplication1\Debug\blinkingC.hex contains 96 bytes
avrdude.exe: reading on-chip flash data:

Reading | ################################################## | 100% 0.05s

avrdude.exe: verifying ...
avrdude.exe: 96 bytes of flash verified

CMD: [50 00 00 00] [cf 50 00 e2]
avrdude.exe: safemode read 1, lfuse value: e2
CMD: [50 00 00 00] [00 50 00 e2]
avrdude.exe: safemode read 2, lfuse value: e2
CMD: [50 00 00 00] [00 50 00 e2]
avrdude.exe: safemode read 3, lfuse value: e2
avrdude.exe: safemode: lfuse reads as E2
CMD: [58 08 00 00] [00 58 08 df]
avrdude.exe: safemode read 1, hfuse value: df
CMD: [58 08 00 00] [00 58 08 df]
avrdude.exe: safemode read 2, hfuse value: df
CMD: [58 08 00 00] [00 58 08 df]
avrdude.exe: safemode read 3, hfuse value: df
avrdude.exe: safemode: hfuse reads as DF
CMD: [50 08 00 00] [00 50 08 ff]
avrdude.exe: safemode read 1, efuse value: ff
CMD: [50 08 00 00] [00 50 08 ff]
avrdude.exe: safemode read 2, efuse value: ff
CMD: [50 08 00 00] [00 50 08 ff]
avrdude.exe: safemode read 3, efuse value: ff
avrdude.exe: safemode: efuse reads as FF
avrdude.exe: safemode: Fuses OK

avrdude.exe done.  Thank you.
Results of the study using Atmel Studio7 to try out a Simple LED Blinking programme in C.
After uploaded successfully, I proceed to captured following video immediately to show my study output.
With the sucess in uplaod and testing of my first LED blinking progamme, I got a bit confident and proceeded to next phase of my study- to progamme the LED and Button pressing operation. The code for the operation are as shown:
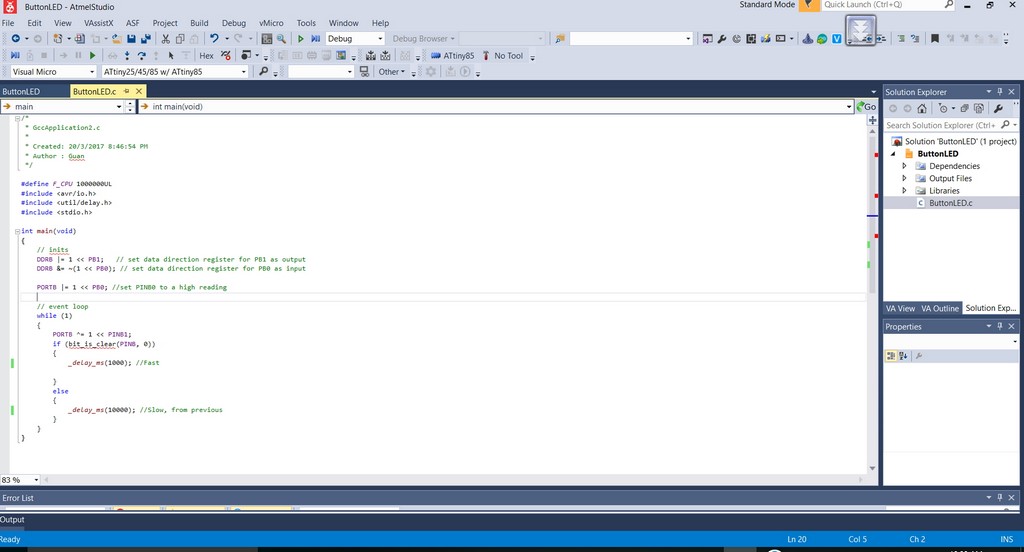
I then gone through the exact same upload processes as mention in the LED blinking study to upload the buttonLED.c programme and the capture of the output window are as shown:
avrdude.exe: Version 5.10, compiled on Jan 19 2010 at 10:45:23
             Copyright (c) 2000-2005 Brian Dean, http://www.bdmicro.com/
             Copyright (c) 2007-2009 Joerg Wunsch

             System wide configuration file is "C:\WinAVR-20100110\bin\avrdude.conf"

             Using Port                    : lpt1
             Using Programmer              : usbtiny
             AVR Part                      : ATtiny85
             Chip Erase delay              : 4500 us
             PAGEL                         : P00
             BS2                           : P00
             RESET disposition             : possible i/o
             RETRY pulse                   : SCK
             serial program mode           : yes
             parallel program mode         : yes
             Timeout                       : 200
             StabDelay                     : 100
             CmdexeDelay                   : 25
             SyncLoops                     : 32
             ByteDelay                     : 0
             PollIndex                     : 3
             PollValue                     : 0x53
             Memory Detail                 :

                                      Block Poll               Page                       Polled
               Memory Type Mode Delay Size  Indx Paged  Size   Size #Pages MinW  MaxW   ReadBack
               ----------- ---- ----- ----- ---- ------ ------ ---- ------ ----- ----- ---------
               eeprom        65     6     4    0 no        512    4      0  4000  4500 0xff 0xff
                                      Block Poll               Page                       Polled
               Memory Type Mode Delay Size  Indx Paged  Size   Size #Pages MinW  MaxW   ReadBack
               ----------- ---- ----- ----- ---- ------ ------ ---- ------ ----- ----- ---------
               flash         65     6    32    0 yes      8192   64    128  4500  4500 0xff 0xff
                                      Block Poll               Page                       Polled
               Memory Type Mode Delay Size  Indx Paged  Size   Size #Pages MinW  MaxW   ReadBack
               ----------- ---- ----- ----- ---- ------ ------ ---- ------ ----- ----- ---------
               signature      0     0     0    0 no          3    0      0     0     0 0x00 0x00
                                      Block Poll               Page                       Polled
               Memory Type Mode Delay Size  Indx Paged  Size   Size #Pages MinW  MaxW   ReadBack
               ----------- ---- ----- ----- ---- ------ ------ ---- ------ ----- ----- ---------
               lock           0     0     0    0 no          1    0      0  9000  9000 0x00 0x00
                                      Block Poll               Page                       Polled
               Memory Type Mode Delay Size  Indx Paged  Size   Size #Pages MinW  MaxW   ReadBack
               ----------- ---- ----- ----- ---- ------ ------ ---- ------ ----- ----- ---------
               lfuse          0     0     0    0 no          1    0      0  9000  9000 0x00 0x00
                                      Block Poll               Page                       Polled
               Memory Type Mode Delay Size  Indx Paged  Size   Size #Pages MinW  MaxW   ReadBack
               ----------- ---- ----- ----- ---- ------ ------ ---- ------ ----- ----- ---------
               hfuse          0     0     0    0 no          1    0      0  9000  9000 0x00 0x00
                                      Block Poll               Page                       Polled
               Memory Type Mode Delay Size  Indx Paged  Size   Size #Pages MinW  MaxW   ReadBack
               ----------- ---- ----- ----- ---- ------ ------ ---- ------ ----- ----- ---------
               efuse          0     0     0    0 no          1    0      0  9000  9000 0x00 0x00
                                      Block Poll               Page                       Polled
               Memory Type Mode Delay Size  Indx Paged  Size   Size #Pages MinW  MaxW   ReadBack
               ----------- ---- ----- ----- ---- ------ ------ ---- ------ ----- ----- ---------
               calibration    0     0     0    0 no          2    0      0     0     0 0x00 0x00

             Programmer Type : USBtiny
             Description     : USBtiny simple USB programmer, http://www.ladyada.net/make/usbtinyisp/
avrdude.exe: programmer operation not supported

avrdude.exe: Using SCK period of 10 usec
CMD: [ac 53 00 00] [00 00 53 00]
avrdude.exe: AVR device initialized and ready to accept instructions

Reading | CMD: [30 00 00 00] [00 30 00 1e]
CMD: [30 00 01 00] [00 30 00 93]
################CMD: [30 00 02 00] [00 30 00 0b]
################################## | 100% 0.00s

avrdude.exe: Device signature = 0x1e930b
CMD: [50 00 00 00] [00 50 00 e2]
avrdude.exe: safemode read 1, lfuse value: e2
CMD: [50 00 00 00] [00 50 00 e2]
avrdude.exe: safemode read 2, lfuse value: e2
CMD: [50 00 00 00] [00 50 00 e2]
avrdude.exe: safemode read 3, lfuse value: e2
avrdude.exe: safemode: lfuse reads as E2
CMD: [58 08 00 00] [00 58 08 df]
avrdude.exe: safemode read 1, hfuse value: df
CMD: [58 08 00 00] [00 58 08 df]
avrdude.exe: safemode read 2, hfuse value: df
CMD: [58 08 00 00] [00 58 08 df]
avrdude.exe: safemode read 3, hfuse value: df
avrdude.exe: safemode: hfuse reads as DF
CMD: [50 08 00 00] [00 50 08 ff]
avrdude.exe: safemode read 1, efuse value: ff
CMD: [50 08 00 00] [00 50 08 ff]
avrdude.exe: safemode read 2, efuse value: ff
CMD: [50 08 00 00] [00 50 08 ff]
avrdude.exe: safemode read 3, efuse value: ff
avrdude.exe: safemode: efuse reads as FF
avrdude.exe: NOTE: FLASH memory has been specified, an erase cycle will be performed
             To disable this feature, specify the -D option.
CMD: [a0 01 fc 00] [00 a0 01 ff]
CMD: [a0 01 fd 00] [00 a0 01 ff]
CMD: [a0 01 fe 00] [00 a0 01 ff]
CMD: [a0 01 ff 00] [00 a0 01 ff]
avrdude.exe: erasing chip
CMD: [ac 80 00 00] [00 ac 80 00]
avrdude.exe: Using SCK period of 10 usec
CMD: [ac 53 00 00] [00 ac 53 00]
avrdude.exe: reading input file "C:\Users\Guan\Documents\Atmel Studio\7.0\GccApplication2\GccApplication2\Debug\ButtonLED.hex"
avrdude.exe: writing flash (110 bytes):

Writing | CMD: [4c 00 00 00] [99 4c 00 00]
#############################CMD: [4c 00 20 00] [cf 4c 00 20]
##################### | 100% 0.11s

avrdude.exe: 110 bytes of flash written
avrdude.exe: verifying flash memory against C:\Users\Guan\Documents\Atmel Studio\7.0\GccApplication2\GccApplication2\Debug\ButtonLED.hex:
avrdude.exe: load data flash data from input file C:\Users\Guan\Documents\Atmel Studio\7.0\GccApplication2\GccApplication2\Debug\ButtonLED.hex:
avrdude.exe: input file C:\Users\Guan\Documents\Atmel Studio\7.0\GccApplication2\GccApplication2\Debug\ButtonLED.hex contains 110 bytes
avrdude.exe: reading on-chip flash data:

Reading | ################################################## | 100% 0.06s

avrdude.exe: verifying ...
avrdude.exe: 110 bytes of flash verified

CMD: [50 00 00 00] [cf 50 00 e2]
avrdude.exe: safemode read 1, lfuse value: e2
CMD: [50 00 00 00] [00 50 00 e2]
avrdude.exe: safemode read 2, lfuse value: e2
CMD: [50 00 00 00] [00 50 00 e2]
avrdude.exe: safemode read 3, lfuse value: e2
avrdude.exe: safemode: lfuse reads as E2
CMD: [58 08 00 00] [00 58 08 df]
avrdude.exe: safemode read 1, hfuse value: df
CMD: [58 08 00 00] [00 58 08 df]
avrdude.exe: safemode read 2, hfuse value: df
CMD: [58 08 00 00] [00 58 08 df]
avrdude.exe: safemode read 3, hfuse value: df
avrdude.exe: safemode: hfuse reads as DF
CMD: [50 08 00 00] [00 50 08 ff]
avrdude.exe: safemode read 1, efuse value: ff
CMD: [50 08 00 00] [00 50 08 ff]
avrdude.exe: safemode read 2, efuse value: ff
CMD: [50 08 00 00] [00 50 08 ff]
avrdude.exe: safemode read 3, efuse value: ff
avrdude.exe: safemode: efuse reads as FF
avrdude.exe: safemode: Fuses OK

avrdude.exe done.  Thank you.
Valla! My time is almost up. The following video shown my study of Button Press to change the blinkind rate of LED using c code in Atmel Studio 7 Environment.
My Reflection
Once again every week I am finding myself running out of time. My study this week gotta end here with the c coding modification and testing in Atmel Studio7. In the begining of last Thursday, I found my Hello board no longer functioning as it suppose to. When checked through the connection my classmate Mr Louis Goh, we found that some of the tiny copper tracks had started to peel off and as a result the tracks are broken. I have no choice but the remake my Hello Board once again. So I had to gone through the hardwork to stuff my hello board and resoldering all the components; after getting the components from our local instructor - Mr Rodney. Thanks so much Mr Rodney.
I am very thankful that all of my classmates, seniors and local instructors have been very helpful in helping me to going through this tough period. My two kids are down with chickenpox consecutively one after another in three weeks time. Because of this my works and study had been seriously affected! The quests for my fabacademy study continue with me juggling between taking care of my elder daughther and young boy at home and also submission of weekly assignment.
Even at this moment of writting this report, my boy is also offering his help to help pressing the button to change the rate of LED blinking. Finally, I would like to appologize if some of my videos are having some background noise of kid watching cartoon on youtube.
Our quests for Fabacademy 2017 go on! Without knowing what are the challenges right ahead of me. May GOD continue to help me too!Amen!