Fabacademy 2017
Sixteenth Week. Interface and application programming
Index
Sixteenth task
Write an application
This week task is to make an application that interfaces with an input and/or output device that you made. I decided to make an application that will allow to move up and down the roller blind of the window so in addition to an automated control based on the amount of light I can also control the window shade manually.
I am very interested on the idea that each component in a house is a self-autonomous node which could sense, react and communicate with other nodes. So instead of thinking in a custom mobile app to control as it is done lately with many IoT devices, I was more interested in a node running a web server with a HTML user interface and extend it with other web based technologies in the future.
Application
I wanted to try as many technologies as possible but I had limited time this week so I decided to work on a simple solution and try more things once I get the basics working.
My initial solution will be a JavaScript node.js server which will talk to my device –last week dcmotor board with input and output ports– via serial interface then a HTML form on top of bootstrap will talk to the server via websockets.
The user interface
For the user interface I decided to go for the most compatible standard, HTML forms. In theory, I will be able to control the window from almost any device, a screen reader or a old phone from example. In order to improve the look and feel of the buttons I choose to use bootstrap, a great framework for creating responsive HTML interfaces. You can find all the documentation here.
HTML below is the user interface, if you are using a computer not connected to internet as a server you will need to download bootstrap locally and point to the local css file instead.
Fabwindow · Roller blind control
Fabwindow Roller blind control
Webserver
For the web server I will be using JavaScript and node.js. Node package manager for JavaScript, I will be using three different elements on the webserver: Express a lightweight webframework to create web applications in node.js, Serialport, a node package to communicate with hardware via serial and Websocket a JavaScript implementation of the websocket protocol to connect my webserver with the HTML User Interface
NPM is a really convenient way of managing all these construction blocks, you just need to make sure to add a package.json file with the packages that you wish to use and their version requirements. Once you run npm install, npm will look for the right versions and install them locally. You can lock, update and use different versions of the package in each of your projects so it makes much more simpler to maintain code.
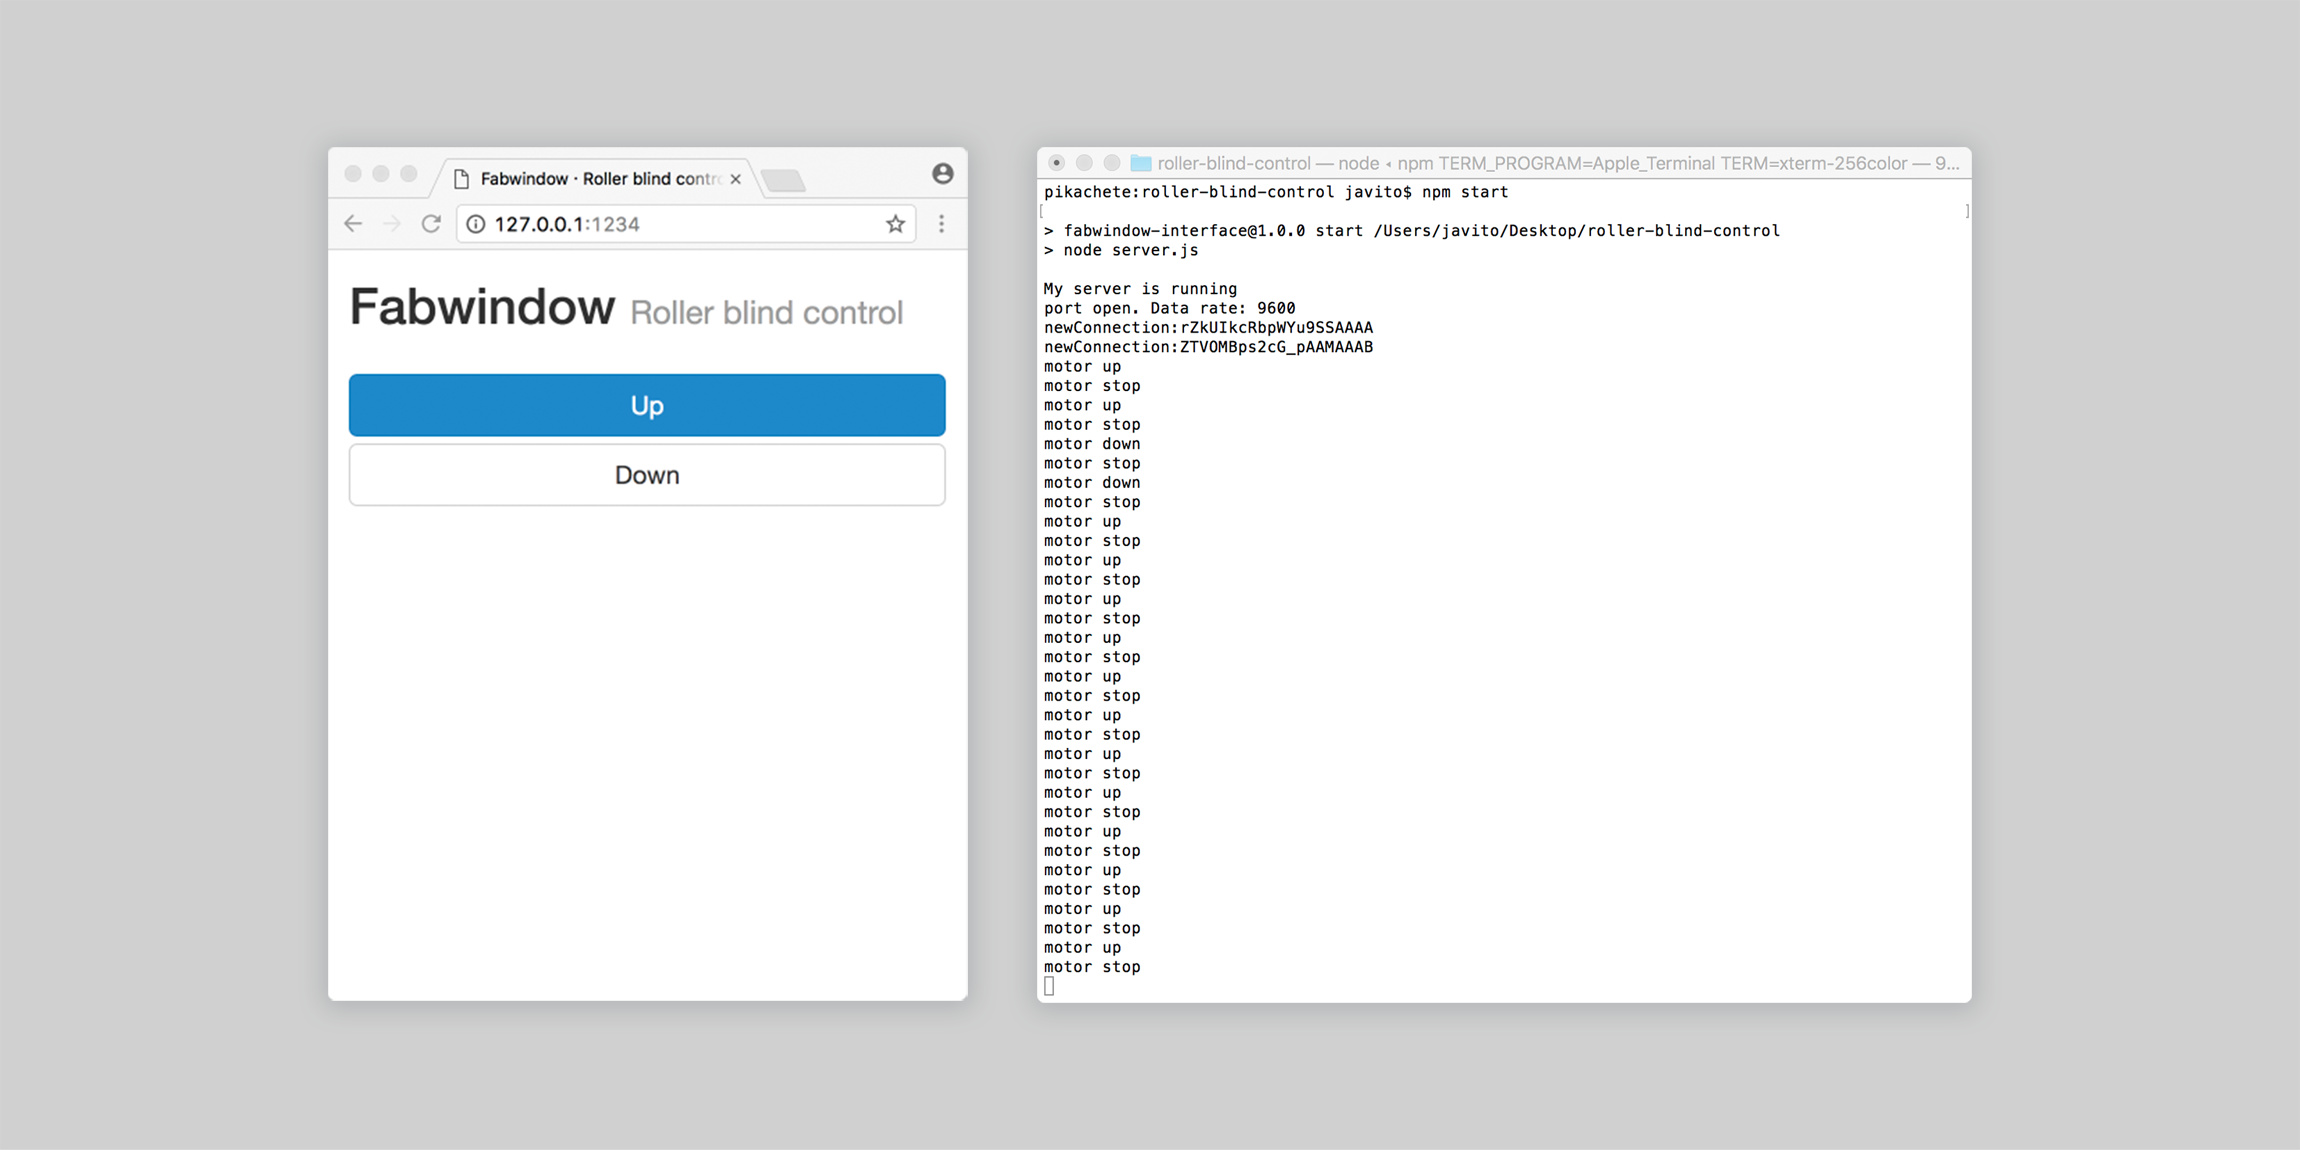
The server's code is no more than 70 lines of code. First, we create an express web app listening to a specific IP port, then we create a serial connection with our hardware device specifying the serial port address and baud rate. Third, we establish a websocket connection once the browser points to the right IP and port address and wait for the information send by the HTML form in the browser, if the information matches the intended messages we send different bytes through the serial port and the console for debugging purposes –three different messages 'u' for motor up, 'd' for motor down and 's' for motor stop–. Finally, a series of auxiliary functions send messages to the console to make sure that connection with the browser and hardware devices are occurring.
//
// server.js based on Epifanio Lorenzo 01/05/17
// (c) FabLab Madid CEU 2017
//
var express = require('express');
var app = express();
var server = app.listen(1234);
app.use(express.static('public'));
console.log("My server is running");

var socket = require('socket.io');
var io = socket(server);
io.sockets.on('connection', newConnection);

function newConnection(socket){
	console.log('newConnection:' + socket.id);
	socket.on('led', ledMsg);
	function ledMsg(data){
		if (data=='u'){
			myPort.write(data);
			console.log('motor up');
		}
		if (data=='s'){
			myPort.write(data);
			console.log('motor stop');
		}
		if (data=='d'){
			myPort.write(data);
			console.log('motor down');
		}
	}
}

var SerialPort = require('serialport');
var myPort = new SerialPort("/dev/cu.usbserial-FTFMJ7FE", {
	baudRate: 9600,
	options: false,
	parser: SerialPort.parsers.readline("\n")
});

myPort.on('open', showPortOpen);
myPort.on('close', showPortClose);
myPort.on('error', showError);

function showPortOpen() {
   console.log('port open. Data rate: ' + myPort.options.baudRate);
}

function showPortClose() {
   console.log('port closed.');
}

function showError(error) {
   console.log('Serial port error: ' + error);
}
User interface javascript
Now we need to add the functionality to the HTML interface to communicate with the webserver, with the code above the HTML interface doesn't know yet how to communicate with the server.
First, we need to establish a websocket connection to the same address and port in which the web server is listening to. Second, we need to add the different functions that will be triggered by the button elements onpress and onrelease events –statusUp(), statusDown() and statusStop() respectively–
Fabwindow · Roller blind control
Fabwindow Roller blind control
Device programming
The last part would be to program the device to switch on and off the motor driver inputs and control the DC motor based on the three different commands sent via the serial port: Up, down and stop.
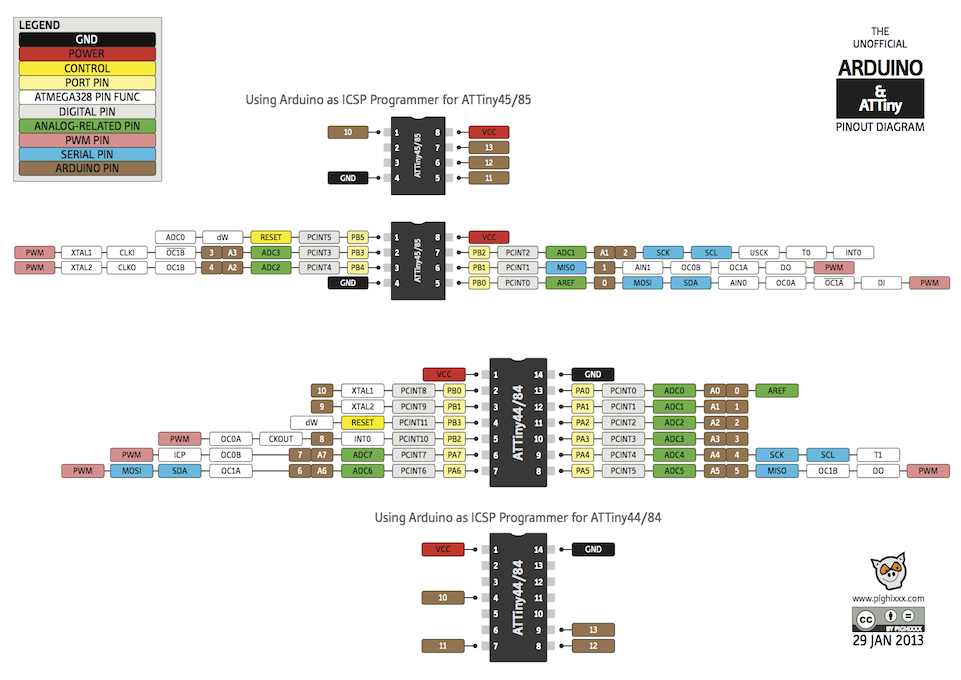
I will be using the Arduino library and IDE for the first time since Week 8. First thing I noticed is that Arduino pinout numbering doesn't match Attiny data sheets, luckily there is plenty of information on the internet about this. I found this great visual cheat sheet of the different attiny processors pinouts:
I will be using the softwareserial library for arduino, this library is a software implementation of the serial protocol. Remember that in order to use the standard arduino hardware implementation of the serial protocol you need to use specific pins of the Attiny.
Then, I need to set up all the different variables and initialize the pins directions for the motor driver, led and serial connection.
Inside the main loop, I check if the serial is being used, if not, it reads the data and depending on the command sent it controls the motor driver up, down or stop.
#include
// only sending info from the computer
// rx 9
// tx 9
SoftwareSerial mySerial(9, 9);
const int ledPin = 7;

const int in1Pin = 1;
const int in2Pin = 0;

int buttonPushCounter = 0;
int buttonState;
int ledState;
int lastButtonState = HIGH;

void setup() {

  pinMode(in1Pin, OUTPUT);
  pinMode(in2Pin, OUTPUT);

  pinMode(ledPin, OUTPUT);

  mySerial.begin(9600);
}


void loop() {
  if (mySerial.available()>0){
    ledState = mySerial.read();
    if (ledState == 'u') {
      // motor up
      digitalWrite(in1Pin,HIGH);
      digitalWrite(in2Pin,LOW);
      // led on
      digitalWrite(ledPin,HIGH);
    } else if (ledState =='s') {
      // motor stop
      digitalWrite(in1Pin,LOW);
      digitalWrite(in2Pin,LOW);
      // led off
      digitalWrite(ledPin,LOW);
    } else if (ledState =='d') {
      // motor up
      digitalWrite(in1Pin,LOW);
      digitalWrite(in2Pin,HIGH);
      // led on
      digitalWrite(ledPin,HIGH);
    }
  }
}
Final step would be to flash the microcontroller, run the server and open the browser on the right IP and port address to initialize the websocket connection. Below the video showing all the parts working together.