
Documented what you learned from reading a microcontroller datasheet.
What questions do you have? What would you like to learn more about?.
Programmed your board.
Described the programming process/es you used.
Included your code.
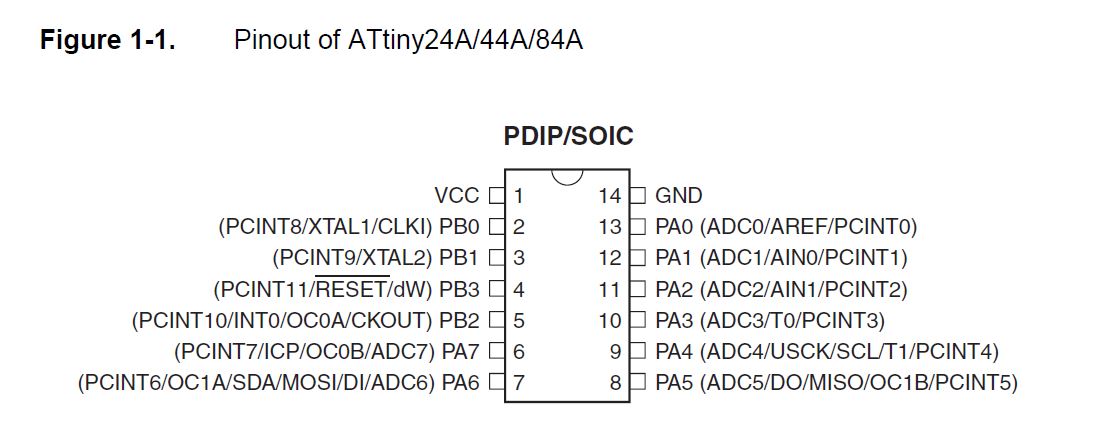
It has been one of the hardest reads I have done at FABacademy so far. That is a big deal, considering I have been reading about electronics for the las couple weeks... I haven't been able to pass the first chapters yet, as I have focus on learning a bit of programation this weeks. Even though I have found some useful information, and I understand why it is interesting to go through it. I intend to finish it this comming weeks. One of the most important things I have found, and also crucial for further programming boards, is the pin configuration. I think this will be important for designing boards, to figure out where each component has to go. I also learnt that not everychip has the same internal memory and apparently this is important for the future because depending on what you want the chip to do, the sketch ocuppies more space. The ATtiny 44 has 4mb, which in my case was more than enough as the biggest one I used was 1.2mB. Anyway I can see how a more complex sketch can increase a lot the memory need. I also learn the operating voltage rates from 1.8 to 5.5 V, this is interesting if you want get rid of the ftdi cable and use a battery for powering the chip. The battery has to be in between those rates if there is not aditional protection.
I am very confused about everything I read and I don't really get much of it. I would like to fully understand how does internally works a chip, I didn't get too clear from the datasheen. Also why is it better to add an external clock to the chip instead of using the internal one? I asked one of my classmates and I haven't really understand yet why we need an external resonator for a led and a button.
This week's goal was to program the hello.ftdi.44 boardwe did on week 6 using the ISP programmer we did on week 4. Neil suggested us to program it using C, but as it was my first-time programming, I decided to start out with Arduino. I wanted to start understanding the basics of coding, before jumping to C learning. As my final project requires real time data, and C gives us a faster data processing, it is definitely something I must do.
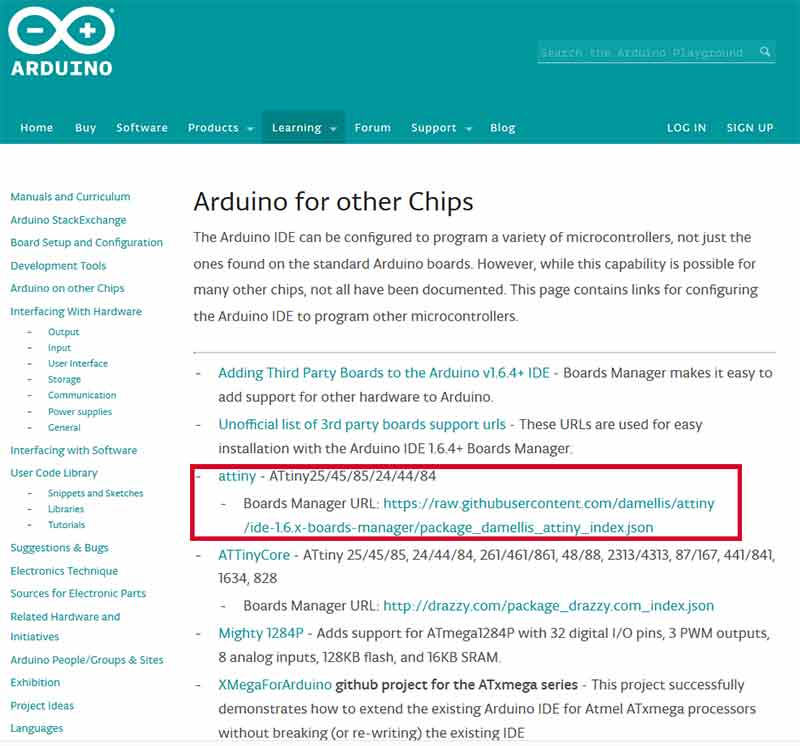
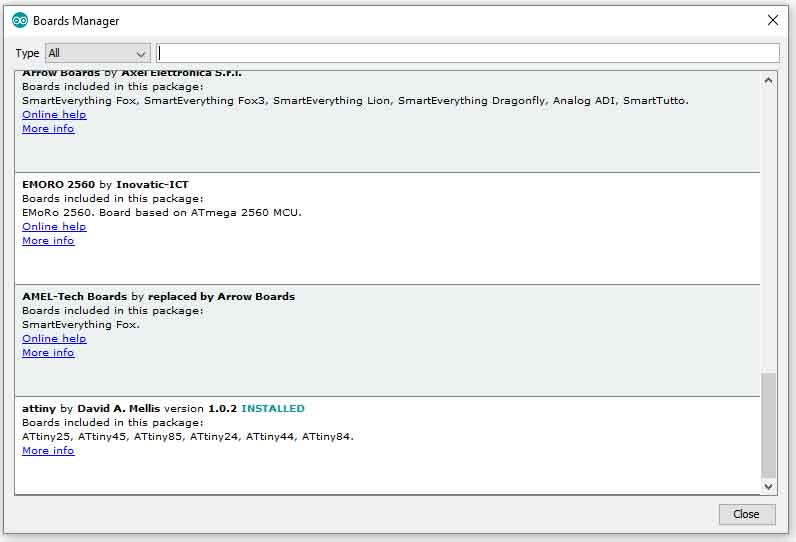
I have followed the class tutorial to program the board. The first step was to install the Arduino IDE, from the Arduino webpage. Once I had the software installed the next step was to install the ATtiny boards, in order to set them as our board on the Arduino IDE. This family of chips don't come by default on arduino's board manager. To be able to install them I visited Arduino's Playground. There I found the instructions to install various tipes of chips. On the Arduino IDE, I went to TOOLS, PREFERENCES, I pasted this link https://raw.githubusercontent.com/damellis/attiny/ide-1.6.x-boards-manager/package_damellis_attiny_index.json on ADDITIONAL BOARDS MANAGER URL. This showed the ATtiny 44 on the board manager and I was able to install them.

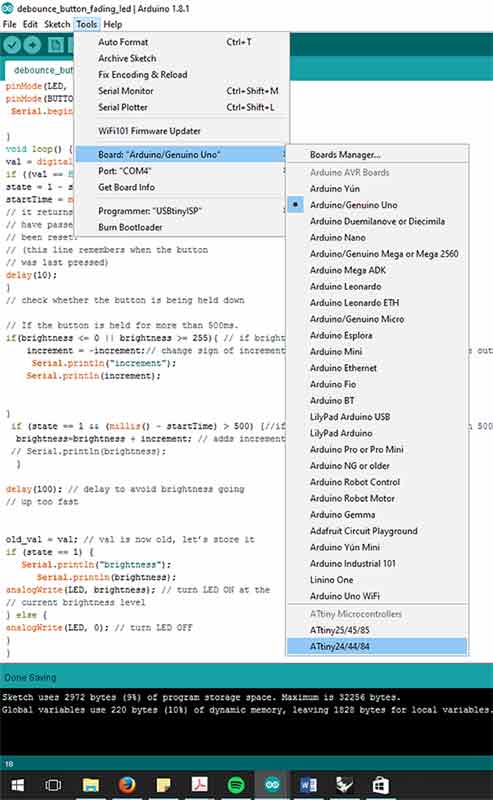
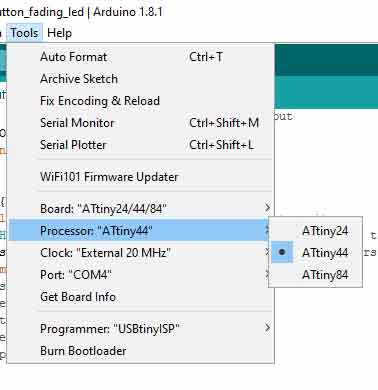
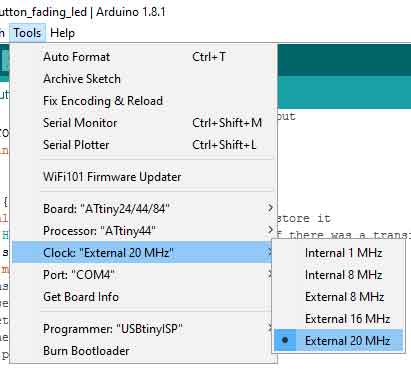
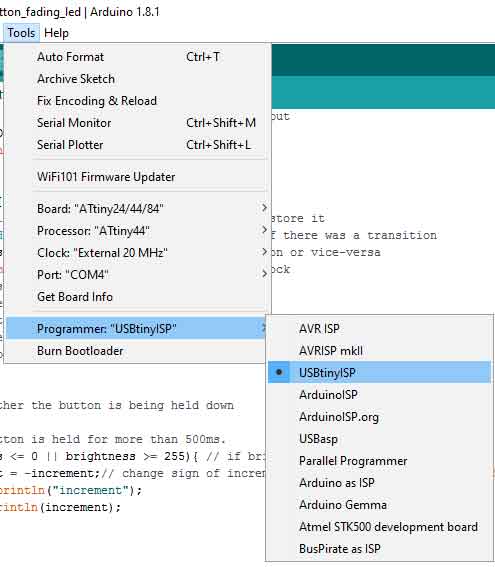
Afterwards, I installed the FTDI cable firmware. Now I was ready to connect my Hello.ftdi44 board to the computer and to the FabISP programmer. Once they were connected to the computer I selected the right options on Arduino IDE. Board: ATtiny 44/ Processor:ATtiny 44/ Clock: Externa 20Mhz/ Port COM 4 (to see wich one it it, it is showed on Window's Device Manager)/ Programmer: USBTinyISP.
Afterwards it is important to know the equivalence of ATtiny pins to Arduino pins, as the Arduino IDE works with Arduino board pins. Fortunately there are a bunch of equivalence tables on the internet, such as this one:

Here we can see that PA7 on ATtiny 44 (Which is where I had connected my LED) matches Arduino pin 7, and PA2 (where the push button is) matches pin 2. Everything seemed right, but when I tried to Burn the bootloader (TOOLS/ BUN BOOTLOADER), I got the error tiny usb not found. For some reason my FabISP was not working... I tried using an arduino as a programmer, but I was still getting an error, this one was related with AVRdude. Completely desperated I went to Jakob Nilsson's webpage. He was one of the only students that programmed the FabISP using Windows on week 4, so I figured out, that maybe he programmed the board on week 6, even though it was not mandatory and he solved it someway. On his page he indicates which drivers need to be uploaded if on Windows' device managers we don't see this:
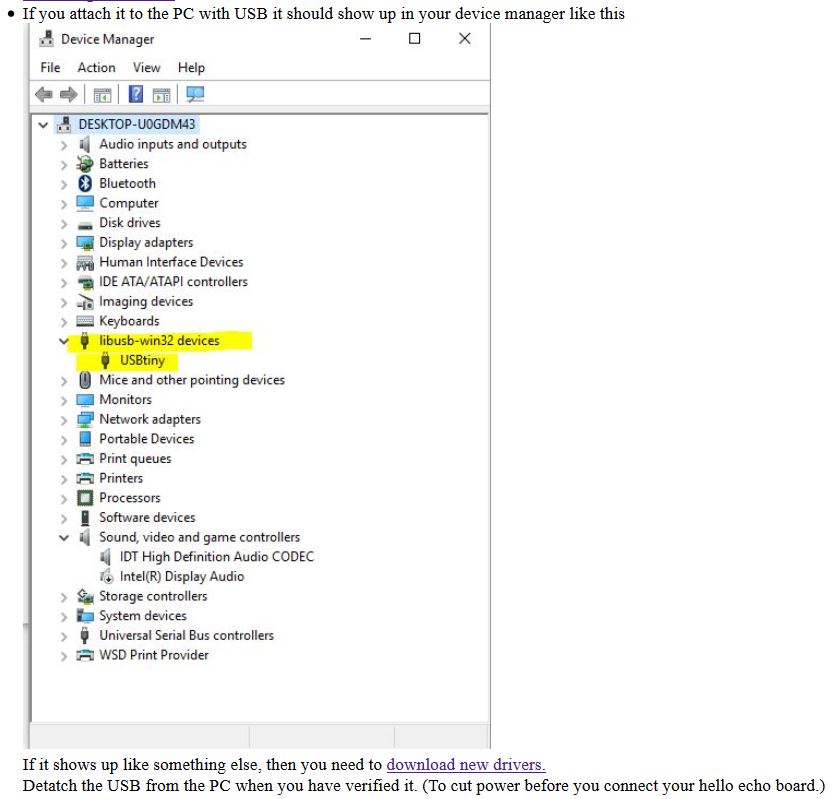
Once I installed the USBTinyDrivers I was finally able to burn the bootloader through my FabISP and no more AVRDude errors appeared.
Now was time to try my Helloboard, I first run an example from Arduino IDE. I used the blink example (FILE/ EXAMPLE/ 01 BASICS/ BLINK). This made the led to start blinking, the button was not engaged on any operation yet. Afterwards I loaded the DEBOUNCE example, this one turned the led on when the button was pressed and off when it was pressed again.

I had "programmed my board" but I still was not really understanding anything yet. Thanks god, we had an very good introductory Arduino class by Guillem Camprodon. That, on top of reading Massimo Banzi's Getting Started with Arduino, motivated me enough to start playing with Arduino coding. I decided after having studied most of the Arduino's Examples I wanted to program my board to turn on a fading on-fading out led when the button was pressed. It took me a little to figure it out. Xavi showed me how using serial.begin() serial.print() and the serial terminal I could delimitate where my error was. Transferring variable data information over the serial line to your desktop computer, to stepping through the code is a way to debug. Finally, I was able to make it work!!
       const int LED = 6; // the pin for the LED
const int BUTTON = 2; // the pin for the button
int val = 0; // stores the state of the input pin
int old_val = 0; // stores the previous value of "val"
int state = 0; // 0 = LED off while 1 = LED on
int brightness = 5; // brightness value of the led
int increment = 5; // amount of brightness increment
unsigned long startTime = 0; // when did we begin pressing?
void setup() {
pinMode(LED, OUTPUT); // tell Arduino LED is an output
pinMode(BUTTON, INPUT); // and BUTTON is an input
 Serial.begin(9600);

}
void loop() {
val = digitalRead(BUTTON); // read input value and store it
if ((val == HIGH) && (old_val == LOW)) { // check if there was a transition
state = 1 - state; // change the state from off to on or vice-versa
startTime = millis(); // millis() is the Arduino clock
// it returns how many milliseconds
// have passed since the board has
// been reset.
// (this line remembers when the button
// was last pressed)
delay(10);
}
// check whether the button is being held down

// If the button is held for more than 500ms.
if(brightness <= 0 || brightness >= 255){ // if brightnes is too high or too low
    increment = -increment;// change sign of increment- to rest if brightness is 255 (fade out)- to add if brightness is 0 (fade in)
     Serial.println("increment");
    Serial.println(increment);


}
 if (state == 1 && (millis() - startTime) > 500) {//if button has been press for more than 500 ms
  brightness=brightness + increment; // adds increment to brightness
 // Serial.println(brightness);
  }

delay(100); // delay to avoid brightness going
// up too fast


old_val = val; // val is now old, let’s store it
if (state == 1) {
   Serial.println("brightness");
      Serial.println(brightness);
analogWrite(LED, brightness); // turn LED ON at the
// current brightness level
} else {
analogWrite(LED, 0); // turn LED OFF
}
}
After having programmed the board I did some more exercises with leds, to keep up practicing coding. My next goal, was to make a program that writes my name in morse. This was not a big challenge, I just tweak the blinking code to create a function for DOT, LINE and SPACE. In morse code, a LINE has to be as long as 3 DOTS, and the space between letters has to equal the time of a LINE. My real challenge was to create a message that was activated when the button was pressed and that was interrupted when it was pressed again. I have used Interruption to do this, the problem is that with interruption, what Arduino does is stop whatever is doing (in this case, displaying a sequence of dot/line/space lights) executes the interruption function and goes back to the point it has stopped. There is not a way to go back to the beginning of the loop. I ended up solving, by making a SWITCH question at the beginning of each letter, so if the button is pressed, it will finish the letter is displaying and turn off. It might not be the cleanest code, I am still investigating others ways to do the same.
int button = 2;// the pin for the button
int state = 0; // 0 = not start action 1=start action
unsigned long startTime = 0; // when did we begin pressing?
  void setup() {
    pinMode(LED_BUILTIN, OUTPUT);// initialize digital pin LED_BUILTIN as an output.
    pinMode(button, INPUT); // and BUTTON is an input
    Serial.begin(9600);
    attachInterrupt( 0, ServicioBoton, HIGH);
 }
  void fn_Dot ( ) {
    digitalWrite(LED_BUILTIN, HIGH);   // turn the LED on
    delay(500);                       // wait for 700 mls: DOT
    digitalWrite(LED_BUILTIN, LOW);    // turn the LED off
    delay(500);
 }
  void fn_Line(){
    digitalWrite(LED_BUILTIN, HIGH);   // turn the LED on
    delay(1500);                      // wait for 2100 mls: LINE (LINE = 3*DOT)
    digitalWrite(LED_BUILTIN, LOW);    // turn the LED off by making the voltage LOW
    delay(500);
}
  void fn_Space(){
    digitalWrite(LED_BUILTIN, LOW);    // turn the LED off by making the voltage LOW
    delay(1000);                         // for same time as line 2100-500
}

// the loop function runs over and over again forever
void loop() {

 switch (state){ //if state i 1 throw first letter
  case 1:
  Serial.print("J");
  fn_Dot();// J (DOT,LINE,LINE,LINE-SPACE)
  fn_Line();
  fn_Line();
  fn_Line();
  fn_Space();// letter space
  break;
  case 0: digitalWrite(LED_BUILTIN, LOW);break;
 }
 switch (state){ //if state i 1 throw second line
   case 1:
   Serial.print("U");fn_Dot();// U (DOT,DOT,LINE-SPACE)
  fn_Dot();
  fn_Line();
  fn_Space();// letter space}
  break;
  case 0: digitalWrite(LED_BUILTIN, LOW);break;
 }
  switch (state){ //if state i 1 throw first line
  case 1:
  Serial.print("L");
  fn_Dot();// L (DOT,DOT,LINE,DOT-SPACE)
  fn_Dot();
  fn_Line();
  fn_Dot();
  fn_Space(); // letter space
  break;
  case 0: digitalWrite(LED_BUILTIN, LOW);break;
  }
  switch (state){ //if state i 1 throw first line
  case 1:
  Serial.print("I");
  fn_Dot(); // I (DOT,DOT-SPACE)
  fn_Dot();
  fn_Space();// letter space
  break;
  case 0: digitalWrite(LED_BUILTIN, LOW);break;
  }
  switch (state){ //if state i 1 throw first line
  case 1:
  Serial.println("A");
  fn_Dot();// A (DOT,LINE-SPACE)
  fn_Line();
  fn_Space(); // letter space
  break;
  case 0: digitalWrite(LED_BUILTIN, LOW);break;
  }
}

void ServicioBoton()
 {
  // Serial.println("inicio");
   if ( millis() > startTime  + 250)
         {   state=1-state;
         // Serial.println(state);
              startTime = millis();

        }
        delay(9000);
              //Serial.println("final");

}
BACK HOME<<<