Exercise 11 - Machine Design
Requirement
- Make a machine, including the end effector, build the passive parts and automate your machine.
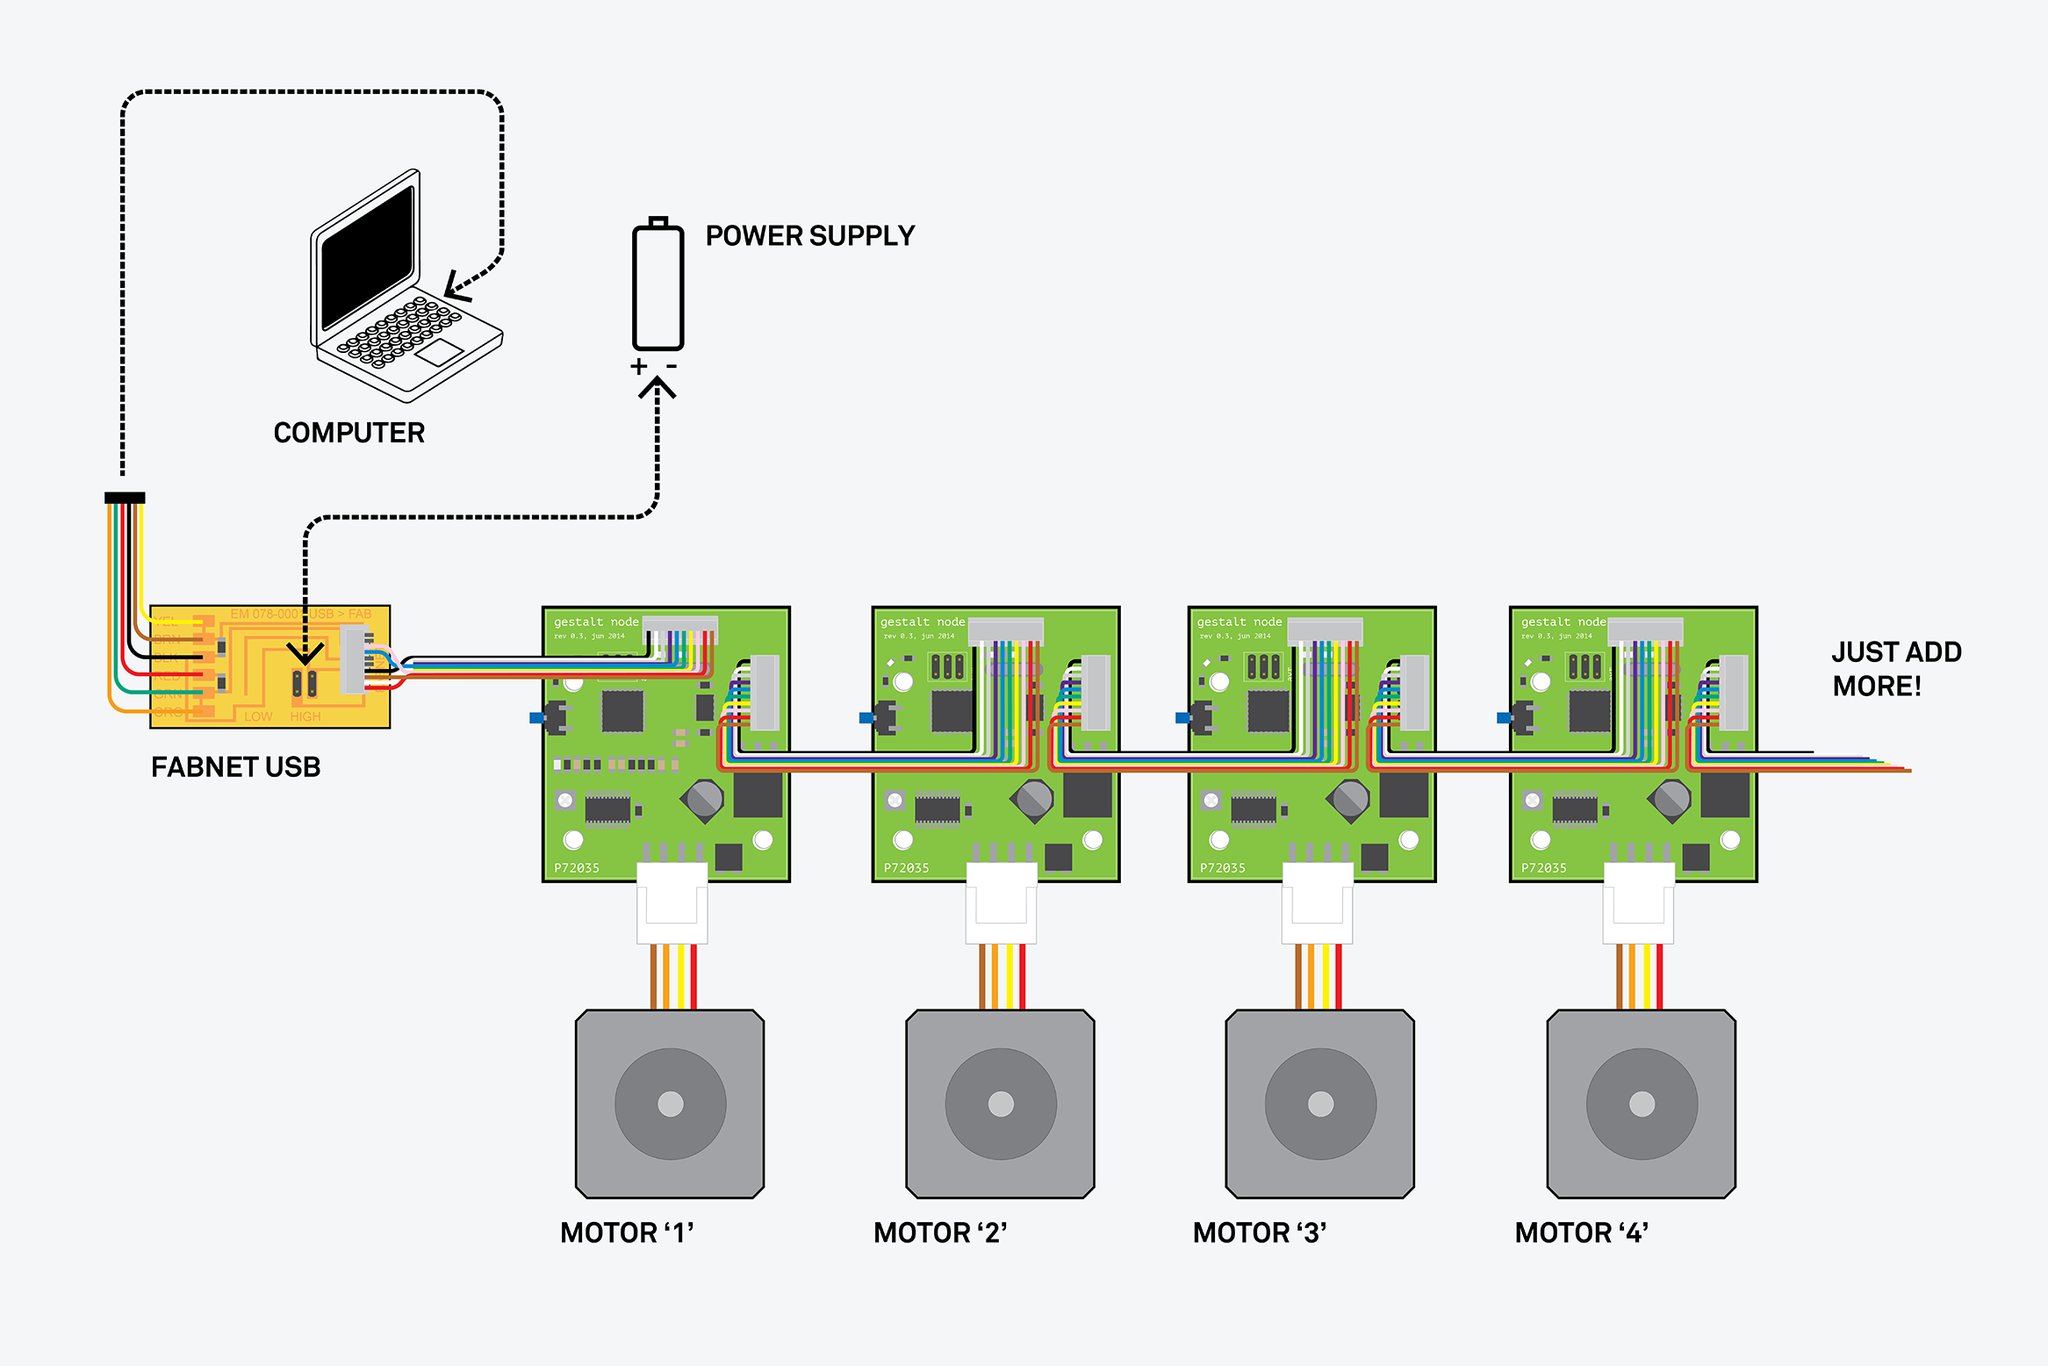
Layout the MTM Circuit
With reference to James Coleman and Nadya Peek on assemble a Configurable Modular Machine. The following are the parts required and connection for Gestalt Nodes to each Motor Axis.
Workload Distribution
Before we proceed to work on automating the machine, the group has met, discuss and distribute the workload as follows for this week machine design:
- Software needed to automate the machine - (Jeff/Ngiap Peng/Tiang Seih)
- Program and Test out in Windows platform - (Jeff/Ngiap Peng/Tiang Seih)
- Program and Test out in Ubuntu platform - (Hong Guan)
- Program and Test out in Mac platform - (Louis)
- Connecting the MTM Kit and Test Run on the Axis - (Ngiap Peng/Jeff/Louis/Hong Guan/Tiang Seih)
- Test the machine using hard coded coordinates on shapes and text
- Text - (Ngiap Peng/Louis)
- Shapes - (Jeff/Hong Guan/Tiang Seih)
- Documentation
- Creating/Updating the Group and Machine Design Page - (Louis/Tiang Seih)
- Photographer - (Hong Guan)
- Videographer - (Louis)
- Poster design for the MTM Group Page - (Hong Guan)
- Video creation for the MTM Group Page - (Louis)
- MTM Presentation - (Tiang Seih)
Software Needed to automate the machine
Windows Platform
To automate the machine, there are still a couple of things to be carried out like installing of the software, configure the node and testing out the code.
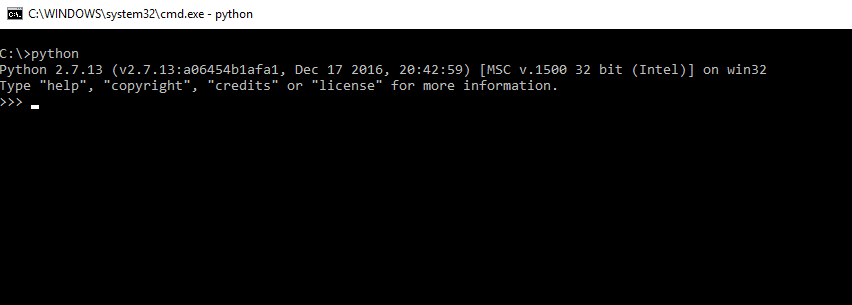
- Install Python 2.7
- After Installation go to windows command prompt -> type: python to check if python is working
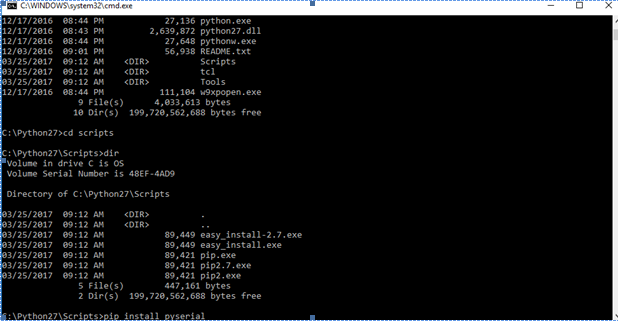
- Install pyserial on windows. At command prompt, type pip install pyserial
- Install pygestalt. Download and unzip pygestalt. At command prompt, type python setup.py install
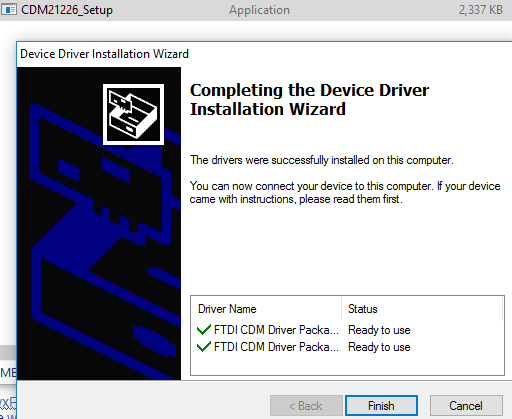
- Install FTDI drivers for windows.
- Installing the libraries by downloading the required using python command line.
- Use pip list to check what are the libraries currently installed
- Go to pyserial directory and execute python setup.py install
- Go to pyserial directory and execute pip install unidecode

Generally Python 2.7 is where we do our programming code, pyserial is for communication between the laptop to gestalt nodes via the usb FDTI through the Fabnet board. The python pip is for package management system used to install and manage software packages written in Python.
Trying out Python in Ubuntu
After some experience in using python in windows 10 platform, our group further our study and experiment with python in Ubuntu.
First up, we copy the exact same MTMfinal.py file into folder /usr/lib/python2.7/pygestalt-master/examples/machine/htmaa/
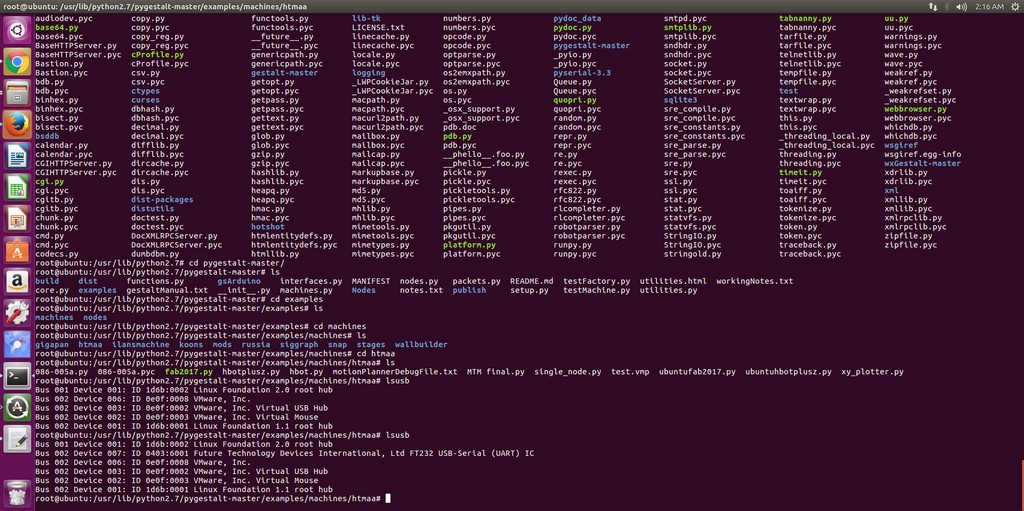
In the MTMfinal.py file we defined the FTDI interface board communication port as shown:

Starting with axis initializaton as shown
At the first execution of programme MTMfinal.py, Python requested user to initialize each axis shown in the snapshot below:
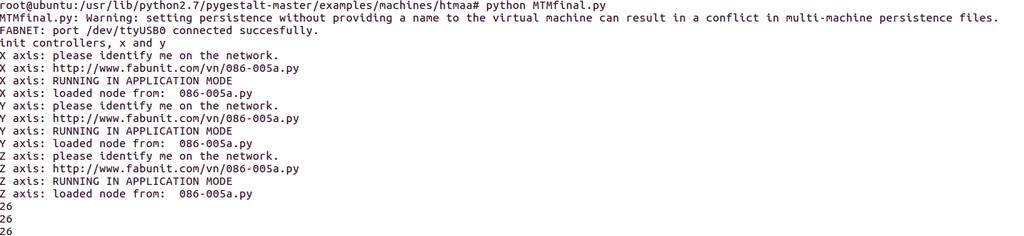
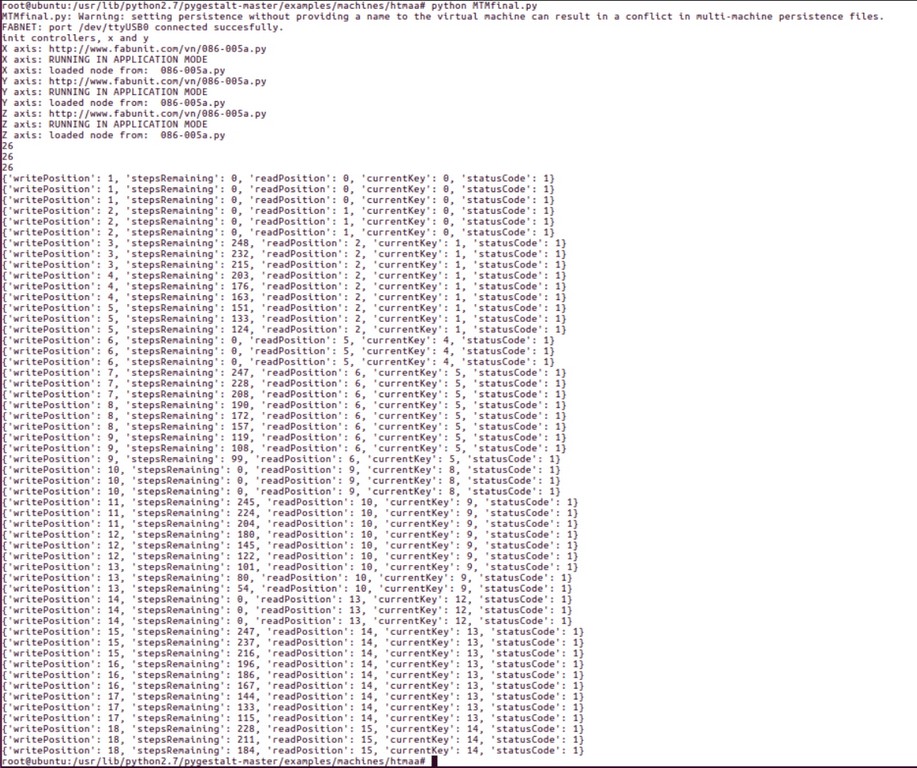
Upon successful initialization, we test run a simple square function as illustrated in the following picture.
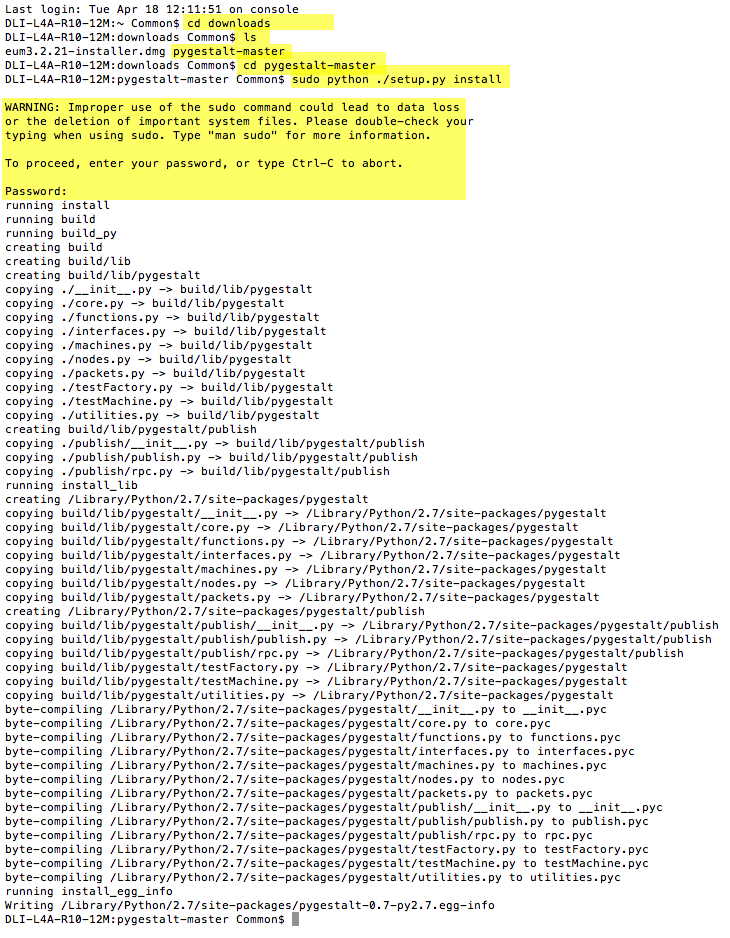
Trying out in Mac
As Mac is not 100% Python ready, we need to install python and setup the pyserial on Mac. Read it here
To install in Mac, we need to download 2 things. One from Nadia and the other pySerial.
On Mac Os installing PySerial & pyGestalt from the Terminal:
1. Download the Nadia Peek pyGestalt zip file.
2. Navigate in the command line where your pyGestalt folder is located.
3. Run the command: sudo python setup.py install, if you are using a sharing account, it is recommended to use an admin account as password is required to install using Sudo in Mac.
You should see something like this
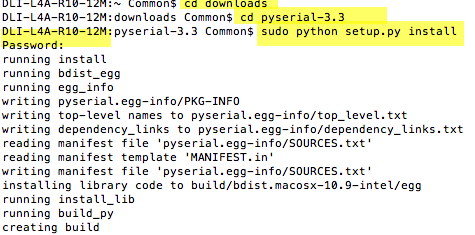
Installing pySerial
1. Download and extract pyserial.2. Navigate via Terminal to the folder you have pyserial extracted, in this folder you should have a file called setup.py
3. Run this script
sudo python setup.py install
You should get something like this after installing.

After this, most of the process is the same as Linux, except the port use for the FDTI is required to change.
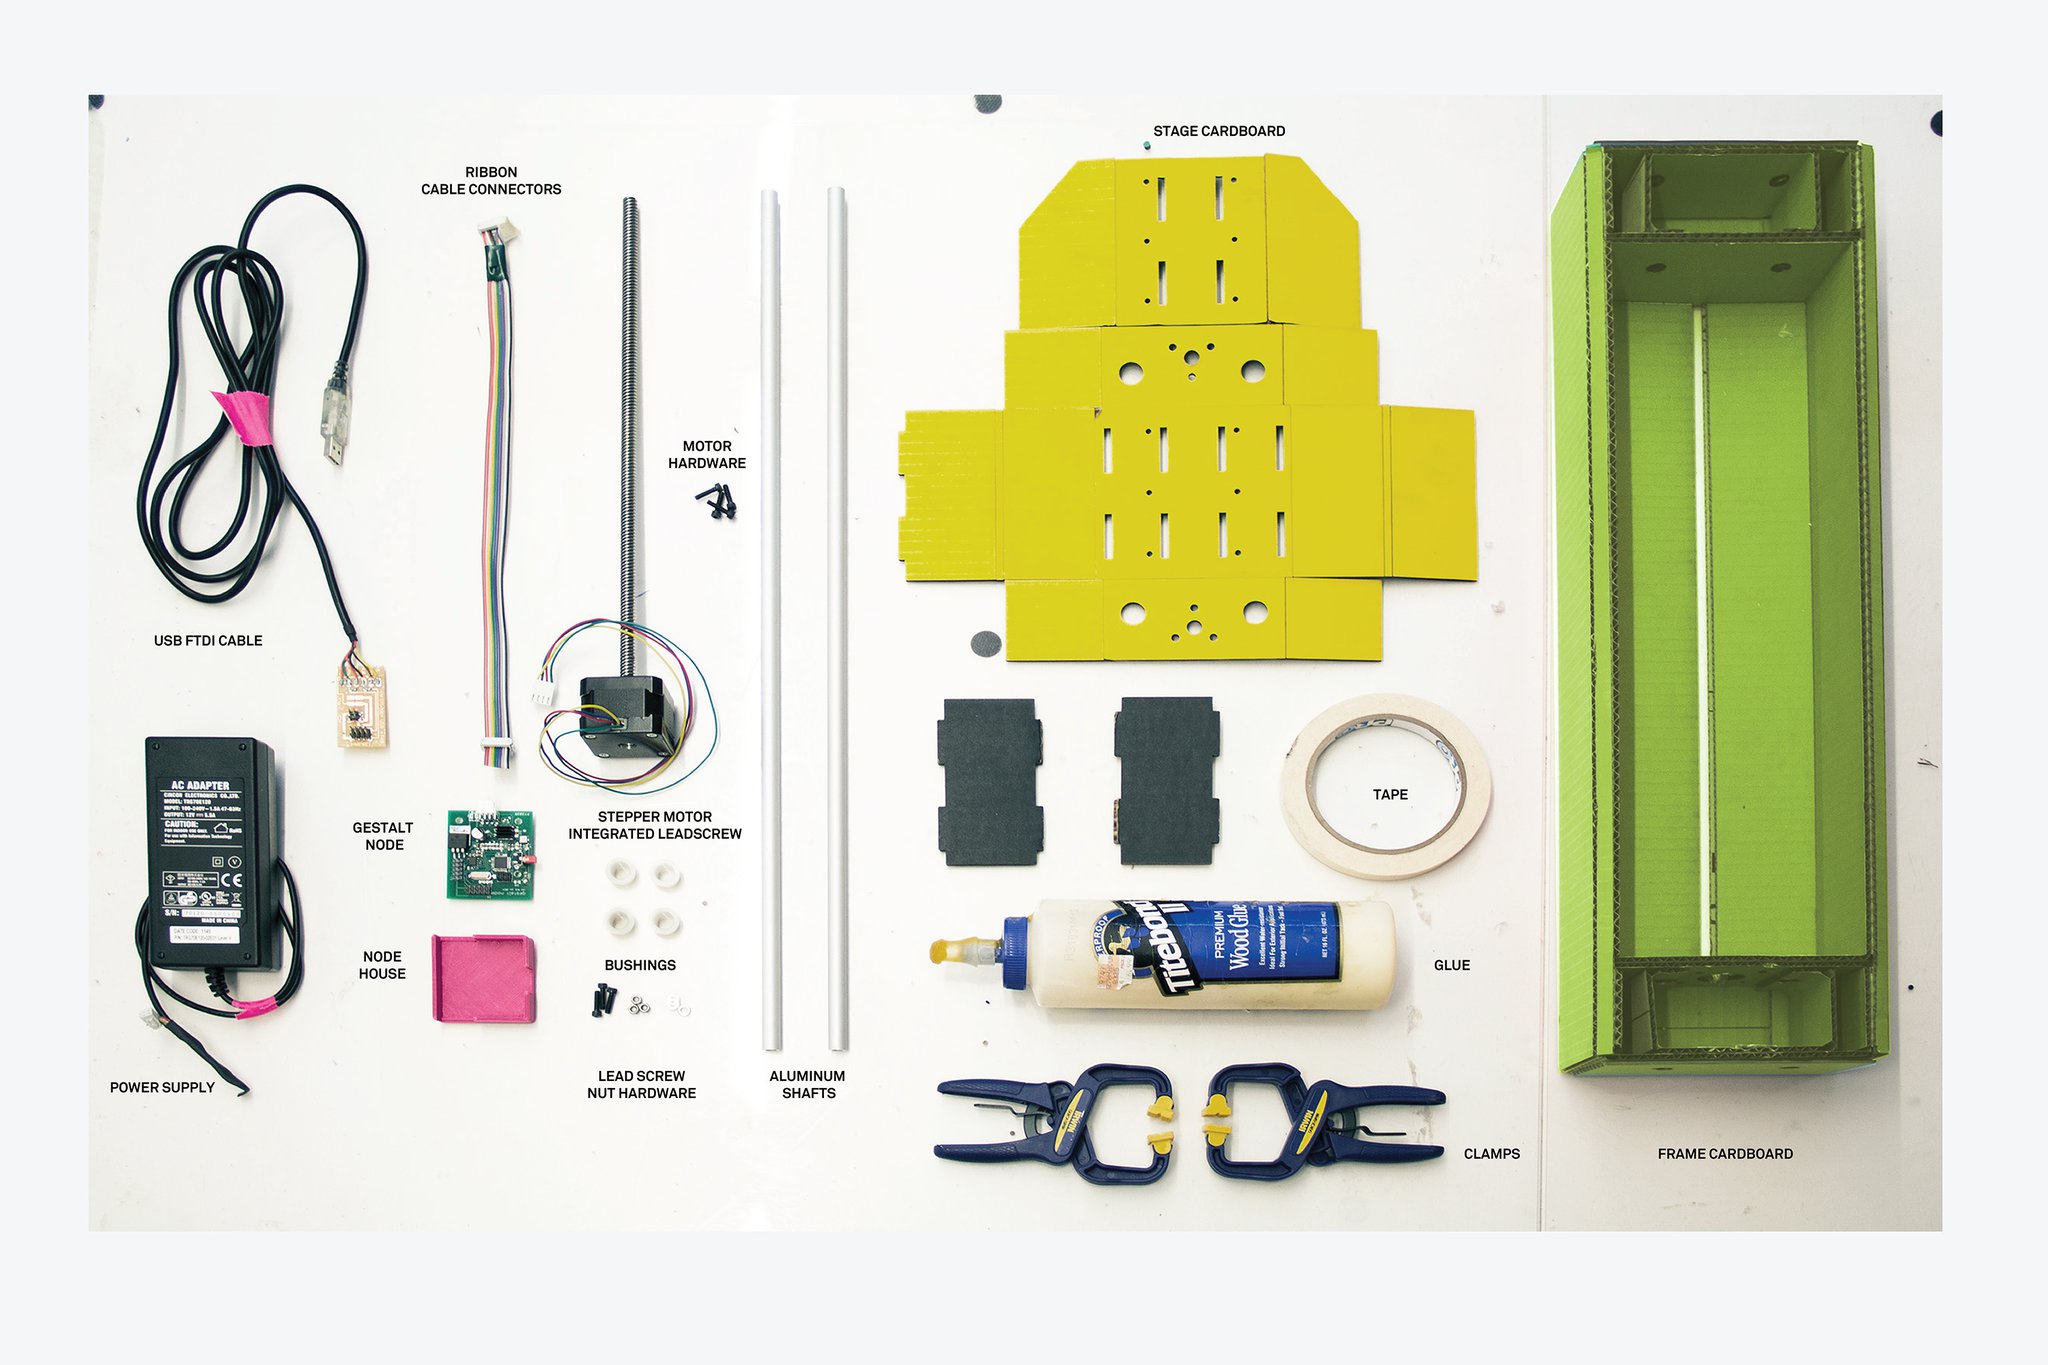
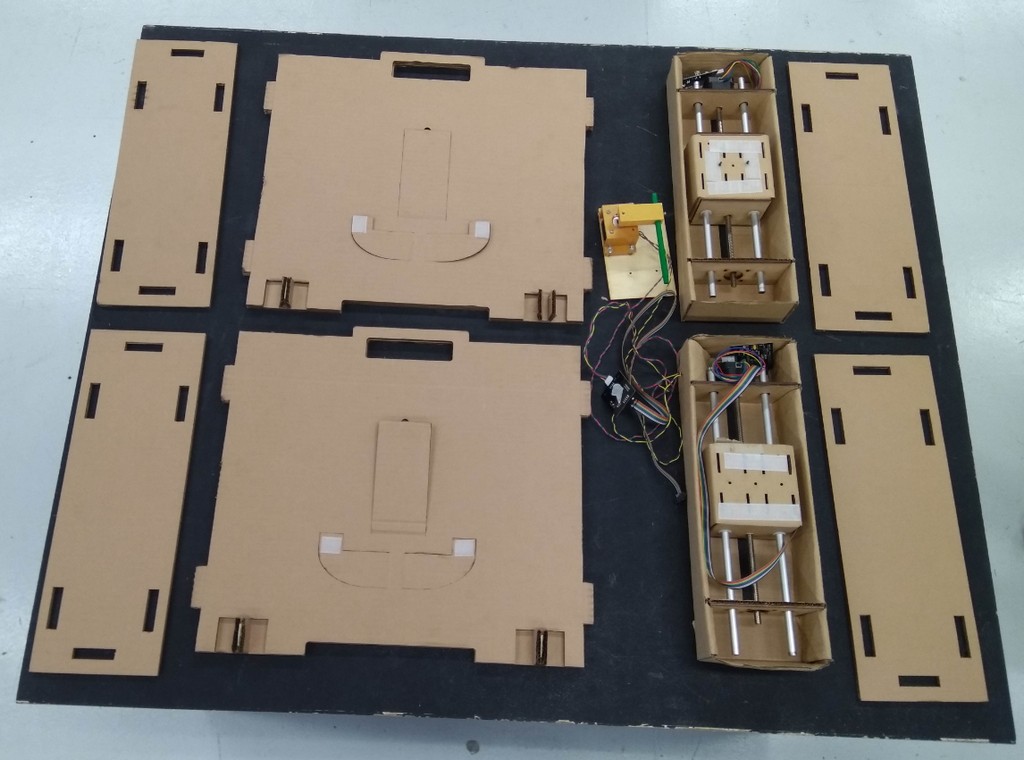
Connecting the MTM Kit and Test Run on the Axis
Our MTM Kit consist of the folllowing
- 2 Stages - Stepper and roll bar
- 4 guide bars
- 3 gestalt circuit board
- 3 Ribbon Communicating Cables
- USB FTDI Cable
- Power supply


Using Nadya's hbotplusz.py as reference, we study the program code for the important function and also modify to suit our machine in python.
- Import the Gestalt library
from pygestalt import nodes
from pygestalt import interfaces
from pygestalt import machines
from pygestalt import functions
from pygestalt.machines import elements
from pygestalt.machines import kinematics
from pygestalt.machines import state
from pygestalt.utilities import notice
from pygestalt.publish import rpc #remote procedure call dispatcher
import time
import io
#------VIRTUAL MACHINE------
class virtualMachine(machines.virtualMachine):  #eventually will subclass from gestalt
def initInterfaces(self):
    if self.providedInterface: self.fabnet = self.providedInterface   #providedInterface is defined in the virtualMachine class.
    else: self.fabnet = interfaces.gestaltInterface('FABNET', interfaces.serialInterface(baudRate = 115200, interfaceType = 'ftdi', portName = 'COM12'))
def initControllers(self):
    print "init controllers, x and y"
    self.xAxisNode = nodes.networkedGestaltNode('X axis', self.fabnet, filename = '086-005a.py', persistence = self.persistence)
    self.yAxisNode = nodes.networkedGestaltNode('Y axis', self.fabnet, filename = '086-005a.py', persistence = self.persistence)
    self.zAxisNode = nodes.networkedGestaltNode('Z axis', self.fabnet, filename = '086-005a.py', persistence = self.persistence)

    self.xyzNode = nodes.compoundNode(self.xAxisNode, self.yAxisNode, self.zAxisNode)
self.position = state.coordinate(['mm','mm','mm']) #X,Y,Z
def initKinematics(self):
    # drive components of h-bot. Inputs are A/B stepper motors, outputs are X/Y in machine coordinates.
    # elements.elementChain.forward(
    # microstep => input microstepcount -> 1/microstepCount -> steps
    # stepper =>   input stepAngle (degrees) -> stepAngle/360 -> revolutions
    # pulley =>    input pitchDiameter (mm)
    # invert =>    if it is inputted backwards. false = its correct connection])

    self.xAxis = elements.elementChain.forward([elements.microstep.forward(4), elements.stepper.forward(1.8), elements.leadscrew.forward(8), elements.invert.forward(False)])

    self.yAxis = elements.elementChain.forward([elements.microstep.forward(4), elements.stepper.forward(1.8), elements.leadscrew.forward(8), elements.invert.forward(True)])
    self.zAxis = elements.elementChain.forward([elements.microstep.forward(4), elements.stepper.forward(1.8), elements.leadscrew.forward(8), elements.invert.forward(True)])

    self.stageKinematics = kinematics.direct(3)
def initFunctions(self):
    self.move = functions.move(virtualMachine = self, virtualNode = self.xyzNode, axes = [self.xAxis, self.yAxis, self.zAxis], kinematics = self.stageKinematics, machinePosition = self.position,planner = 'null')
    self.jog = functions.jog(self.move) #an incremental wrapper for the move function
    pass
Drawing and test out the machine
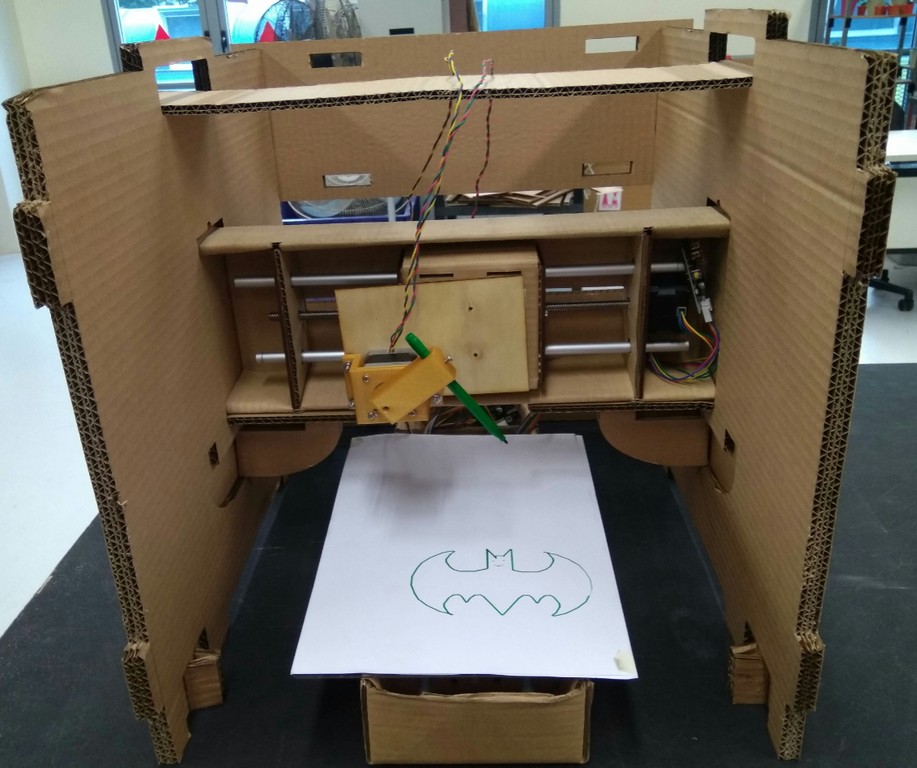
To test our machine, we hard coded the coordinates to test out a few shapes and text as follows
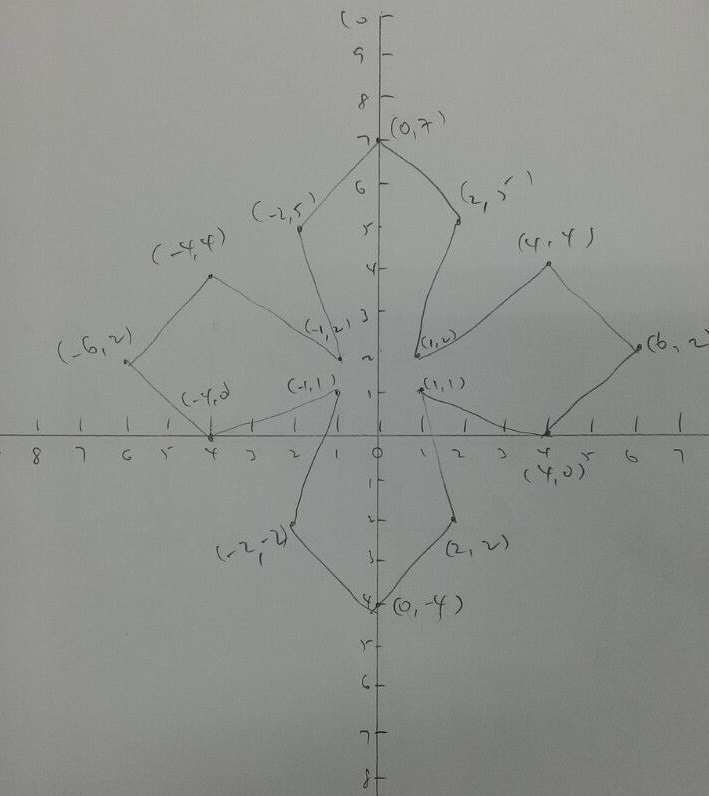
- Text - "SP"
- Text - "NEIL"
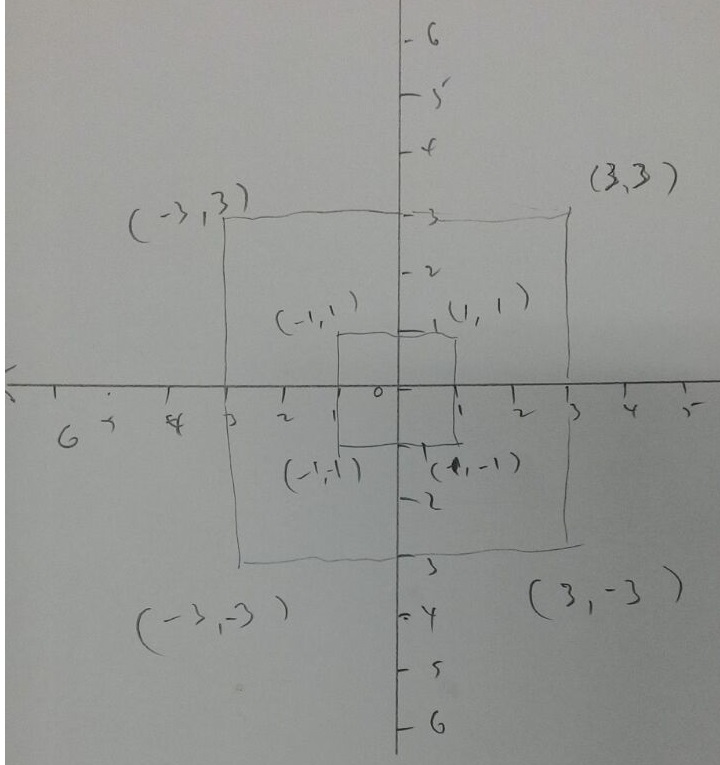
- A square
- A Square within a square which required the pen to be lift between shapes
- Cross
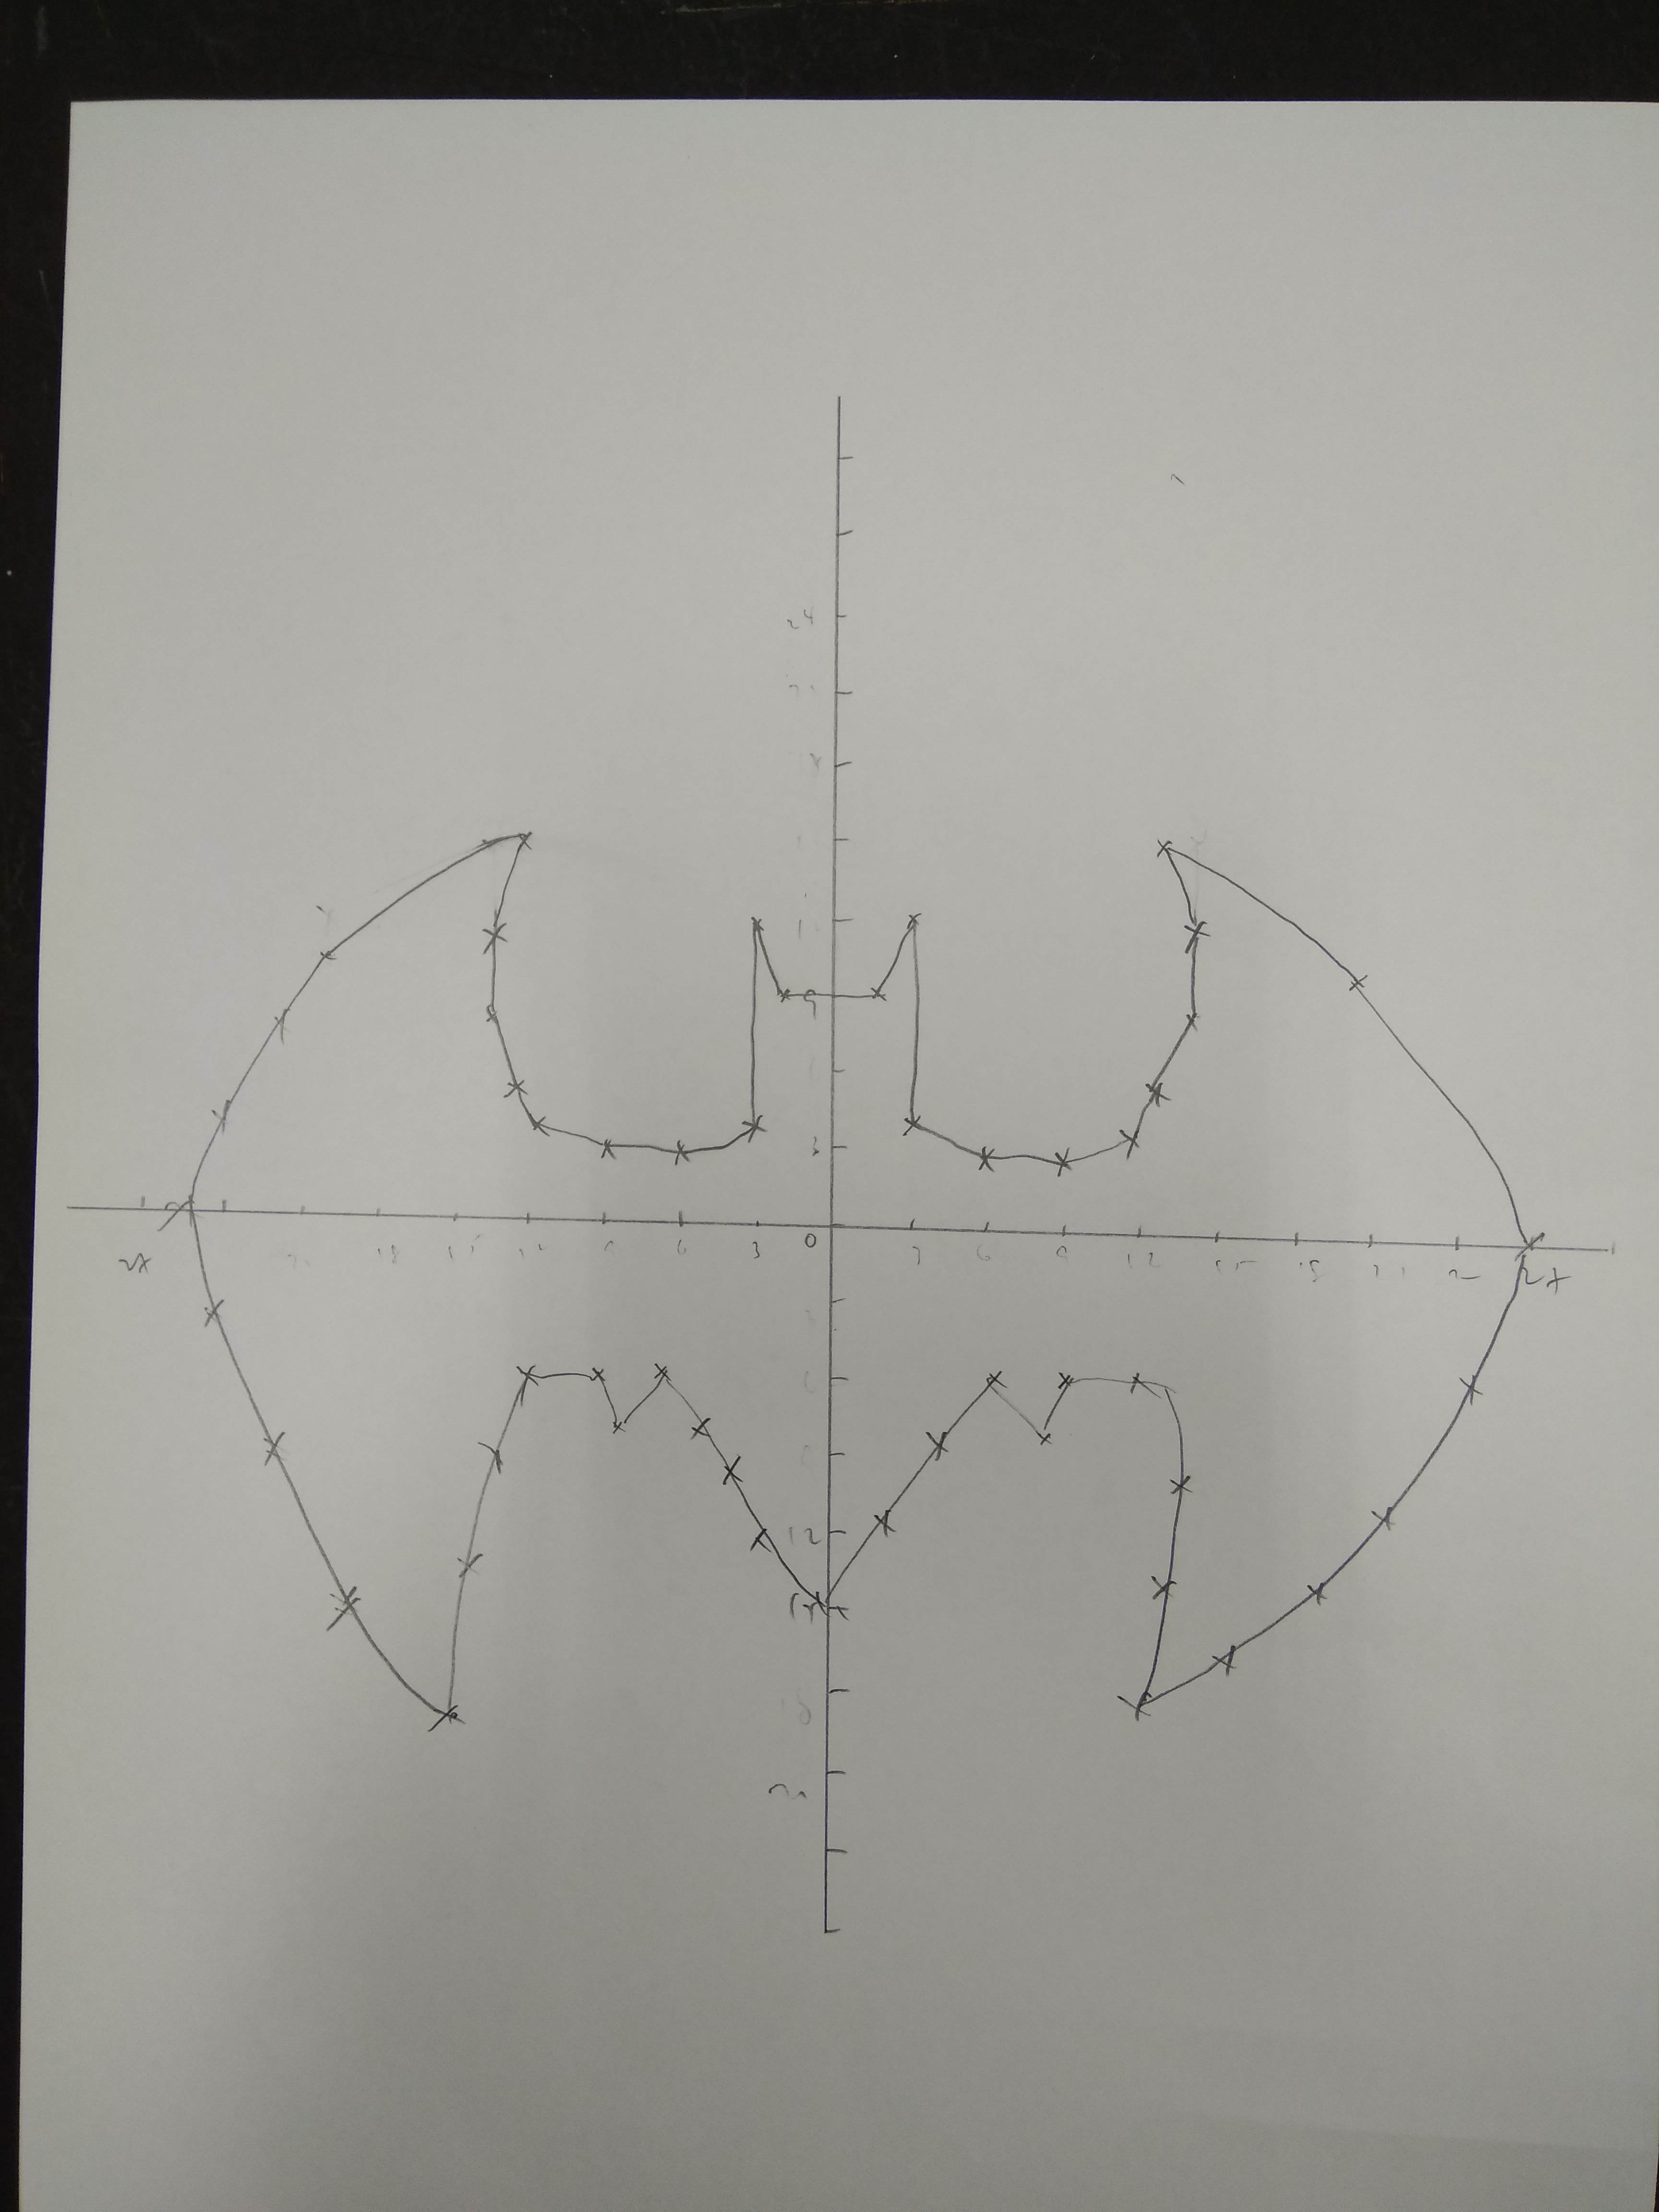
- Batman Logo
Our Thoughts
This week is an interesting week but a challenging one. After designing the Machine using James Coleman and Nadya Peek on Configurable Modular Machine, we will need Python to automate our machine.
We worked together as a team to understand Python. We connect it to the Stepper motors with the gestalt circuit board. We dolly chained the gestalt circuits and run codes to test the motor and see how it works.
While trying, we were hit with a snag on the code, we realised we used elements.pulley.forwards instead of elements.leadscrew.forward.
We also realised that using plywood as the drawing bed is not the best solution as it is slightly warpped. Therefore we changed the drawing bed to Acrylic instead.
We also think that editing Python in IDLE also has issues like indentation problems which are quite troublesome. It is something we feel quite unnecessary as it feels troublesome, maybe with more time using Python, we may familarise it in the future.
Interesting reads on Python indentation: here
But overall, when our machine works with the move code that we hardcoded it, we feel sense of satisfaction and we are all happy that we are able to create a machine!
Improvements to mtm project
After working on the Group Project, we jot down what are the flaws and would like improve. Here are some of the improvements we would like to work on:
1. Use of solenoid for the end effector.
2. Housing for fabnet board and gesltat nodes.
3. Making casing or housing more sturdy and better storage.
Hero Shot of our design

Stop Motion Assembly
Downloads
Members
Teo Cher Kok
Soh Hong Guan
Foo Tiang Seih
Phay Ngiap Peng
Goh Chong Hao Louis
Return to top