Introduction
This week's assignment was to write an application that interfaces with an input &/or output device that you made, comparing as many tool options as possible. I chose to try out as many tools as possible. I tested different languages while making the gui. The platforms attempted were:
- GTK(Gimp Tool Kit)
- wx python
- Matplotlib with wx python
GTK
GTK, or the GIMP Toolkit, is a multi-platform toolkit for creating graphical user interfaces. Offering a complete set of widgets, GTK+ is suitable for projects ranging from small one-off tools to complete application suites. It is written in C but has been designed to support a wide range of languages, such as Perl and Python . I began by going through a number of video and online documentation. I must say making graphical user interfaces was a new and exciting journey for me
installing
To install use the following command
sudo apt-get install libgtk-2.0-devGTK+ has a number of dependencies that have to be installed for it to work optimally.
The code
The code used is written in c++ language as shown below
 #include <gtk/gtk.h>

int main(int argc, char *argv[]) {

  GtkWidget *window;
  GtkWidget *okBtn;
  GtkWidget *clsBtn;

  GtkWidget *vbox;
  GtkWidget *hbox;
  GtkWidget *halign;
  GtkWidget *valign;
  GtkWidget *wins;


  gtk_init(&argc, &argv);

  window = gtk_window_new(GTK_WINDOW_TOPLEVEL);
  gtk_window_set_position(GTK_WINDOW(window), GTK_WIN_POS_CENTER);
  gtk_window_set_default_size(GTK_WINDOW(window), 350, 200);
  gtk_window_set_title(GTK_WINDOW(window), "MySerial");
  gtk_container_set_border_width(GTK_CONTAINER(window), 10);


  vbox = gtk_vbox_new(FALSE, 5);

  valign = gtk_alignment_new(0, 1, 0, 0);
  gtk_container_add(GTK_CONTAINER(vbox), valign);
  gtk_container_add(GTK_CONTAINER(window), vbox);

  wins = gtk_text_view_new();
  gtk_text_view_set_editable(GTK_TEXT_VIEW(wins), FALSE);
  gtk_text_view_set_cursor_visible(GTK_TEXT_VIEW(wins), FALSE);
  gtk_container_add(GTK_CONTAINER(vbox), wins);


  hbox = gtk_hbox_new(TRUE, 3);

  okBtn = gtk_button_new_with_label("OK");
  gtk_widget_set_size_request(okBtn, 70, 30);
  gtk_container_add(GTK_CONTAINER(hbox), okBtn);
  clsBtn = gtk_button_new_with_label("Close");
  gtk_container_add(GTK_CONTAINER(hbox), clsBtn);

  halign = gtk_alignment_new(1, 0, 0, 0);
  gtk_container_add(GTK_CONTAINER(halign), hbox);

  gtk_box_pack_start(GTK_BOX(vbox), halign, FALSE, FALSE, 0);

  g_signal_connect(G_OBJECT(window), "destroy",
        G_CALLBACK(gtk_main_quit), G_OBJECT(window));

  gtk_widget_show_all(window);

  gtk_main();

  return 0;
}
The code line GtkWidget *window, *table, *label, *button;/ is used to declare the variables used. All the parameters to be added in the interface window are declared here. The declarations can be separated as i did in my code.
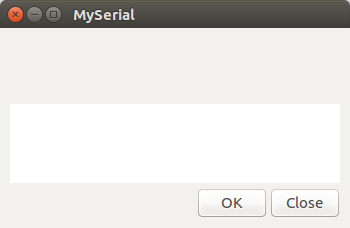
The main window
The code for the main window is as shown below
   window = gtk_window_new(GTK_WINDOW_TOPLEVEL);
  gtk_window_set_position(GTK_WINDOW(window), GTK_WIN_POS_CENTER);
  gtk_window_set_default_size(GTK_WINDOW(window), 350, 200);
  gtk_window_set_title(GTK_WINDOW(window), "MySerial");
  gtk_container_set_border_width(GTK_CONTAINER(window), 10);
The line gtk_window_set_default_size(GTK_WINDOW(window), 350, 200); sets the size of the window.
The line gtk_window_set_title(GTK_WINDOW(window), "MySerial"); sets the title of the window.
Adding a button
To add a button the code below is used
  okBtn = gtk_button_new_with_label("OK");
  gtk_widget_set_size_request(okBtn, 70, 30);
  gtk_container_add(GTK_CONTAINER(hbox), okBtn);
First declare a new button is being added and that it has a label with the line okBtn = gtk_button_new_with_label("OK");
Then set the size of the buttongtk_widget_set_size_request(okBtn, 70, 30);
Finally for the button to be displayed you must addgtk_container_add(GTK_CONTAINER(hbox), okBtn);
Responsiveness
For you to be able to close the window you must include the code line g_signal_connect(G_OBJECT(window), "destroy",
G_CALLBACK(gtk_main_quit), G_OBJECT(window));
To display the window and all the contents you must include gtk_widget_show_all(window);
compiling
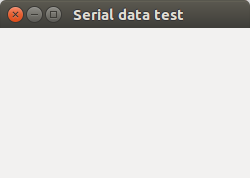
TO compile the code that i wrote of a simple GUI i used the commandg++ first.cpp `pkg-config --libs gtk+-2.0` `pkg-config --cflags gtk+-2.0`And in order to show the outcome of the code i used the
/a.outcommand. and this is the output got.
Download code here
Wx Python
wxPython is a GUI toolkit for the Python programming language. It allows Python programmers to create programs with a robust, highly functional graphical user interface, simply and easily. It is implemented as a Python extension module (native code) that wraps the popular wxWidgets cross platform GUI library, which is written in C++.
installing
To install wx python (assuming you already have python) use the command sapt-get install python-wxgtk2.8
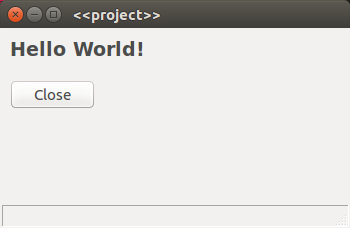
My gui
I was able to come up with a simple window with hello world as the title.
Download code here
Matplotlib and Wx python
In order to visualise the data on a gui i chose to incorporate matplotlib with wx python. I modified the code in the tutorials in the fab academy archives.The Gui
The code for displaying the Gui is as follows.
  class MyFrame(wx.Frame):

    def __init__(self, parent, title):
        super(MyFrame, self).__init__(parent, title=title,
            size=(250, 150))

        # Attach the paint event to the frame
        self.Bind(wx.EVT_PAINT, self.OnPaint)

        # Create a timer for redrawing the frame every 100 milliseconds
        self.Timer = wx.Timer(self)
        self.Timer.Start(100)
        self.Bind(wx.EVT_TIMER, self.OnPaint)

        # Show the frame
        self.Centre()
        self.Show()

    def OnPaint(self, event=None):
        # Create the paint surface
        dc = wx.PaintDC(self)

        # Refresh the display
        self.Refresh()

        # Get data from serial port
        value = arduino.readline()
  val=float(value)
  print(val + 50)

        # Draw the serial data

        # Set up colors:
        thickness = 4
        border_color = "#990000"
        fill_color = "#FF944D"
        dc.SetPen(wx.Pen(border_color, thickness))
        dc.SetBrush(wx.Brush(fill_color))

        # Draw a line
        dc.DrawLine(50, 40, 50+val, 40)

        # Draw a rectangle
        dc.DrawRectangle(50,50,val,50)
This code displays a window as seen below.