Interface and Application Programming
OverviewLast updated: 25/05/2016
Objective Write an application that interfaces with an input &/or output device that you made. Learning outcomes 1.Interpret and implement programming protocols; Have I... Described my process using words/images/screenshots? Explained the protocols I used? Had a fun time? Outlined problems and how I fixed them? Included original code? Summary This week I started with making a simple serial interface with Processing. Then I moved on to web app design, that challenged me quite a lot. I used nodejs and johnny five as platforms.Interface with Processing In the first place I wanted to build a simple interface with Processing, a programming environment that I am quite familiar with. I took the I2C network that I built in week 15 and I made it interact with my laptop through Serial communication. I first looked at this tutorial that absolutely did not work. At least it gave me an idea of how to set up my code. I kept the same code in the slaves of the I2C network and I prototyped this interface with and Arduino Mega as a master. The arduino code is as follows:
#include Wire.h

void setup()
{
  Wire.begin(); // join i2c bus (address optional for master)
  Serial.begin(115200); //same as in the Processing sketch
}

void loop()
{

  char val = 0;
  //serial reading from Processing
  if (Serial.available())
   {
     val = (char)Serial.read(); // read it and store it in val
   }
  //each number received corresponds to a different slave request
  if (val == '1')
  {
    Wire.requestFrom(4, 1);
  }
  else if (val == '2')
  {
    Wire.requestFrom(5, 1);
  }

   else if (val == '3')
  {
    Wire.requestFrom(6, 1);
  }

  while(Wire.available()) // slave may send less than requested
 {
    int i = Wire.read(); // receive a byte as character
 }

  delay(10); //small delay is necessary for the Arduino not to freeze
}import processing.serial.*;
Serial myPort;
//defining the shapes
int rectX, rectY;
int rect1X, rect1Y;
int rect2X, rect2Y;
int rectSize = 150;
color rectColor, rect1Color, rect2Color, baseColor;
color rectHighlight, rect1Highlight, rect2Highlight;
//setting the booleans for the mousover interaction
boolean rectOver = false;
boolean rect1Over = false;
boolean rect2Over = false;
void setup() {
size(900, 500);
//myPort = new Serial(this, "/dev/ttyACM0", 115200);
myPort = new Serial(this, "COM4", 115200);
//colors of the buttons
rectColor = color(30);
rectHighlight = color(100);
rect1Color = color(30);
rect1Highlight = color(100);
rect2Color = color(30);
rect2Highlight = color(100);
//position of the buttons
rectX = width/4 -rectSize;
rectY = height/2-rectSize/2;
rect1X = width/2-rectSize/2;
rect1Y = height/2-rectSize/2;
rect2X = width/4+3*rectSize;
rect2Y = height/2-rectSize/2;
background(100, 200, 200);
//texts on the interface
textSize(60);
fill(100);
text("Serial to I2C Communication", 30, 60);
textSize(40);
fill(0);
text("Node 1", 80, 150);
textSize(40);
fill(0);
text("Node 2", 380, 150);
textSize(40);
fill(0);
text("Node 3", 680, 150);
noStroke();
fill(100);
rect(0, 450, 900, 50);
}
void draw() {
update(mouseX, mouseY);
//to get the opacity on mouseover
if (rectOver) {
fill(rectHighlight);
} else {
fill(rectColor);
}
rect(rectX, rectY, rectSize, rectSize, 15);
if (rect1Over) {
fill(rect1Highlight);
} else {
fill(rect1Color);
}
rect(rect1X, rect1Y, rectSize, rectSize, 15);
if (rect2Over) {
fill(rect2Highlight);
} else {
fill(rect2Color);
}
rect(rect2X, rect2Y, rectSize, rectSize, 15);
}
//gets as input the mouse position and checks whether the cursor is on top of any of the three buttons
void update(int x, int y) {
if ( overRect(rectX, rectY, rectSize, rectSize) ) {
rectOver = true;
rect1Over = false;
rect2Over = false;
} else if ( overRect1(rect1X, rect1Y, rectSize, rectSize) ) {
rect1Over = true;
rectOver = false;
rect2Over = false;
} else if ( overRect2(rect2X, rect2Y, rectSize, rectSize) ) {
rect2Over = true;
rect1Over = false;
rectOver = false;
} else {
rect1Over = rectOver = rect2Over = false;
}
}
//events when the mouse is pressed: send a value through serial. Also, a check on the monitor is done to see whether the values are actually sent.
void mousePressed() {
if (rectOver) {
myPort.write('1');
println("1");
}
if (rect1Over) {
myPort.write('2');
println("2");
}
if (rect2Over) {
myPort.write('3');
println("3");
}
}
boolean overRect(int x, int y, int width, int height) {
if (mouseX >= x && mouseX <= x+width &&
mouseY >= y && mouseY <= y+height) {
return true;
} else {
return false;
}
}
boolean overRect1(int x, int y, int width, int height) {
if (mouseX >= x && mouseX <= x+width &&
mouseY >= y && mouseY <= y+height) {
return true;
} else {
return false;
}
}
boolean overRect2(int x, int y, int width, int height) {
if (mouseX >= x && mouseX <= x+width &&
mouseY >= y && mouseY <= y+height) {
return true;
} else {
return false;
}
}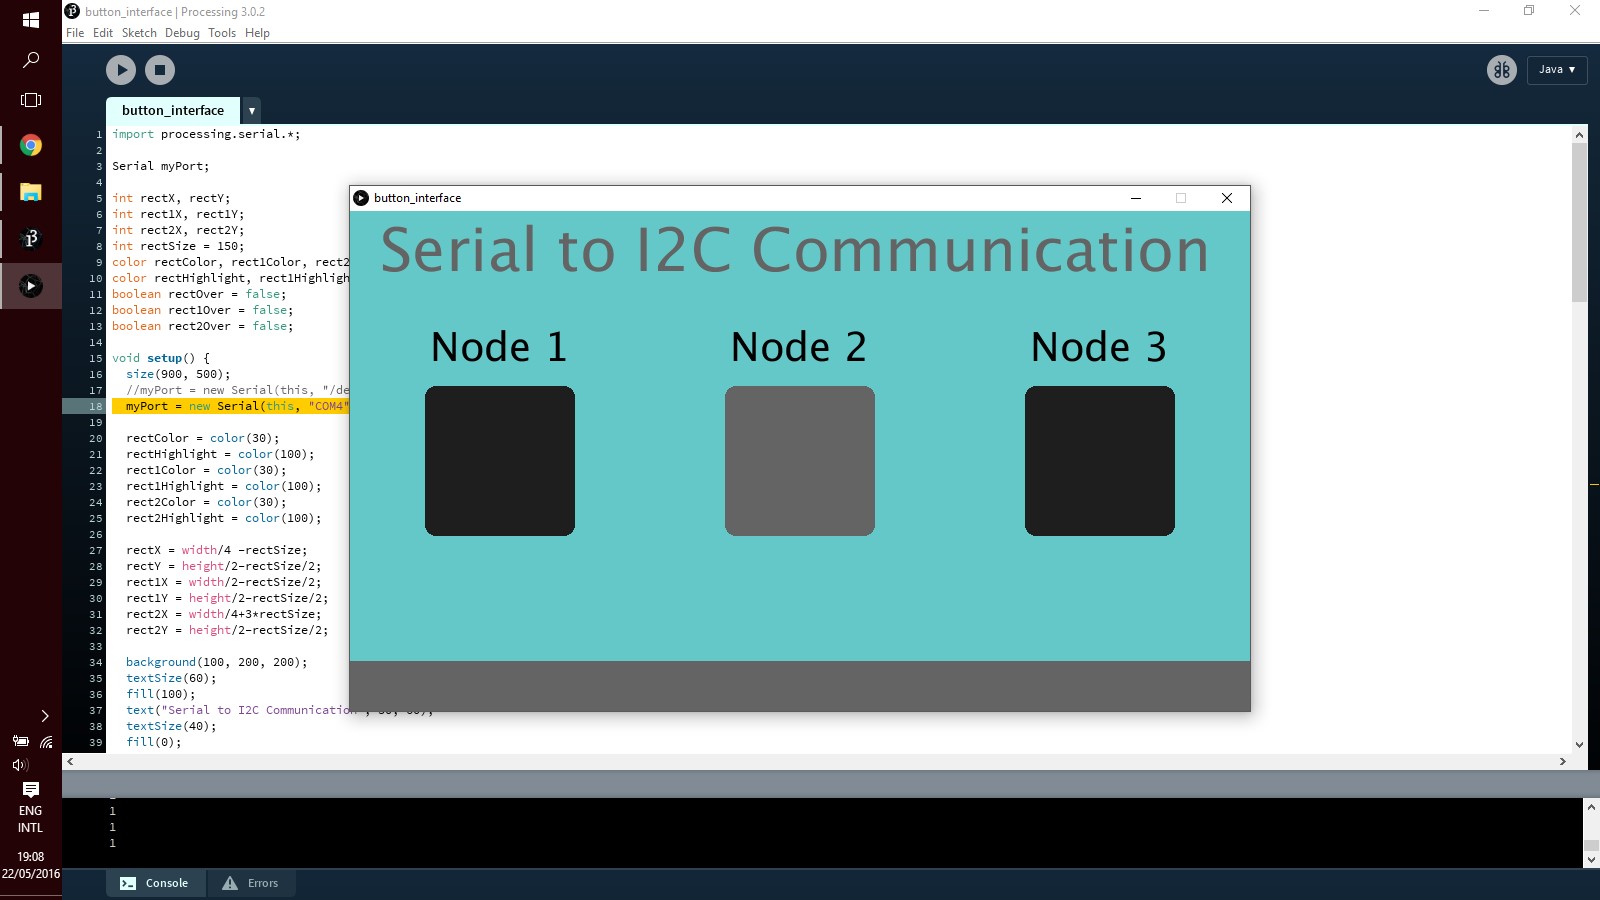 Below instead is a short movie of the interaction.
The interface worked well when using the Arduino Mega, as shown in the video. However, when I tried to hook up the Satshakit it did not work. Debugging was quite difficult as there is no LED for the communication channel as there is on the Arduino, so I did not know where the interruption of signal happened.
Below instead is a short movie of the interaction.
The interface worked well when using the Arduino Mega, as shown in the video. However, when I tried to hook up the Satshakit it did not work. Debugging was quite difficult as there is no LED for the communication channel as there is on the Arduino, so I did not know where the interruption of signal happened.
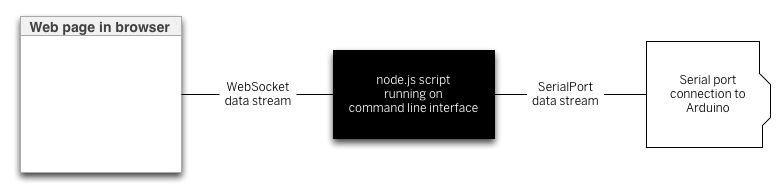
Web Interface with Nodejs As a second challenge I tried and succeded in building a simple web-app that could communicate with the Arduino. The firt attempt was the one to read values on a webpage from the Arduino through the serial port. The workflow is shown in the picture below.
 I started with downloading all the necessary programs and packets. I did find this repository really useful. I downloaded the following three applications:
$ sudo apt-get install nodejs
$ sudo apt-get install npm
$ sudo apt-get install build-essential$ npm install serialport int i = 0;
void setup()
{
Serial.begin(9600);
}
void loop()
{
//only enters the loop when a byte is sent over from node
if (Serial.available())
{
char input = Serial.read();
Serial.println(i);
i++;
delay(10);
}
}var serialport = require('serialport'); // include the library
SerialPort = serialport.SerialPort;
var WebSocketServer = require('ws').Server;
var SERVER_PORT = 8081; // port number for the webSocket server, that needs to match the one in the html script
var wss = new WebSocketServer({port: SERVER_PORT}); // the webSocket server
var connections = new Array;
portName = process.argv[2]; //portname is passed on as argument from terminal
var myPort = new SerialPort(portName, {
baudRate: 9600,
parser: serialport.parsers.readline("\n")
});
//events list when the serial communication is started
myPort.on('open', showPortOpen);
myPort.on('data', sendSerialData);
myPort.on('close', showPortClose);
myPort.on('error', showError);
wss.on('connection', handleConnection);
//function list to set up the serial communication
function handleConnection(client) {
console.log("New Connection"); // you have a new client
connections.push(client); // add this client to the connections array
client.on('message', sendToSerial)
{console.log("sending request to Arduino");}
; // when a client sends a message,
client.on('close', function() { // when a client closes its connection
console.log("connection closed"); // print it out
var position = connections.indexOf(client); // get the client's position in the array
connections.splice(position, 1); // and delete it from the array
});
}
function sendToSerial(data) {
console.log(data);
myPort.write(data);
}
function broadcast(data) {
for (myConnection in connections) { // iterate over the array of connections
connections[myConnection].send(data); // send the data to each connection
}
}
function showPortOpen() {
console.log('port open. Data rate: ' + myPort.options.baudRate);
}
function sendSerialData(data) {
if (connections.length > 0) {
broadcast(data);
}
console.log(data);
}
function showPortClose() {
console.log('port closed.');
}
function showError(error) {
console.log('Serial port error: ' + error);
} !DOCTYPE html>
html>
head>
script type="text/javascript" src="https://cdnjs.cloudflare.com/ajax/libs/p5.js/0.4.8/p5.min.js">
script type="text/javascript" src="https://cdnjs.cloudflare.com/ajax/libs/p5.js/0.4.8/addons/p5.dom.js">
script type="text/javascript">
var text;
var socket = new WebSocket("ws://localhost:8081");
function setup()
{
createCanvas(400, 200);
background(200);
// The socket connection needs two event listeners:
socket.onopen = openSocket;
socket.onmessage = showData;
text = createDiv("Counter:");
text.position(50,100);
//when the websocket communication is established
function openSocket() {
text.html("Socket open");
socket.send("Hello server");
}
//when there are data coming from serial and are displayed
function showData(result) {
text.html("Counter:" + result.data);
text.position(50, 100);
socket.send('a');
}
}
function draw()
{
var c = color(255, 204, 0);
fill(c);
noStroke();
rect(40, 120, 310, 5);
}
/script>
meta charset="utf-8">
title>
/head>
body>
/body>
/html>$ cd directory
$node file.js /dev/ttyACM0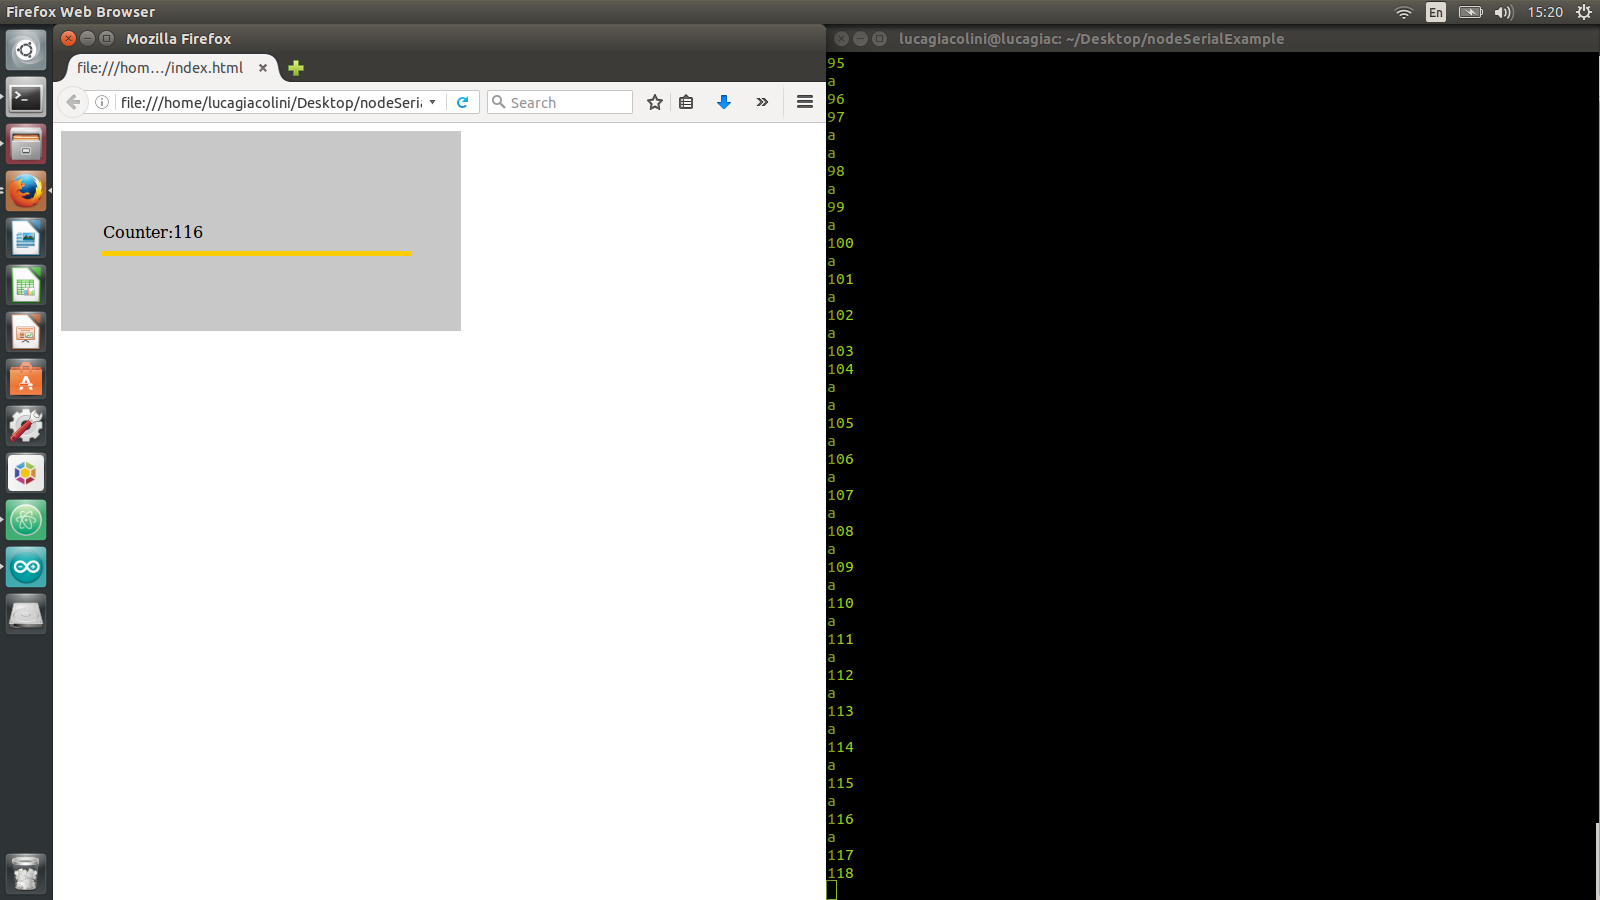 Introduction to Johnny-Five
Johnny Five is an awesome platform that allows to control boards such as Arduino with javascript and potentially from the web. In order to quickly get going with it, I decided to simply follow two basic tutorial. In the first place I followed these instructions. Very concise and useful. In the first place I uploaded the sketch StandardFirmata from the example list on the Arduino Mega. After I had downloaded the jhonny-five packets through
Introduction to Johnny-Five
Johnny Five is an awesome platform that allows to control boards such as Arduino with javascript and potentially from the web. In order to quickly get going with it, I decided to simply follow two basic tutorial. In the first place I followed these instructions. Very concise and useful. In the first place I uploaded the sketch StandardFirmata from the example list on the Arduino Mega. After I had downloaded the jhonny-five packets through
$ npm install johnny-fivevar five = require("johnny-five"),
board = new five.Board();
board.on("ready", function() {
// Create an Led on pin 13
var led = new five.Led(13);
// Strobe the pin on/off, defaults to 100ms phases
led.strobe();
});var five = require("johnny-five");
var board = new five.Board();
board.on("ready", function() {
// Create a standard `piezo` instance on pin 3
var piezo = new five.Piezo(3);
// Plays a song
piezo.play({
// song is composed by an array of pairs of notes and beats
// The first argument is the note (null means "no note")
// The second argument is the length of time (beat) of the note (or non-note)
song: [
["C4", 1 / 4],
["D4", 1 / 4],
["F4", 1 / 4],
["D4", 1 / 4],
["A4", 1 / 4],
[null, 1 / 4],
["A4", 1],
["G4", 1],
[null, 1 / 2],
["C4", 1 / 4],
["D4", 1 / 4],
["F4", 1 / 4],
["D4", 1 / 4],
["G4", 1 / 4],
[null, 1 / 4],
["G4", 1],
["F4", 1],
[null, 1 / 2]
],
tempo: 100
});
});Conclusions Last week has been really interesting and useful for me. I started with something in my comfort zone: programming with Processing. However, this was a bit more advanced than the little I could do before and I was satisfied with it. Web programming was a bit more difficult for me. However, I think I now have enough basis to start a project in that direction, it just takes me much more than one week only.