
Week 13: Getting something out of the Fab-Pic
Hello again...
This weeks task: make your own board output something...
Let me short think about some output-ideas:
Okay, we will use a stepper motor. Always a nice feature if you want to make a robot or any moving device.
Some theory about the standard stepper-interface:
The most interfaces uses 3 signals:
There are a lot of ready-to-use stepper-driver out there, for example the polulu boards.
Classical self-made drivers uses the L297 and L298 ICs. A little bit outdated, but still good and easy to use.
For making this assingment a little more interessting i will use an old 5.25" floppy drive. This old drives have a stepper motor for the read/write-head that is not controlled by the drive itself, but on the external floppy-controller. Therefore the drive has the enable, direction and step signal routed out to the connector.
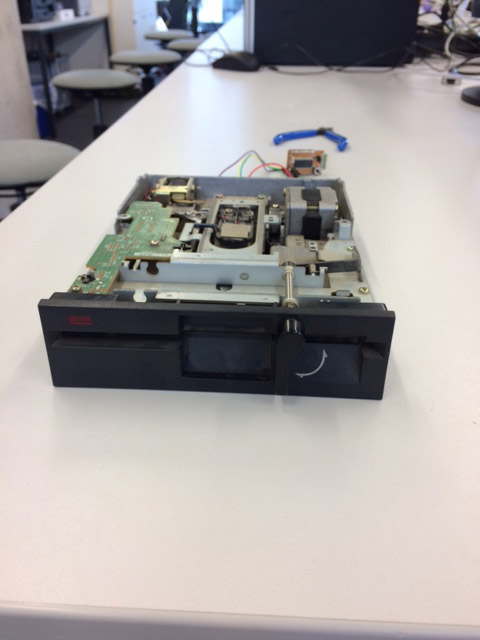
In my bookshelf i found an old book from 1994, with the connector-description from the old drives:

Hooking the floppy and the Fab-Pic together:


Writing some code, and this comes out (turn your volume up for the nice old floppy-sound):
Ok, there was a little more work in it ;)
For generating the step-pulses i use a timer of the pic, timer 1.
This timer has a 16bit value, and after some calculating i get the values for the pre- and postscaler. All other configs are good described in the datasheet:
            T1CON = 0b00000011; //Config Timer2

    IPR1bits.TMR1IP = 1; //Setting Timer1 to high-prio

    PIE1bits.TMR1IE = 0; //Disable Timer1 Interrupt until drive to middle

    PIR1bits.TMR1IF = 0; //rest TMR1-Interrupt flag

    RCONbits.IPEN = 1; //enable High/Low-Prio

    ei(); // master switch to enable interrupt

    INTCONbits.GIE_GIEH = 1; //enable all Low-Prio-Interrupts

    INTCONbits.PEIE_GIEL = 1; //enable all Low-Prio-Interrupts
Everytime the timer overflows an interrupt is generated. Due to the fact that our PICs just knows 2 interrupt-priorities we have to check on every interrupt which interrupt-source has generated the interrupt.
After the check we can execute some code, and reset the interrupt.
Because we want different frequencys we preload the timer-value on every interrupt:
          void interrupt trigger_interrupt(void) //High priority interrupts

          {

               if (PIR1bits.TMR1IF == 1)

               {

                    if (motor_step == 1) {motor_step = 0;}

                    else

                        {

                       if (motor_direction == 0) {motor_direction = 1;}

                       else {motor_direction = 0;}

                        motor_step = 1;

                    }

                   TMR1H = high;

                   TMR1L = low;

                   PIR1bits.TMR1IF = 0;

               }

          }
The calculation of the preload-value is made by the subroutine "play".
The main program just calls play one time with a wished frequency, and after this nothing needs to be done anymore.
          void play(int frequency)

{

    //Using Timer1 for PWM-Generating

    //Timer is configuered as 16-Bit, running on FOSC/4 = 8MHz, 65536 counts max

    //For one periode pf sound (1Hz) two timer-overflow are needed (one low, one high)

    //TMR1H is the high register

    //TMR1L is the low register

    long temp;

    if (frequency <=62) frequency = 62;

    if (frequency <=62) frequency = 62;


    temp = -((8000000/frequency/2)-65536);

    high = temp / 255;

    low = temp - (high * 255);


    drive_enable = 0;  //Switch drive on
}
If you want to stop the output we just stop the motor by killing the enable signal:
            void stop()

            {

               drive_enable = 1;  //Switch drive off

            }
Another possibilty is to switch of the timer-interrupt:
PIE1bits.TMR1IE = 0; //Disable Timer1 Interrupt
In a music-title the breaks are very important. Therefore a little sleep-subroutine is used:
          //function to generate delays of ms without max limit

          void sleep (int delay)

          {

            int i;

             for(i=0; i<=delay; i++)

              {

                __delay_ms(1);

              }

          }
The main code consists just out of
play(frequency);sleep(sometime);stop();sleep(sometime)
uh...
i need some notes
okay, a little excurse:
A lot of music files you can find in the web are in MIDI-format.
This format is designed in a time, when memory was very expensive. And it is desigend by musicans, for musicans.
Because of this the time-delays are not in seconds but in quarter-notes and metronome-ticks.
And there are no frequencys but notes. Yes notes. Like C1 or D3.
Due to the MTM-Week (still have to write the docu for presentation next day) i will not explain the whole format to you. If you are interessded, google it. There are a lot of good explanations out there. I used these to write a php-script.
Here on github the server can´t execute PHP, so you have to execute it on your PC or server.
For some time you can also use the srcipt on my own server:
CLICK
I´ve zipped the sourcecode for the PIC and the PHP-Script for you,
download it here:
floppy.zip
So long, have fun and save the princess!