08. Embedded Programming
Assignments
- Read a microcontroller datasheet
- Program my board to do something
Reading attiny44 datasheet
I am from electronics background & I have done embedded programming for Atmega 16, STM8s, PIC24 series microcontrollers. But I am not familiar with attiny 44. So, I started from datasheet.
Here is the datasheet for Attiny 44.
Datasheets are instruction manuals for electronic components. They explain exactly what a component does and how to use it.these documents are usually written by engineers for other engineers, and as such they can often be difficult to read, especially for newcomers. Nevertheless, datasheets are still the best place to find the details you need to design a circuit or get one working.
Here is the tutorial on sparkfun named as How to read a datasheet". People who are new to electronics can follow this tutorial to understand different sections of datasheet.
By reading the datasheet of attiny44, I learned about the different ADC pins, port pins available in the microcontroller.
I also learned about the function and usage of all pins.
Programming my Hello World Board
I decided to use C programming. Among many IDEs available, I chose Atmel Studio. I downloaded Atmel Studio from here & installed it.
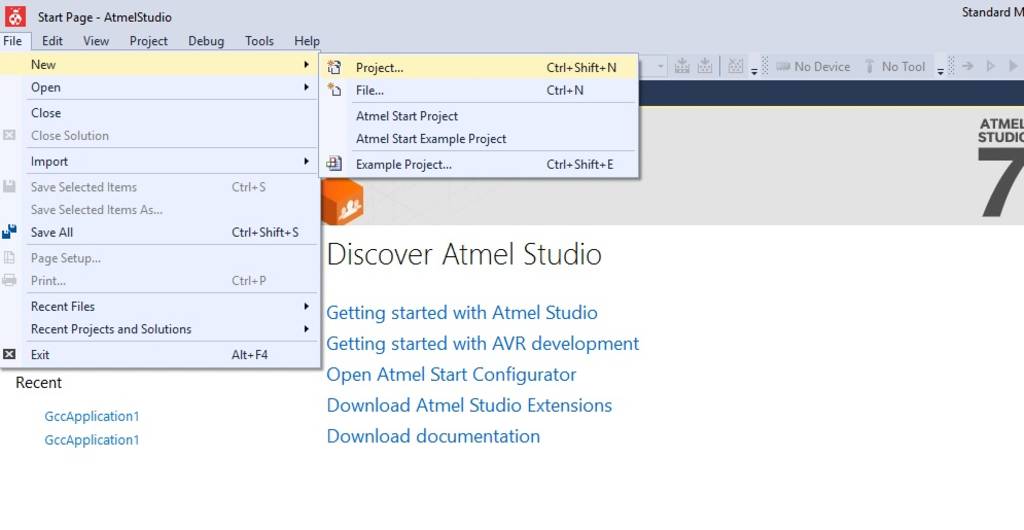
Creating new project in Atmel Studio
Step 1: Go to file --> New --> Project
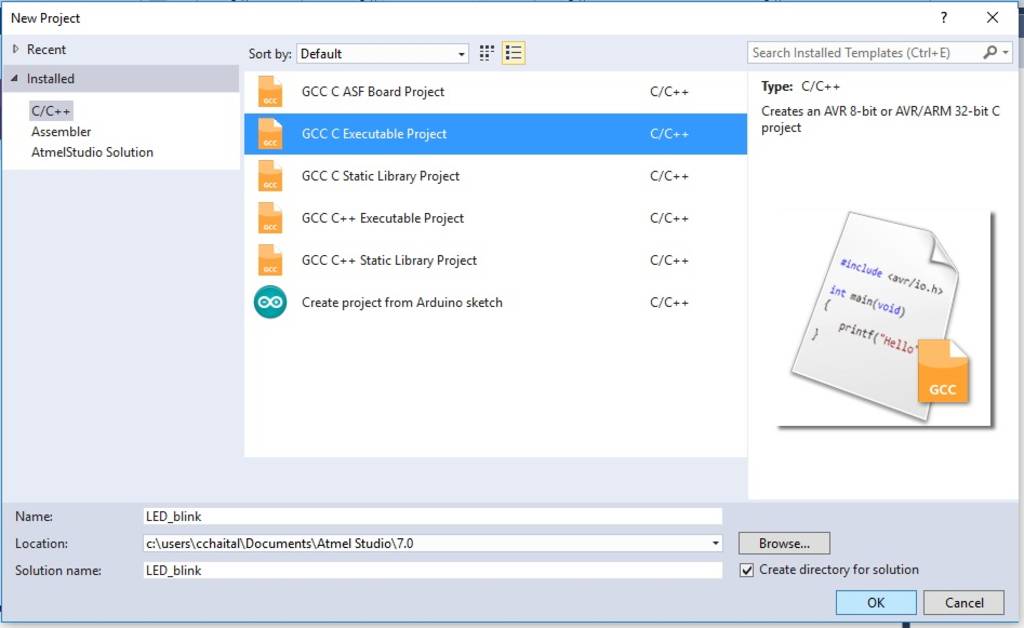
Step 2: Select GCC C Executable Project, and give the name and location for the project.
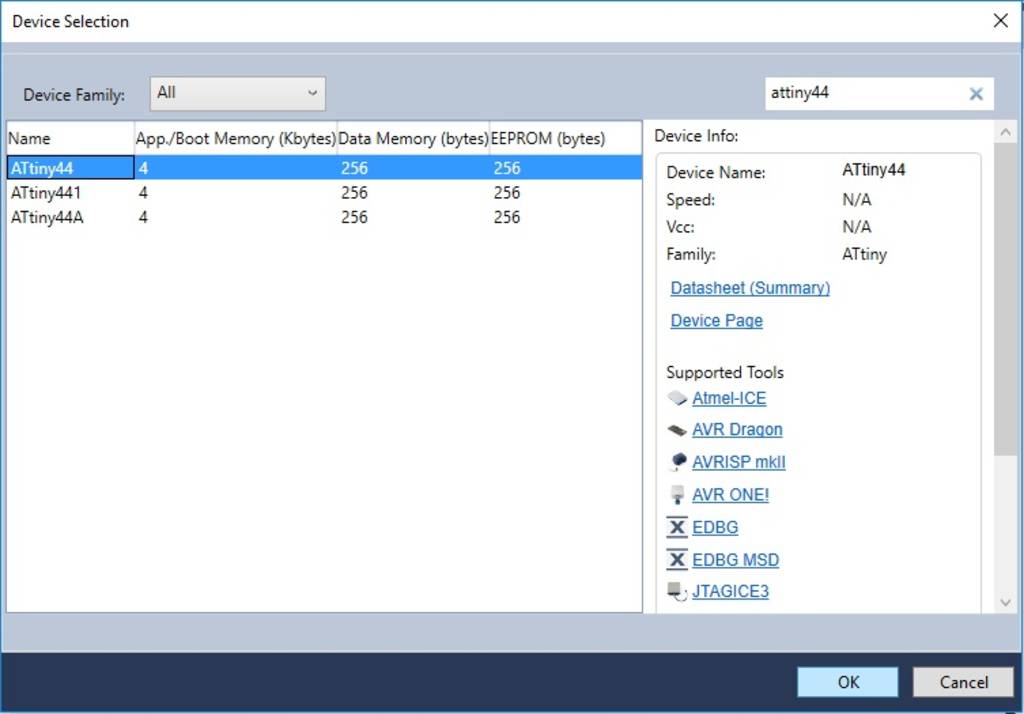
Step 3: Select the microcontroller - (In this case, select Attiny 44)
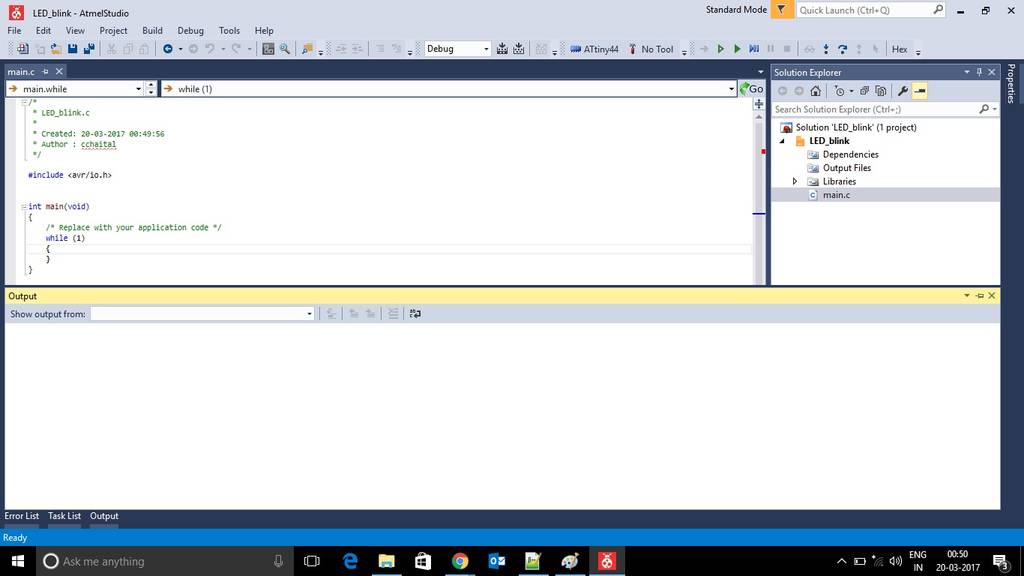
Step 3: Start writing code in C.
Embedded C code for blinking the LED
In my Hello World Baord, I have connected LED to PIN6 i.e. PA7 & push button to PIN10 i.e PA3. So, first step is to define PA7 as digital output pin.
For this we use DDR command. Few examples for using DDR command are given below:
- To set all pins of PORT A as output we should write : DDRA =0xFF or DDRA =0b11111111
Note: "1" represents output. "0x" represents hexadecimal value & "0b" represents binary value - To set all pins of PORT A as input we should write : DDRA =0x00 or DDRA =0b00000000
Note: "0" represents input. - To set PA7 as output & PA3 as input we should write : DDRA =0x80 or DDRA =0b10000000
To set a particular pin high or low, we use PORT command.Few examples for using PORT command are given below:
- To make pin 7 of PORT A high (i.e. 1) we should write : PORTA |= (1<<7) or PORTA |= (0b10000000)
Note: "|" represents boolean OR operator. "<<" represents left shift operator.
Here the 7the digit of the port a will become 1 and all other pins will remain the same. This is because if we boolean OR something with 1 the result will be 1 and if we boolear OR something with 0 the result will be the same thing. - To make pin 7 of PORT A low (i.e. 0) we should write : PORTA &= ~(1<<7) or PORTA &= ~(0b10000000)
Note: "&" represents boolean AND operator. "~" represents negation operator.
Here the 7the digit of the port a will become 0 and all other pins will remain the same. This is because if we boolean AND something with 0 the result will be 0 and if we boolear AND something with 1 the result will be the same thing.
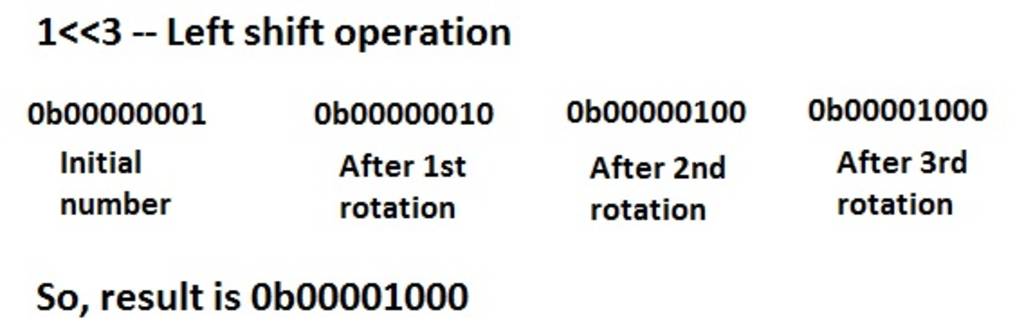
Note: (1<<3) means 1(i.e 0b00000001) will be rotated three times towards left.
Even though my board has 20Mhz resonator, for this program I used internal clock. Attiny 44 has internal clock of 8MHz. Since clock prescaler CKDIV8 is set to 1 by default, the actual clock frequency becomes 8Mhz/8 = 1Mhz. So in code I will define F_CPU as 1000000. This F_CPU value will be used by _delay function which is defined in delay.h header file. However, we can set CKDIV8 to 0 to avoid frequency division. I will also show how to use external clock later.
Here is the c code written for blinking the LED every second.
/* * led_blink.c * * Created: 20-03-2017 00:49:56 * Author : cchaital */ #define F_CPU 1000000 //Define clcok speed as 1Mhz #include//Import header file required for AVR microcontrollers #include //Import header flie required for delay function int main(void) { DDRA = 0b10000000; //set PA7as output & all other pins as input while (1) //Repeat the below actions continuously { PORTA |= (1<<7);// Set PA7 high (Make LED ON) _delay_ms(1000);//delay of 1 sec PORTA &= ~(1<<7);// Set PA7 low (Make LED OFF) _delay_ms(1000);//delay of 1 sec } }
Burning the program using FabIsp into Hello World Board
Configure FabISp in Atmel Studio
First download WINAVR from here and install it. Then follow the below steps:
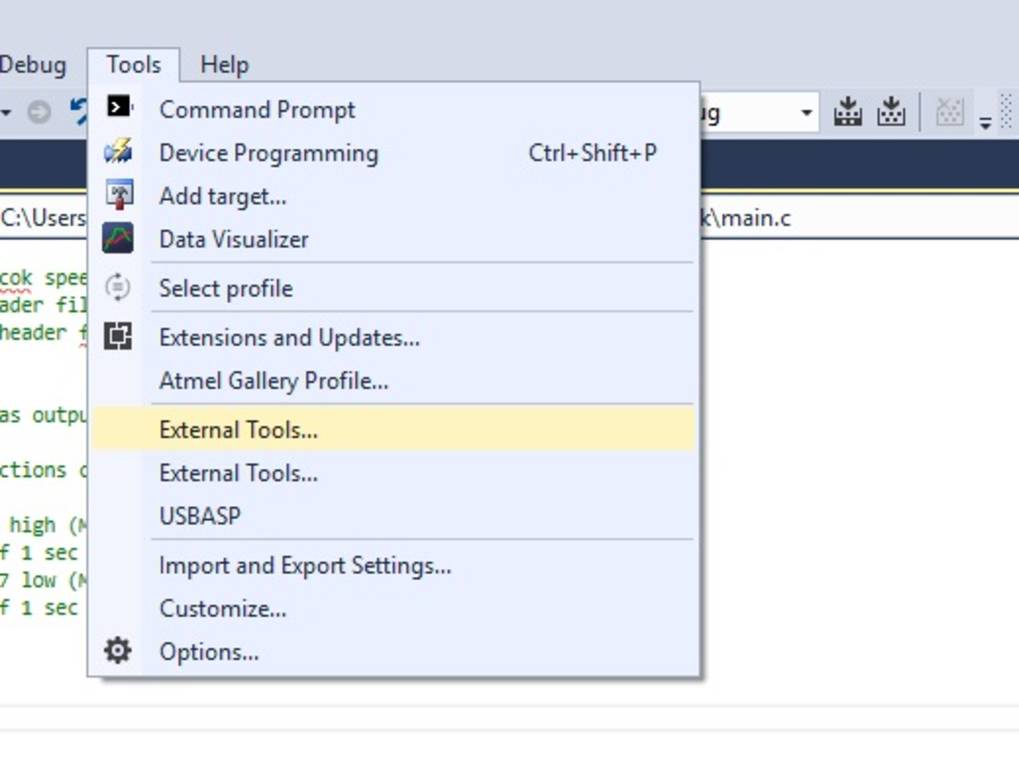
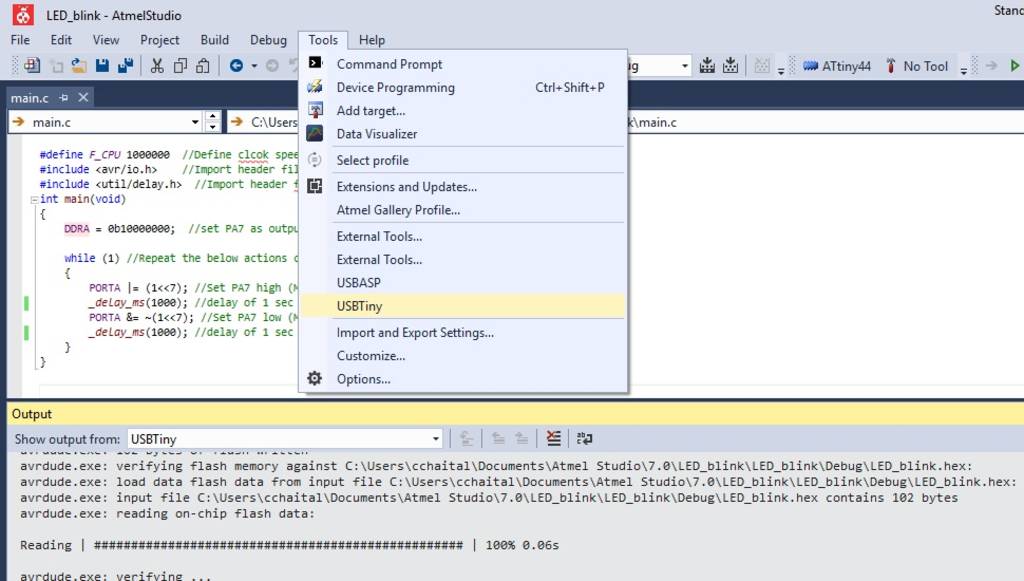
Step 1: Go to Tools --> External Tools (Note: If external Tools option is not available, then first customize the "Tools" menu & add command named as "External Tools" under Tools Menu)
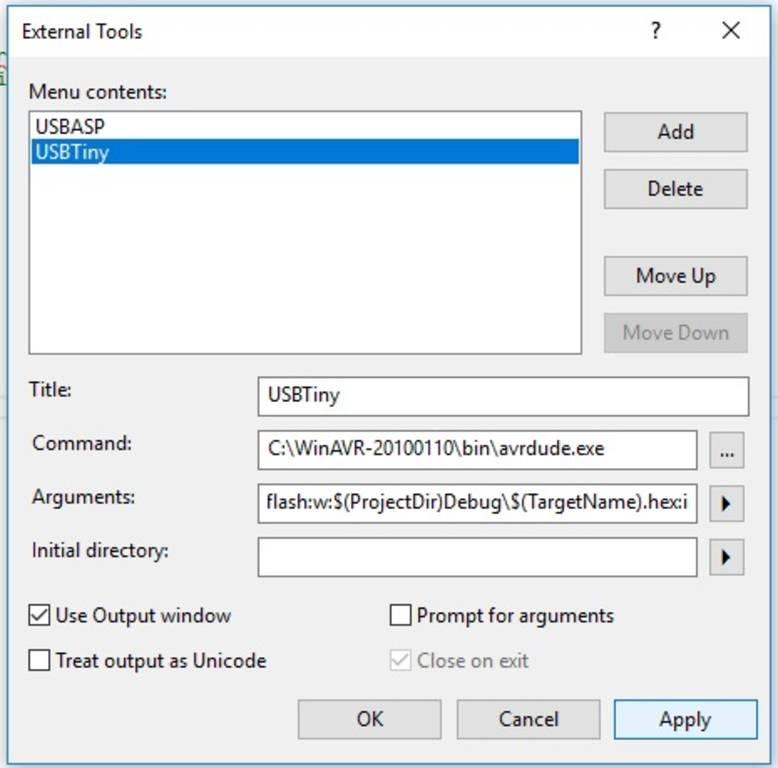
Step 2: Click on ADD. Fill the information as follows:
Title : USBTiny
command: C:\WinAVR-20100110\bin\avrdude.exe
Arguments: avrdude -c usbtiny -p attiny44 -U flash:w:$(ProjectDir)Debug\$(TargetName).hex:i
Check "use output window"
Then click on apply.
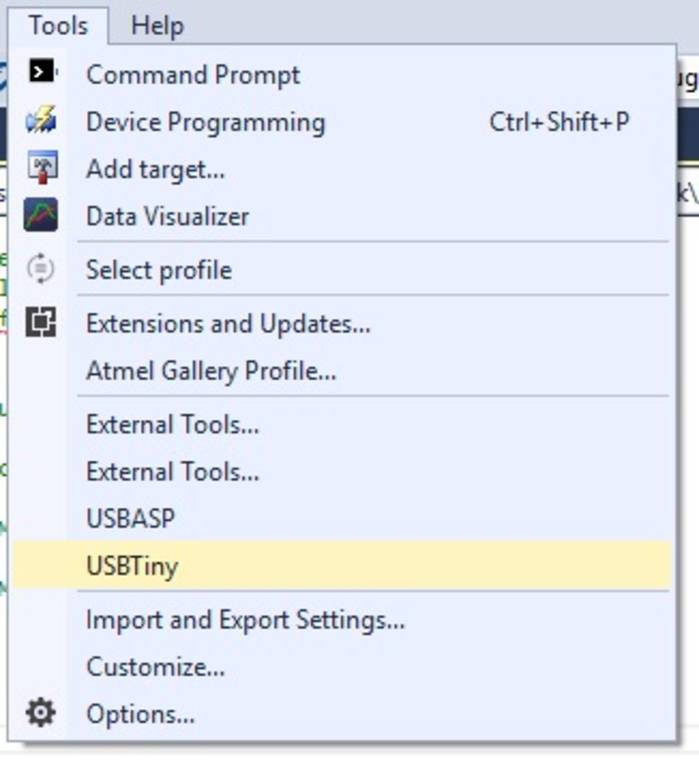
Now you can see "USBTiny" option under "Tools" menu.
Install driver for USBTiny (For Windows)
Download driver from here
I faced some error while installing the driver which says that windows cannot verify the digital signature for the drivers required for this device.
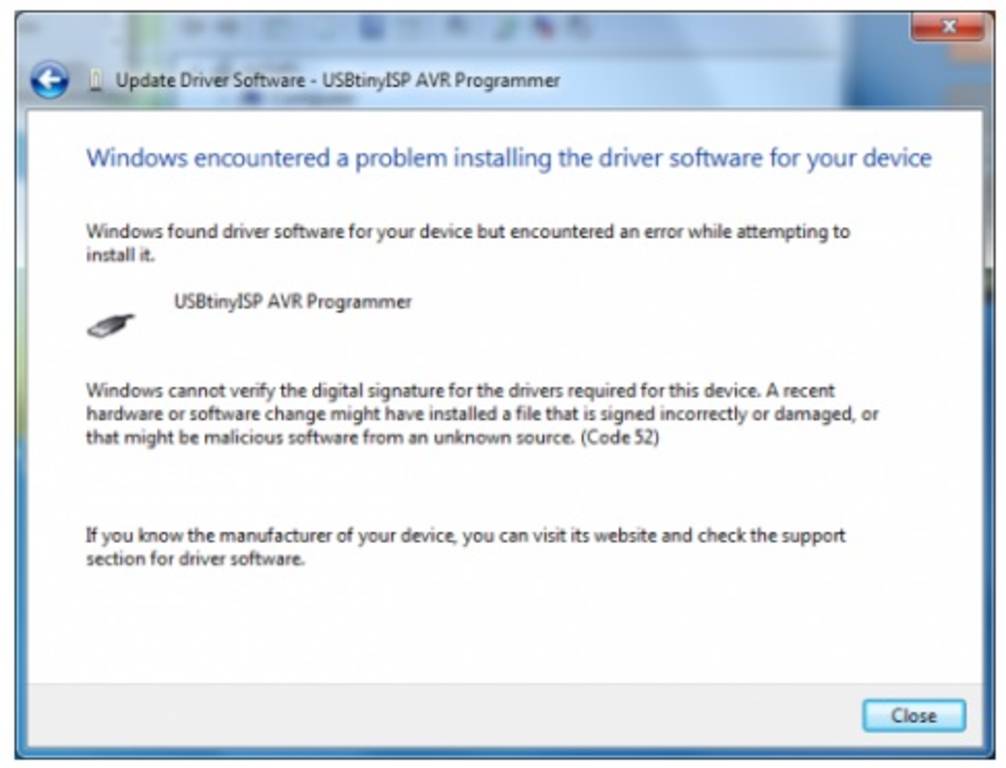
To solve this error, I disabled the device driver signature verification.
To disabled the device driver signature verification please follow this Tutorial
Once driver is installed,now we can port our program into Hello World board using our FabISp.
To burn program, go to Tools & click on USBTiny. (Before this, don't forget to build the solution)
Make sure to power both boards separately. (i.e. Use USB to power FABIsp & FTDI to power Hellow Board) because when we removed solder jumper in FABIsp, we actually removed Vcc connection.
Here is the output...
Embedded C code to make LED ON only when push button is pressed.
/* * led_with_push_button.c * * Created: 20-03-2017 00:49:56 * Author : cchaital */ #define F_CPU 1000000 //Define clcok speed as 1Mhz #include//Import header file required for AVR microcontrollers #include //Import header flie required for delay function int main(void) { DDRA = 0b10000000; //set PA7as output & all other pins as input while (1) //Repeat the below actions continuously { if((PINA & (1<<3))==0b00000000) PORTA |= (1<<7);// Set PA7 high (Make LED ON) else PORTA &= ~(1<<7);// Set PA7 low (Make LED OFF) } }
Here is the output...