Final Project Weekly evolution
This page covers my final project weekly evolution, illustrating my progress, discoveries, failures, reflexions and inspirations !

Day 1: Here we go !
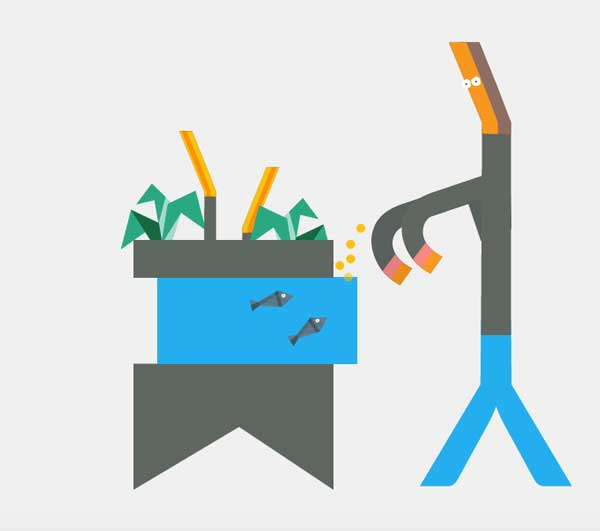
"Imagine having a self-sustaining ecosystem at home or at work, using the beauty of aquaponics to grow healthy vegies, learn and discover with"
I'm really exited to see how the "How to make almost anything" training from Fab Academy @ Green Fab Lab will help me work on this idea
Wait a moment ! I’m new here, WHAT IS AQUAPONICS ?
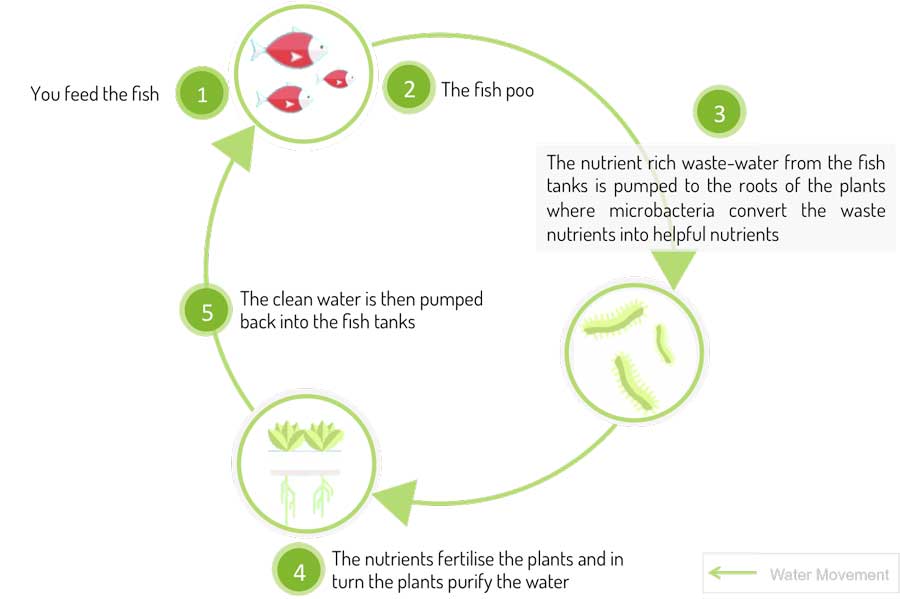
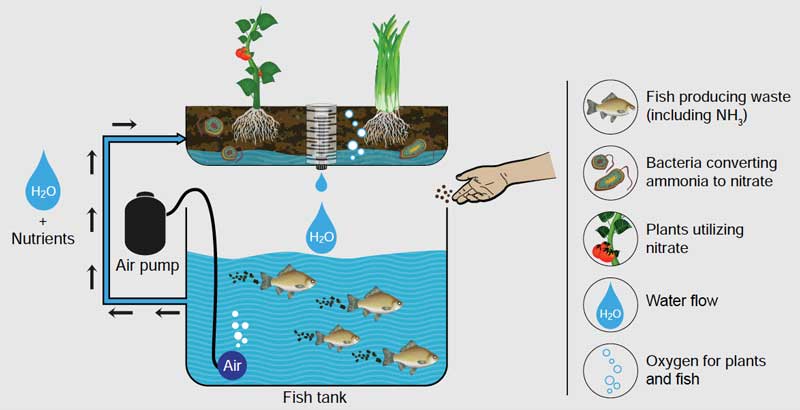
Imagine having a living ecosystem where the fish and plants can comfortably coexist in the same habitat. As fish mature and produce waste, plants use that waste as their nutrients to grow, while also cleaning the tank’s water. Aquaponics is integrated fish and plant farming method. This is how the virtuous cycle of Aquaponics works.

When it comes to sustainable farming, aquaponics presents several advantages compare to classical methods of agriculture:
No fertilizer: Aquaponics doesn’t use any chemical fertilisers or pesticides improving food security
Less water:Aquaponics uses only about 10 percent of the water needed to grow the sameplant in soil. Thus, soil-less cultivation has great potential to allow production where water is scarce or expensive.
Design for cities: Aquaponics is one method that allows people to intensively grow food where in-ground agriculture is difficult or impossible like non-arable land in cities
Productivity and yield:The main reason is the fact that soil-less culture allows the farmer to monitor, maintain plants and adjust the growing conditions for the plants, ensuring optimal real-time nutrient balances, water delivery, pH and temperature + allow dense crop production.
Reduced workload: Soil-less culture does not require ploughing, tilling, mulching or weeding
What are the applications of Aquaponics I could work on ?
Completely new to the subject, I decided to start by a small market study to have a better idea on what aquaponics could be used for. I've highlighted three mains applications based on the size of the aquaponics system:
For individuals: small scale indoor or outdoor aquaponics systems build upon an aquarium that has a volume capacity from 20 L to 200L. These systems produce leafy greens and aromatic all year round.
For communities: small scale food production capacity using fish tank that has a volume capacity from 1000 L to 10 000L. These systems produce leafy green, fruiting vegetables, fruits and fish. (i.e. For example a 1000 L fish tank system could produce 350 salads, 30 kg tomatoes and 30kg of Tilapia per year.
For cities: big scale food production capacity able to produce several kg of vegetable and fish per day
From the 6 months timeframe proposed by Fab Academy and the fact that I'm a starting from scratch, I will focus my effort on a small scale aquaponic system that could be used for:
Families to have a self-sustaining ecosystem using the beauty of aquaponics in their own home to grow, learn and discover with, all-year-round
Schools to have a self-explaining tool to help students explore how our natural environment works
Co-working Spaces / Restaurants / Shops to have Decoration / training purposes
Companies to improve the well being of their "digitized" employees by leveraging the "anti-stress" potential of aquaponics
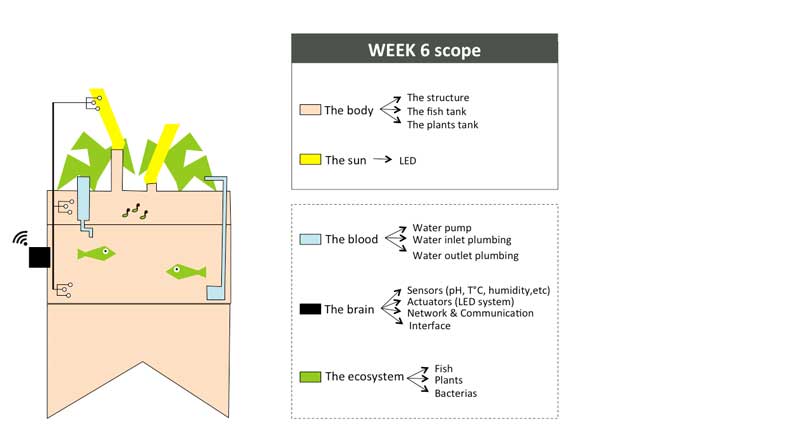
Week01 - Defining the indoor aquaponic system anatomy
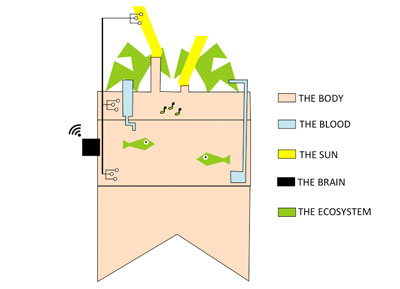
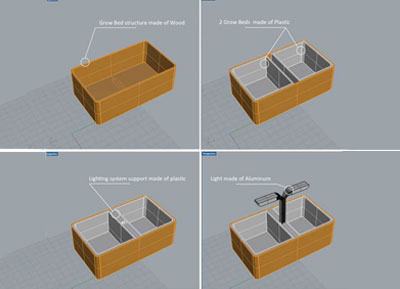
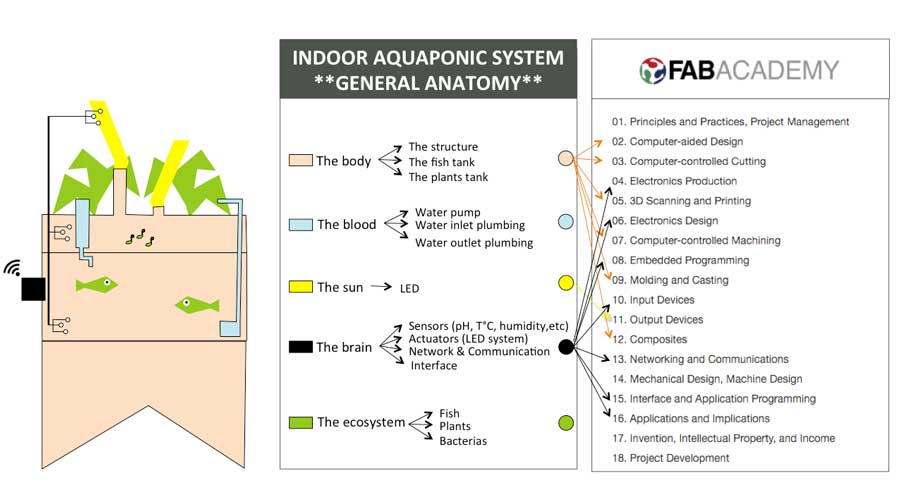
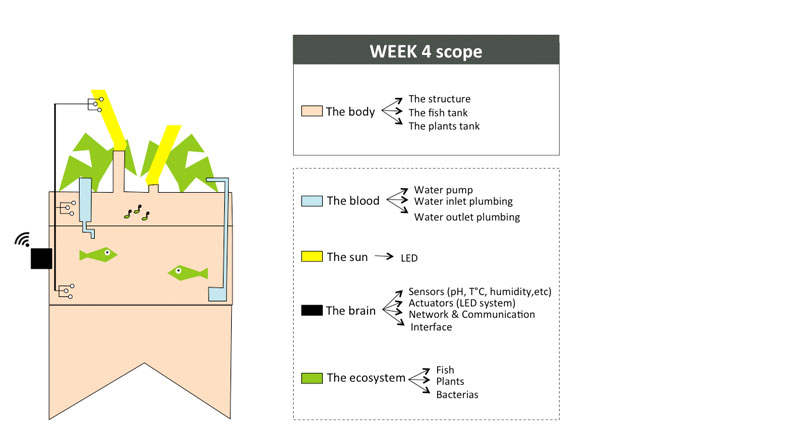
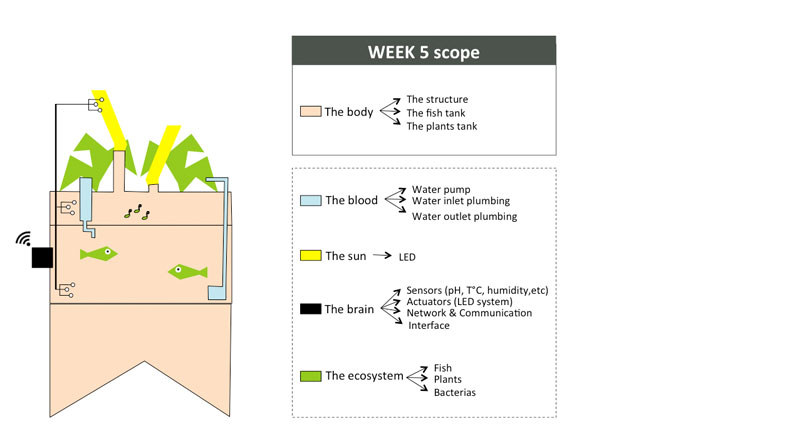
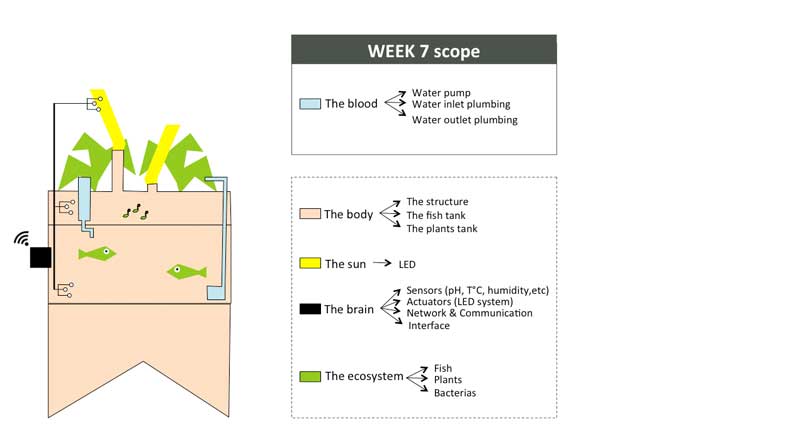
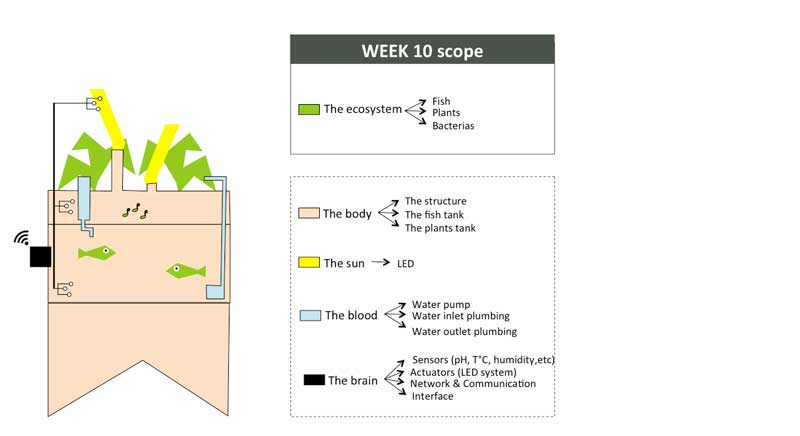
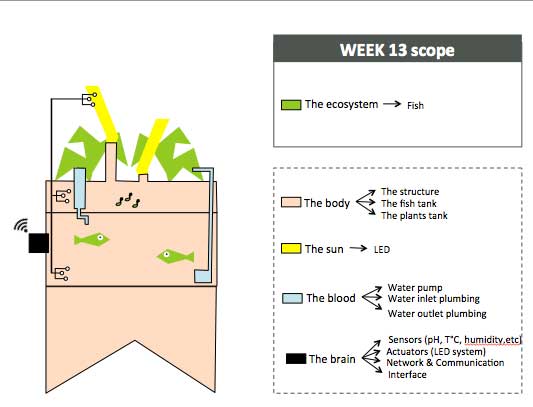
To organize my workflow in the next 6 months, I will divide the indoor aquaponics system in sub-components and work on one sub-component at a time with a spiral management approach.
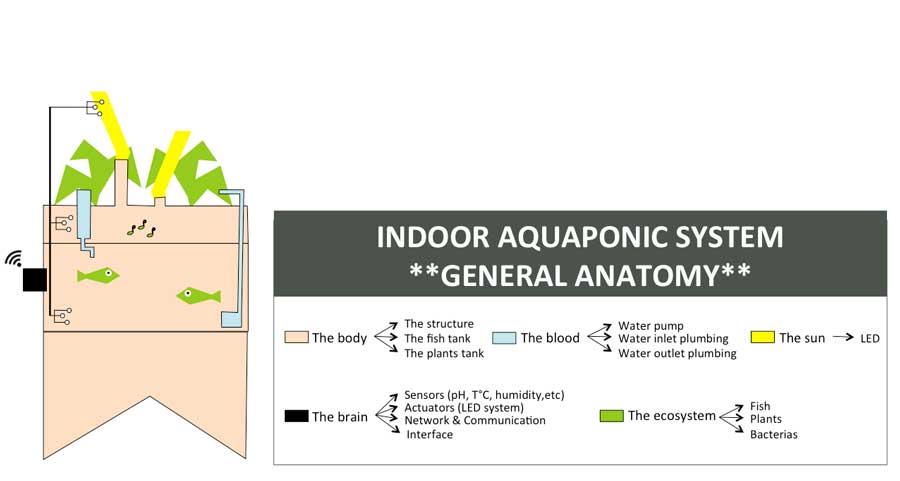
The body: a structure able to handle the fish tank, the grow bed and lighting system weight
The blood: a closed water system that run among the aquaponic ecosystem
The sun: an intelligent lighting system allowing to balance the lack of natural light consuming as less energy as possible
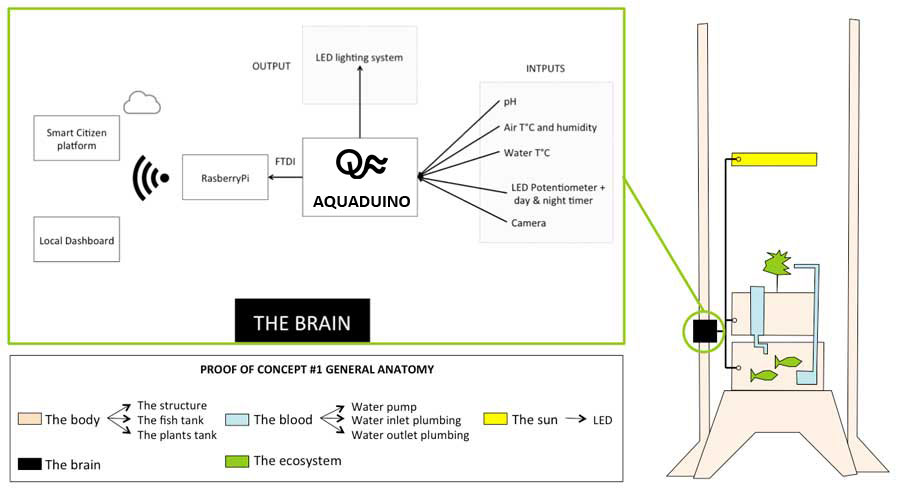
The brain: a cloud based monitoring and control system that will improve the user experience
The ecosystem:Symbiotic relationship between the fish, the beneficial microbes and plants
Each week of the Fab Academy aims to teach us a new skill, starting from 3D modelling to 3D printing, to milling, electronics, etc. Connecting the anatomy of the indoor aquaponic system and the Fab Academy training will help know which skill could be applied to develop a specific sub component. Here is a sketch to illustrate how I can use the Fab Academy training to work on this idea
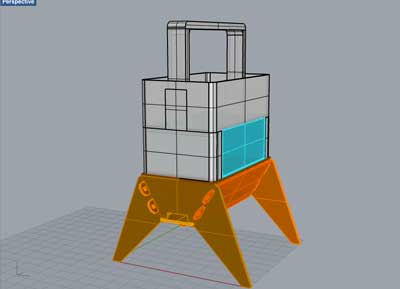
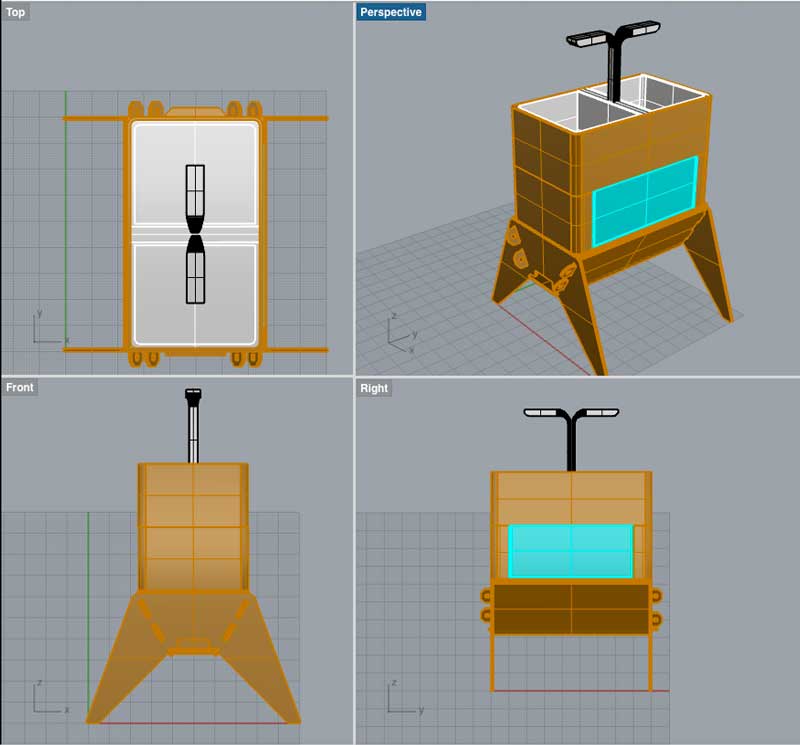
Week02 - Designing the "Body" with 3D model software
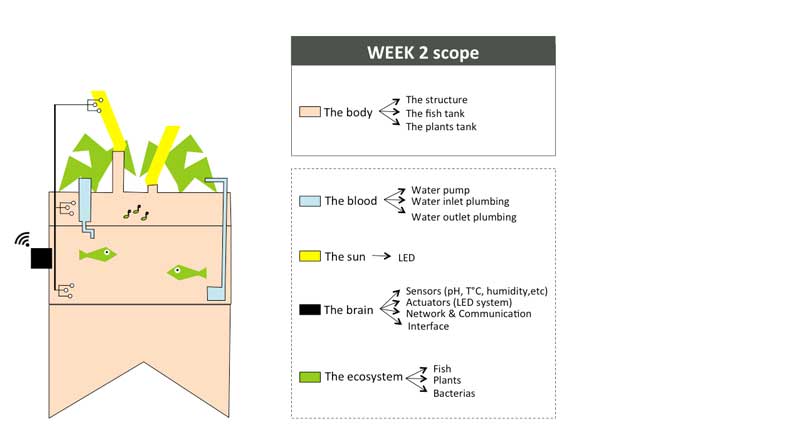
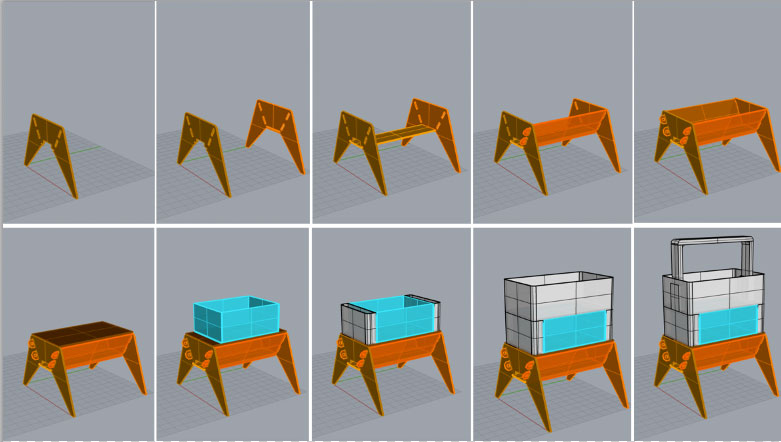
As we are starting the 3D modelling weekly assignment, I will try to come up with a first 3D design with different software and pubish some renderings as well.
Softwares used

Using Sketchup

Using Rhino
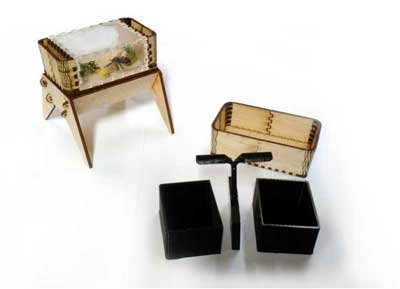
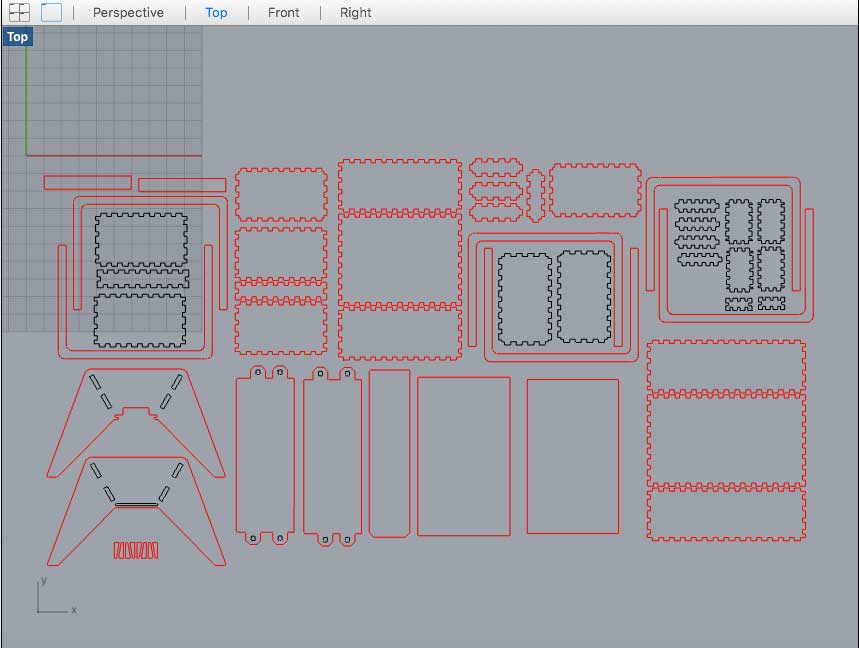
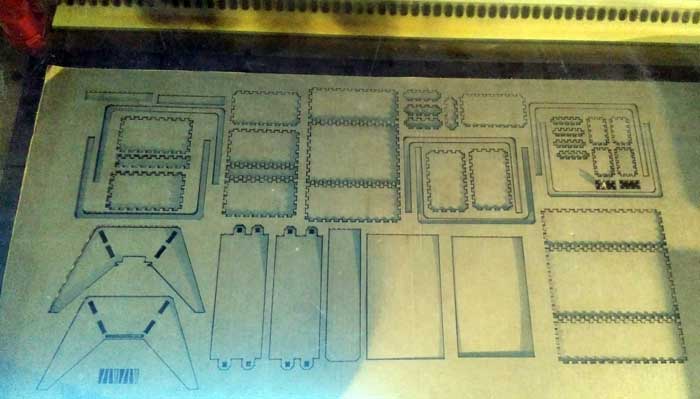
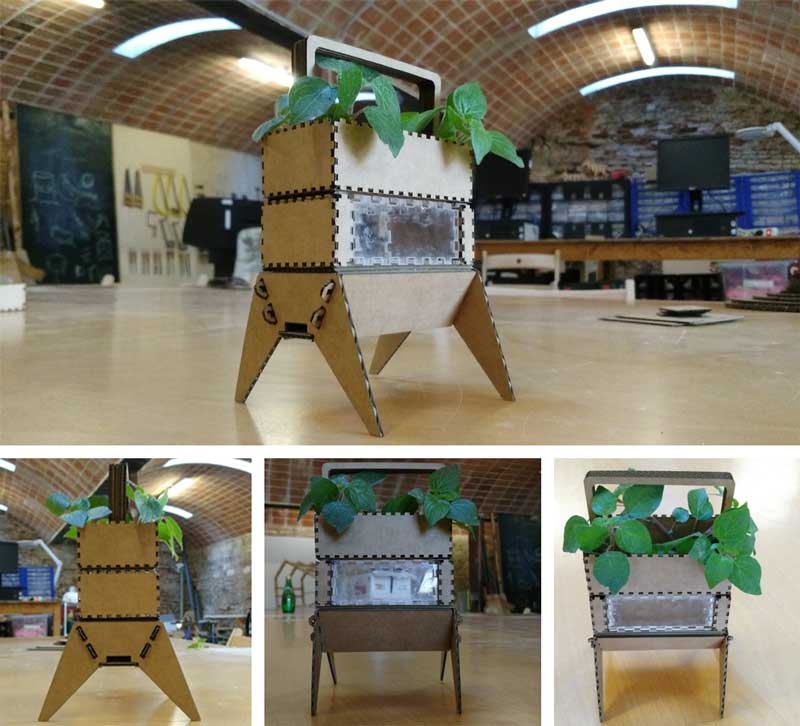
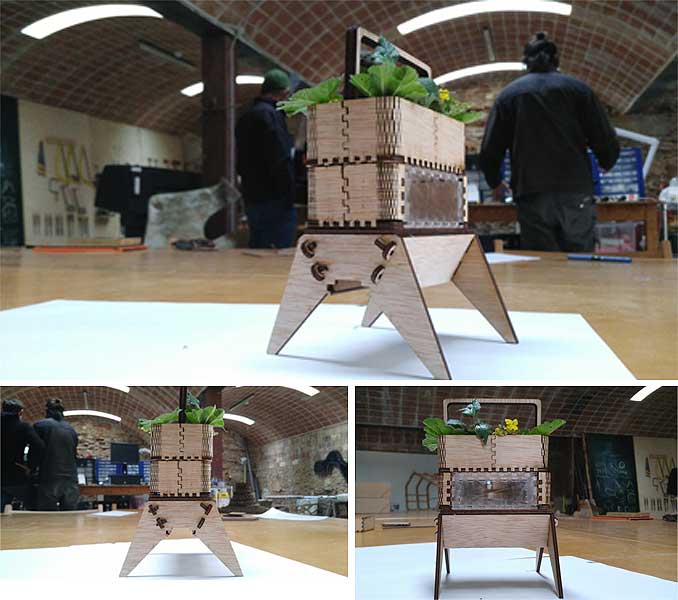
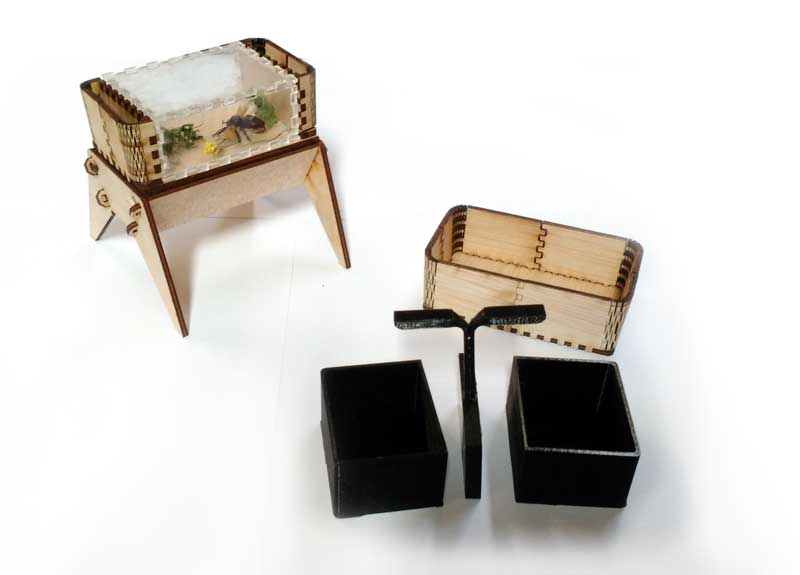
Week03 - Creating a small scale "Body"
with computer-controlled cutting

Machine used
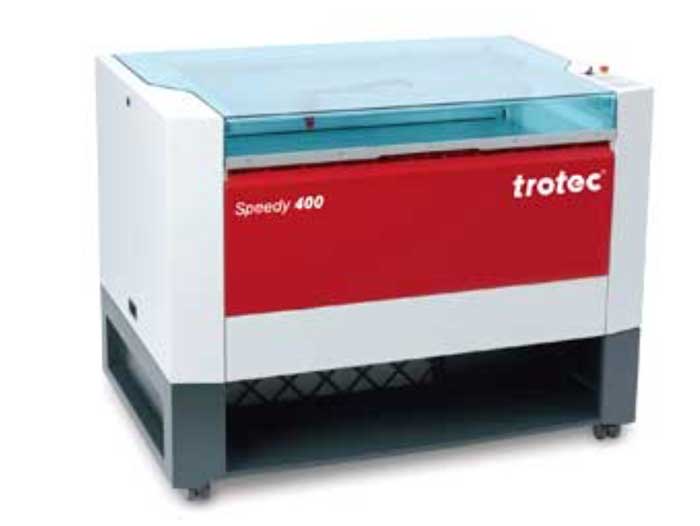
At the Green Fab Lab we have a Laser cutter Trotec Speedy 400 offering a working area of 1000 x 610 mm.
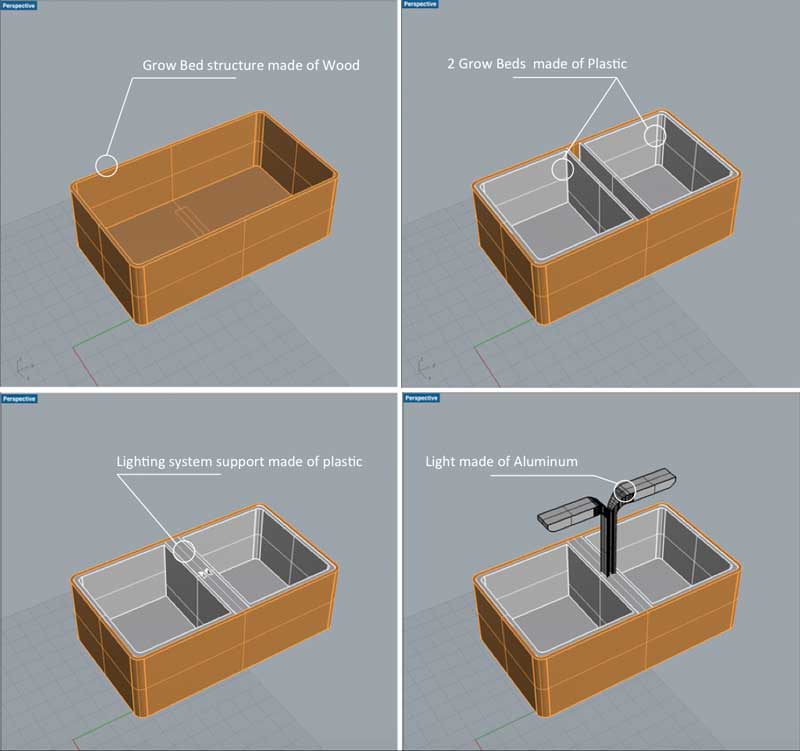
Week04 - Revisiting the "Body" with 3D modeling
Softwares used
Rhino3d
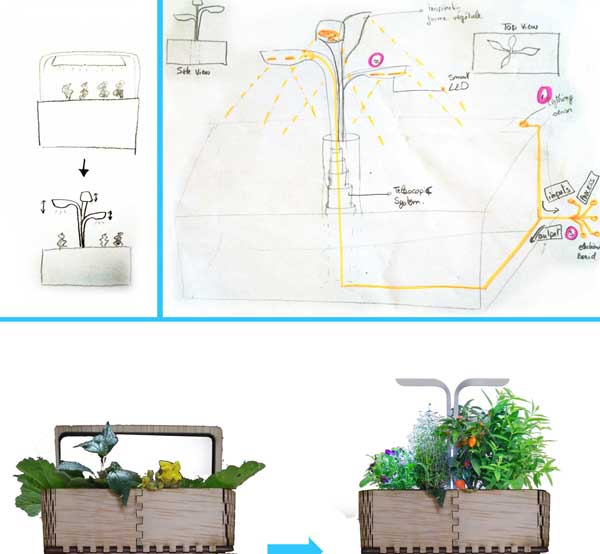
In parralel of the electronic assignment, I decided to revisit a bit the design of my original idea. As a first step, I've done a small market study about existing commercial indoor aquaponics systems available out there. For that, Kickstarter has been of a great help since most of the indoors aquaponic systems available on the market have been crowdfunded.

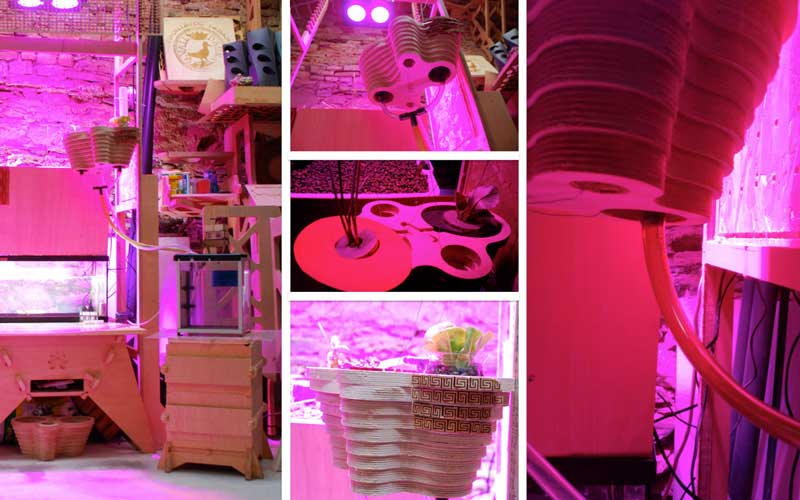
I really like the lighting system proposed by the Veritable model because of the two following aspects:
It's organic shape inspired from plants
It's telescopic capacities to adapt the heigh of the lighting system according to the plants grow.
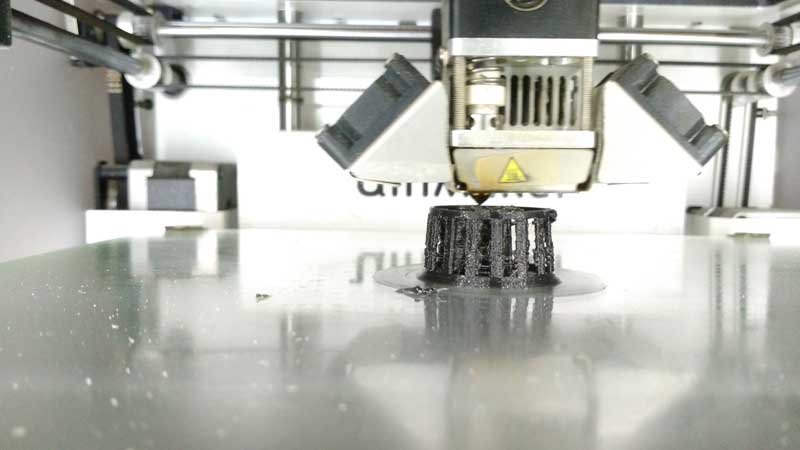
Week05 - Improving the small scale "Body" with 3D printing
Machine used
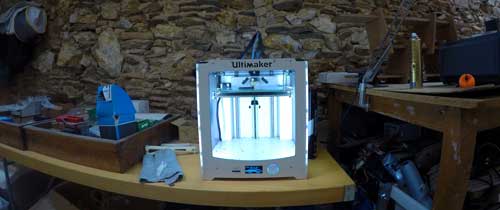
At the Green Fab Lab we have a Ultimaker 2
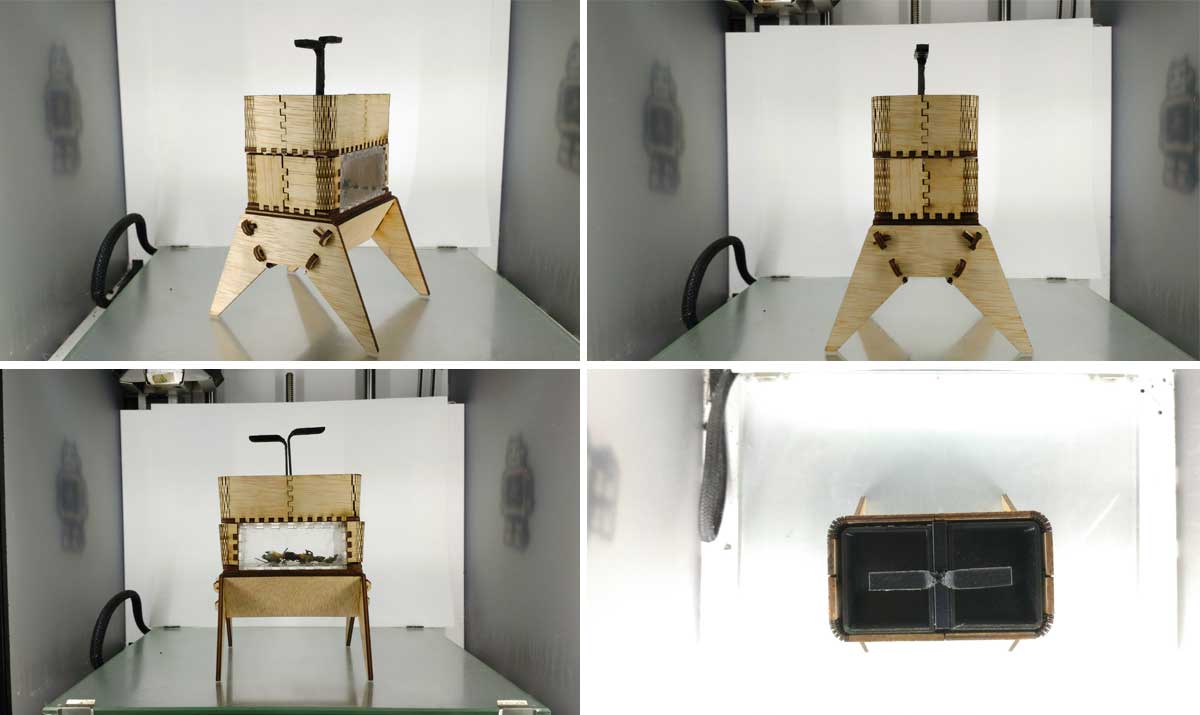
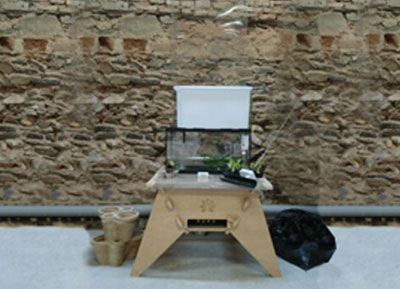
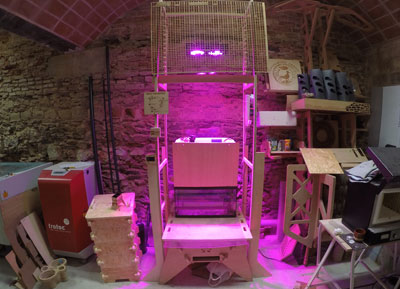
Week06 - Building the 1:1 scale "Body" with CNC milling
POC#1 will be a self-educational tool to explore / understand / learn how the biological cycle of aquaponics works (i.e. symbiotic relationship between the fish, the beneficial microbes and plants) while at the same time, I will continue apply the knowledge aquired during Fab Academy to revisit the design, the structure and electronic systems and hopefully transfrom this POC into a "Minimum Viable Product" (MVP).
Machine used
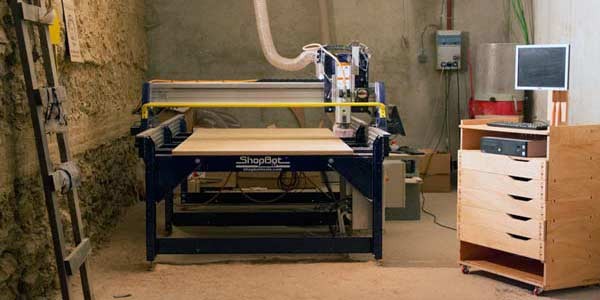
At the Green Fab Lab we have a Shopbot PRSalpha 96 48
POC#1 name
In reference to a person that I really care about, I will name this Proof Of Concept Peixaplants, a Catalan way to refer to aquaponics
The body and sun
When it comes to the "sun", for indoor culture, there are two ways to light the plants:
Position the plants in front of a south oriented window to get direct light
Or, get a complementary lighting system
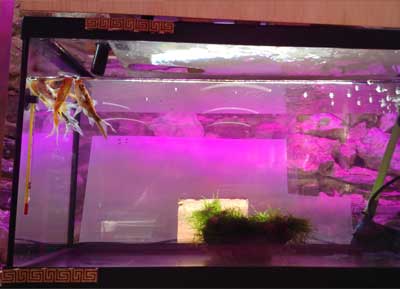
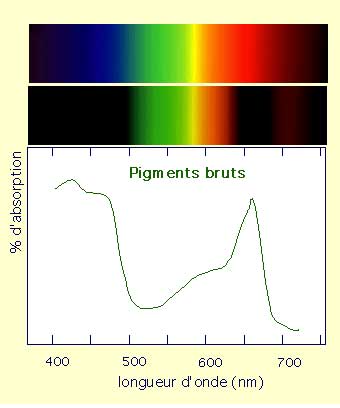
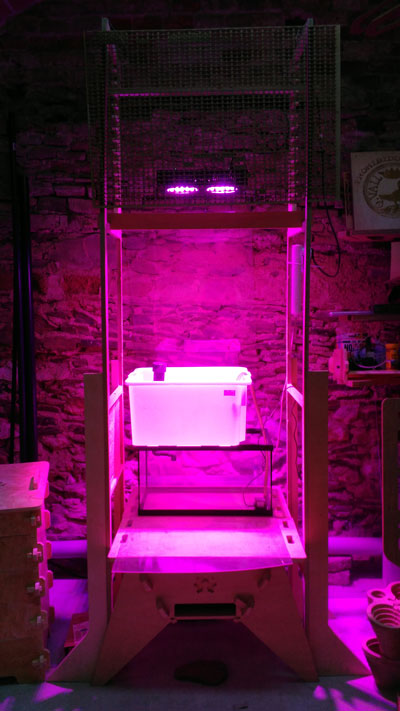
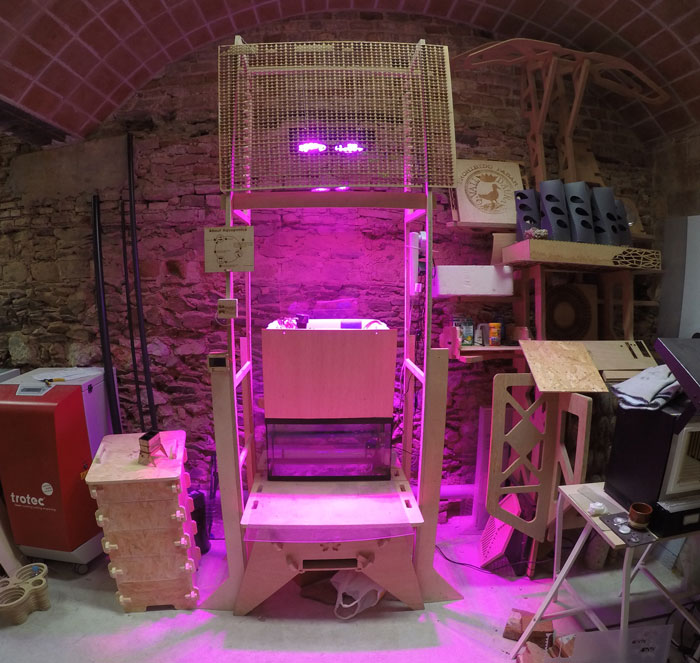
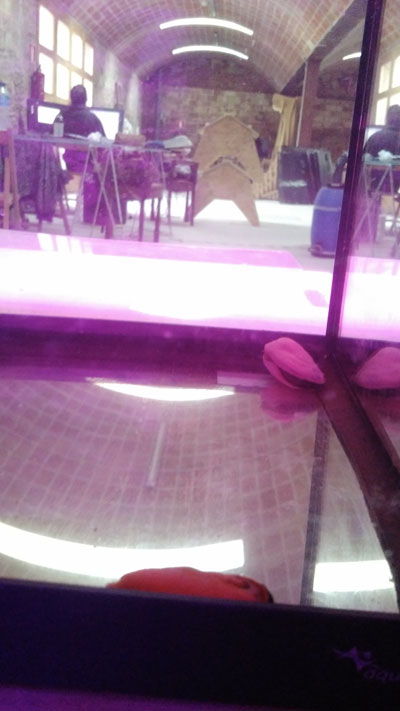
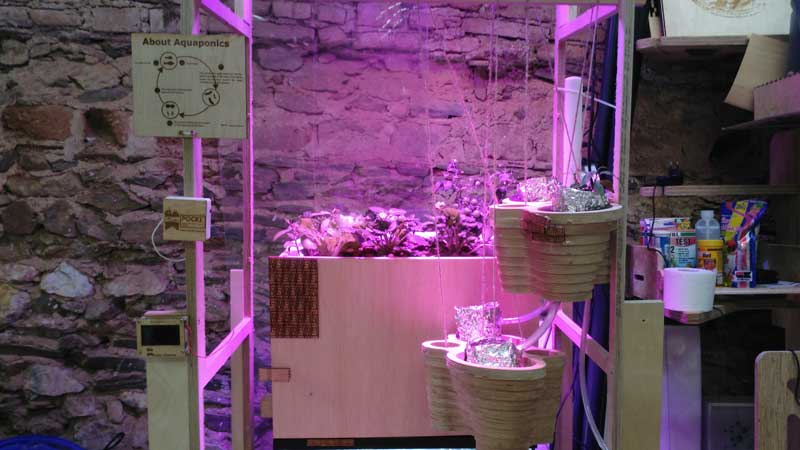
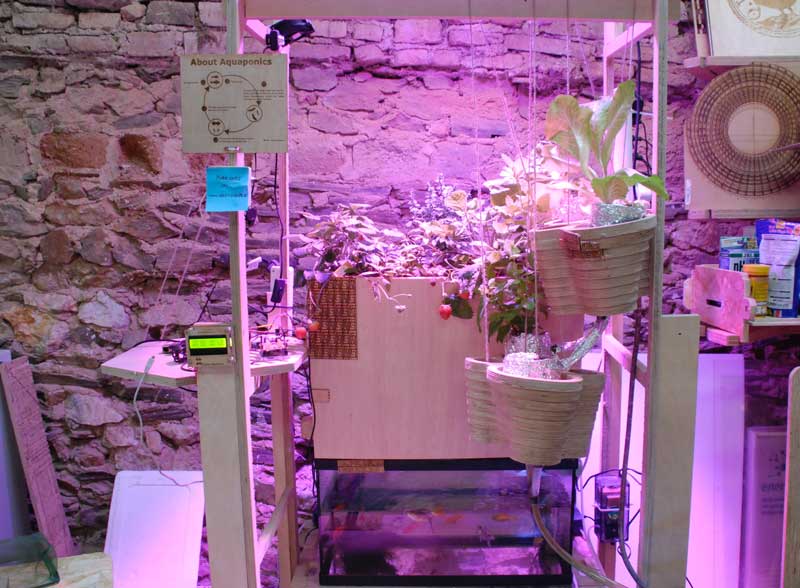
I would like to buid a system where people are free to decide where they want to locate their aquaponic ecosystem and get a continuous production even if their flat doesn't provide enough direct natural light. After some bibliographic research, I understood that plants doesn't absorb the totality of the natural light spectrum: they only absorb blue wave lenght (i.e. around 450 nm) and dark red wave lenght (i.e. around 650 nm) as described in Fig.x. I decided to go for a LED lighting system since it presents a lot of advantages (i.e. low energy consumption, long lifetime, large choice when it comes to light spectrum, and last but not leaste knowing that LED follow Moore's law by doubling performance every 2 years and prices divided by 10 every 10 years). What's more, the cool part is that I will be able to build it during the Fab Academy.
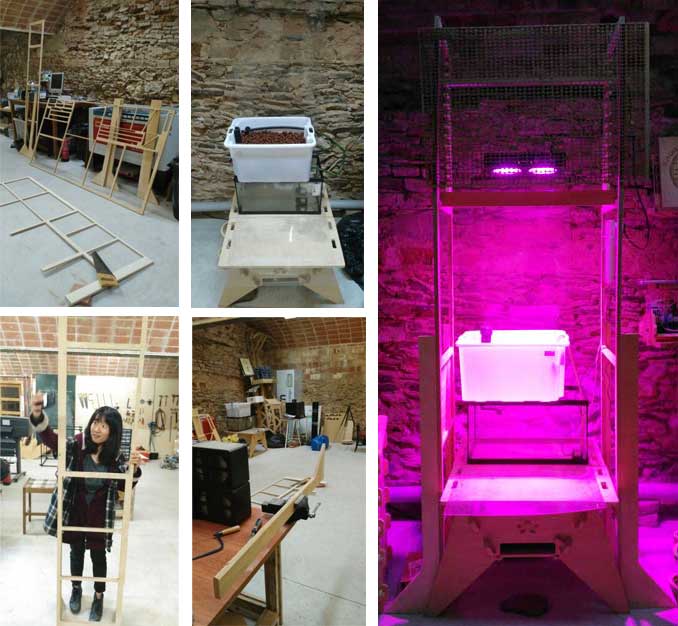
But to start with, I bought a commercial LED growing plants lighting system.
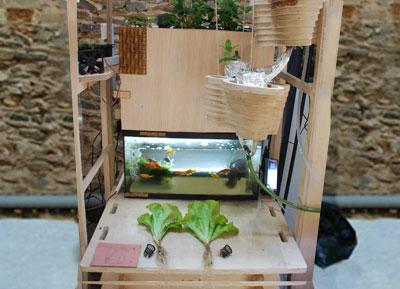
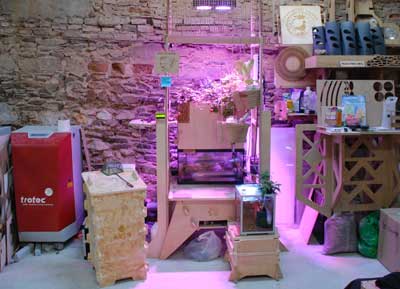
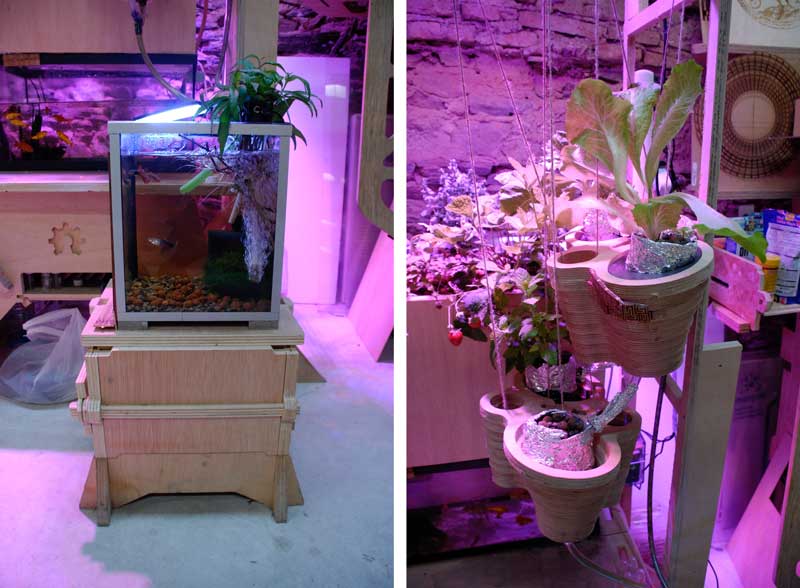
When it comes to the body, I took advantage of some CNC remaining pieces in the carpentry to build up a shelve that will support the fish tank and the LED lighting system. After few hours cuting wood and assembling the shelve, Peixaplants get its body and sun in place :)
Choice of the aquaponic technique
All aquaponic systems share several common and essential components. These include: a fish tank, a mechanical filter, a biofilter, and hydroponic containers.
However, there are three main designs of the plant growing areas including:
Media bed
Nutrient Film Technique (NFT)
Deep Water Culture (DWC)
After a quick market study, the most common plant growing technique for an aquaponic indoor garden is Media Bed for its convenience for small scale system. So I decided to go with this technique !
Week07 - Working on POC#1's BLOOD
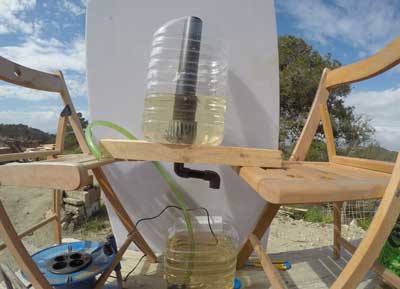
Approach n°1: Continuous drain
While we were learning about electronic design, I continue to dedicate some time of my week to work on the most important aspects of the aquaponic system: "The Blood".
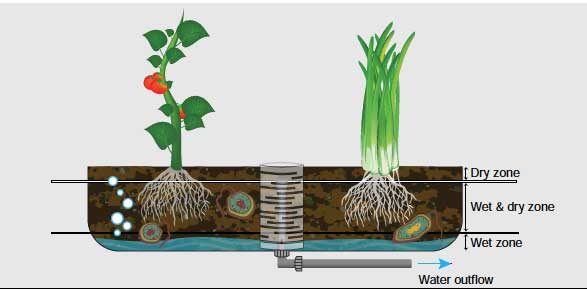
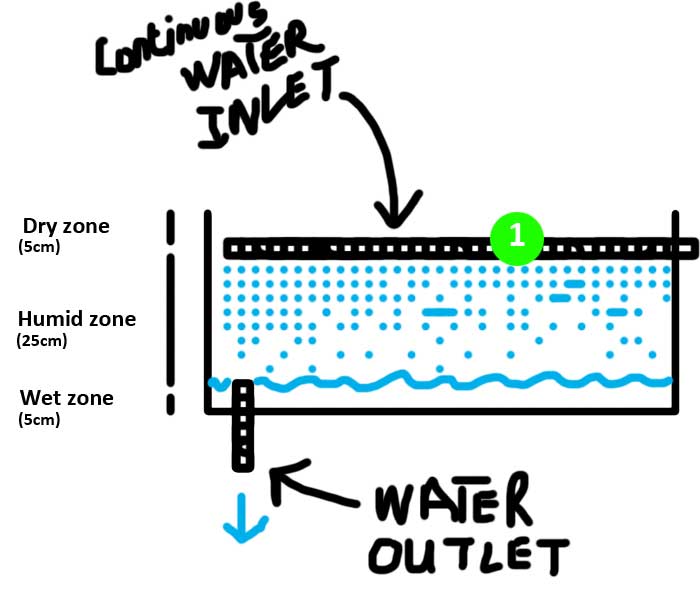
There are different techniques to deliver water to media beds, each can be relevant depending on the local availability of materials, the degree of technology desired or the experience of the operators. In my case, I decided to simply trickled water from holed pipes uniformly distributed on the medium (1). This constant flow designs, where the water level within the grow bed is always the same, is supposed to support the same growth rates of plants as more complicated methods as it let the growbed substrate always wet
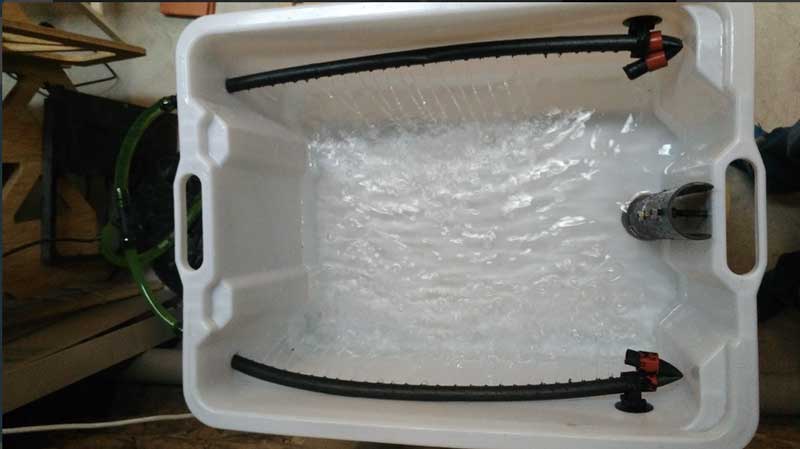
After running the test during several days, here are my feedbacks on this technique
| Advantages | Drawbacks |
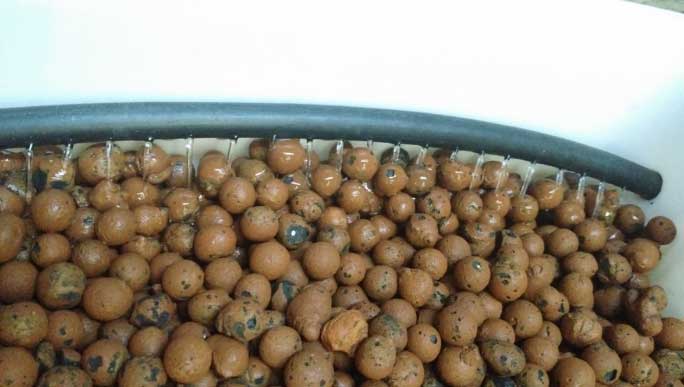
| The continuous drain design provides a nice waterfall noise | These water distribution system can be clogged with solid fish waste and should be periodically cleared. |
| The continuous drain design allows to keep a constant water level in the fish tank | Water distribution system doesn't cover the entire growbed surface letting some dry zones |
Approach n°2: Flood and drain
From this observation, I decided to improve the water irrigation system with a bell siphon. Bell siphon is a type of autosiphon that exploits a few physical laws of hydrodynamics and allows the media bed to flood and drain automatically, periodically, without a timer. The action, timing and ultimate success of the siphon are dependent on the water’s flow rate into the bed, which is constant.
A bit a water dynamics to understand how does it work.
Water flows into the grow bed at a constant flow rate (1). As the water fills the grow bed it reaches the top of the standpipe (2), and begins to drip through the standpipe back (3) to the fish tank. Without the bell portion of the bell siphon, this would create a condition of constant water height. Instead, as the water continues to fall through the standpipe (4), the bell, which sits over the standpipe something like a hat, acts as an air tight lock and produces a siphon effect. This suction within the bell starts the siphon. Once started, all the water from the bed starts to rapidly flush down the standpipe as the bell keeps its air tight seal. The draining through the standpipe is faster than the constant inflow from the fish tank. When the water in the grow bed drains all the way down to bottom (5), air enters the bottom of the bell and immediately stops the siphon. The water then slowly fills back up and repeats the whole cycle again continuously. See the section on Further Reading at the end of this publication for more information on bell siphons.
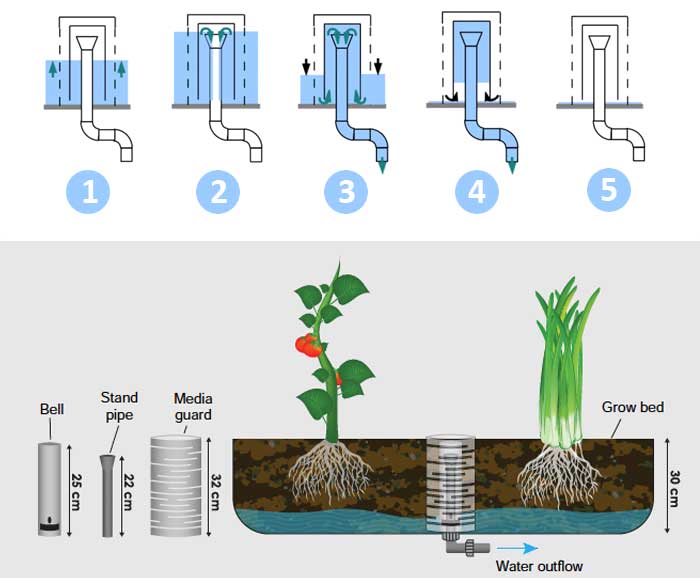
Looking around the web, I've found a clever way to use only two PVC pipes instead of three, as illustrated above.The tips comes from a design developped by the RiseBox team in a French Fab Lab. Instead of using a third PVC pipe as a media guard (that takes some extra space in the grow bed), this technique use a PVC stepper that has the same diameter of the bell PVC pipe.


Now let's test it
Building a vermi-composter to feed the fish
One of the two inputs in any aquaponics system is fish feed. Having in mind a fully circular aquaponics system, I took advantage of the computer controlled machining week and already design vermi-composter from aker to build one. This vermi composter will be a good opportunity to explore the synergies between vermi-composting and aquaponics in the coming weeks.
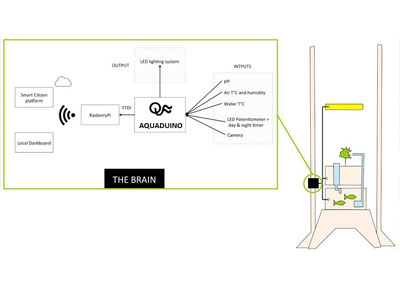
Week08 - Designing the Aquaduino v0.1 aka the "Brain"

Before we start, what inputs are important to monitor in aquaponics ?
Water is the life-blood of an aquaponic system. It is the medium through which all essential macro- and micronutrients are transported to the plants, and the medium through which the fish receive oxygen. Thus, it is one of the most important aspect to monitor for successful aquaponic food production. Five key water quality parameters have to be considered dissolved oxygen (DO), pH, temperature, total nitrogen, and water alkalinity. Each parameter has an impact on all three organisms in the unit (fish, plants and bacteria), and understanding the effects of each parameter is crucial. Although some aspects of the knowledge on water quality and water chemistry needed for aquaponics seem complicated, the actual management is relatively simple with the help of simple test kits. Water testing is essential to keeping good water quality in the system.
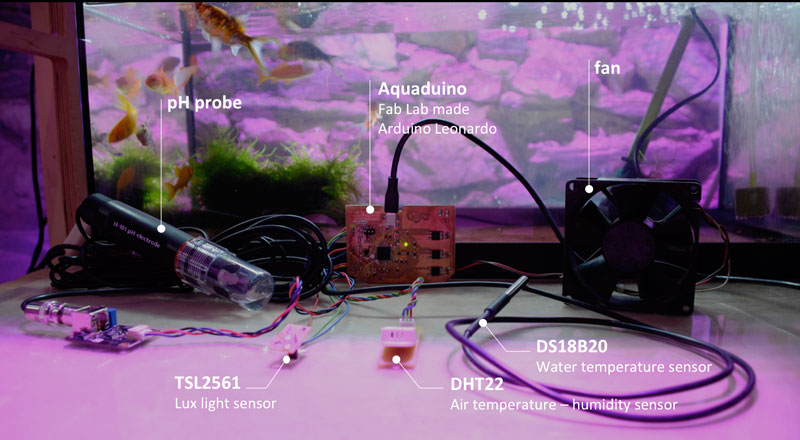
For this first version of Aquaduino, I envision to start monitoring:
- pH : The pH of the water has a major impact on all aspects of aquaponics, especially the plants and bacteria. For plants, the pH controls the plants’ access to micro- and macronutrients. At a pH of 6.0–6.5, all of the nutrients are readily available, but outside of this range the nutrients become difficult for plants to access. In fact, a pH of 7.5 can lead to nutrient deficiencies...
- Electrical Conductivity (EC): EC is commonly used to measure the total amount of nutrient salts in the waterwhich which is directly linked to nitrate and other macro and micro nutrients concentration that interest us for plants growth.
- Water T°C : Water temperature affects all aspects of aquaponic systems. Overall, a general compromise range is 18–30 °C. Temperature has an effect on DO as well as on the toxicity (ionization) of ammonia; high temperatures have less DO and more unionized (toxic) ammonia.
Dissolved oxygen is the water quality parameter that has the most immediate and drastic effect on aquaponics. Indeed, fish may die within hours when exposed to low DO within the fish tanks. Thus, ensuring adequate DO levels is crucial to aquaponics. However monitoring DO levels is very important, it is quite challenging because accurate DO measuring devices are very expensive or difficult to find . It is often sufficient for small-scale units to instead rely on frequent monitoring of fish behaviour and plant growth, and ensuring water and air pumps are constantly circulating and aerating the water. In a next Aquaduino iteration, I will include it.
Another interesting inputs to include will be:
- Air humidity and Temperature
- A web cam: to take snap shot every day to build nice time lapse to see plants growth
Designing the "Brain" architecture
Our weekly assignment was about Embeded Programming and it help me to start thinking about the electronic architecture of the aquaponic system "Brain". Which sensor should I develop first ? How do I design the electronic architecture leveraing already developed sensors & FabDuino from last years Fab Academy students ? How do I consider their compatibility with already comercial parts such RasberyPi ? What are the data I would like to keep loally and what are the one I would like to send to the cloud ? Which platform should I consider to send my data having in mind scalability if a business can start from this POC ? etc
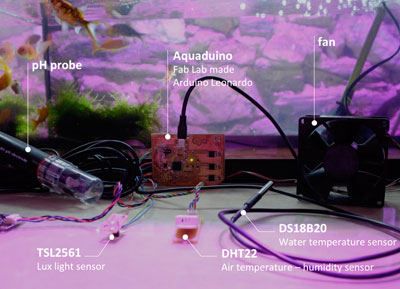
Fortunately, I meet our in-house electronic genius Guillem from the Smart Citizen team that tremendously help me answering these questions and drawing the following electronic architecture
Drawing the AQUADUINO V0.1 simple schematic on a piece of paper
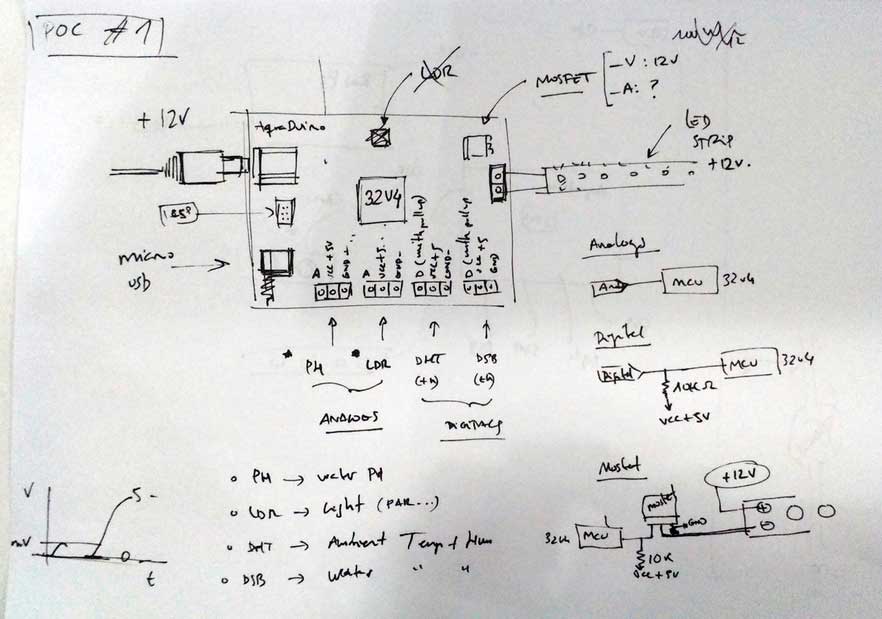
Before jumping on Eagle, I sat down with our local Guru to draw on a piece of paper, what I will need to add//remove on the top of a FabDuino to make it work. We also decided to include the outputs on the same board. For more info about the EAGLE schematic, please go to the Week12 section
.Week09 - Easter Break
Starting a market study about existing indoor aquaponics system
During this week of holidays, I started to look at what others aquaponics systems providers are doing around the world to identify what could be interesting to implement in the Spanish context knowing that so far, there are very few players. It is amazing to see the diversity of value propositions that could provide an indoor aquaponic garden, from a simple home furniture, to a disruptive tool to teach students about biology / agriculture and even business ! To efficiently mine the aquaponics news, I've discovered an amazing "free data mining tool" for marketing called Scoop.it.
Along the progress of the Fab Academy I will document the evolution of my market study findings in the following section. But I've already identify inspiring opportunities for Barcelona and its surroundings :)
.Week10 - Kickstarting the "Ecosystem" with Nitrifying bacteria and the biofilter
Important biological components of aquaponics to understand before starting putting the fish
Aquaponics is a form of integrated agriculture that combines two major techniques, aquaculture and hydroponics. In one continuously recirculating unit, culture water exits the fish tank containing the metabolic wastes of fish. The water first passes through a mechanical filter that captures solid wastes, and then passes through a biofilter that oxidizes ammonia to nitrate. The water then travels through plant grow beds where plants uptake the nutrients, and finally the water returns, purified, to the fish tank (Fig.42.). The biofilter provides a habitat for bacteria to convert fish waste into accessible nutrients for plants. These nutrients, which are dissolved in the water, are then absorbed by the plants. This process of nutrient removal cleans the water, preventing the water from becoming toxic with harmful forms of nitrogen (ammonia and nitrite), and allows the fish, plants, and bacteria to thrive symbiotically. Thus, all the organisms work together to create a healthy growing environment for one another, provided that the system is properly balanced.
Plants and fish should be added only after the nitrogen cycle is complete.
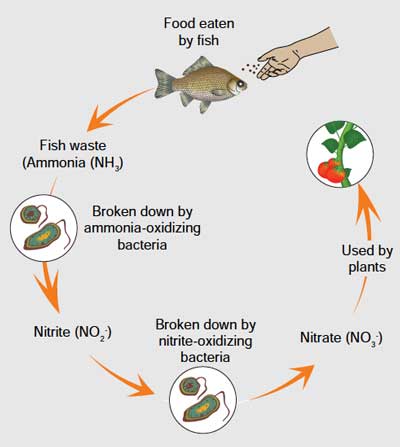
In a new aquaponic system, there are no nitrifying bacteria, which live in diverse environments such as soil, sand, water and air, are an essential component of the nitrification process that converts plant and animal waste into accessible nutrients for plants. Fig.43. shows all the stages of the nitrogen cycle in an aquaponic system. This natural process of nitrification by bacteria that happens in soil also takes place in water in the same way.
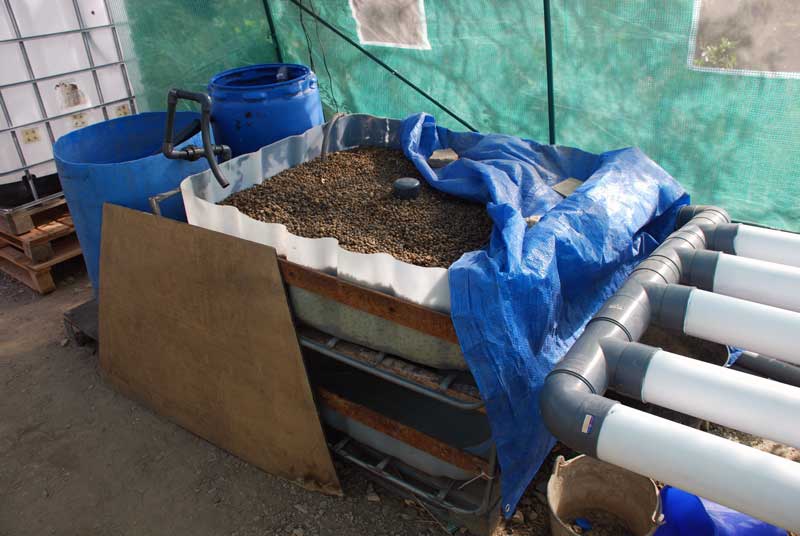
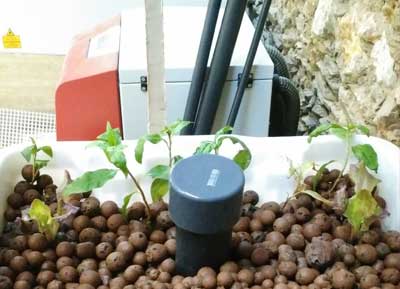
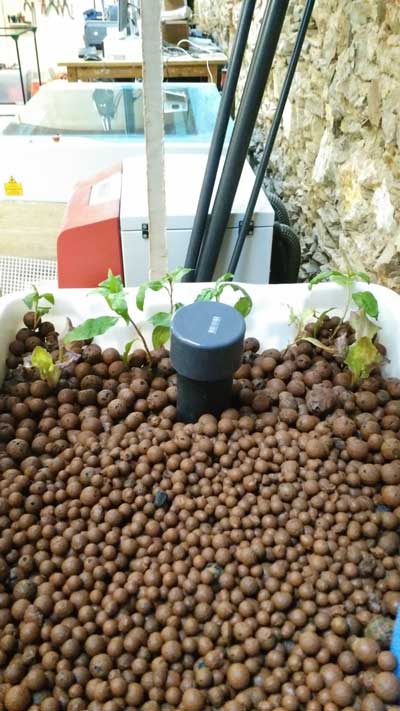
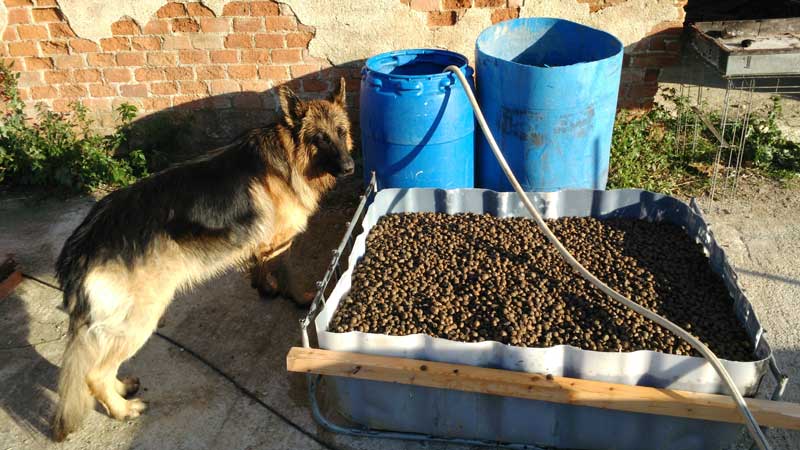
STEP 1: Cleaning the clay pellets to prepare the growing medium
Bacterial colonies will thrive on any material, such as plant roots, along fish tank walls and inside each grow pipe. The total available area available for these bacteria will determine how much ammonia they are able to metabolize. Aquaponic systems require a separate biofiltration component where a material with a high surface area is contained, such as inert grow media as expanded clay
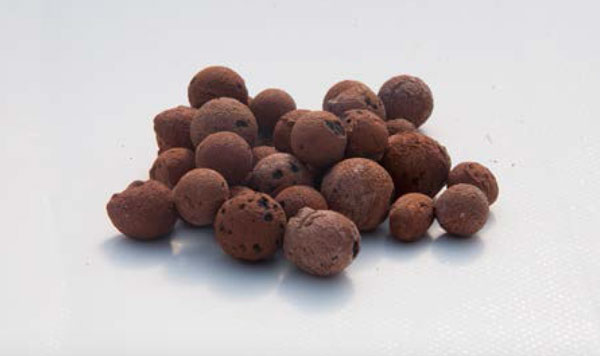
Light expanded clay aggregate (LECA) consists of expanded clay pebbles. Originally, it was manufactured for thermal insulation of building roofs, but it has more recently been used in hydroponics. These pebbles are round in shape and very lightweight compared with other substrates. The surface area of LECA is about 250–300 m2/m3, which is within the target range. However, LECA is relatively expensive and not widely available around the world. It comes in a variety of sizes; for aquaponics the larger sizes with diameters 8–20 mm are recommended.
Before adding LECA, it's recommended to clean and let them during a while in contact with water so that they won't float anymore. In my case, I let them during 5 days in a water tank, cleaning the water every day.
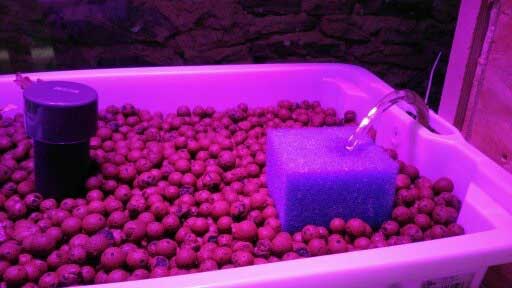
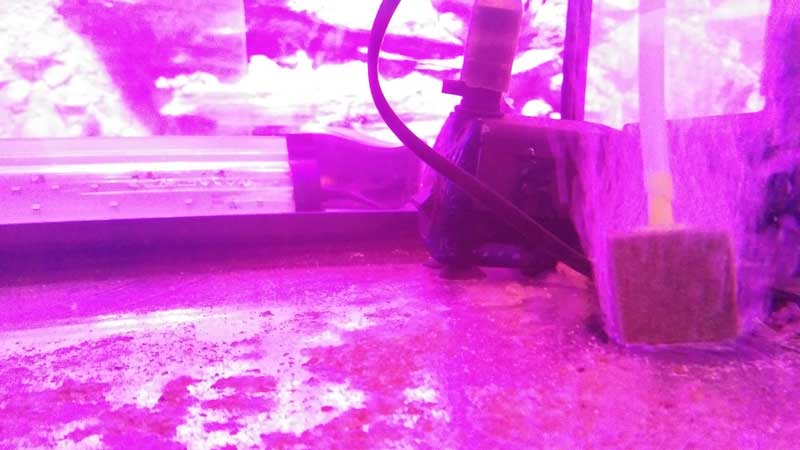
Once I consider LECA was clean enough, I added them into the grow bed and let run the water pump during one day with a small moss filter to remove the last solid particles to ensure the water is cleaned
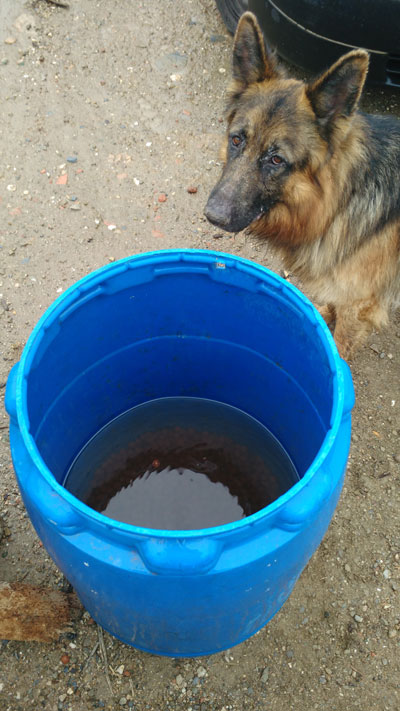
STEP 2: Remove the chlorine from the tap water (2days)
As I'm using tap water, it is important to ensure that no remaining chlorine could be found in the water before starting the nitrogen cycle (otherwise your bacteria will be killed by the chlorine and you don't want that). A simple technique is to use a air buller during 24 hours that will remove the entire chlorine from your water.
STEP 3: Cycle the system and start a biofilter colony (25 days) adding an ammonia source
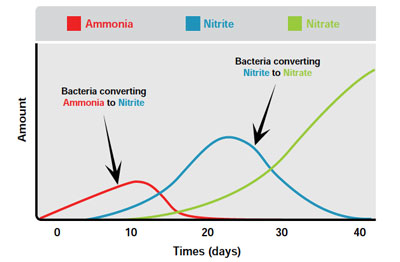
System cycling is the initial process of building a nitrifying bacteria colony in a new aquaponic unit. This 3–5 week process involves adding an ammonia source into the system (fish feed, ammonia-based fertilizer) up to a concentration in water of 1-2 mg/litre in order to stimulate nitrifying bacteria growth. In my case I added two frozen mussels (technique used in aquariophilie to start the nitrogen cycle). This should be done slowly and consistently. Ammonia, nitrite and nitrate are monitored to determine the status of the biofilter: the peak and subsequent drop of ammonia is followed by a similar pattern of nitrite before nitrate starts to accumulate. The five most important factors for good nitrification are: high surface area media for bacteria to grow and colonize; pH (6–7); water temperature (17–34 °C); DO (4–8 mg/litre); cover from direct exposure to sunlight
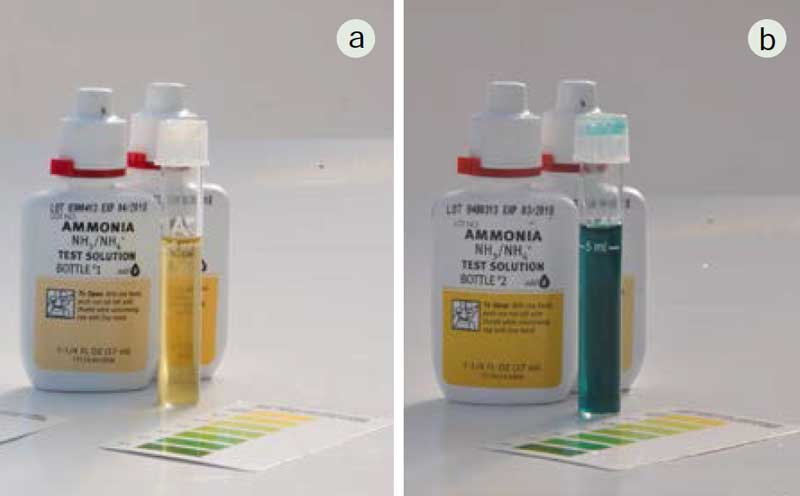
STEP 4: Monitor the nitrogen cycle evolution with ammonia and nitrite tests
Ammonia and nitrite tests are used to monitor the function of the nitrifying bacteria and the performance of the biofilter. In a functioning system, ammonia and nitrite should be close to 0 mg/litre. High levels of either ammonia or nitrite require a water change and management action. Usually, poor nitrification is due to a change in water temperature, DO or pH levels.
Fish and plants will be added when ammonia and nitrite levels are low and the nitrate level begins to rise. So according to the bibliography and Fig.52, if the nytrifying cycle go well I will be able to put the first plants and fish in Week#15. See you there !
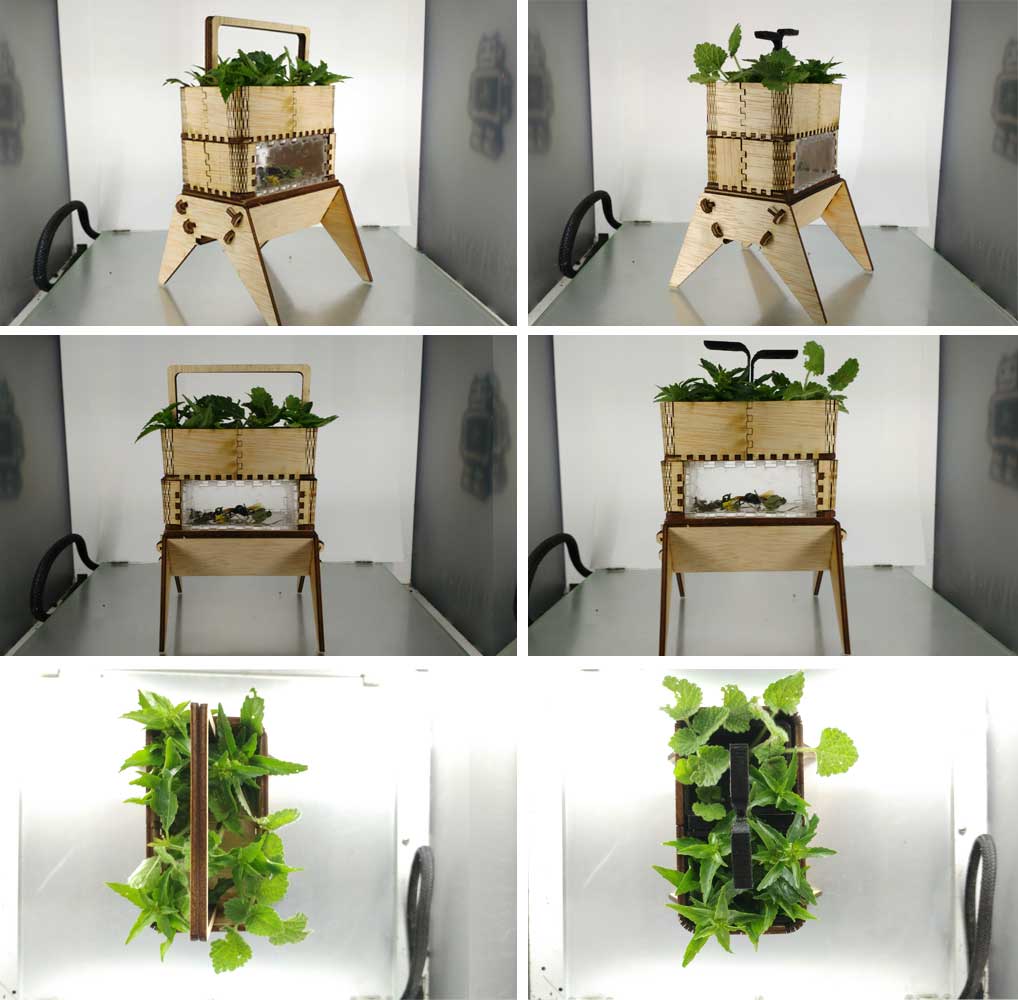
Week11 - Introducing the first plants in the "Ecosystem"
?? Rise of Nitrate, but nothing about Nitrite and Ammonia ??
After one week of system cycling, adding ammonia source into the system, I get the surprise to see that the level of Ammonia & Nitrite was not increasing at it should be and remain around 0 mg/L. However, the level of Nitrate was growing on a daily basis. These surprising results mean that I've already had a nitrifying bacteria colony in the aquaponic unit :)
Thinking about various hypothesis, I've realized that before adding the clay balls in the grow bed, I cleaned // stored them during two weeks with some rain water that was coming from an underground tank located in front of the Green Fab Lab. By testing the water quality of this rain water, I've found high level of Nitrate ! This finding confirm the hypothesis that my nitrifiyng bacteria colony camefrom there.
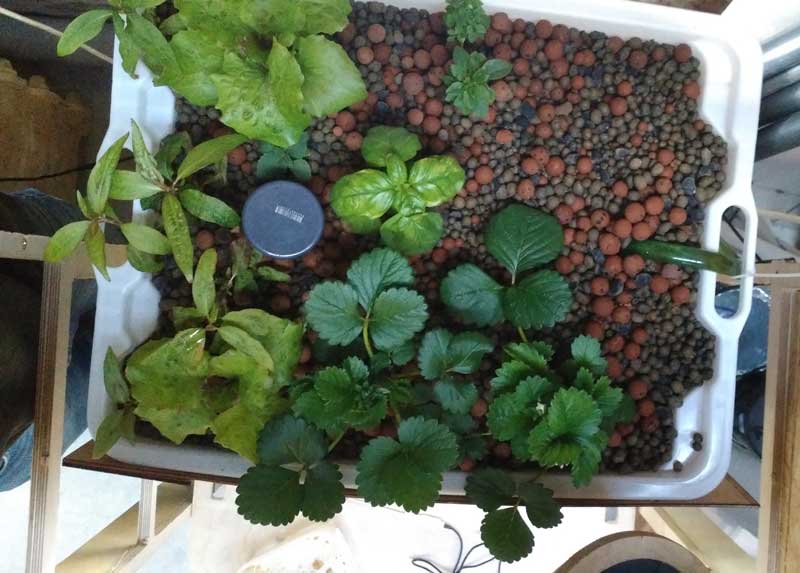
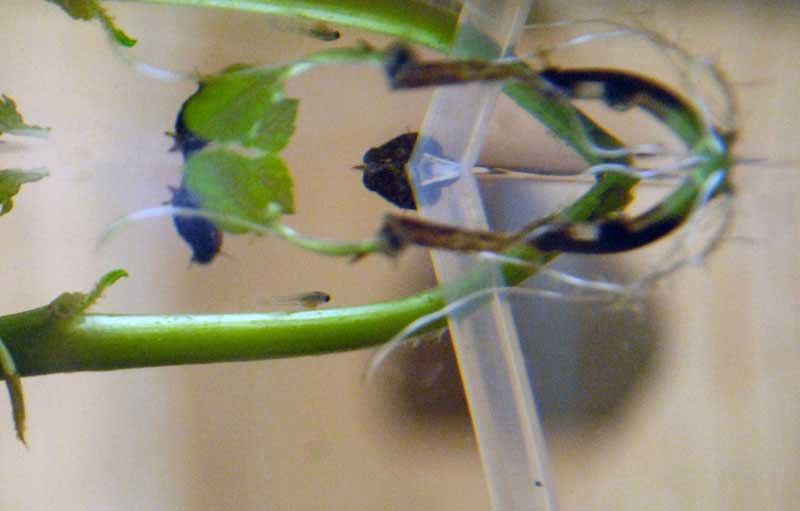
These results motivate me to indroduce the first plants while waiting a bit more to introduce the fish.
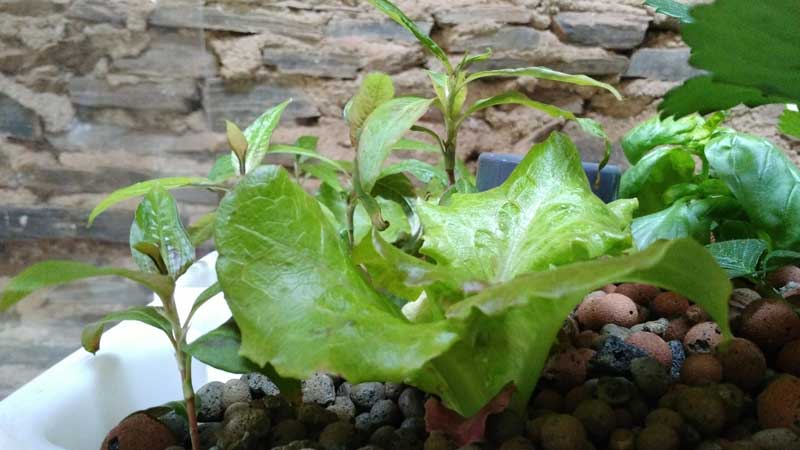
So here we go ! Let's introducing some leafy greens
In the coming weeks I will post some animated GIF to illustrate the grow of our lovely plants
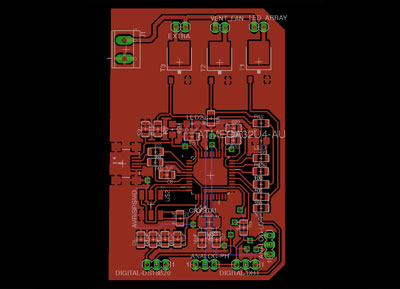
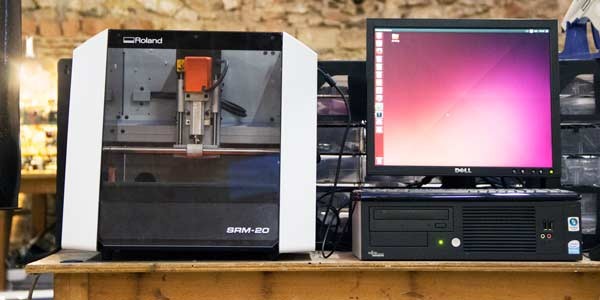
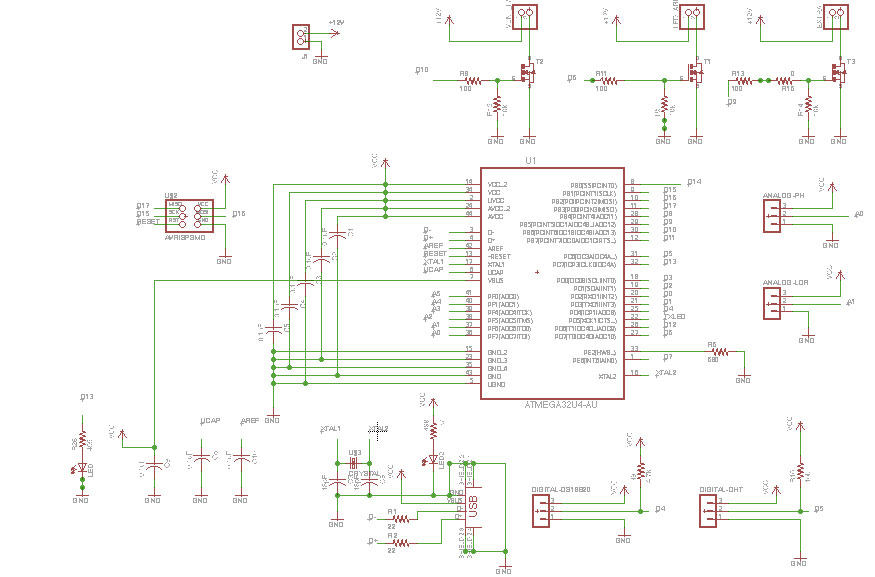
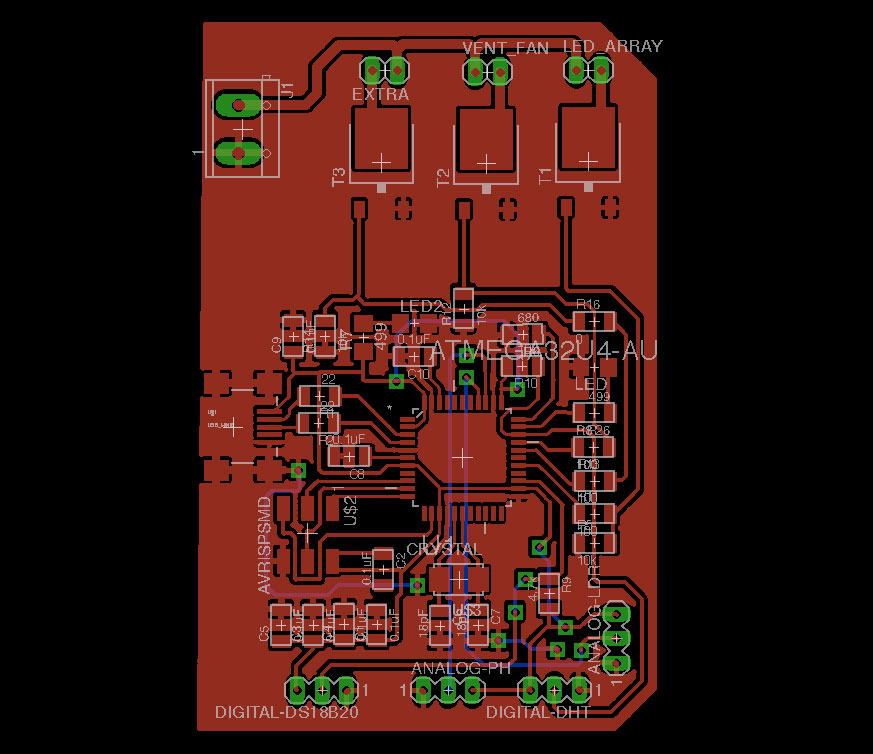
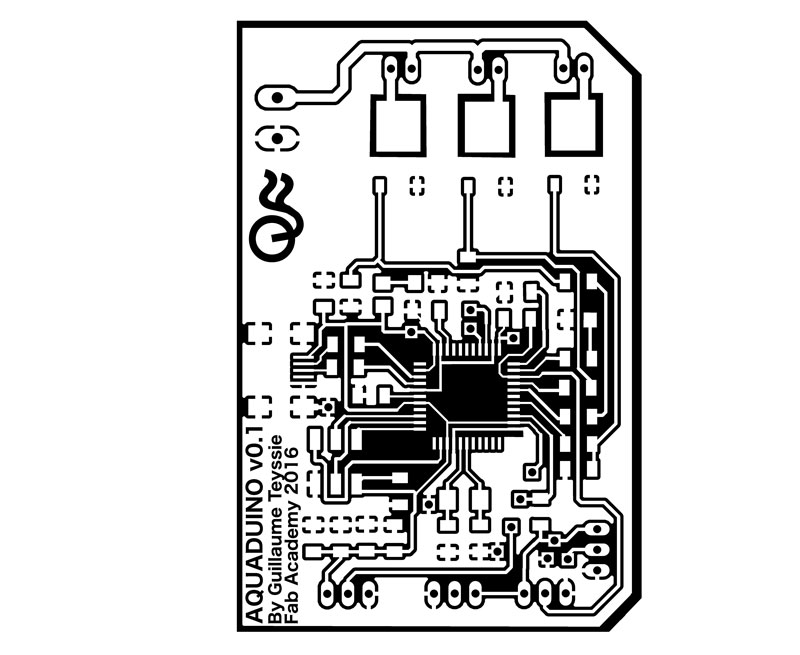
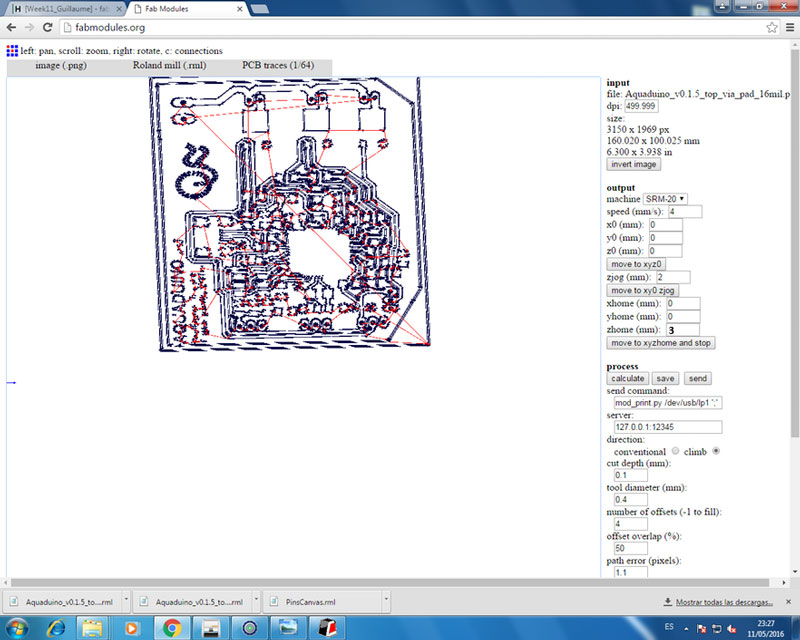
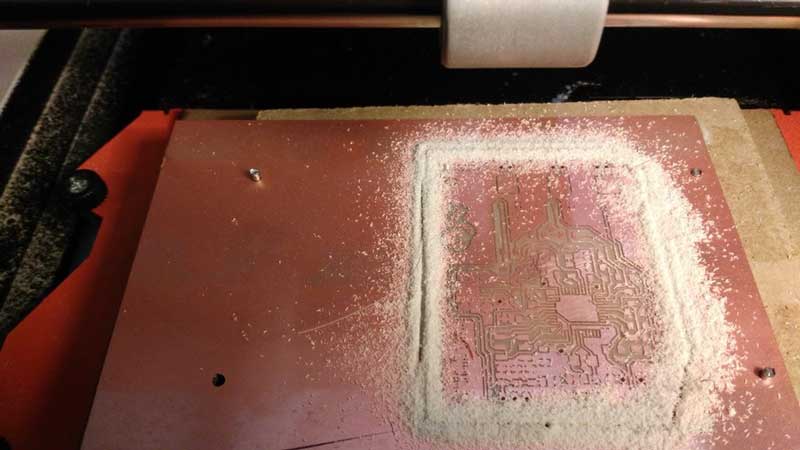
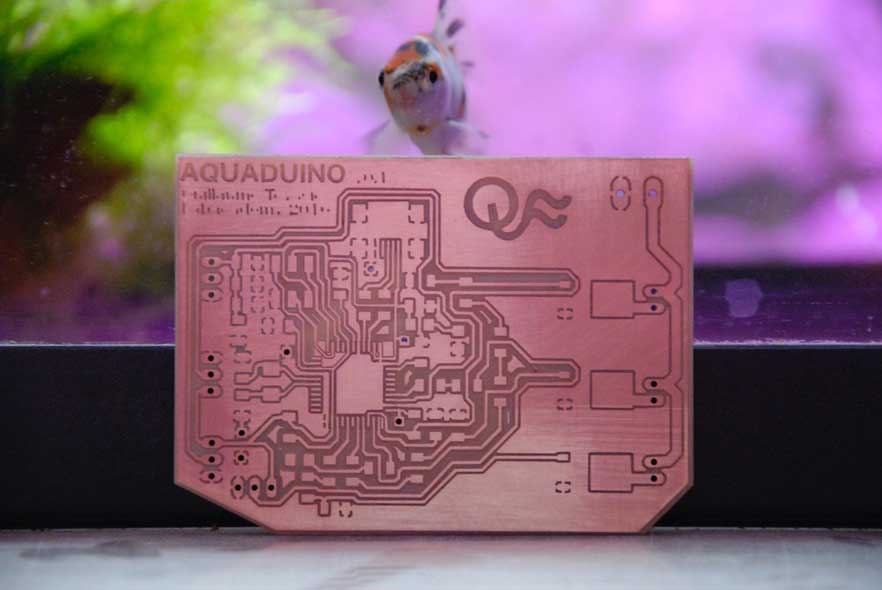
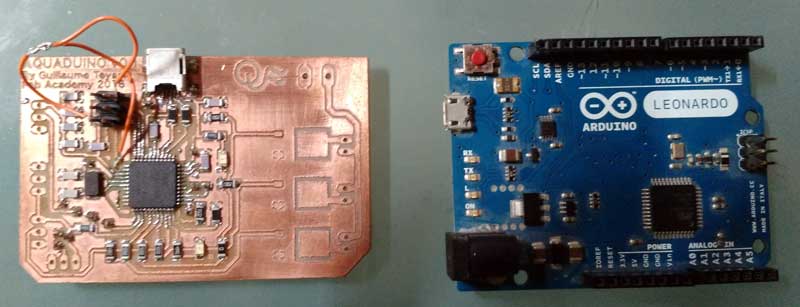
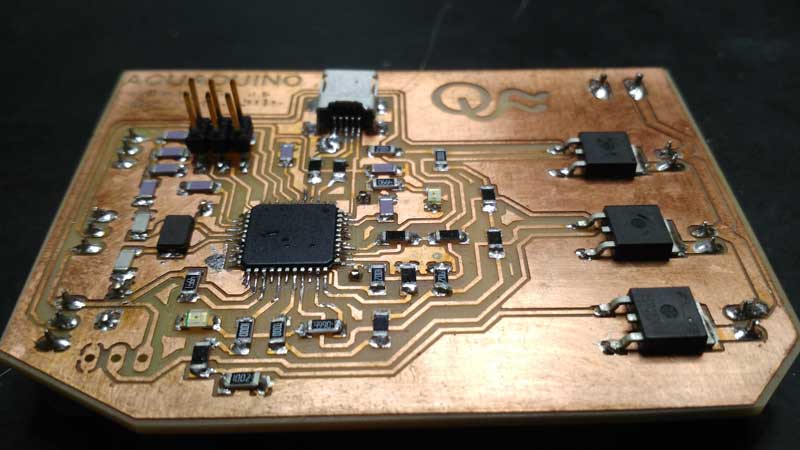
Week12 - Working on Aquaduino v0.1 schematic & board with Eagle
Software used
To design the Aquaduino circuit, I will used EAGLE PCB Software .

Machine used
To mill the Aquaduino circuit, I will used MONOFAB SRM-20 .
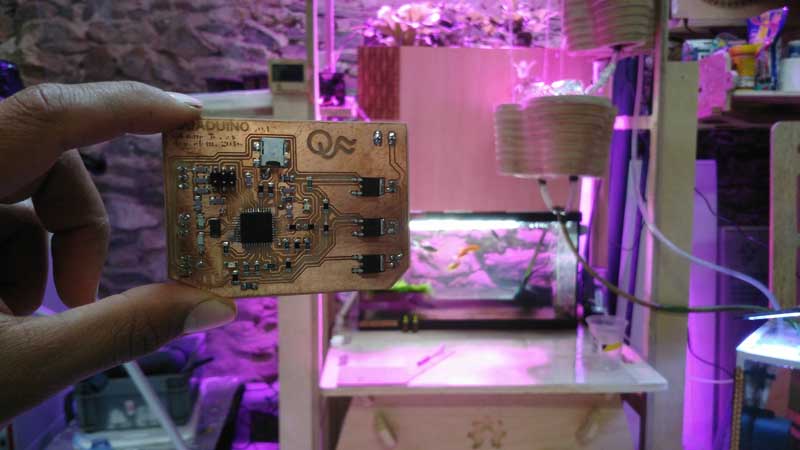
Aquaduino v0.1
As I mentioned in Week#8, I started the Aquaduino based on FABLEO schematic removing reset Button, some LEDs and several pins. The reason behind that was to simplify the design keeping only crucial elements.
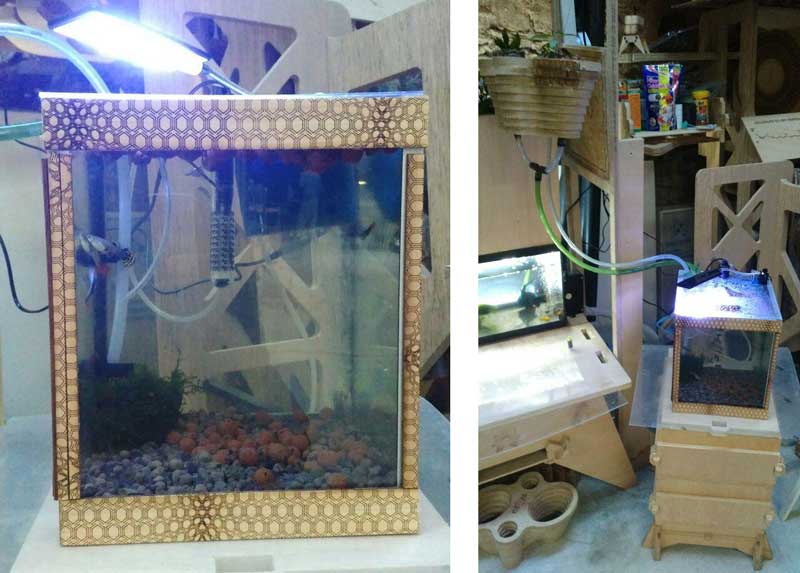
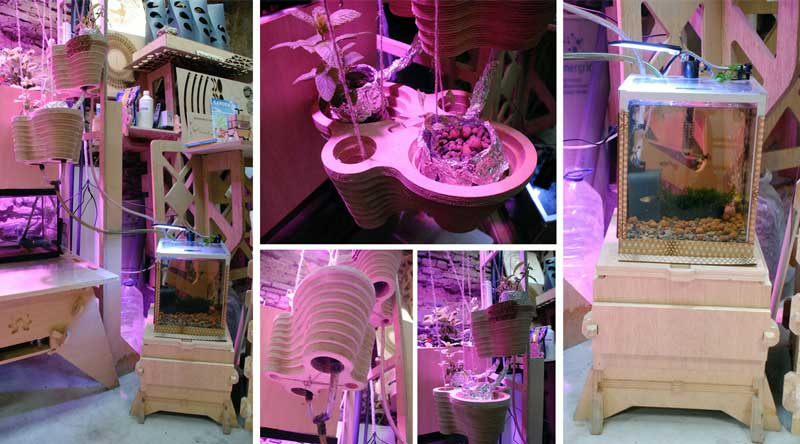
Working on a new aquaponic system >> POC#2
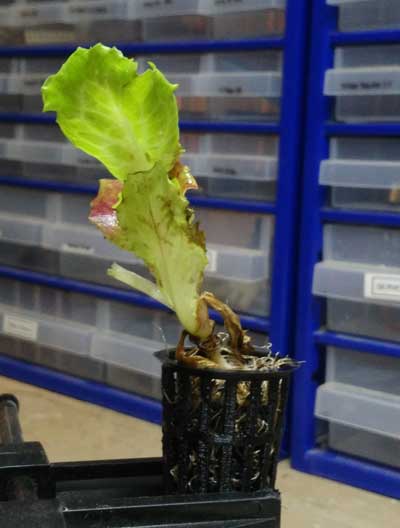
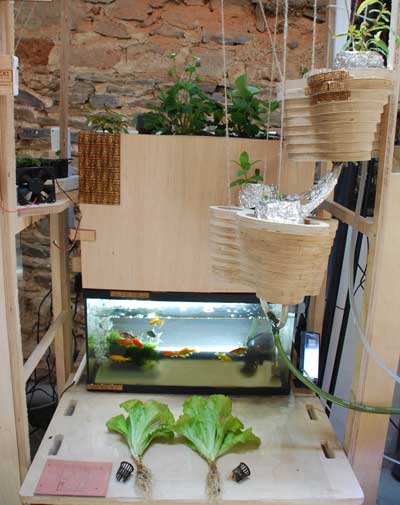
While I was cleaning the Lab after our 2 weeks group project rush, I've found this plants pot done by a former Fab Academy student Lina Monaco.
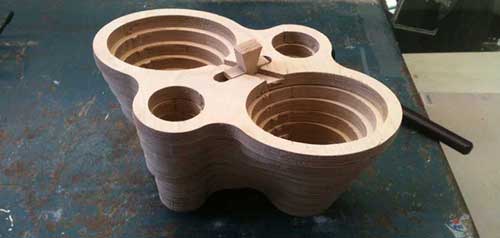
It gave me the idea of another aquaponic system that could be more modular, easy to use, and that offer the opportunity to increase the number of components made in Fab Lab.

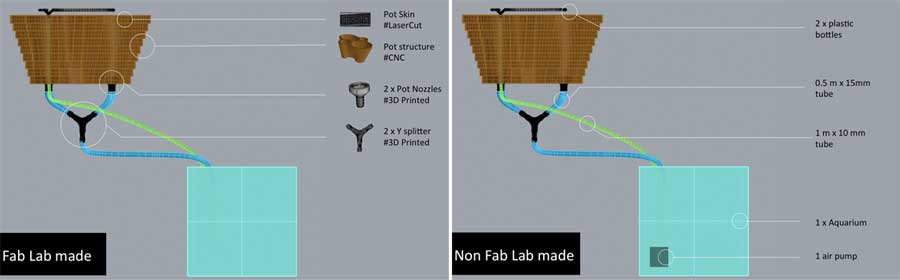
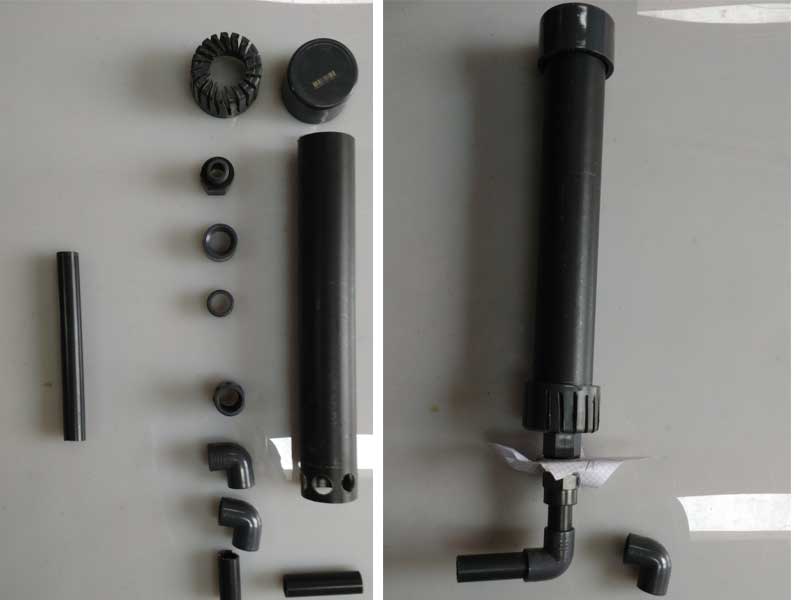
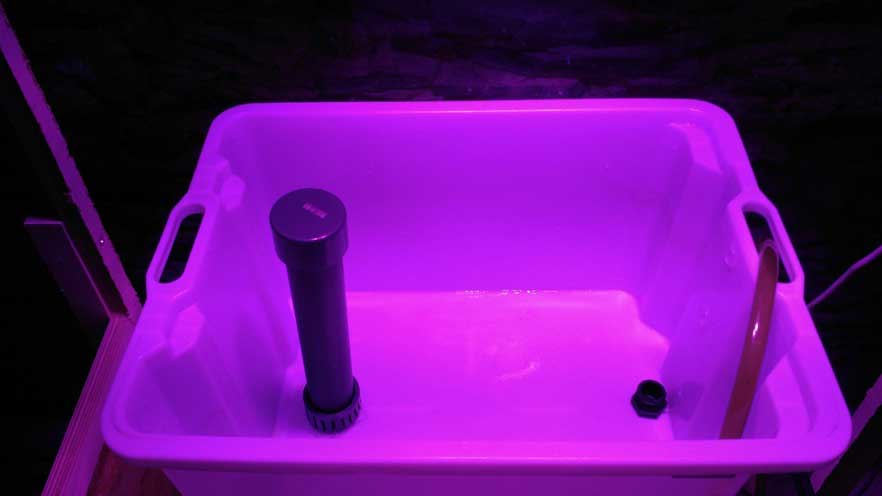
For this new aquaponic system, I will not use any water pump but only an air pump that will act as both an air & water pump. The technique is called "Airlift". It use an air pump rather a water pump to lift the water. Air is forced to the bottom of a pipe within the fish tank, bubbles form and burst, and during their rise to the surface the bubbles transport water with them. One benefit is that airlifts can be more electrically efficient, and in addition, water is also oxygenated through the vertical movement operated by the air bubbles. Last but not least, the main benefit comes from an economy of scale – a single air pump can be purchased for both aeration and water circulation, which reduces the capital investment in a second pump.
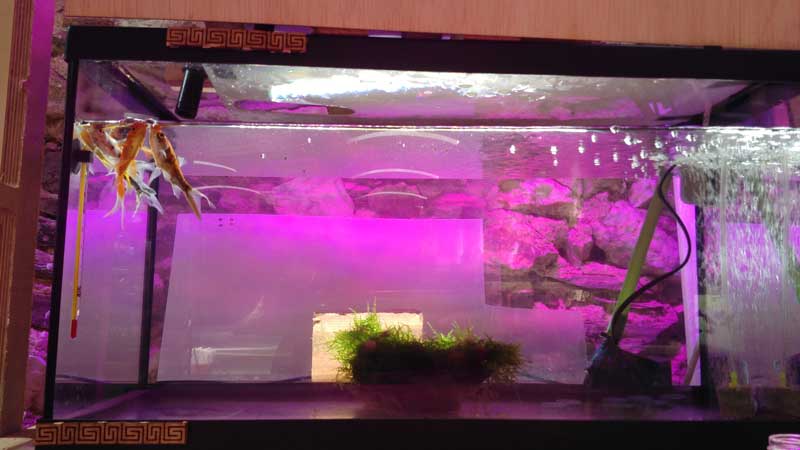
Week13 - Introducing the first fish in the "Ecosystem"
As the ammonia and nitrite levels are below 1 mg/litre it is safe to start adding the first fish.
Fish selection for POC#1
Several fish species have recorded excellent growth rates in aquaponic units. Fish species suitable for aquaponic farming include: tilapia, common carp, silver carp, grass carp, barramundi, jade perch, catfish, trout, salmon, Murray cod, and largemouth bass. As POC#1 aims to be used as ornamental purpose, I decided to introduce ornmental fish.
Base on the fact that Gold carps have a high tolerance to a variety of water conditions and therefore are good candidates for an aquaponic system, I decided to introduce 5 of them. I bough them at a local aquarium store in Barcelona.
Fish selection for POC#2
In order to try another fish specie and take into account the small volume of POC#2 aquarium, I decided to introduce some guppies
Week14 - Soldering the brain and connecting the first sensors
Soldering the brain
During the Week12, I've been designing and milling the aquaduino and now it's time for stuffing !
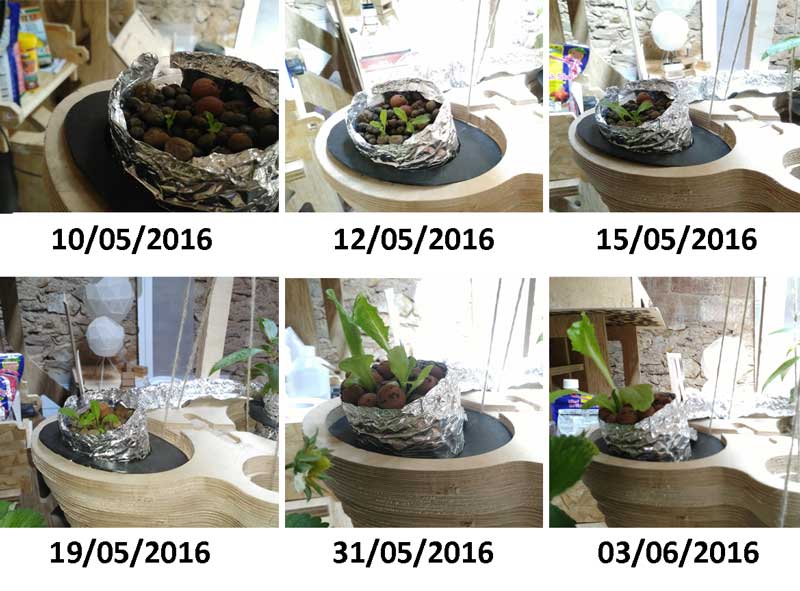
Updates about POC#1's ecosystem
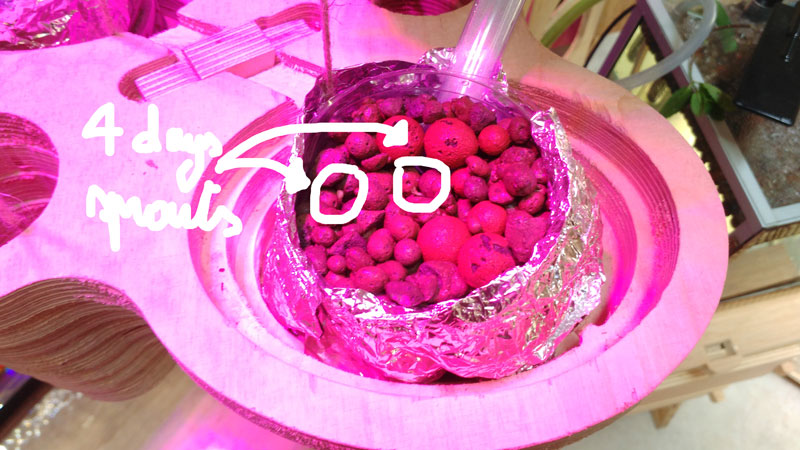
It's been almost 2 weeks since I introduced the first sprouts during Week11 (i.e. 2 lettuces, 2 basils, some vietnamises coriander, 2 strawberries). Every 3 days, I tried to take some snapshots with my smartphone, waiting for pluging the webcam to the RasberryPie. And here are the results !

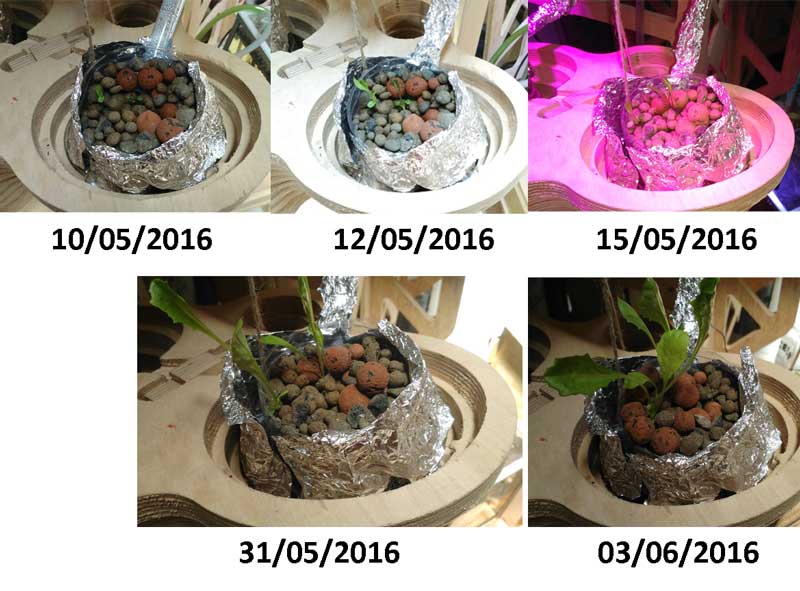
Updates about POC#2's ecosystem
To increase the biofilter mass, I decided to add another CNC pot below tyhe first one.
This time, I didn't buy any sprout but decided to start from the plants seed directly.


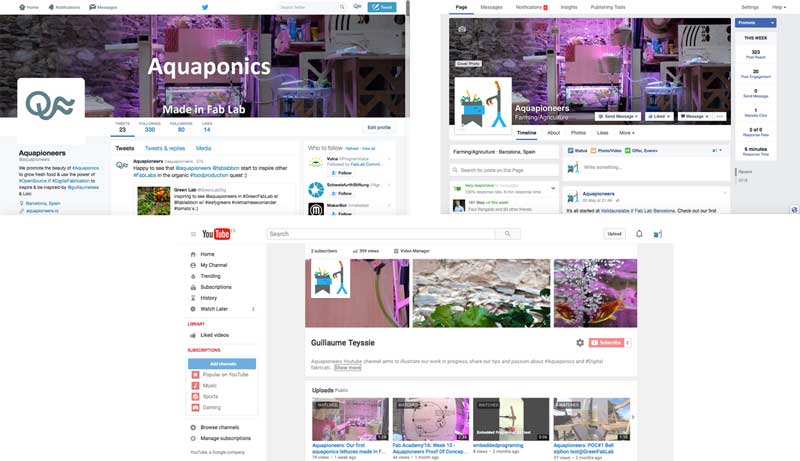
Week15 - Launching aquapioneers.io
1+1 =3
Along the Fab Academy and thanks to the great human platform that offer GreenFabLab, I met Loic, a #maker with a strong background in #hydroponics and earlier contact with Aquaponics back in Israel
Loic’s help me to step up tremendously the Aquapioneers project. So together, we decided to build up Aquapioneers website to start sharing how we envision the futur of Aquaponics with Digital Fabrication.
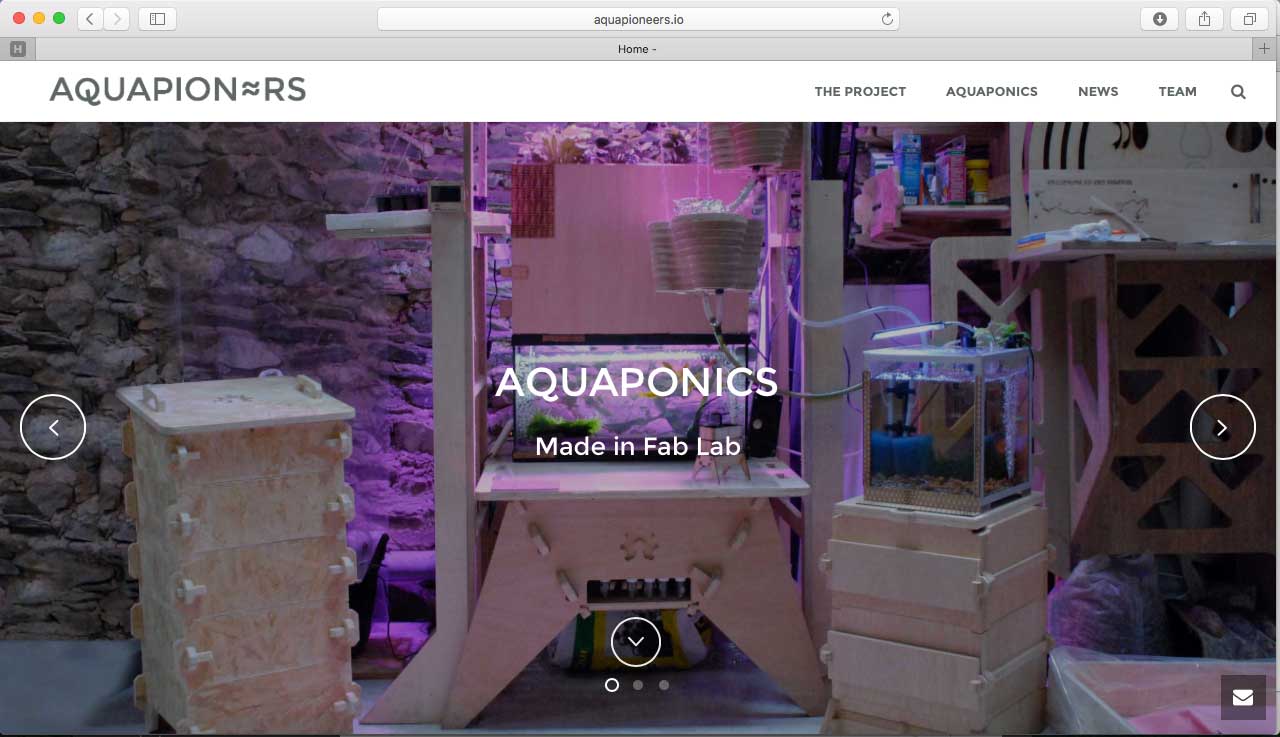
In a row, Aquapioneers’ vision is to locally promote aquaponics as a means of sustainable food production in urban areas , using Barcelona as a living Lab and aligning itself with the Green FabLab’s commitment to sustainability and self-sufficiency.
In the meantime, it also aims to provide a global open platform of R&D and education, using the power of open source tools combined with the collaborative intelligence of Fab Lab network to inspire and be inspired.
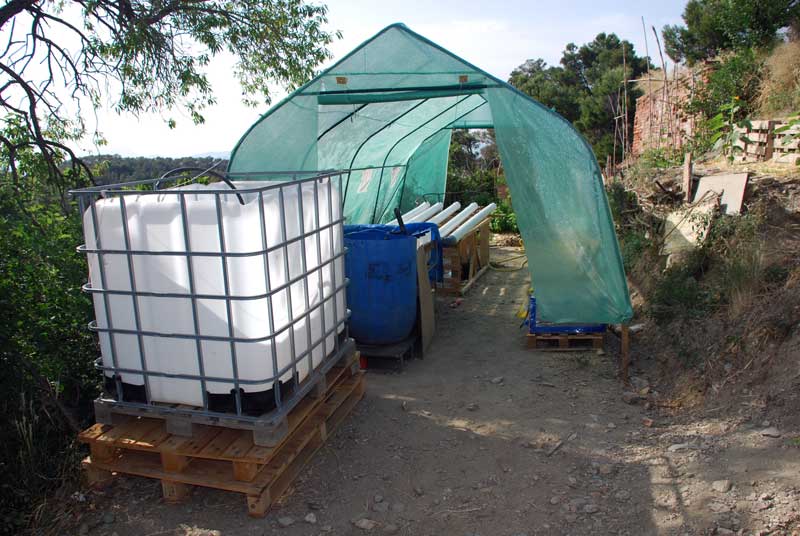
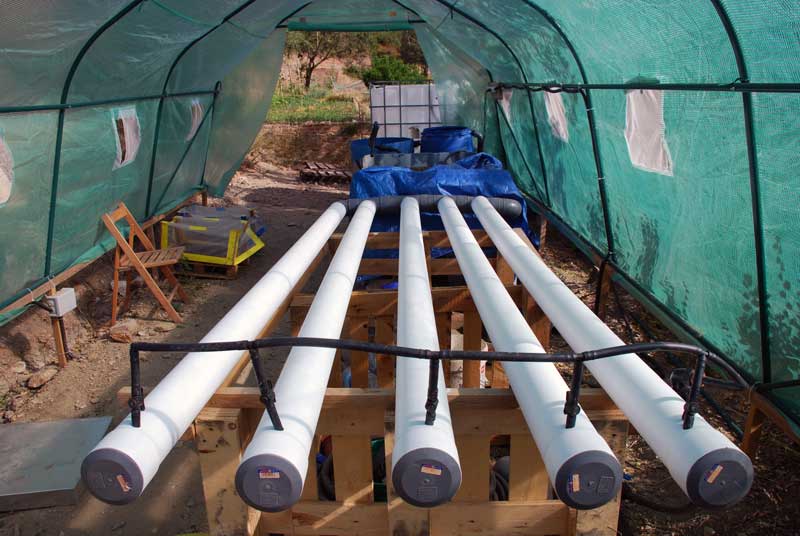
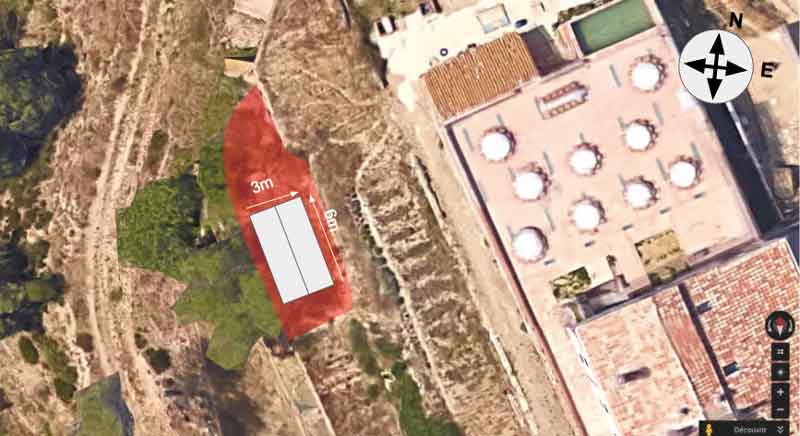
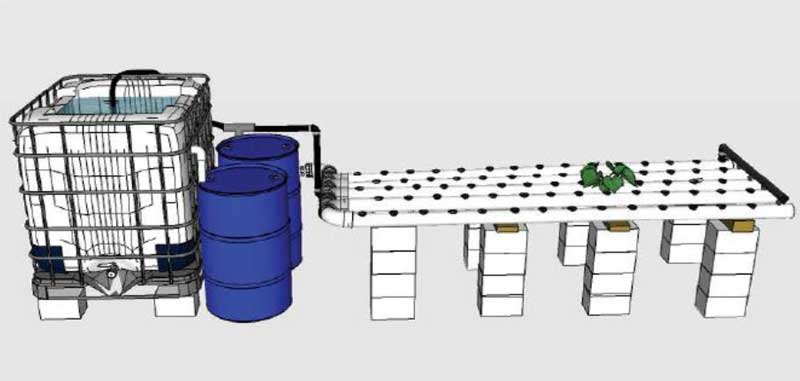
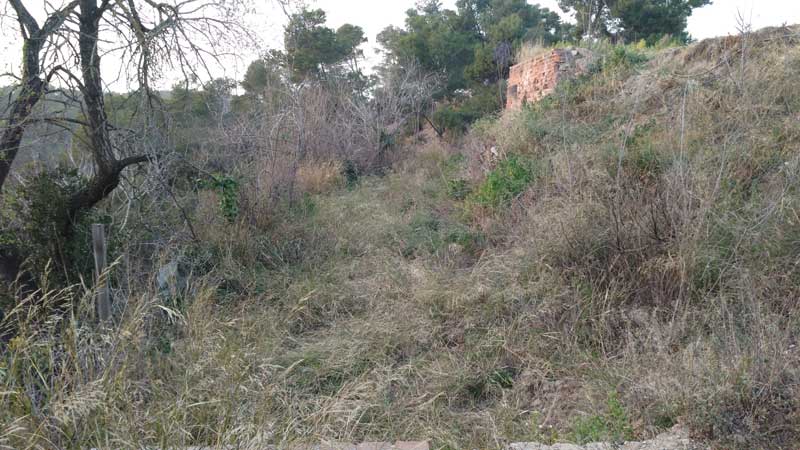
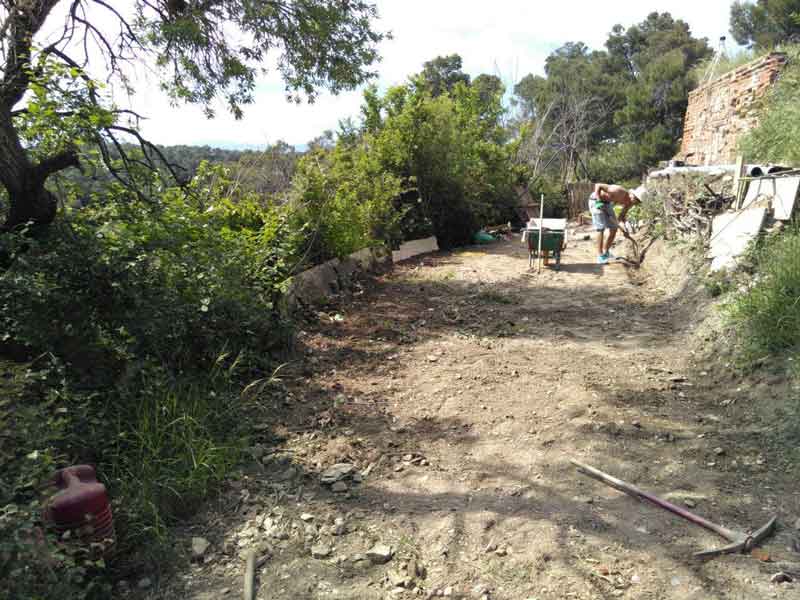
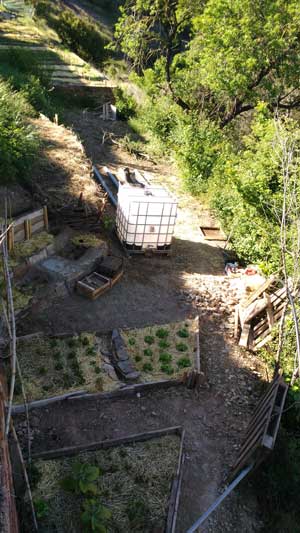
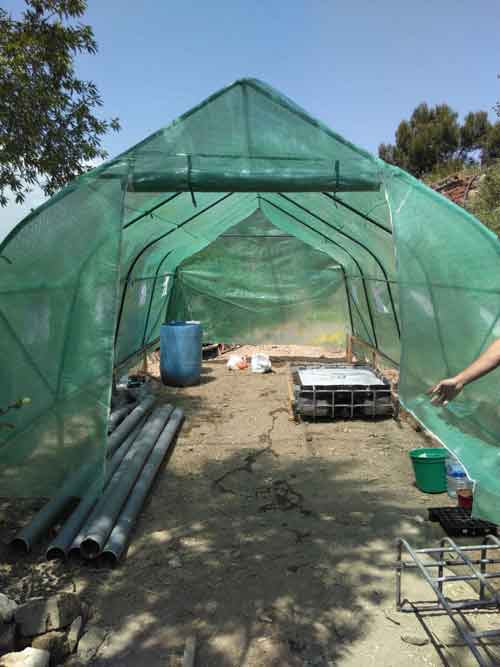
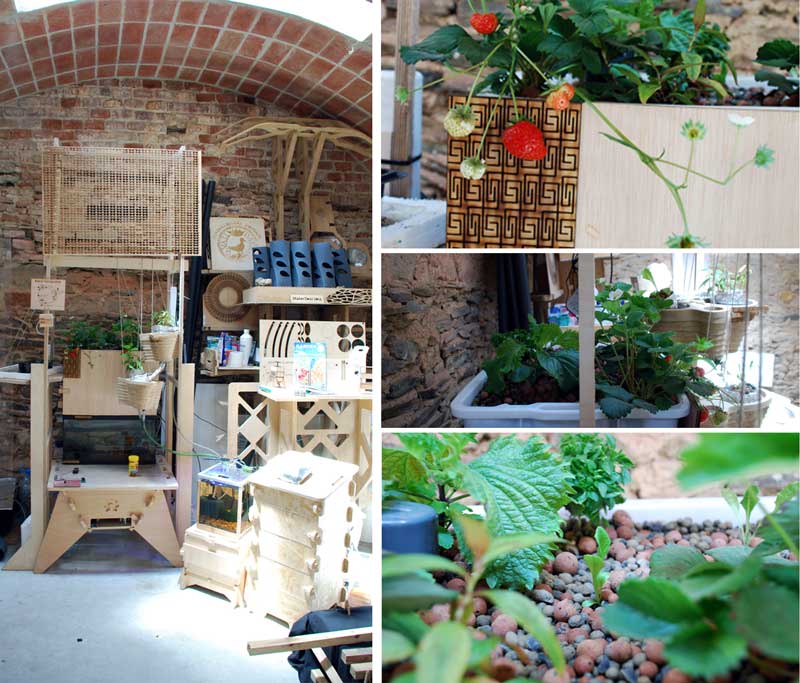
Kickstaring a 20 m2 aquaponic greenhouse at the Green Fab Lab
The Green Fab Lab offers an amazing playground for outdoor experimentations that contribute to the Self-sufficiency vision of this place. So here we go ! The aquaponics POC#3 will be a 20m2 Aquaponic Greenhouse for small scale food production, including both fish and vegetable farming.

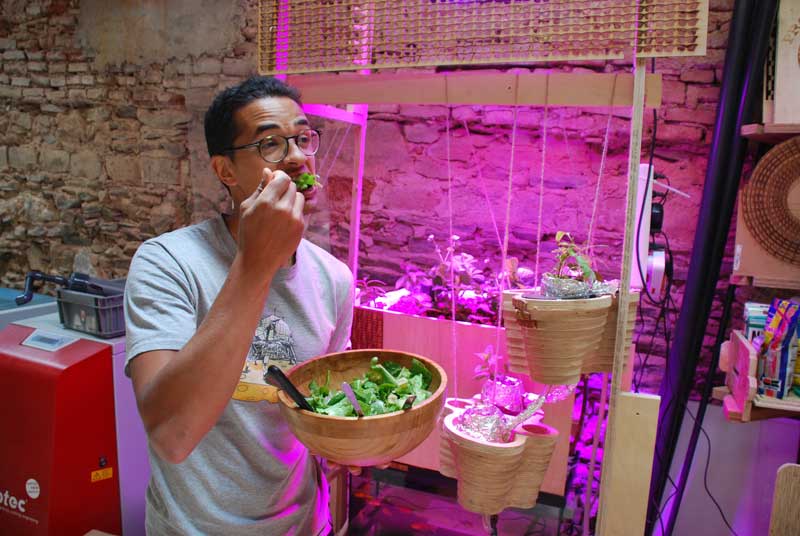
Week16 - Eating my first aquaponics lettuces
Updates about POC#1's ecosystem
Here come the big moment n#1!
Here come the big moment n#2!
Week17 - Connecting and coding the Brain's inputs
Reading water temperature from DS18B20 sensor
Steps
The one wire Digital Temperature Sensor - DS18B20 from Maxim ,formerly Dallas, (that cound be found on Github) is a great chip for measuring temperature in wet environments. Luckily, there is a Dallas Temperature library for the arduino which makes using this sensor very easy.

Just download a copy of the library. In it you will find two folders. Drag and drop the DallasTemperture folder into your arduino/libraries folder. If you dont already have the OneWire library then you will need to copy that folder into the libraries folder also.
Next, load up the sketch below and upload it to your Arduino board. Using the Dallas Temperature Library makes getting the temperature easy.
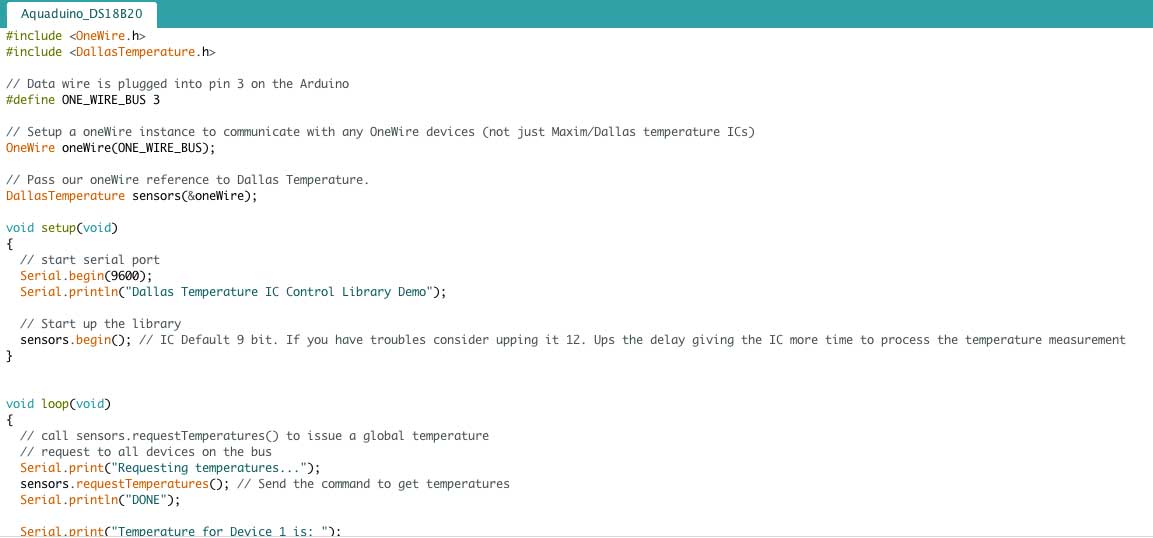
Sample Code
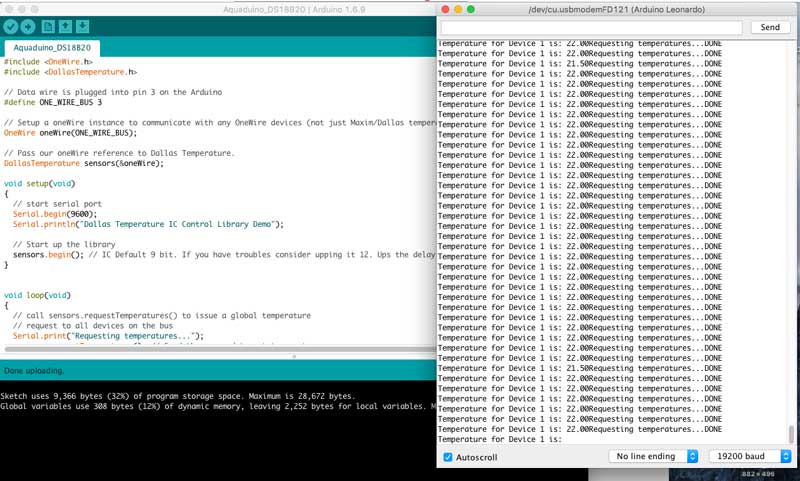
When you have uploaded the sketch, click on the Serial Monitor and you should see output like the following. The temperature is in degrees C
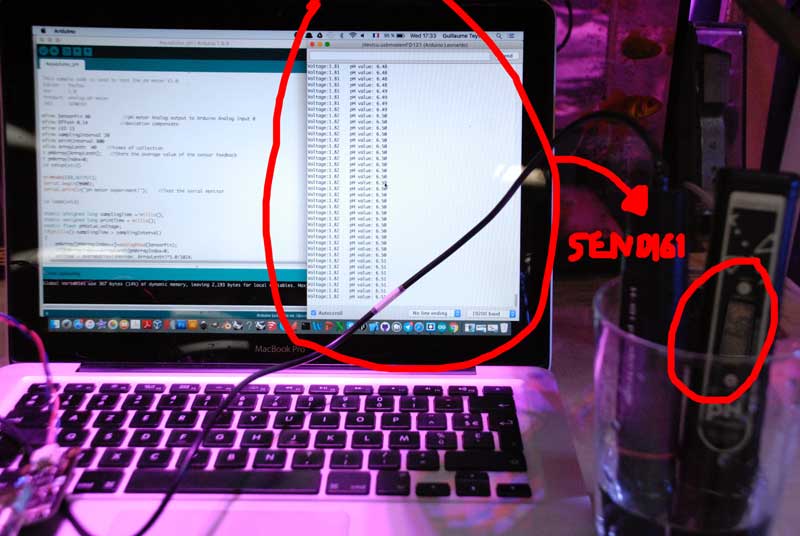
Reading pH value from SEN0161 sensor sensor
The code is directly taken from Wiki page of DFRobotics PH meter where I bought the pH probe
Steps
- The pH electrode is connected to the BNC connector on the pH meter board, and then use the connection lines, the pH meter board is connected to the analog port 0 of the Aquaduino. When the Arduino controller gets power, you will see the blue LED on board is on.
- Upload the sample code to the Arduino controller.
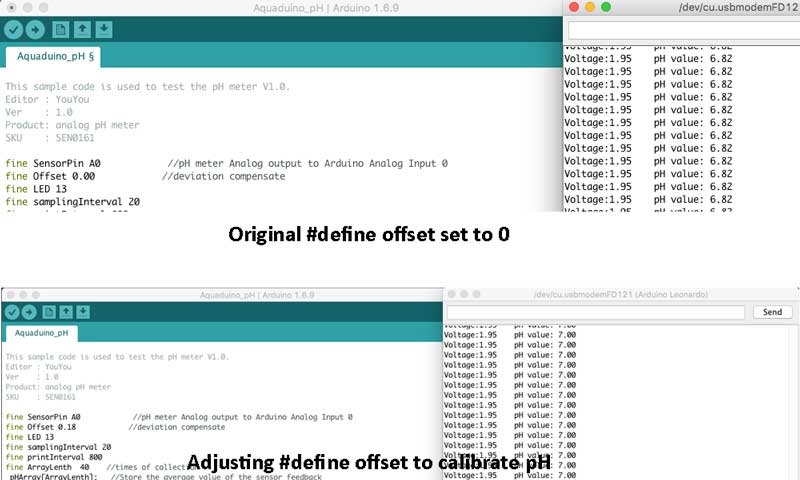
- Put the pH electrode into the standard solution whose pH value is 7.00, or directly shorted the input of the BNC connector. Open the serial monitor of the Arduino IDE, you can see the pH value printed to it, and the error does not exceed 0.3. Record the pH value printed, then compared with 7.00, and the difference should be changed into the "Offset" in the sample code. For example, the pH value printed is 6.88, so the difference is 0.12. You should change the # define Offset 0.00 into # define Offset 0.12 in the sample code.
- Fine adjustment
- For Acid solution: Put the pH electrode into the pH standard solution whose value is 4.00. Then wait about a minute, adjust the Gain Potential device, let the value stabilise at around 4.00. At this time, the acidic calibration has been completed and you can measure the pH value of an acidic solution.
- For Alkaline solution: According to the linear characteristics of pH electrode itself, after the above calibration, you can directly measure the pH value of the alkaline solution, but if you want to get a better accuracy, you can recalibrate it with the standard solution, pH = 9.18. Also adjust the gain potential device, let the value stabilise at around 9.18. After this calibration, you can measure the pH value of the alkaline solution.
NOTE:
                If you want to measure the pH value of other solution, you must wash the pH electrode first!
                The power supply is closer to +5.00V, the more accurate pH reading you could get.
Sample Code
The sample code I used for testing the PH meter and get the sensor feedback from the Arduino Serial Monitor could be found on the Wiki page of DFRobotics PH meter
Reading Air Temperature and Humidity value from DHT22 sensor
Adafruit have a DHT11//DHT12 library and example code that makes it easy to test the DHT11 and get values to display on the serial window of the Arduino IDE.
Steps
- Download the library from Adafruit, , the link takes you to the "GitHub" page . Look for the zip file download button.
- Unzip the files into your libraries folder. The best place to unzip to is under your "My Documents\Arduino\Libraries" folder - later if you upgrade the Arduino IDE the library will still be there.
- If you browse to your libraries folder you should see a new folder named DHT-sensor-library-master Rename it to DHT
- Connect up your Arduino and start the IDE
- Look under File -> Examples -> DHT and open DHTtester.
- You will need to comment the line startng with #define DHTTYPE DHT22 by putting a // in front of it and then uncomment the line starting with //#define DHTTYPE DHT11by removing the two leading//'s.
- Upload the sketch then open the serial window. You should see the temperature and humidity level scrolling. If you breathe onto the sensor you should see the temperature and humidity rise. It will take a few seconds as the sensor is slow.
Sample Code
In the example sketch the temperature and humidity variables are defines as "float", i.e. they have decimal places. This can be changed to an "int" to remove the decimal places as they aren't needed in this project.
Find the lines:
- float h = dht.readHumidity();
- float t = dht.readTemperature();
- and change them to:
- int h = dht.readHumidity();
- int t = dht.readTemperature()
Upload the sketch and check the results in the serial window. You should see the temperature as whole rather than decimal numbers.
My test sketch:
Week18 - Connecting and coding the Brain's outputs
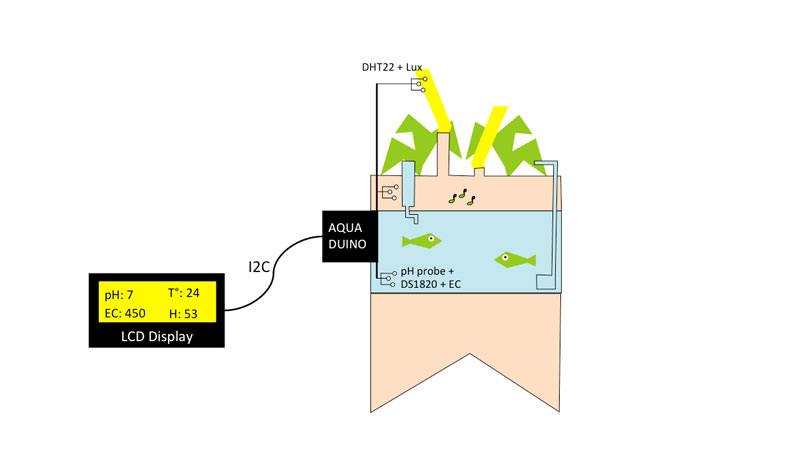
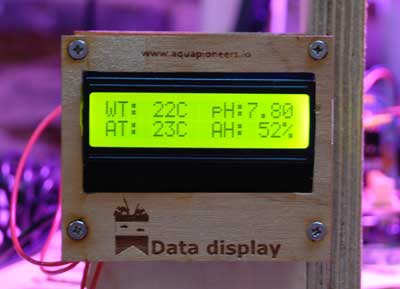
Displaying four Aquaduino Inputs on a 16x02 LCD display with the help of the I2C bus.
Now it's time to get things serious! As initially planned for my final project, I wanted to display several inputs value at the same time such as
- Water temperature
- pH
- Air humidity and Temperature
- Light intensity
- Electro-conductivity
/*
 # Aquiduino v0.1 code used to display using I2C bus analog pH meter + DHT22 + DS1820
 # Editor : Guillaume Teyssie // Fab Academy 2016 @ GreenFabLab
 # Ver    : 1.0
 # Date: 17/06/2016
*/


// Importing libraries
#include "Adafruit_LiquidCrystal.h"
#include "OneWire.h"
#include "DallasTemperature.h"
#include "Wire.h"
#include "DHT.h"

// Sensors pin allocation o the Arduino
#define ONE_WIRE_BUS 10         // DS1820 is plugged into pin 10 on the Arduino
#define DHTPIN 11               // DHT22 is plugged into pin A0 on the Arduino
#define DHTTYPE DHT22
#define pHProbe A0            //pH meter Analog output to Arduino Analog Input 0
#define Offset 0.14             //pH deviation compensate
#define LED 13                  //pH
#define samplingInterval 40     //pH
#define printInterval 800       //pH
#define ArrayLenth  40          //times of collection


// DS1820: Setup a oneWire instance to communicate with any OneWire devices (not just Maxim/Dallas temperature ICs)
OneWire oneWire(ONE_WIRE_BUS);

// DS1820: Pass our oneWire reference to Dallas Temperature.
DallasTemperature sensors(&oneWire);

// DHT22: Setup a DHT instance to communicate with any DHT devices
DHT dht(DHTPIN, DHTTYPE);

// Connect via i2c, default address #0 (A0-A2 not jumpered)
Adafruit_LiquidCrystal lcd(0x20);

//pH: Store the average value of the sensor feedback
unsigned long int avgValue;

//time variable for screen refresh
unsigned long tiempo=millis()+5000;

void setup(void) {

  // DHT22: Start up the Dallas library
  sensors.begin(); // Initialize DHT22 sensor

  // LCD I2C: set up the LCD's number of rows and columns:
  lcd.begin(16, 2);
  lcd.setBacklight(HIGH);

  // pH:
  pinMode(LED,OUTPUT);


  }

void loop(void) {

  /* DS1820 */

  // call sensors.requestTemperatures() to issue a global temperature
  sensors.requestTemperatures();
  int wt = sensors.getTempCByIndex(0);


  /* DHT22 */

  // call sensors.requestTemperatures() to issue a global temperature

  int h = dht.readHumidity();
  int t = dht.readTemperature();


  /* pH probe */

  // call buf[10] to issue a global pH

  int buf[10],temp;

  //pH probe algorithm

  for(int i=0;i 10;i++)       //Get 10 sample value from the sensor for smooth the value
  {
    buf[i]=analogRead(pHProbe);
    delay(10);
  }
  for(int i=0;i 9;i++)        //sort the analog from small to large
  {
    for(int j=i+1;j 10;j++)
    {
      if(buf[i]>buf[j])
      {
        temp=buf[i];
        buf[i]=buf[j];
        buf[j]=temp;
      }
    }
  }
  avgValue=0;
  for(int i=2;i 8;i++)                      //take the average value of 6 center sample
    avgValue+=buf[i];
  float phValue=(float)avgValue*5.0/1024/6; //convert the analog into millivolt
  phValue=3.5*phValue;                      //convert the millivolt into pH value
//  Serial.print("pH:");
//  Serial.println(phValue,2);


  /*DISPLAY THE DATA*/

  if (tiempo millis())
  {
    lcd.clear();
    // DS1820
    lcd.setCursor(0, 0);
    lcd.print("WT:");
    lcd.setCursor(4, 0);
    lcd.print(wt);
    lcd.setCursor(6, 0);
    lcd.print("C");
    // DHT22
    lcd.setCursor(0, 1);
    lcd.print("AT:");
    lcd.setCursor(4, 1);
    lcd.print(t);
    lcd.setCursor(6, 1);
    lcd.print("C");
    lcd.setCursor(9, 1);
    lcd.print("AH:");
    lcd.setCursor(13, 1);
    lcd.print(h);
    lcd.setCursor(15, 1);
    lcd.print("%");
    //pH
    lcd.setCursor(9, 0);
    lcd.print("pH:");
    lcd.setCursor(12, 0);
    lcd.print(phValue);
    lcd.setCursor(14, 0);
    tiempo = millis() +5000;
  }

  }
Hardware assembly
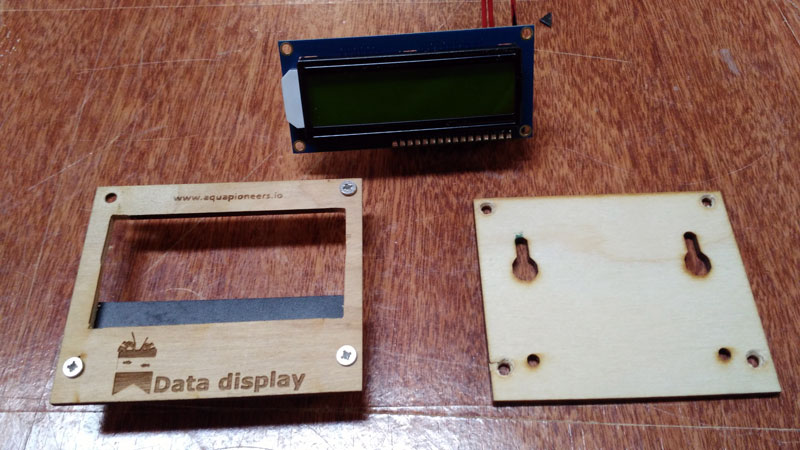
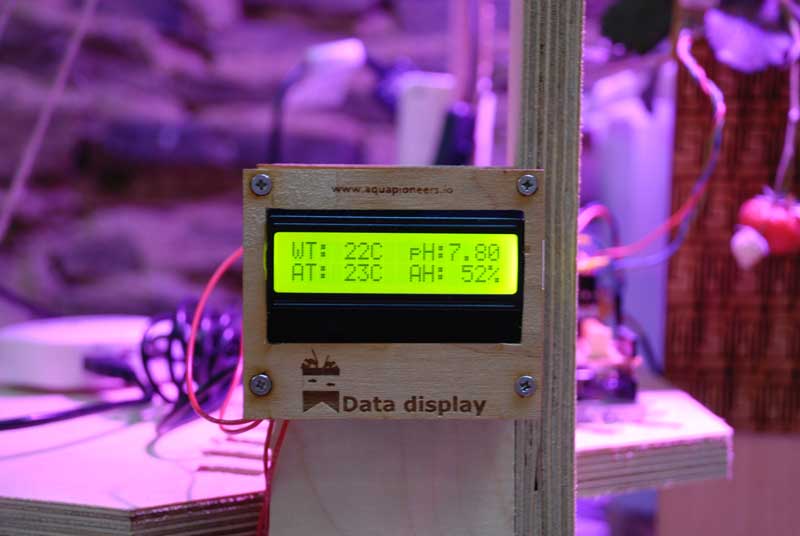
LCD Display is ON !
The output of that sketch is the video that you can see below.
Updates about POC#2's ecosystem
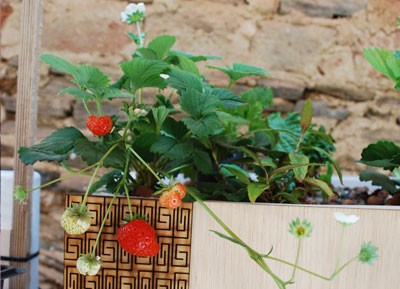
Week19 - Eating my first aquaponics strawberries
Updates about POC#1's ecosystem


Updates about POC#2's ecosystem
Week20 - Where a story ends, another begins
Updates about POC#1's ecosystem
Updates about POC#2's ecosystem
POC#3 = 1500L aquaponic greenhouse