Week 16:
Interface and Application Programming
Objective
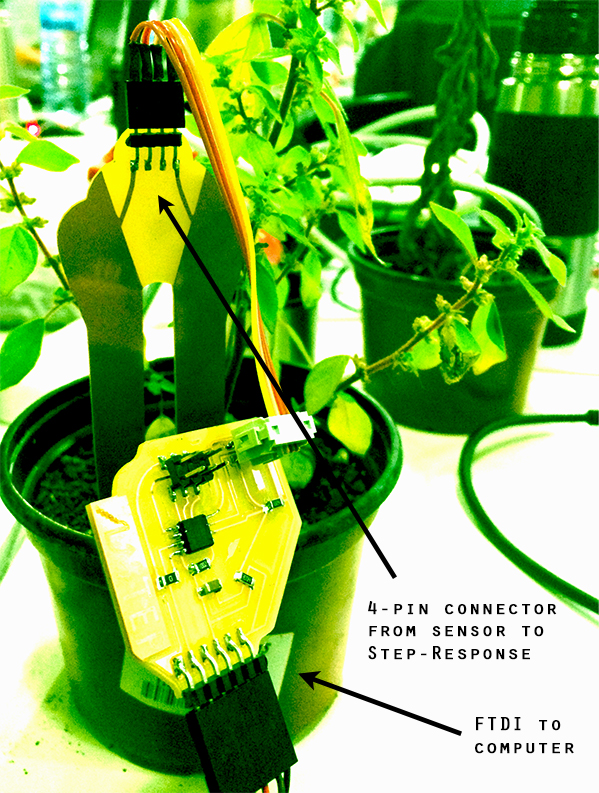
This week I am making a sensor communicate with the computer, which alters the signal and puts out a more complicated visual response.
Software
- C
- Processing
Practices
Recap of sensor input
Here are some notes to get back into the frame of mind of Week 11, when the sensor and the board that reads it were made:
- Use this bash (which is what the programming language of the Terminal is called) to make the step response board read the capacitance sensor:
- find the USB port name:
ls /dev/tty.usb*
- in the Terminal, navigate to the folder with the Python file (the Python file is from Neil's site
- run the command:
python hello.txrx.45.py /dev/tty.usbserial-FT94TM0I
- you get the Python window opening based on this
Simple steps to get into Processing
Get a sense of how Processing works by starting with a very basic file from Tiago's page (look at bottom of page).
I had to download "Unarchiver" so I could read Tiago's .rar on a Mac.
Change the serial port specification in Tiago's file:

Connect everything:
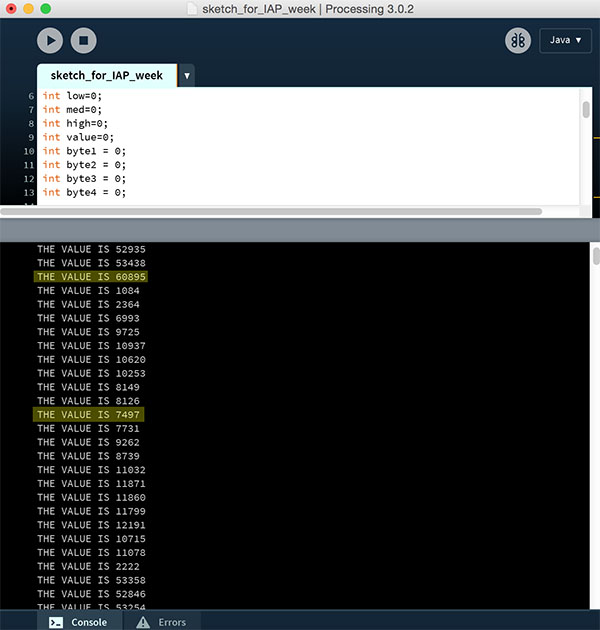
See the reading:
Now, load the "Processing Tree" example. Copy and paste the code.
The goal is to change the input for this Processing sketch from being mouse position to being input from a sensor. See the code here ~ there are plenty of comments in the code to explain what's going on.
import processing.serial.*;

Serial myPort;  // Create object from Serial class
int val;      // Data received from the serial port
int sensorData; // Data received from the serial port with 1,2,3,4 framing numbers filtered out
int low=0;
int med=0;
int high=0;
int value=0;
int byte1 = 0;
int byte2 = 0;
int byte3 = 0;
int byte4 = 0;
int value2=0;

////////////////

float theta;

void setup() {
  size(640, 360); // pixel size of output screen
  println(Serial.list());
  myPort = new Serial(this, "/dev/tty.usbserial-FT94S5UT", 9600); // 9600 is baud rate
}

void draw() {
  background(0);
  frameRate(60);

////////////////

  while (myPort.available() > 0) {    // If data is available
    byte1 = byte2; // this byte definition stuff is from Neil's .c code for my TxRx Step Response board; I believe it is "framing" ~ it sets up the port to read cleanly
    byte2 = byte3;
    byte3 = byte4;
    byte4 = low;
    low = high;
    high = myPort.read();

    if ((byte1 == 1) & (byte2 == 2) & (byte3 ==
      3) & (byte4 == 4)) {     // Filter out the framing numbers: 1,2,3,4
      value = (256*high + low) / 100;
      // value =int (map(value, 30000, 57000, 0, 500)); ~ NB, this was a first attempt to change the numbers being read, which were on the order of 50,000 - 60,000. We scrapped this and used simple division instead ~ in the line above, you can see I divided the values by 100.
      println("THE VALUE IS " + value); // print to the screen
    }
  }
////////////////

  stroke(255);
  // Let's pick an angle 0 to 90 degrees based on the mouse position ~ NB, this was changed to a "float" to be reading from the serial port instead of reading from the mouse position
  float a = (value*15 / (float) width) * 90f; // here I added a multiplier for the value, as it made a better range of movement in the visualization
  // Convert it to radians
  theta = radians(a);
  // Start the tree from the bottom of the screen
  translate(width/2, height);
  // Draw a line 120 pixels
  line(0, 0, 0, -120);
  // Move to the end of that line
  translate(0, -120);
  // Start the recursive branching!
  branch(120);
}
void branch(float h) {
  // Each branch will be 2/3rds the size of the previous one
  h *= 0.66;

  // All recursive functions must have an exit condition!!!!
  // Here, ours is when the length of the branch is 2 pixels or less
  if (h > 2) {
    pushMatrix();    // Save the current state of transformation (i.e. where are we now)
    rotate(theta);   // Rotate by theta
    line(0, 0, 0, -h);  // Draw the branch
    translate(0, -h); // Move to the end of the branch
    branch(h);       // Ok, now call myself to draw two new branches!!
    popMatrix();     // Whenever we get back here, we "pop" in order to restore the previous matrix state

    // Repeat the same thing, only branch off to the "left" this time!
    pushMatrix();
    rotate(-theta);
    line(0, 0, 0, -h);
    translate(0, -h);
    branch(h);
    popMatrix();
  }
}
Getting a very jumpy file.
Then changed this line, acc to some advice from Caro:
float a = (value*15 / (float) width) * 90f;
Came up with the number 15 through experimenting.
Watch it working!
See just the screen of Processing:
Files
- Processing sketch for Tree, adjusted:
- For the files to make all the parts, go to Week 11, input sensors.
Some Other Questions About Plant Humidity
Does the reading in a plant pot change if you add water? No. Do rubber gloves work to dampen the signal of the human hand? Yes. But they have to stay totally clean. Does the sensor respond if, while it is in the soil, you touch the plant? Yes. At first. Then no. I'm not sure why. It might have to do with discharge. See what happens with some vegetables on my desk:
So, does this relate to what the capacitance sensor is reading with the plant?
Here's something useful from a website on capacitance sensors:
The incremental change in the dielectric constant of a capacitive humidity sensor is nearly directly proportional to the relative humidity of the surrounding environment. The change in capacitance is typically 0.2–0.5 pF for a 1% RH change, while the bulk capacitance is between 100 and 500 pF at 50% RH at 25°C. Capacitive sensors are characterized by low temperature coefficient, ability to function at high temperatures (up to 200°C), full recovery from condensation, and reasonable resistance to chemical vapors. The response time ranges from 30 to 60 s for a 63% RH step change.
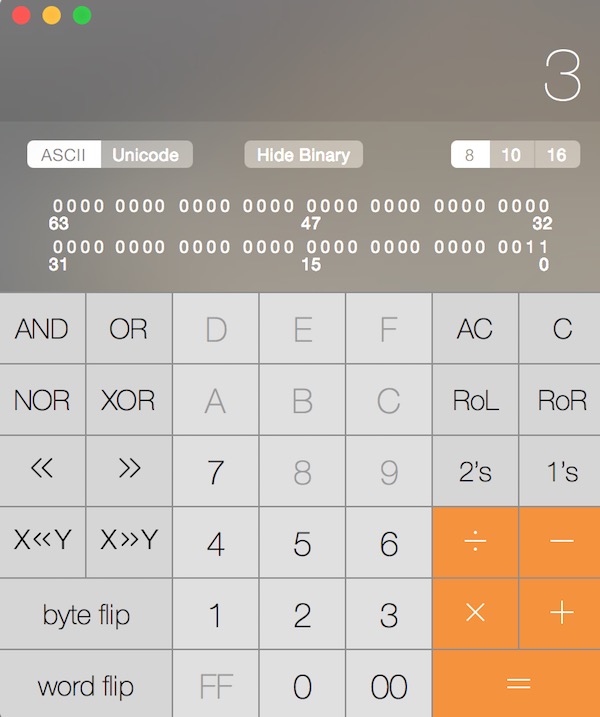
An Aside: 8-bit vs 10-bit information
- 8 bits is one byte. The bits are 0s and 1s.
- 2^10 is as many bits as you can have entering a serial port. This is 1023. (Well, actually 1024.)
- We have a programming calculator on our calculators that can show how different numbers are converted into bits. Here is what "3" looks like in binary:
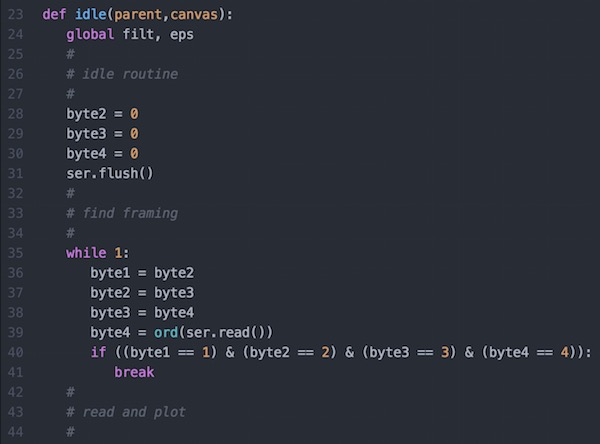
- In Neil's .py code, there is some code in the beginning to help identify the high and low parts of a MORE than 8-bit number ~ it is this:
- The bytes get assembled into a value. Then, you see a line for a "lo-pass filter" to average out peaks and valleys in the number stream:

Examples where this matter? The way smart beehives work is by using a laser pointer hitting an LDR to send high and low signals. You want to throw out the noise.
For the Python GUI that pops up with my input sensor, the numbers shown correspond to voltage. The resolution of the voltage reading is 5 / 1024 (voltage divided by number of bits available).
See the serial monitor from Arduino that shows the kind of "noise" that can come in through the serial port; so the program is designed to only start reading after 4 consistent bytes come in.

That's essentially it for this week ~~
Other things that happened this week
Vailets Hack Day.
Lots of kids exploring design and tech! Thanks to Xavi Dominguez.
Had frustrations trying to set up a Kinect scanner (XBox 360) to work with Skanect 1.5.0. Tangentially related to Week 05.
Great difficulty getting Skanect to recognize the sensor ~ it happened occasionally, but I couldn't tell why sometimes it worked and sometimes not. Switched to Windows, tried 4 different drivers. Seemed to work with 2.0. Deleted other drivers. Physically moved location. Didn't work. Returned to former location. Worked. Tried again to move. Didn't work. Does this have to do with the quality or consistency of the power? It is hard to know. The software + hardware speak to each other only very begrudgingly.
Recitation: Gian Paolo Bassi of SolidWorks

- Interesting, dynamic guy. Here are some of the things I noted:
- art to part
- declarative design
- a project of creating a digital twin of Singapore
- Gehry project for the LA river: starts w this digital model of a "twin" of 10 miles of the LA river system
- SolidWorks has a sustainability and cost function already embedded
- Neil says the "killer app" for dig-fab, bits-to-atoms and back again, is self-sufficient production (the Self-Sufficient City)
- SolidWorks moving into supporting robot-making
- sensors that interact with the design ~ real-time design adjustment, it seems ...
- smart cities can turn data into things