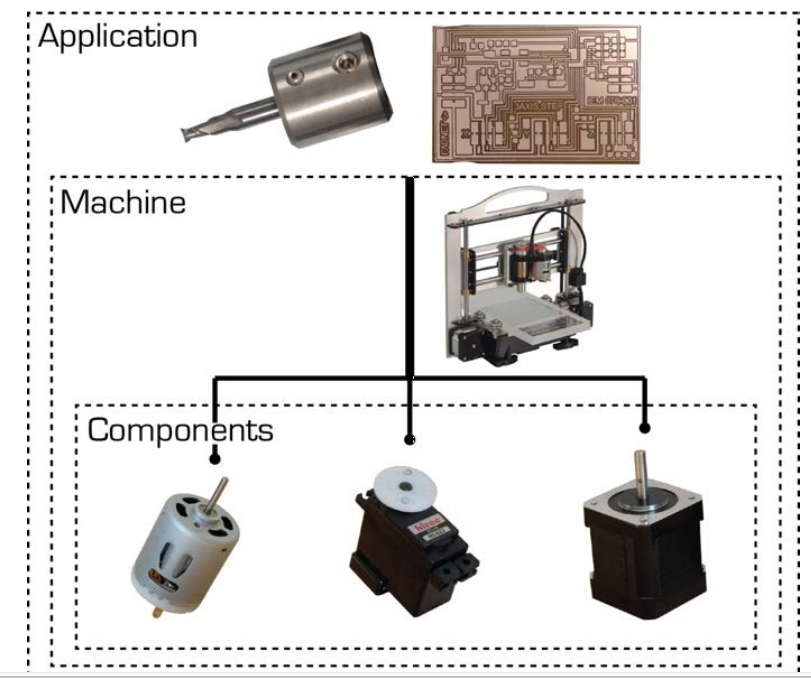
Mechanical Design and Machine Design
This Week's Assignment:
Make a machine, including the end effector, build the passive parts and operate it manually, document the group project and your individual contribution. See details here and here
-
Tools, Materials and Electronics
- Laser cutter for the structure
- Roland monofab SRM-20 for the PCB Board
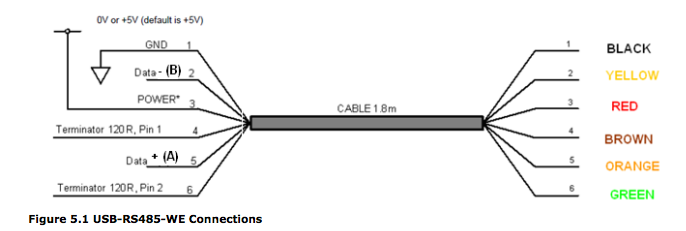
- 6 pin RS-485 cable
- FABNET USB
- Gestalt node board, aluminium etc... (Design & Construction MTM Kit)
- FR1 copper plate
- 6mm Cardboard
- 12V power for the motors Programing
- PyGestalt
- Modular Machines that Make — [m]MTM
- FTDI Driver
- Gestal Library
Files
All files can be download here.
Woma project
I have joined Woma in Paris team beginning of May in the hope that I would be there fast enough to be able to join the team, but most of the MTM assigments were already completed. I read their work on the project page and learned what they have done. Since most was already completed I have decided to make one simple machine that will slider using Gestalt Nodes. My main objective is understanding the programming part and play around with Gestalt Framwork. Roman has done it in the team and will be able to asssist me in case there is any problem. Understanding this would be my challenge; this can help me make my own machine or maybe a CNC.
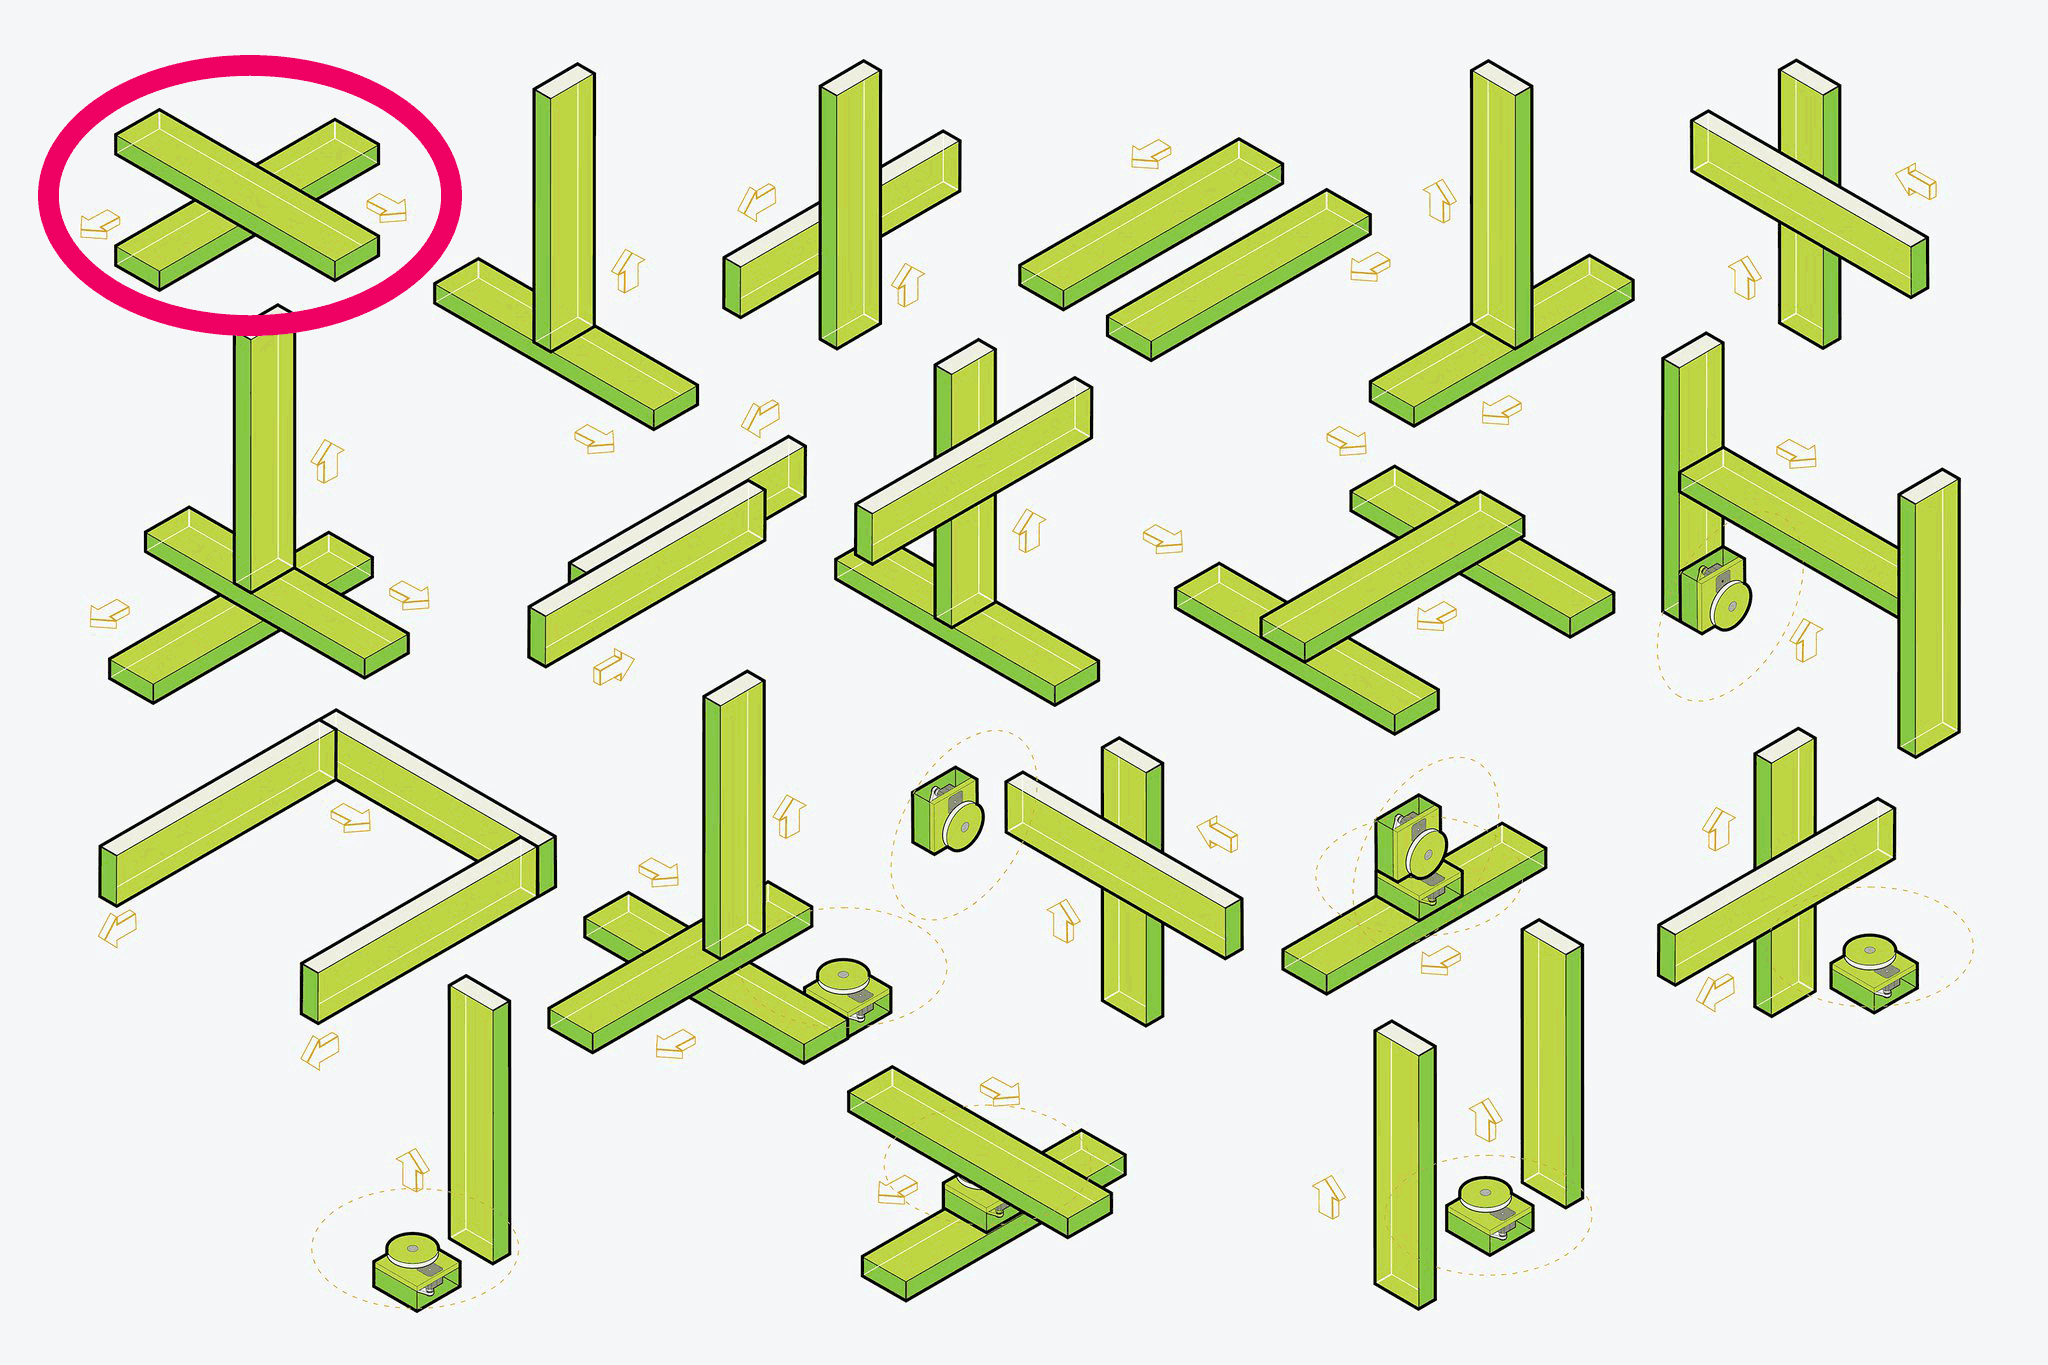
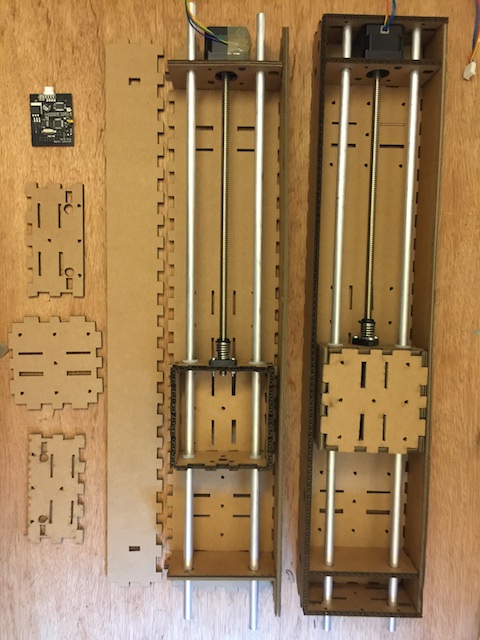
Making the linear stages — Creating MTM Cardboard Kits
Here are the Machines that Make Reconfigurable Stages : 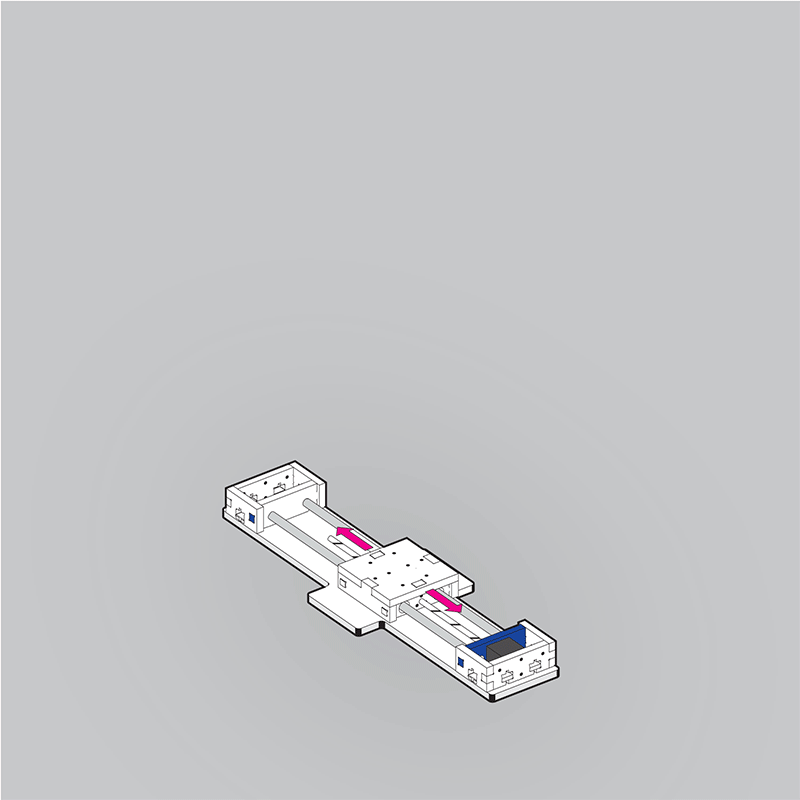
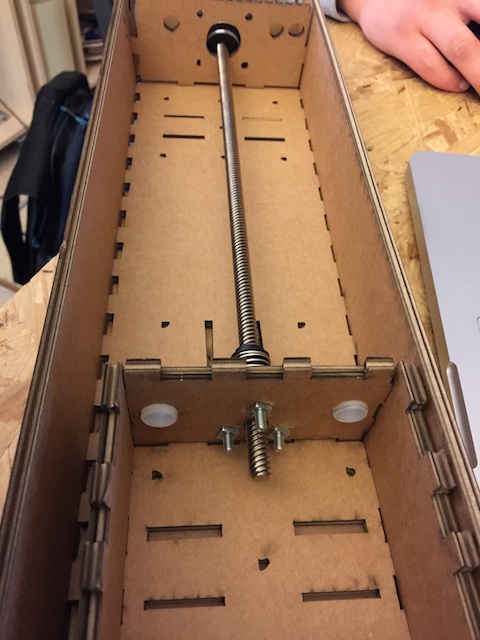
To make this simple machine (moving on 2-axes (XY), I used Jason to re-draw the motor mount cad file. It is mainly box structure, bed and holders for X-Y direction movements. I cut the design (3 times) on the laser cuter following the settings on 6mm MDF material for the laser cutter at Woma (see the word document for Woma laser cuter in the zip file) .
Cutting the mecanics
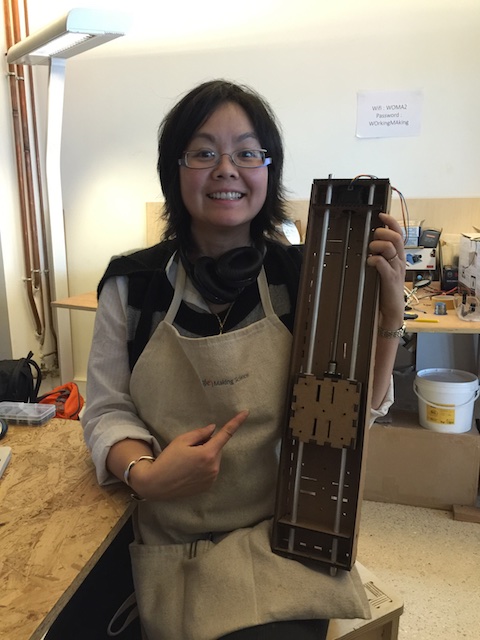
I made arm following the tutorial. See below.

PyGestalt
This assigment will be using Pygestalt Framework. It is a framework that enables individuals to build their own digital fabrication tools, such as common tools laser cutters, 3D printers, and CNC mills.
- Gestalt is currently written in Python
- External communication and synchronization is supported over USB
- Gestalt’s ability to communicate over USB, makes it possible to run machine controllers on the recently released $25 Raspberry Pi (Raspberry Pi Foundation, 2013)
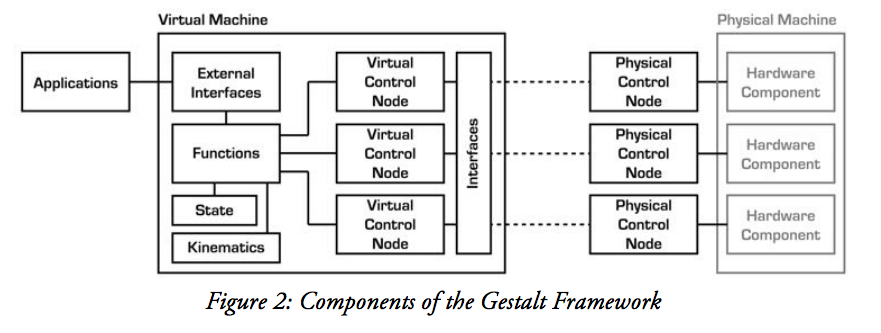
- The Gestalt framework is comprised of an extensible collection of software modules that can be combined in many ways to quickly realize machine controllers.
- A series of physical control nodes provide
low-level control of the machine components and connect to the Gestalt
virtual machine via either a direct connexion or a network bus. Each physical
control node is matched by a virtual node that exposes to the virtual machine
the functions needed to control its specific hardware. The virtual machine
additionally might contain kinematic definitions, memory of state (i.e.
position), machine-level functions (e.g. to move the machine) and external
interfaces through which user applications can control the machine.
Within the virtual machine, the user defines:- the interface for the machine (initInterfaces)
- the number of axis/nodes (initControllers)
- the coordinate system in use (initCoordinates)
- the characteristics of each axis such as number of microsteps, degrees per step, linear motion per revolution and direction
- public interfaces/functions: e.g. move(), jog()
- machine position
- spindle speed setting
FabNet
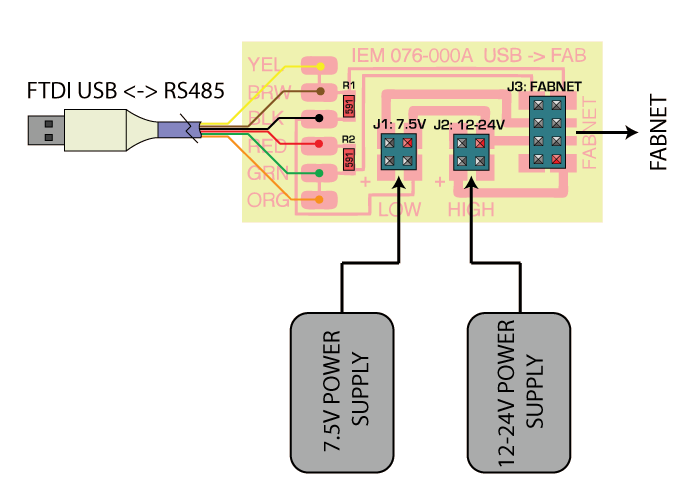
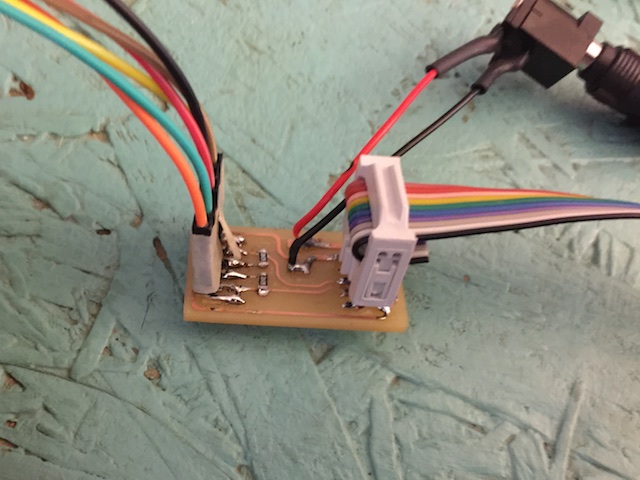
Woma team made a FabNet from Bas that allows me to use a straight through ribbon cable. In week 11, NetWork and Communications, (I am a few weeks behind for this week so I did week 11 before 9) I thought that cable was an FTDI cable (TTL 232R), but reading the tutorial I know now that it is a RS-485, that is why it did not work when I tried to use it with two SatshaKit. I solder it again see, below.
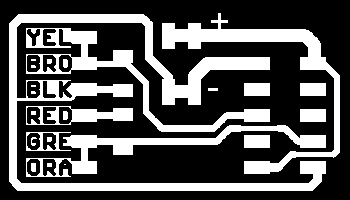

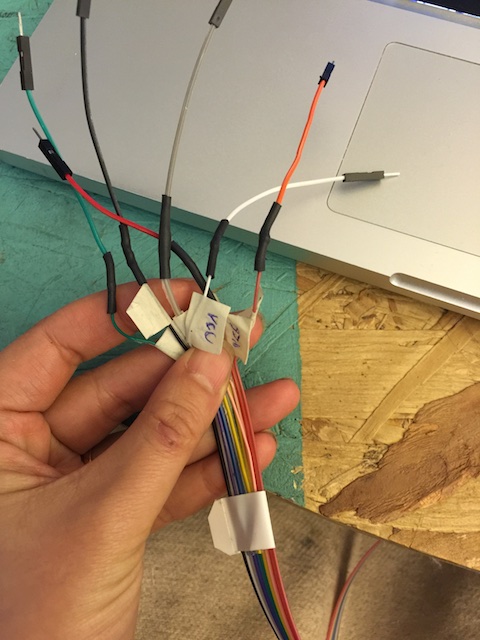 I named each wire RS A, RS B, GND A, GND B, and VCC A and B for usability ;), so it will be easy to reconnect to the Gestalt Node when we have to put it away.
 I did not need the stepper motor and node that came with it for the excercices but wanted to show them.
Wiring
Actual XY — plotter assembly
Hooking the two nodes

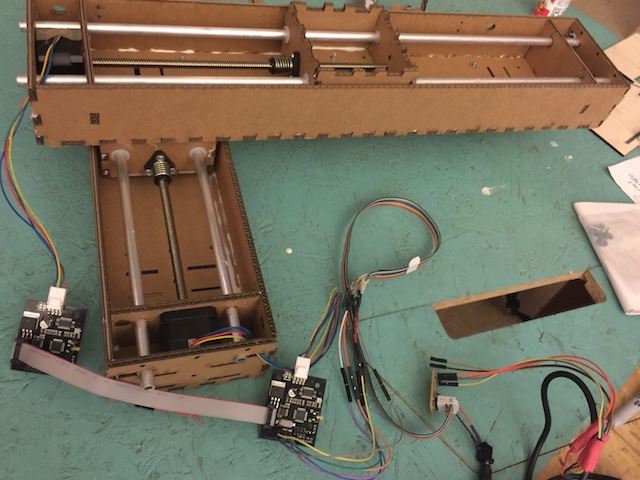
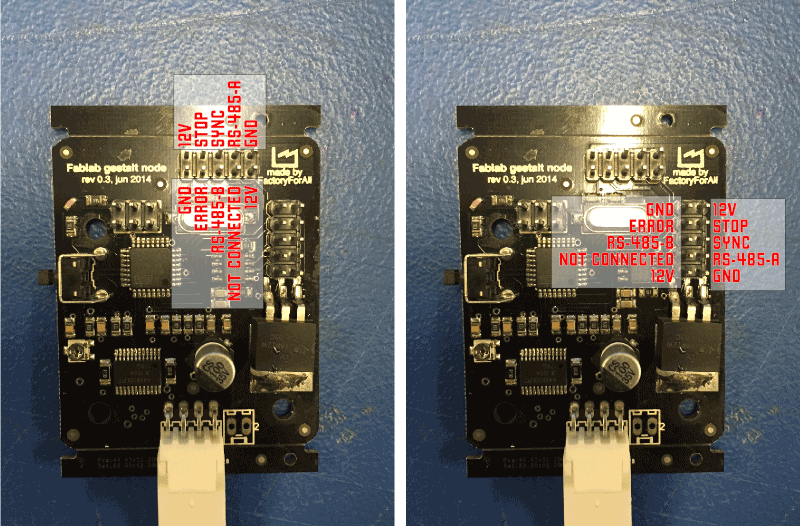
As shown in above figure I prepared the electronics board, connexions and mechanical setup. Note that I used a 12V power supply. I forgot to turn the Volt switch from 7V to 12 and all overheated. Fortunatly, nothing overburned! All is functionnal.
A special thanks to Jason for his 6mm file that really helped me get going wit MTM.
"When we design physical things, we are in a sense programming matter,
encoding in the form and material of designed objects instructions on how
they should interact with the world around them." — Ellison Moyer
Getting the Software Running
1. Installing Driver
I did it last, few weeks ago, so I did not have to do it again. Driver file can be found here
2. Installing Python
Python 2.7.4 can be found here.
3. Installing PySerial
I downloaded the .tar.gz install package PySerial 3.1.1. I see you Command Prompt / Terminal session and “cd” into the pyserial-3.1.1 folder, then I ran the command:
sudo python setup.py install
After installation it should look something like this
Installed /Library/Python/2.7/site-packages/pyserial-3.1.1-py2.7.egg
Processing dependencies for pyserial==3.1.1
Finished processing dependencies for pyserial==3.1.1
Phonesavanhs-MacBook-Pro:pyserial-master phonesavanh$
4. Installing Gestalt update!: NO NEED TO DO THIS STEP!
I created a symbolic link to gestalt6 directory in /usr/bin/I cloned this folder and make this command in the Terminal
sudo ln -s Users/phonesavanh/Desktop/repos/gestalt\ Gestalt/gestalt6 /Library/Python/2.7/site-packages/gestaltNote to myself that python path is different from system $PATH
I am wondering what is the difference between Gestal from Nadya's gitHub and the one below, PyGestalt. UPDATE! I had an error and later learned that installing Gestalt was a mistake, ONLY PyGestalt had to be installed!!!
5. Installing PyGestalt
As per Nadya's instructions, download the pygestalt code from here and after downloading and unzipping the pygestalt files, change to the pygestalt directory and run setup.py to install the software:
sudo python ./setup.py install
After instalation it should look something like this
running install
running build
running build_py
creating build
creating build/lib
creating build/lib/pygestalt
copying ./__init__.py -> build/lib/pygestalt
copying ./core.py -> build/lib/pygestalt
copying ./functions.py -> build/lib/pygestalt
copying ./interfaces.py -> build/lib/pygestalt
copying ./machines.py -> build/lib/pygestalt
copying ./nodes.py -> build/lib/pygestalt
copying ./packets.py -> build/lib/pygestalt
copying ./testFactory.py -> build/lib/pygestalt
copying ./testMachine.py -> build/lib/pygestalt
copying ./utilities.py -> build/lib/pygestalt
creating build/lib/pygestalt/publish
copying ./publish/__init__.py -> build/lib/pygestalt/publish
copying ./publish/publish.py -> build/lib/pygestalt/publish
copying ./publish/rpc.py -> build/lib/pygestalt/publish
running install_lib
creating /Library/Python/2.7/site-packages/pygestalt
copying build/lib/pygestalt/__init__.py -> /Library/Python/2.7/site-packages/pygestalt
copying build/lib/pygestalt/core.py -> /Library/Python/2.7/site-packages/pygestalt
copying build/lib/pygestalt/functions.py -> /Library/Python/2.7/site-packages/pygestalt
copying build/lib/pygestalt/interfaces.py -> /Library/Python/2.7/site-packages/pygestalt
copying build/lib/pygestalt/machines.py -> /Library/Python/2.7/site-packages/pygestalt
copying build/lib/pygestalt/nodes.py -> /Library/Python/2.7/site-packages/pygestalt
copying build/lib/pygestalt/packets.py -> /Library/Python/2.7/site-packages/pygestalt
creating /Library/Python/2.7/site-packages/pygestalt/publish
copying build/lib/pygestalt/publish/__init__.py -> /Library/Python/2.7/site-packages/pygestalt/publish
copying build/lib/pygestalt/publish/publish.py -> /Library/Python/2.7/site-packages/pygestalt/publish
copying build/lib/pygestalt/publish/rpc.py -> /Library/Python/2.7/site-packages/pygestalt/publish
copying build/lib/pygestalt/testFactory.py -> /Library/Python/2.7/site-packages/pygestalt
copying build/lib/pygestalt/testMachine.py -> /Library/Python/2.7/site-packages/pygestalt
copying build/lib/pygestalt/utilities.py -> /Library/Python/2.7/site-packages/pygestalt
byte-compiling /Library/Python/2.7/site-packages/pygestalt/__init__.py to __init__.pyc
byte-compiling /Library/Python/2.7/site-packages/pygestalt/core.py to core.pyc
byte-compiling /Library/Python/2.7/site-packages/pygestalt/functions.py to functions.pyc
byte-compiling /Library/Python/2.7/site-packages/pygestalt/interfaces.py to interfaces.pyc
byte-compiling /Library/Python/2.7/site-packages/pygestalt/machines.py to machines.pyc
byte-compiling /Library/Python/2.7/site-packages/pygestalt/nodes.py to nodes.pyc
byte-compiling /Library/Python/2.7/site-packages/pygestalt/packets.py to packets.pyc
byte-compiling /Library/Python/2.7/site-packages/pygestalt/publish/__init__.py to __init__.pyc
byte-compiling /Library/Python/2.7/site-packages/pygestalt/publish/publish.py to publish.pyc
byte-compiling /Library/Python/2.7/site-packages/pygestalt/publish/rpc.py to rpc.pyc
byte-compiling /Library/Python/2.7/site-packages/pygestalt/testFactory.py to testFactory.pyc
byte-compiling /Library/Python/2.7/site-packages/pygestalt/testMachine.py to testMachine.pyc
byte-compiling /Library/Python/2.7/site-packages/pygestalt/utilities.py to utilities.pyc
running install_egg_info
Writing /Library/Python/2.7/site-packages/pygestalt-0.7-py2.7.egg-info
5. Installing wxPython
This installation will give me an GUi. I downloaded here for mac but the installation package was damaged. I downloaded a few more time but got the same answer. Dommage!
6. Connecting FTDI to FABNET
In order for the computer to talk to the gestalt nodes, we need to first inform it of the serial device that we are using. The command line in Terminal to verify the portbName:
ls /dev/tty*
My port type is:
/dev/tty.usbserial-FTZ56QNH I changed this information in the file single_node.py exemple in Nadya's exemple folder.
I ran run the single-node test but first I CD the folder where the example are located
cd /Users/phonesavanh/Desktop/repos/09/pygestalt/examples/machines/htmaaand typed in the Terminal:
python single_node.py
The motor moved for 5 seconds and stop. It gave me this type of error in the Terminal:
At this point I was clueless and found that Steven Chew (special thanks for the great documentation) explained it very well : "The PyGestalt framework initializes and tries to identify the X-axis node. A blue led blinks on the gestalt node. Press the pushbutton on the gestalt node to identify it on the network. Once all the gestalt nodes have been identified, a persistence file, test.vmp containing this information is saved in the project folder. If the machine configuration is changed, test.vmp has to be deleted and the nodes re-identified."But after the first few moves I had this error :
X Axis: NO URL RECEIVED X Axis: False X Axis: Could not reach virtual node. Retrying (#2) X Axis: Could not reach virtual node. Retrying (#3) X Axis: Could not reach virtual node. Retrying (#4) X Axis: Could not reach virtual node. Retrying (#5) X Axis: Could not reach virtual node. Retrying (#6)
I did as Jason did and it worked! See video below.
Jason also explained that for this single node test file, the program simply moves the stage through 4 different positions, saved as a list of coordinates in the variable supercoords:
supercoords = [[10], [20], [10], [0]]
for coords in supercoords:
stage.move(coords, 0)
status = stage.xAxisNode.spinStatusRequest()
while status['stepsRemaining'] > 0:
time.sleep(0.001)
status = stage.xAxisNode.spinStatusRequest()
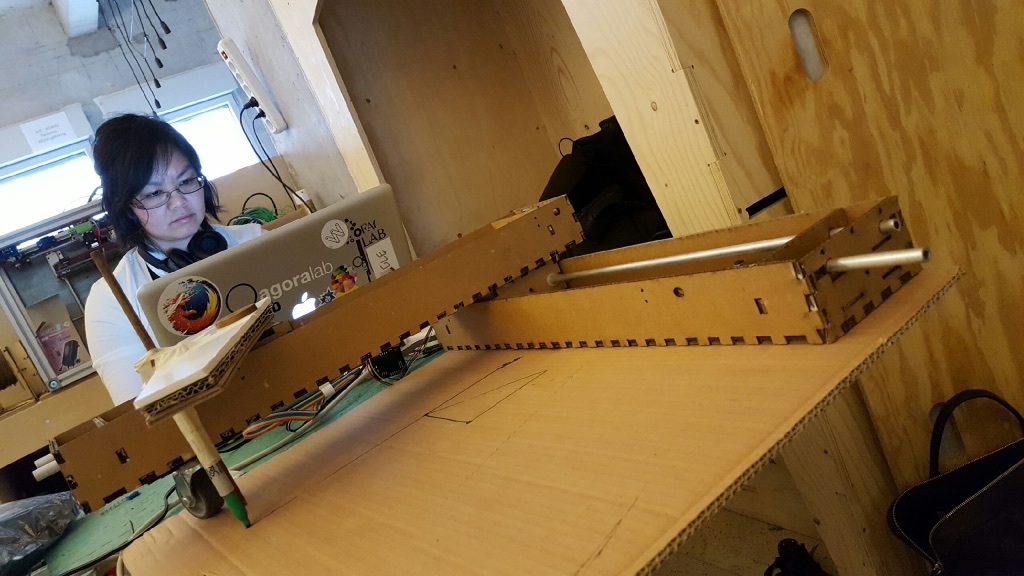
Controlling the machine (X,Y)
Once pygestalt has been setup, I could now test the gestalt nodes and familiarise myself with the framework. There are a few examples on Nadya's repo and loaded the program on gestalt board to get the motor rotating in X linear motion and I prepared the same setup for the motors, the Y direction.
I tried the program from examples and later I modified few lines to vary speed, distance and the angle. That was specified in velocity, mm and Degree respectively. See the code below:
2-axis Control
This part was a bit complicated and I had lots of difficulty. Fortunatly Stewn Chew from Fab Lab Singapor did a 2-axis control so I followed what he did. To test pygestalt with a 2-axis control, Nadya has another example in the htmaa folder, xy_plotter.py. The virtual machine has to be re-configured for a 2-axis design. This is done within the initControllers() function, where the nodes are defined:
def initControllers(self): self.xAxisNode = nodes.networkedGestaltNode('X Axis', self.fabnet, filename = '086-005a.py', persistence = self.persistence) self.yAxisNode = nodes.networkedGestaltNode('Y Axis', self.fabnet, filename = '086-005a.py', persistence = self.persistence) self.xyNode = nodes.compoundNode(self.xAxisNode, self.yAxisNode)
The kinematics for both axes also has to be defined:
def initKinematics(self):
self.xAxis = elements.elementChain.forward([elements.microstep.forward(4), elements.stepper.forward(1.8), elements.leadscrew.forward(8), elements.invert.forward(True)])
self.yAxis = elements.elementChain.forward([elements.microstep.forward(4), elements.stepper.forward(1.8), elements.leadscrew.forward(8), elements.invert.forward(False)])
self.stageKinematics = kinematics.direct(2)	#direct drive on all axes
Since there are 2-axis, each point in moves also has 2 values, representing the [x,y] coordinates of the point:
moves = [[10,10],[20,20],[10,10],[0,0]]
The end of the move sequence occurs when there are no more spinStatusRequests. I only need to check the request on any one of the axis; there is no need to check spinStatusRequest on all the axes on the virtual machine.
for move in moves:
stages.move(move, 0)
status = stages.xAxisNode.spinStatusRequest()
# This checks to see if the move is done.
while status['stepsRemaining'] > 0:
time.sleep(0.001)
status = stages.xAxisNode.spinStatusRequest()
Voilà
I made some test with the help of Roman (huge thanks to you Roman!). EDP pageSee the video. If I have time I will try to make better image using coordinates (as oposed to gCode). using this site, the PNG Modules
My phone.py code here:
# Two stage example Virtual Machine file
# moves get set in Main
# usb port needs to be set in initInterfaces
# Nadya Peek Dec 2014

#------IMPORTS-------
from pygestalt import nodes
from pygestalt import interfaces
from pygestalt import machines
from pygestalt import functions
from pygestalt.machines import elements
from pygestalt.machines import kinematics
from pygestalt.machines import state
from pygestalt.utilities import notice
from pygestalt.publish import rpc	#remote procedure call dispatcher
import time
import io


#------VIRTUAL MACHINE------
class virtualMachine(machines.virtualMachine):

def initInterfaces(self):
if self.providedInterface: self.fabnet = self.providedInterface		#providedInterface is defined in the virtualMachine class.
else: self.fabnet = interfaces.gestaltInterface('FABNET', interfaces.serialInterface(baudRate = 115200, interfaceType = 'ftdi', portName = '/dev/tty.usbserial-FTZ56QNH'))

def initControllers(self):
self.xAxisNode = nodes.networkedGestaltNode('X Axis', self.fabnet, filename = '086-005a.py', persistence = self.persistence)
self.yAxisNode = nodes.networkedGestaltNode('Y Axis', self.fabnet, filename = '086-005a.py', persistence = self.persistence)

self.xyNode = nodes.compoundNode(self.xAxisNode, self.yAxisNode)

def initCoordinates(self):
self.position = state.coordinate(['mm', 'mm'])

def initKinematics(self):
self.xAxis = elements.elementChain.forward([elements.microstep.forward(4), elements.stepper.forward(1.8), elements.leadscrew.forward(8), elements.invert.forward(True)])
self.yAxis = elements.elementChain.forward([elements.microstep.forward(4), elements.stepper.forward(1.8), elements.leadscrew.forward(8), elements.invert.forward(False)])
self.stageKinematics = kinematics.direct(2)	#direct drive on all axes

def initFunctions(self):
self.move = functions.move(virtualMachine = self, virtualNode = self.xyNode, axes = [self.xAxis, self.yAxis], kinematics = self.stageKinematics, machinePosition = self.position,planner = 'null')
self.jog = functions.jog(self.move)	#an incremental wrapper for the move function
pass

def initLast(self):
#self.machineControl.setMotorCurrents(aCurrent = 0.8, bCurrent = 0.8, cCurrent = 0.8)
#self.xNode.setVelocityRequest(0)	#clear velocity on nodes. Eventually this will be put in the motion planner on initialization to match state.
pass

def publish(self):
#self.publisher.addNodes(self.machineControl)
pass

def getPosition(self):
return {'position':self.position.future()}

def setPosition(self, position  = [None]):
self.position.future.set(position)

def setSpindleSpeed(self, speedFraction):
#self.machineControl.pwmRequest(speedFraction)
pass

#------IF RUN DIRECTLY FROM TERMINAL------
if __name__ == '__main__':
# The persistence file remembers the node you set. It'll generate the first time you run the
# file. If you are hooking up a new node, delete the previous persistence file.
stages = virtualMachine(persistenceFile = "xy.vmp")

# You can load a new program onto the nodes if you are so inclined. This is currently set to
# the path to the 086-005 repository on Nadya's machine.
#stages.xyNode.loadProgram('../../../086-005/086-005a.hex')

# This is a widget for setting the potentiometer to set the motor current limit on the nodes.
# The A4982 has max 2A of current, running the widget will interactively help you set.
#stages.xyNode.setMotorCurrent(0.7)

# This is for how fast the
stages.xyNode.setVelocityRequest(8)

# Some random moves to test with
moves = [[-30,10],[-20,20],[-10,10],[0,0],[-10,10],[-120,20],[110,10],[0,60]]

# Move!
for move in moves:
stages.move(move, 0)
status = stages.xAxisNode.spinStatusRequest()
# This checks to see if the move is done.
while status['stepsRemaining'] > 0:
time.sleep(0.001)
status = stages.xAxisNode.spinStatusRequest()
Special Thanks to all fabers from whom I read the informations from such as well documented Fab Lab , Juha's page from Fab Lab Oulu.