Assignment
- Read a microcontroller data sheet.
- Program your board to do something, with as many different programming languages and programming environments as possible.
- Identify relevant information in a microcontroller data sheet
- Implement programming protocols
- Documented what you learned from reading a microcontroller datasheet.
- What questions do you have? What would you like to learn more about?
- Programmed your board
- Described the programming process/es you used
- Included your code
This week's assignment is to program my ATtiny board in different Embedded proraming techniques.
Atmel AVR
The AVR is a modified Harvard architecture 8-bit RISC single-chip microcontroller, which was developed by Atmel in 1996. The AVR was one of the first microcontroller families to use on-chip flash memory for program storage, as opposed to one-time programmable ROM, EPROM or EEPROM used by other microcontrollers at the time.
The creators of the AVR give no definitive answer as to what the term "AVR" stands for. However, it is commonly accepted that AVR stands for Alf (Egil Bogen) and Vegard (Wollan)'s RISC processor. Note that the use of "AVR" in this article generally refers to the 8-bit RISC line of Atmel AVR Microcontrollers.
Basic families
AVRs are generally classified into following:
- Main article: Atmel AVR ATtiny comparison chart
- 0.5-16 kB program memory
- 6-32-pin package
- Limited peripheral set
- 4-256 kB program memory
- 28-100-pin package
- Extended instruction set (multiply instructions and instructions for handling larger program memories)
- Extensive peripheral set
- 16-384 kB program memory
- 44-64-100-pin package (A4, A3, A1)
- 32-pin package : XMEGA-E (XMEGA8E5)
- Extended performance features, such as DMA, "Event System", and cryptography support.
- Extensive peripheral set with ADCs
- FPGA 5K to 40K gates
- SRAM for the AVR program code, unlike all other AVRs
- AVR core can run at up to 50 MHz
- Fab ISP
- Atmel ICE
- AVRDude
- AVR-GCC
- Open the preferences dialog in the Arduino software.
- Find the "Additional Boards Manager URLs" field near the bottom of the dialog.

- Paste the following URL into the field (use a comma to separate it from any URLs you've already added):
https://raw.githubusercontent.com/damellis/attiny/ide-1.6.x-boards-manager/package_damellis_attiny_index.json
- Click the OK button to save your updated preferences.
- Click the "Tools" button --> go to "Board" and Open the "Boards Manager..." in the Arduino software.
- Scroll to the bottom of the list; you should see an entry for "ATtiny" or find the "attiny" in the "Filter your search..."

- Click on the ATtiny entry. An install button will appear. Click the install button.

- The word "installed" will now appear next to the title of the ATtiny entry.

- Close the boards manager. Now you can see an entry for ATtiny in the "Tools --> Board" menu.

Start to Embedded Programing
In Fab Academy 2016 I made a dancing light control circuit using ATtiny 44 microcontrolle using Eagle software. The scematics and other details of design are shown below. The process of milling the PCB are same as in the electronics production. Once the board is made next is to programm the ATtiny45 for that we require FAB ISP. I had my own FAB ISP board which I made in the electronics production week. The dancing circuit is two LED controled by one ATtiny44 prosessor. Once the board is milled next is to solder the components with reference to my position diagram.


Started to program my ATtiny 44 board.
Open the Arduino software (IDE) and from the tools manu select Board "ATtiny",then select the processor "ATtiny44" likewise processor Clock speed can also set as "20 Mhz" since I am using 20 Mhz resonator in my circuit.
Program
I started programming using Arduino IDE. I made a simple programm for reading the input data from the switch and accordingly ON and OFF the LED's with a delay. The program is as shown below. After coding and debugging the file can be burned to my processor using FAB ISP board.

Download My Program file :
Dancing light using ATtiny44
My board is having two LEDs (one is blue and the other green) and one Switch. When the Switch is pressed, the LEDs glowing simultaneously. Each LED glow on one second delay.
First LED ON state

First & Second LED OFF state

Second LED ON state

tinyAVR
- the ATtiny series
megaAVR
- the ATmega seriesXMEGA
- the ATxmega seriesApplication-specific AVR
megaAVRs with special features not found on the other members of the AVR family, such as LCD controller, USB controller, advanced PWM, CAN, etc.
FPSLIC (AVR with FPGA)
32-bit AVRs
Main article: AVR32
In 2006 Atmel released microcontrollers based on the 32-bit AVR32 architecture. They include SIMD and DSP instructions, along with other audio and video processing features. This 32-bit family of devices is intended to compete with the ARM-based processors. The instruction set is similar to other RISC cores, but it is not compatible with the original AVR or any of the various ARM cores.
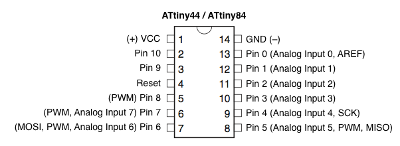
Here I use the ATtiny 44 IC

Last week I have made my own HELLO board with little customization that include 2 LED and 1 switch, so this week I'm going to play with the same and make it glow. I have installed compatible version of arduino IDE
For programming I have two options,The FAB ISP was made during My Pre Fab Academy course echo.hello.isp.
The image shown below is a board which I made in pre fab Academy time.


I need to install the following softwares in my PC so that I can run the board.
In a glimpse AVRDude is excellent program for burning hex code into microcontroller. USBasp is awesome USB based programmer for the AVR. We can install Avrdude by using below command:
apt-get install avrdudeTo install AVR gcc:
apt-get install avrdudeWhat is AVR gcc?
This tutorial helps me a lot in finding the constraints

Arduino IDE setup: To add our board in the list
Goto preferences -> Add Attiny git library link to the field "Additional board manager URL's:" after its done we can see our board in Tools -> Boards clock. Now we have to select port from the tool menu itself, My programmer is Fab ISP that is "Tinyisp" have to burn the ATtiny 44 with Bootloader by simply selecting the bootloader menu from the tools.
How to install ATtiny44 library in arduino IDE
The ATtiny is a great option for running simple Arduino programs: it is small, cheap and relatively easy to use.
Installing ATtiny support in Arduino 1.6.5
In Arduino 1.6.5, you can install the ATtiny support using the built-in boards manager.