WEEK 5 - 3D Scanning and Printing
TASK:
* test the design rules for your printer(s) (group project)
* design and 3D print an object (small, few cm) that could not be made subtractively
* 3D scan an object (and optionally print it)
* Create and print 3D wedge model using UP Printer, test shaft and hole tolerance. Print and test printer tolerence with overhang model.
* Print 3D model of Origami Hinges and Parametric chair.
* 3D scan Electric guitar with 123D Catch and print it.
Create and print wedge and shaft model
Software Downloads: SketchUp Up! V2.17 MeshLab
Download Sketchup file here
3D printing has made it's mark in reshaping product development and manufacturing.
It has transformed from individuals to small and medium companies into makers and
inventors. Some of the critical advantages of 3D printing over manufacturing includes:
- Rapid Production
- Waste Minimization
- Accessibility
1) SketchUp Tutorial
Map of working process:
Create wedge model in SketchUp> Export as STL (need to install plugin first)> Print models> Examine tolerance and repeat process if neccessary.
Here are some of the critical steps:
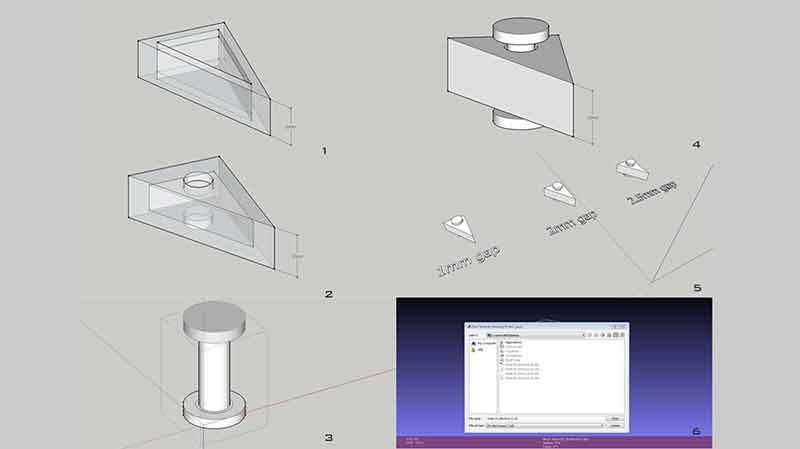
a) Create SketchUp model using push method to boolean shaft, save as dwg. format and open in MeshLab to convert to stl. format. Model was not in original scale after importing to MeshLab. Subsequently downloaded and installed SketchUp STL exporter plugin and all worked out successfully. 3 models were created with 1mm, 2mm and 2.5mm gap tolerance between the shaft and the wedge.
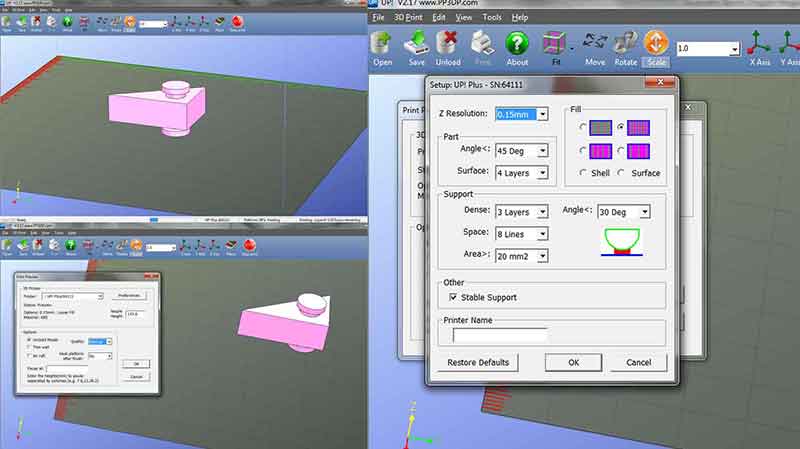
b) Below are settings of the UP printer. The Support Area has been set to the maximum so that no supports will be generated within the shaft.
c) 2 models were printed using the UP Printer and only the 2mm model was able to be printed with the wedge freely rotated. The result was pretty satisfactory.
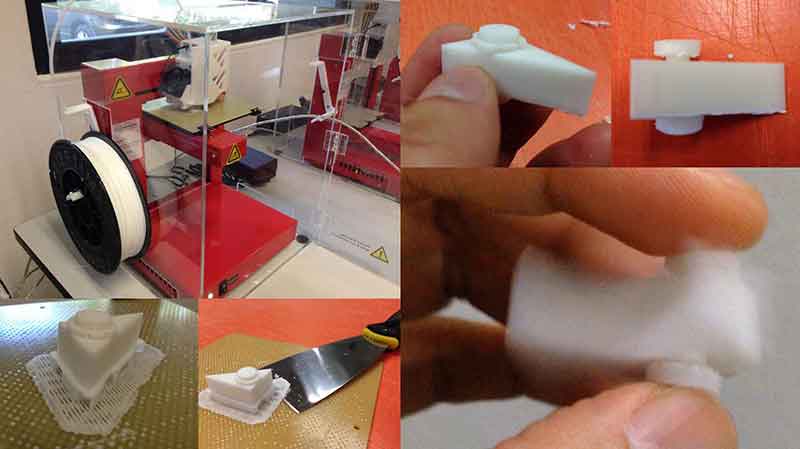
d) In comparision with the wedge model done using Ultimaker 2, the Ultimaker model seemed to be able to handle tolerance way better than the UP Printer. The wedge model with 1mm clearance all round the shaft was able to be pushed through easily for the model printed by Ultimaker 2 whereas the UP printer can only make do with 2mm tolerence.
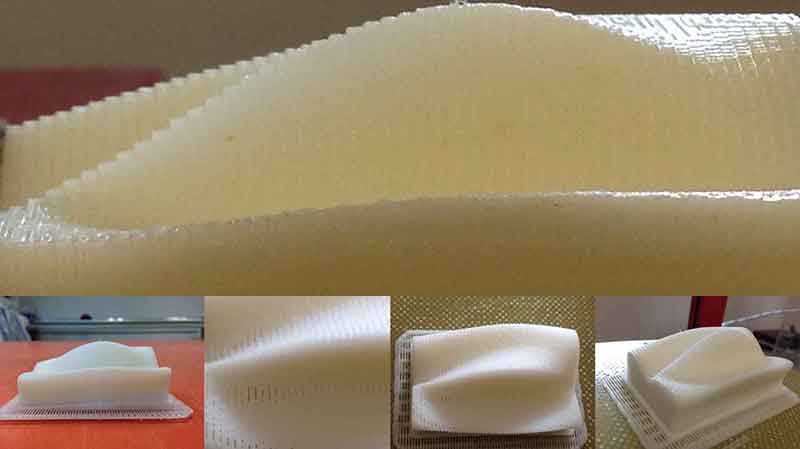
2) Overhang test using UP Printer
a) Download overhang model from Thingiverse.
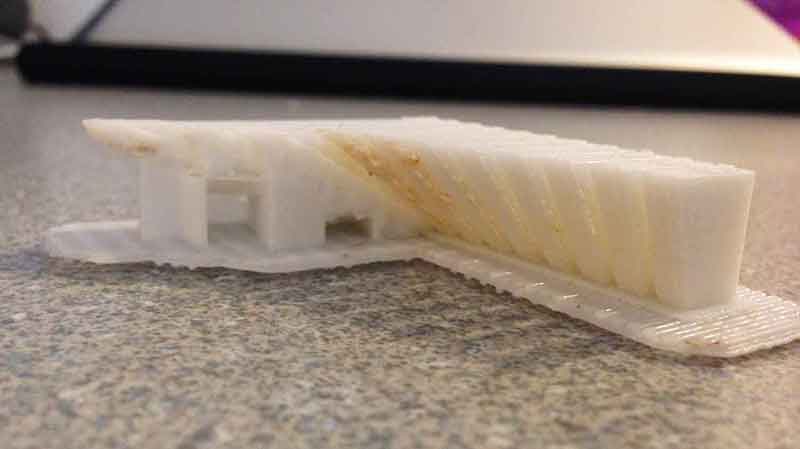
b) Next, print the model for examination of the overhang quality. As observed from the print-out by the UP Printer (see below image), it indicated that at 20 to 55 degrees the model does not require any support. The burn or stain marks shown in the model might have been caused by either dirty nosel head or that the acrylic casing for the printer might have cause overheating. To further improve this, printer support should be totally removed so that the overhang experiment can be observed by the distortion of cantilever.
a) Download overhang model from Thingiverse.
b) Next, print the model for examination of the overhang quality. As observed from the print-out by the UP Printer (see below image), it indicated that at 20 to 55 degrees the model does not require any support. The burn or stain marks shown in the model might have been caused by either dirty nosel head or that the acrylic casing for the printer might have cause overheating. To further improve this, printer support should be totally removed so that the overhang experiment can be observed by the distortion of cantilever.
Print 3D model of Origami Hinges and Parametric chair
Software Downloads: Up! V2.17 Cura for Ultimaker Rhino Grasshopper
Download Rhino Grasshopper files here:
HexOrigami_Hinges.3dm
Parametric Bench_Prep2.3dm
a) Creating and printing Origami Hinges
Inspired by James Novak with his Living Hinge, here are some critical steps towards creating hinges for origami:
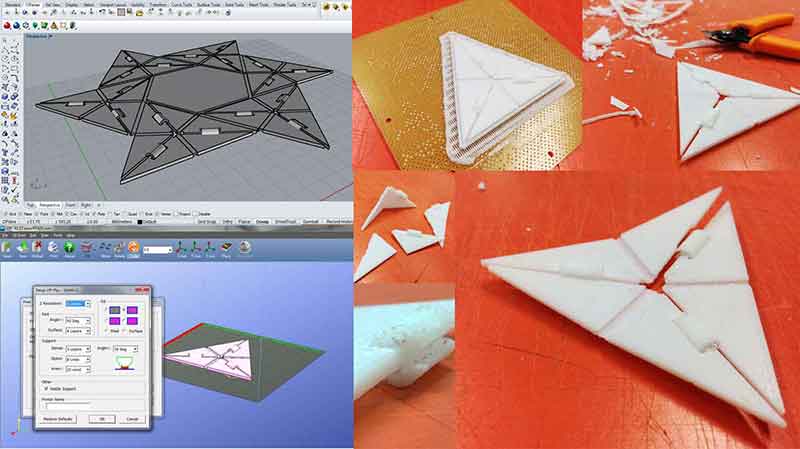
1) Extrude origami pattern into flat solids of 1mm thick using Rhino. Model out every triangulation. Cylindrical connectors were placed at 3 sides of triangle joints and a thin 1mm layer placed at the other 3 joints.
2) Export to stl. format and configure settings in UP Printer software. Print support was set to maximum so that the base may be included in the print out. If support was set to zero, the planes will not be supported.
Print results:
1) Very disappointing as the joints did not manoeuvre at all.
2) Supports were very difficult to remove although it was subsequently removed.
3) Thin joints were able to bend (3-4 times) but breaks after a while.
3) Puzzled by the result because the cylindrical connectors were filled with support eventhough the printer was suppose to only provide support when surface exceeds 20 square millimeters.
Suggestions:
1) Re-orientate model to print vertically. Cylindrical connectors should perhaps orientate vertically, like the wedge model exercise as seen above.
2) Try other materials.
3) Try other connectors.
4) Add more hinges to avoid breakage.
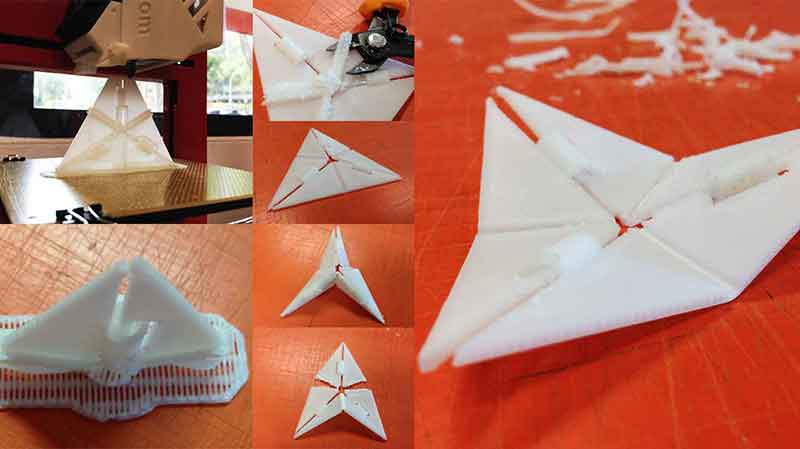
Second print worked out to be a lot better. This was done by printing vertically. Bending joints still broke after a few bends. This can be resolved by adding hinges.
b) Creating and printing Parametric bench
Inspired by several parametric furniture designs, this part of the exercise involved in downloading a grasshopper algorithum from Mkr, a grasshopper forum user.Here are some critical steps towards creating a parametric bench using RHGH and the printing development:
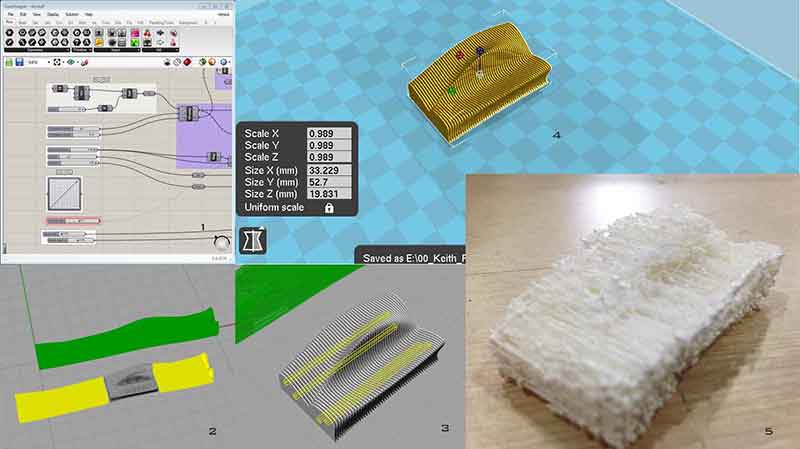
1) Open up the grasshopper file in Rhino. Adjust the settings to taste and bake the grasshopper component at the end of the algorithum chain.
2) Shorten bench by isolating parts needed.
3) Add in connectors.
4) Export as stl. format and bring it into Cura, Ultimaker 2 operation software.
5) As the model consists of vertical elements and minimal horizontal ones, there's minimal settings to be adjusted.
6) Save file as GCode into an SD card and insert it into Ultimaker 2 printer to process printing.
Print results:
1) SUCCESSFULLY printed a parametric pastry!!!! :(
2) Print error due to sizings of each members and components.
3) Error could have been resulted in 3D model error.
Suggestions:
1) Scale down members of model further so that each elements may be at least 1mm thick.
2) Try printing as 1 piece instead and leave the actual printing to CNC machines.
Result of second print:
Voila! This was done by pulling the members closer together and print (UP Printer) them as a solid.
3D scan Electric guitar with 123D Catch and print it
Software Downloads: Up! V2.17 123D Catch Rhino MeshMixer
Download 123D Catch files and images here:
mesh.mtl
mesh.obj
PRS.3dp
tex_0.jpg
tex_1.jpg
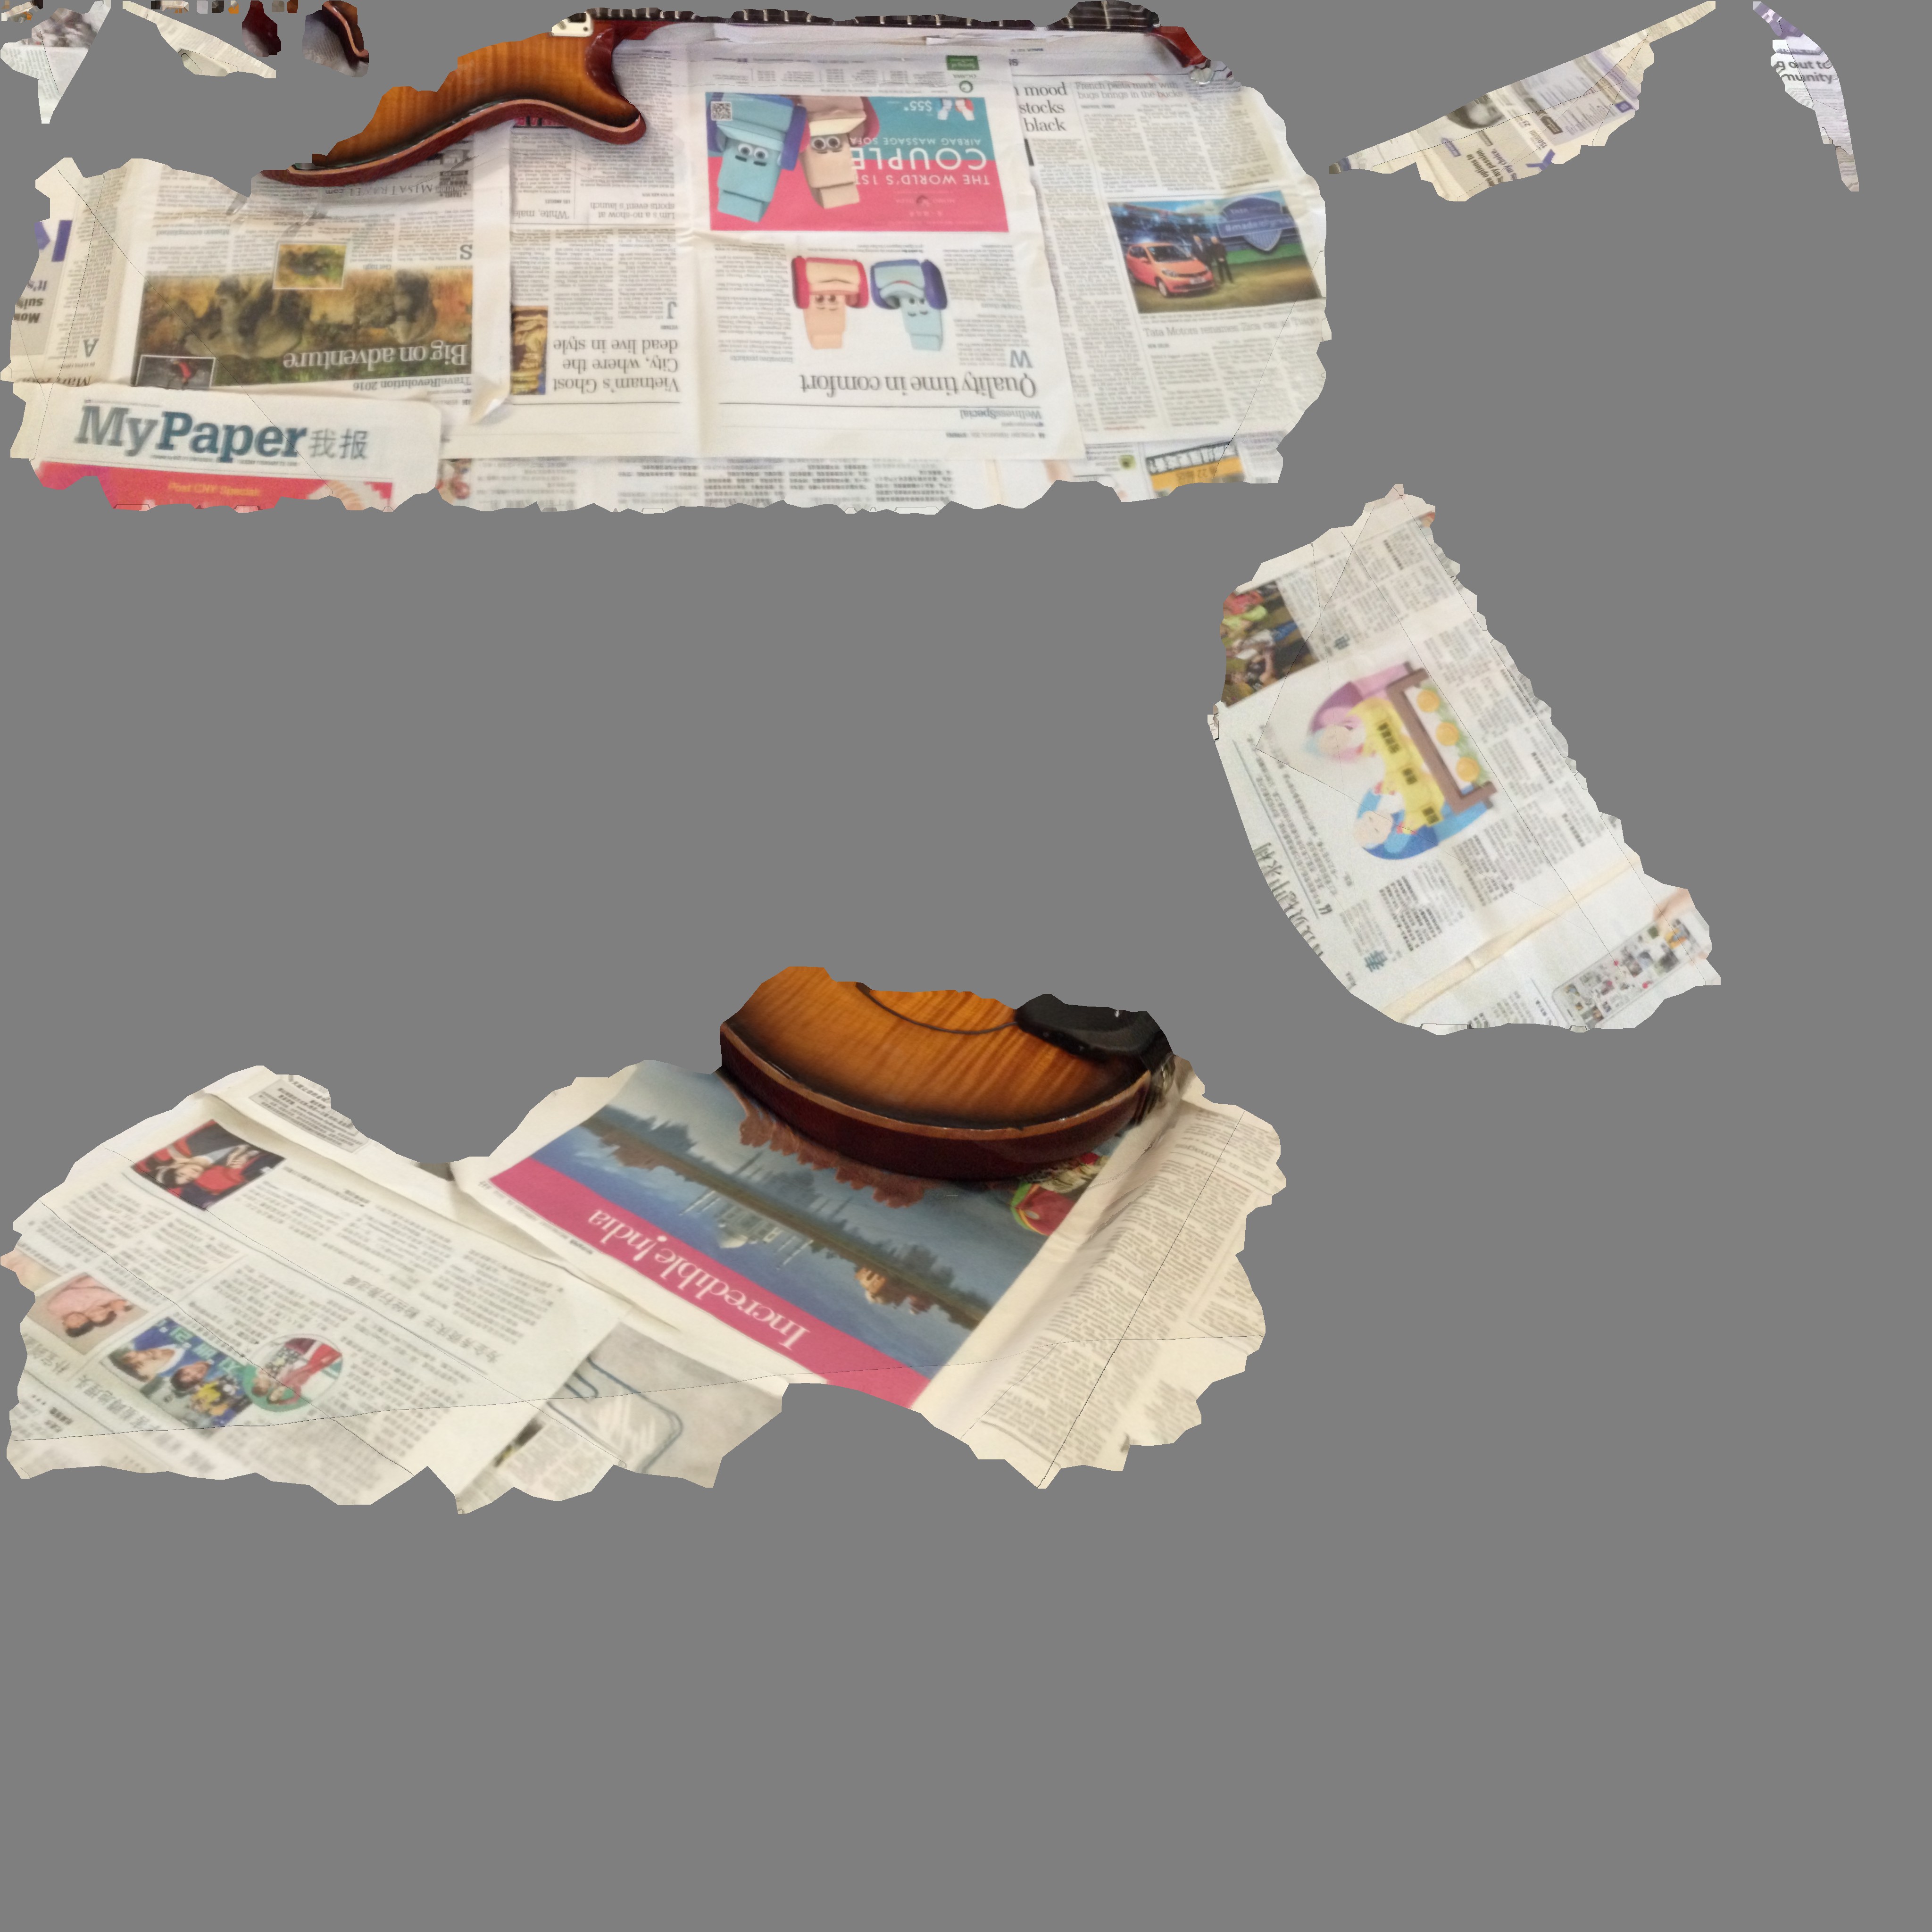
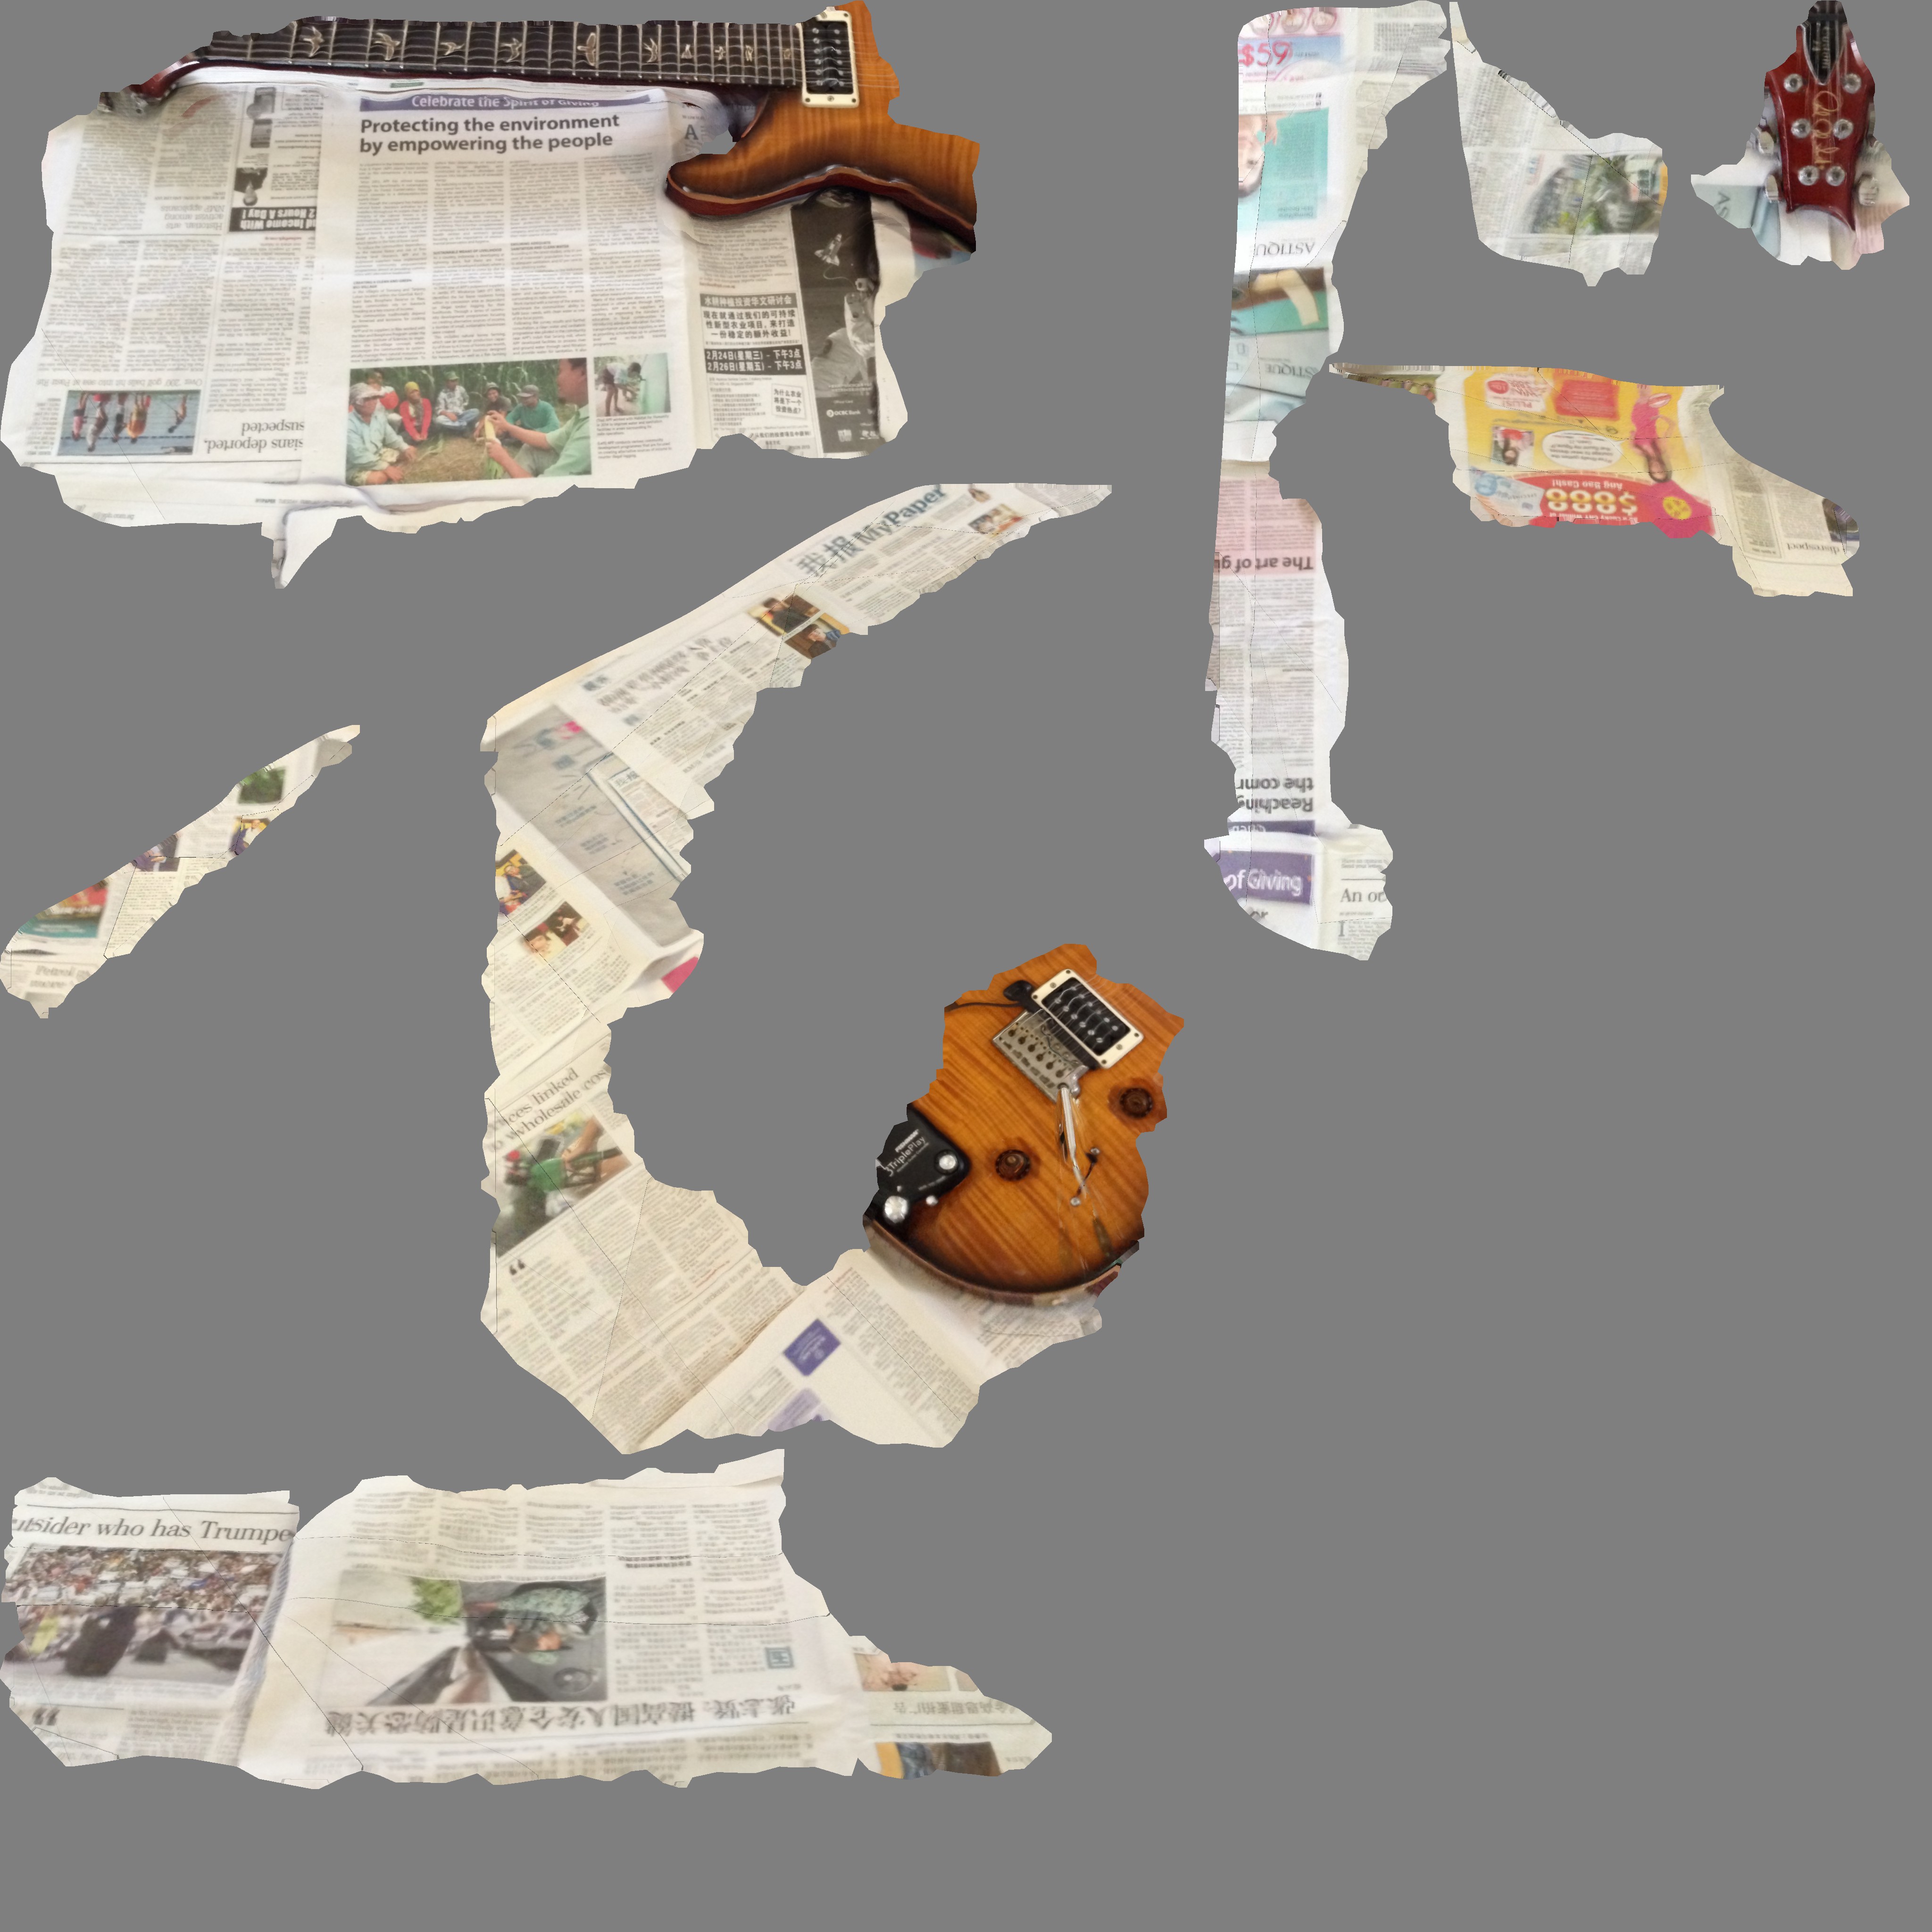
a) 3D Scanning a Paul Reed Smith Custom 24 Electric Guitar
3D scanning using a smart phone can be quite challenging, nevertheless, here are the steps and experiences:
1) Either download 123D Catch app from app store or simply take several photos and import them into the Desktop version of the program.
2) Take photos around the chosen subject and ensure the following rules are carried out:
* Ample lighting, indoor as well as outdoor.
* Avoid glare from light entering through windows or openings
* Place newspaper or patterned paper underneath subject
* Ensure all angles of the subject are captured
* Take at least 20 to 30 images
***For more tips and tutorials, go to Autodesk 123D
3) Once photos were taken, simply click "Submit" if you are using smart phone app.
4) As for Desktop version, simply click "create a new capture" and import the images to the program.
5) Next, select "Create Project".
6) Once project has been created, use the Lassoso Selection tool to slowly remove unwanted parts.
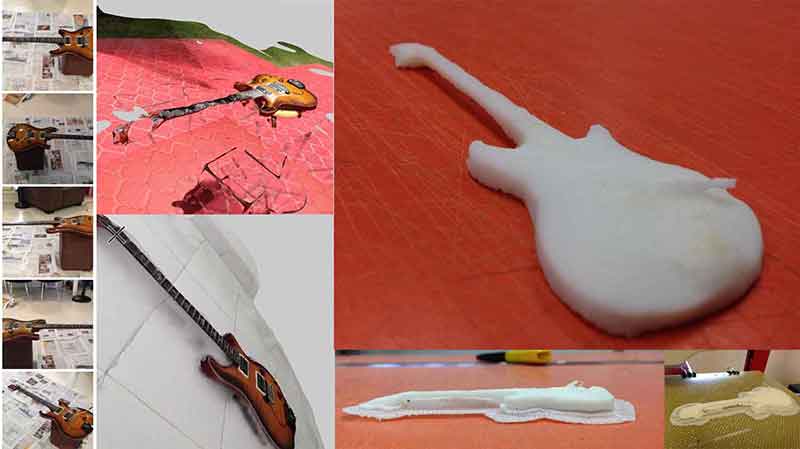
7) You can access Meshmixer (download and install first) by going to File>3D Printer. This will call up Meshmixer automatically where the model can be enhanced further (refer to image 3 below).
8) Alternatively, you can export the capture within 123D Catch as obj. file and open it up in Rhino where you can have a complete palette of mesh/ surface editing tools available (refer to image 4 below).
Meshmixer tutorials can be found here.

Scanning and print results:
1) Scanning using smart phone was interesting but the results can be further improved.
2) Editing the 3D model can be quite a hassel especially when the capture wasn't good enough.
3) Unable to maximize usage of Meshmixer for the following reasons:
* Unable to fully trim edges even after increasing the resolution. Edges remain jagged.
* Mesh Mixer crashes very often and slows down computer.
Suggestions:
1) Mount camera on stand to enhance clarity of pictures.
2) Consider alternate softwares to edit complicated models
3) Controlled lighting is crucial
REFLECTIONS
This week has been quite an unexpected twist as 3D scanning and printing wasn't thought to be as complex as it turned out to be compared to for instance learning electronics. One of the highlights of the week was being able to explore the various capabilities of a 3D printer and seeing the printables as not just a static by-product but can be a flexible one too! The short coming for 3D printers or the usage of it is really the question of accuracy, choice of materials and application.
As for 3D scanning, it is really amazing to witness how captured images by smart phones can be transformed into 3D models and can be further altered and enhanced for specific uses. The current disadvantages of 3D scanning, as a personal device, is almost similar to that of 3D printing but it is definitely something that will continue to advance and improved in time to come.

Related Projects