I divided the project in three parts:
Assignment:
* complete your final project, tracking your progress:
what tasks have been completed, and what tasks remain?
what has worked? what hasn't?
what questions need to be resolved?
what will happen when?
what have you learned?
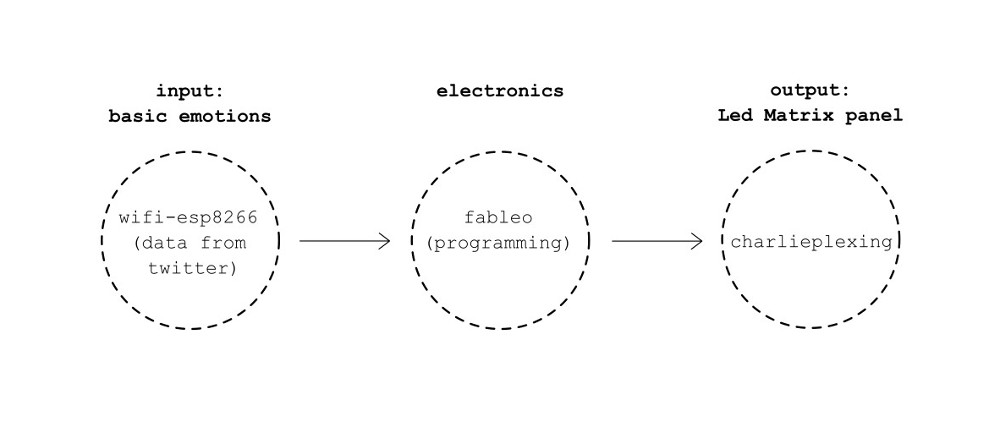
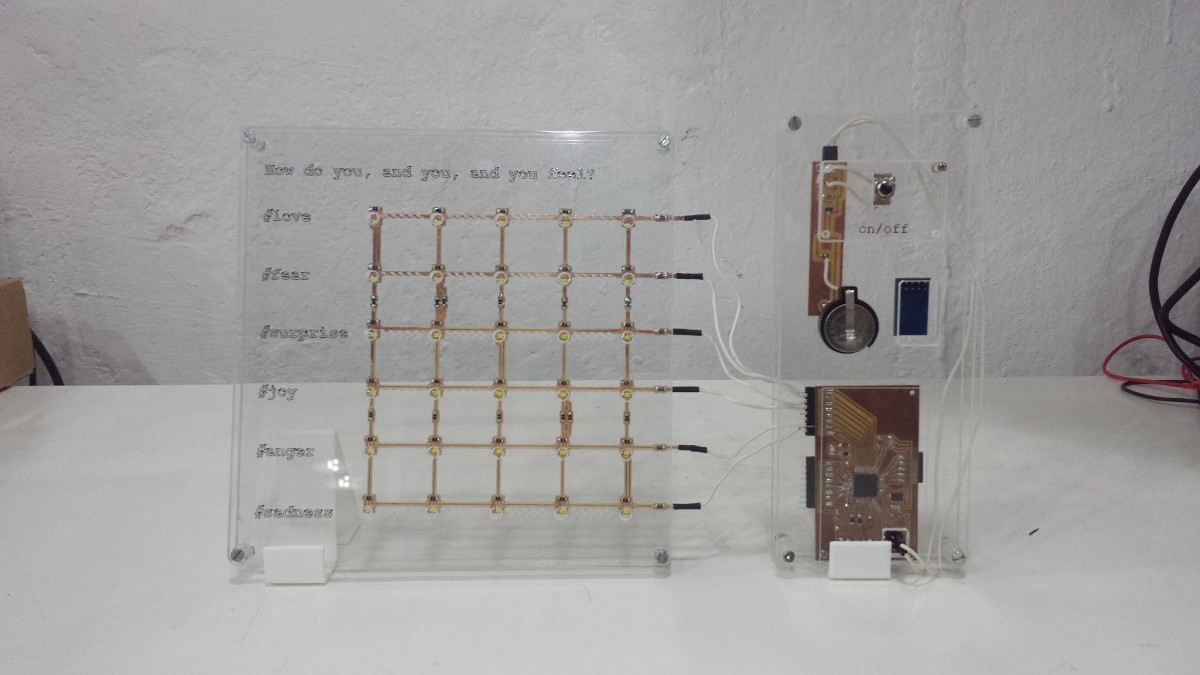
My final project is a device that tries to connect people with the environment that surrounds them, understanding it as square meters, a city, a country or the world through showing the emotions (love, fear, joy, surprise, anger and sadness) of it. The idea is to make a person feel as part of something bigger for an instant, where boundaries become a matter of scale.
I divided the project in three parts:
Tasks:
computer-aided design /
computer-controlled cutting /
electronics design /
electronics production /
output devices /
embedded programming /
3Dprinting
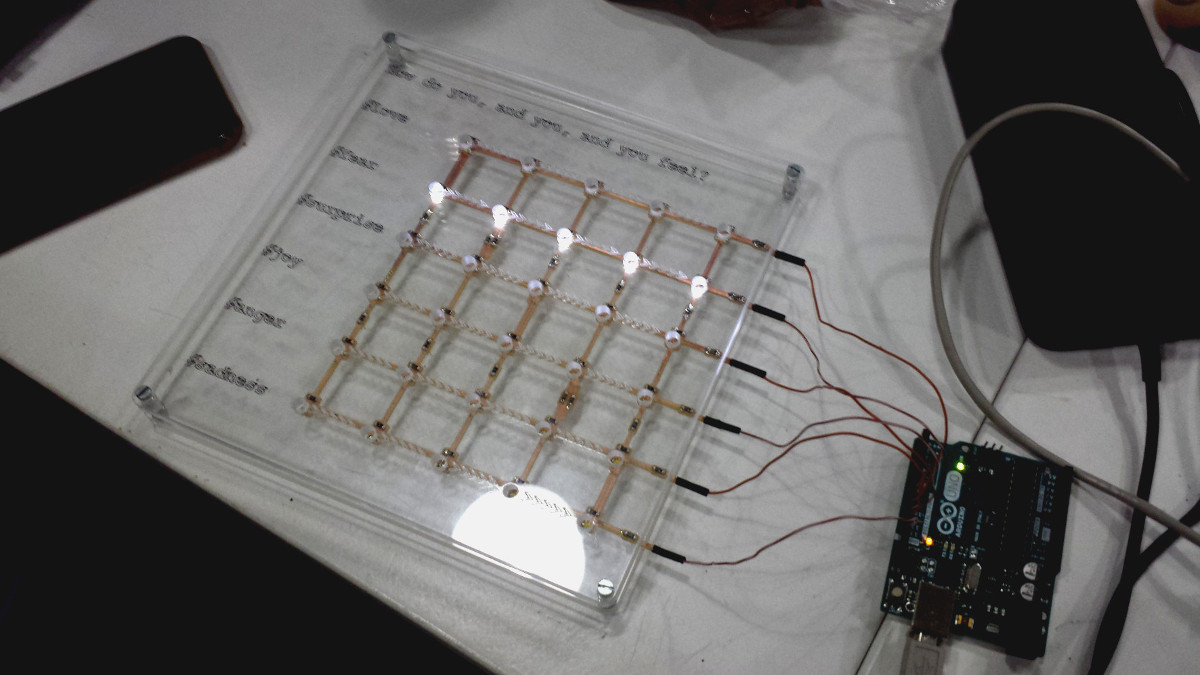
At the begining I wanted to do a charlieplexing led panel, I started by doing modules of 3 pins with 6 leds each, for knowing how many leds you have to use for chalieplexing you have to do a simple equation:
N(N-1)=leds where "N" is the number of pins.
Each module will be an output representing an emotion:
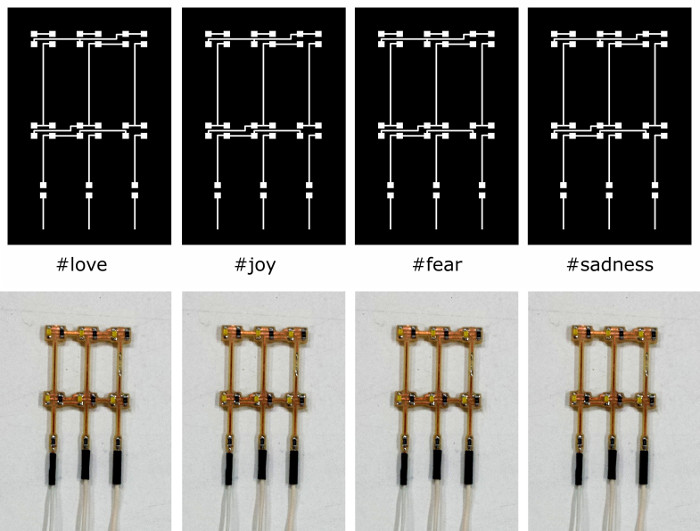
Then I realized that I wanted to use more leds to show more emotions therefore I designed one panel of 30 leds with 6 pins, the good thing about charlieplexing method is that the efficiency increases when you add more pins.
Electronics design (eagle):
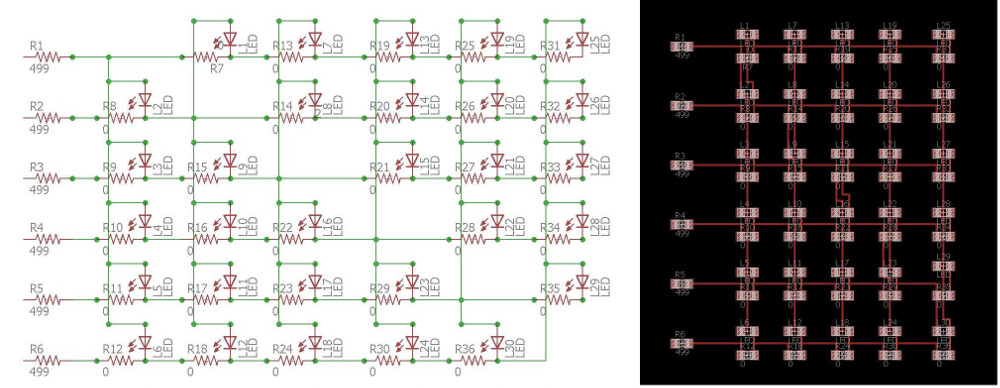
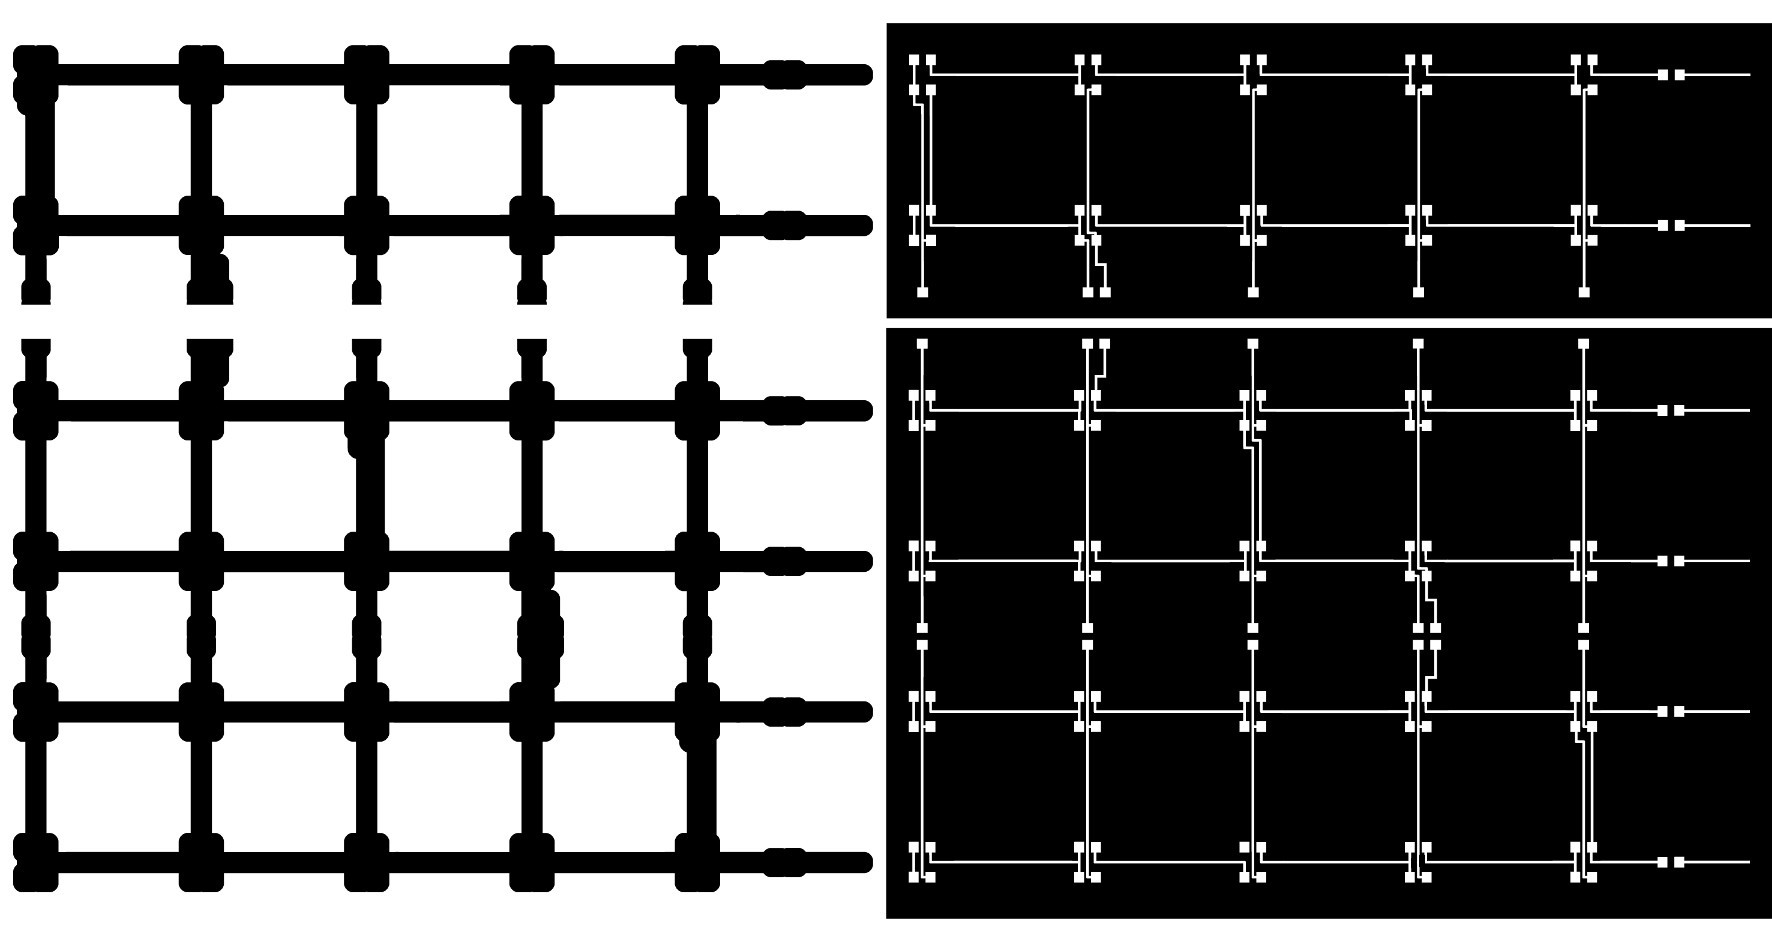
I like the aesthetics of electronics therefore wanted to mill a board and use pcb as the material for doing the led panel as one of my classmates (Kat) did for the output assignment. I wanted to make it bigger, and if you do the design on eagle there is a limit of size therefore I exported the board and edited it in inskape.
Computer-aided design (inskape):
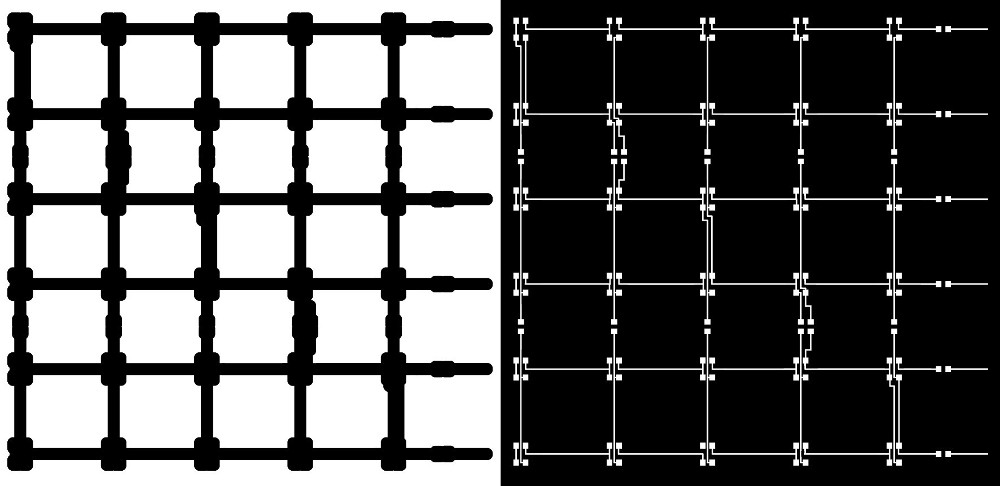
The bigest size of pcb that we had in the lab was 152x102 therefore I added more jumpers in order to make it bigger and use two pcb boards.
Traces / outline:
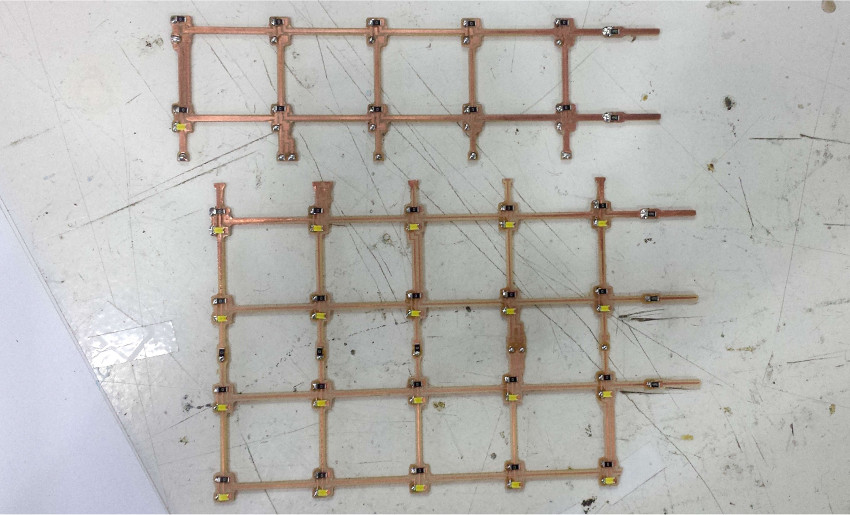
Electronics production (Roland SRM-20 mill):
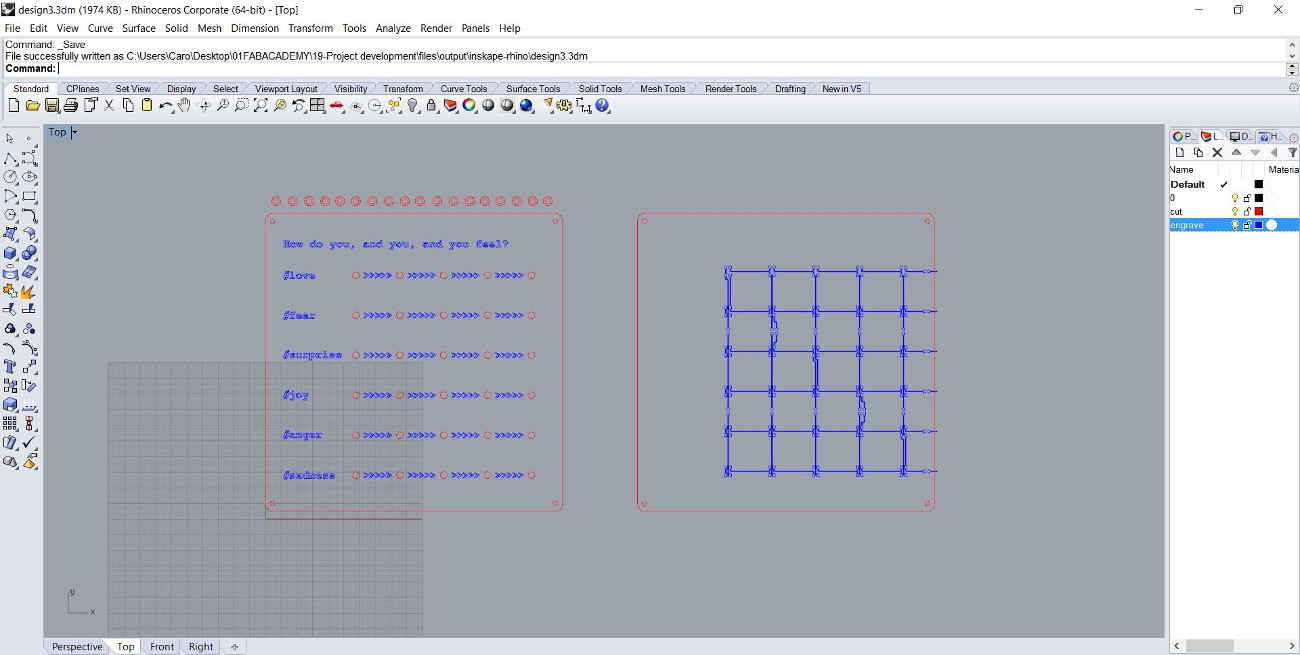
Computer-aided design (rhino, inskape, gimp):
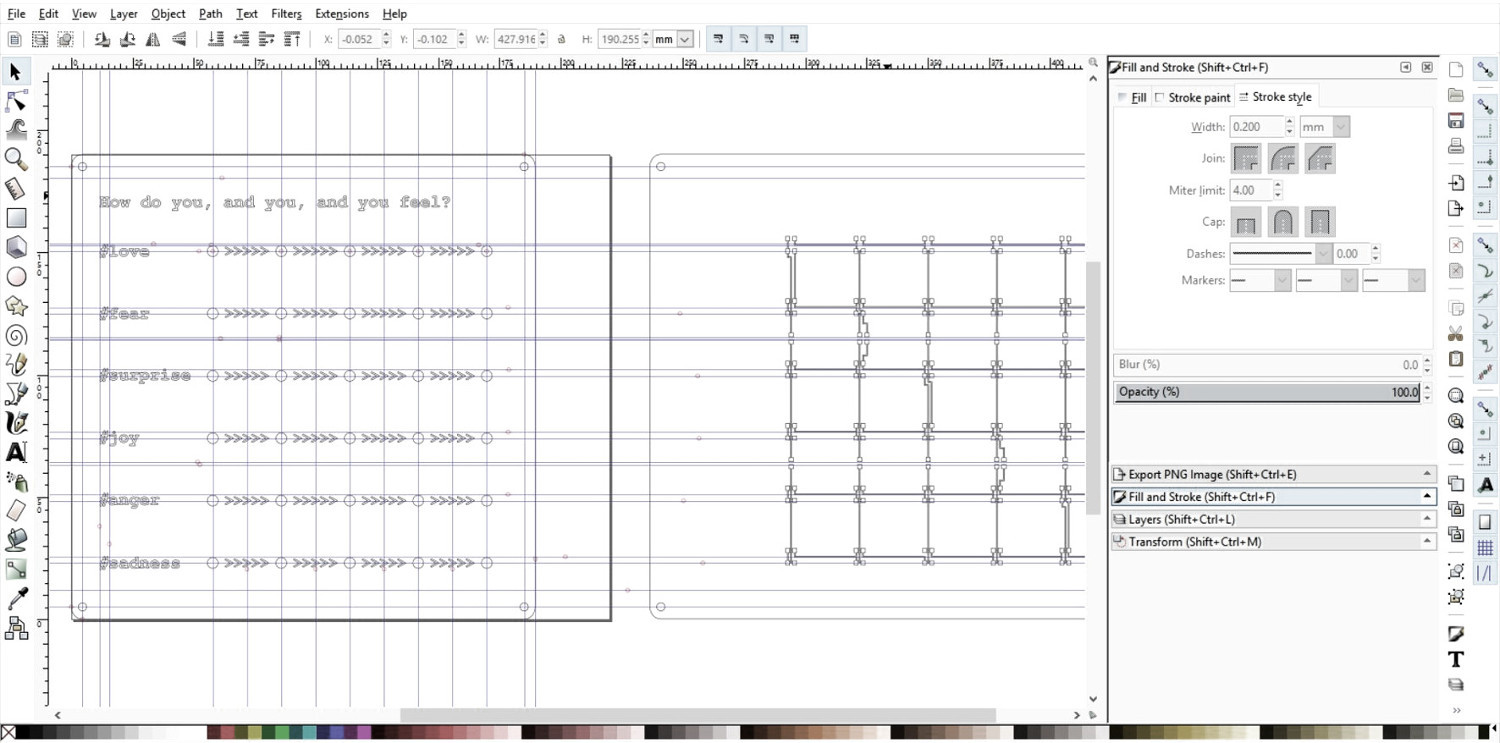
Engrave_blue / cut_red:
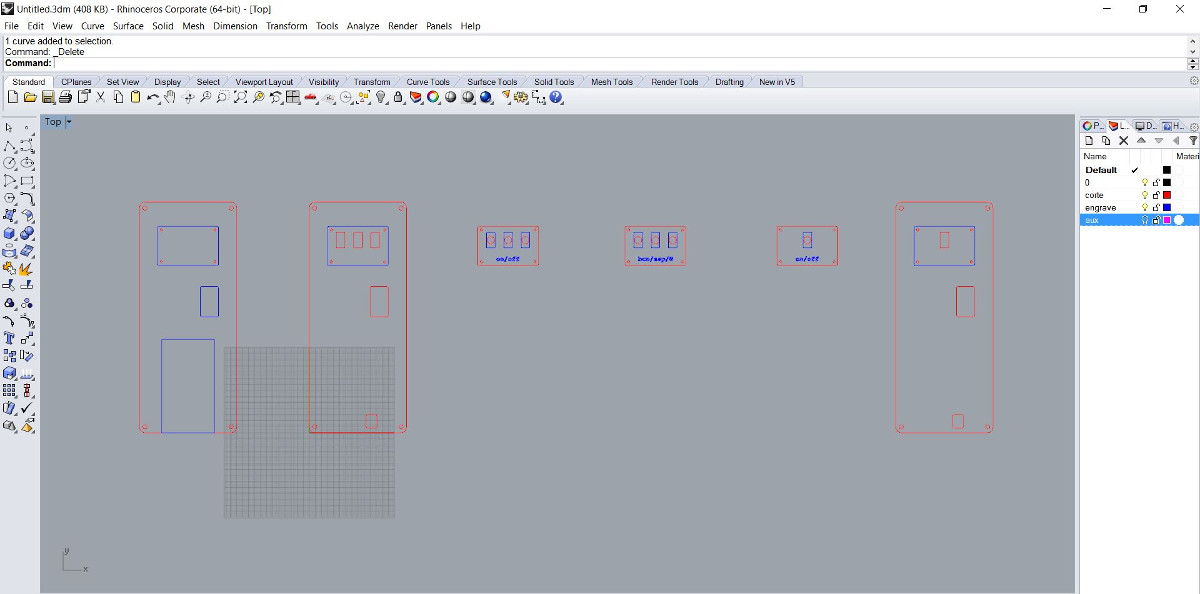
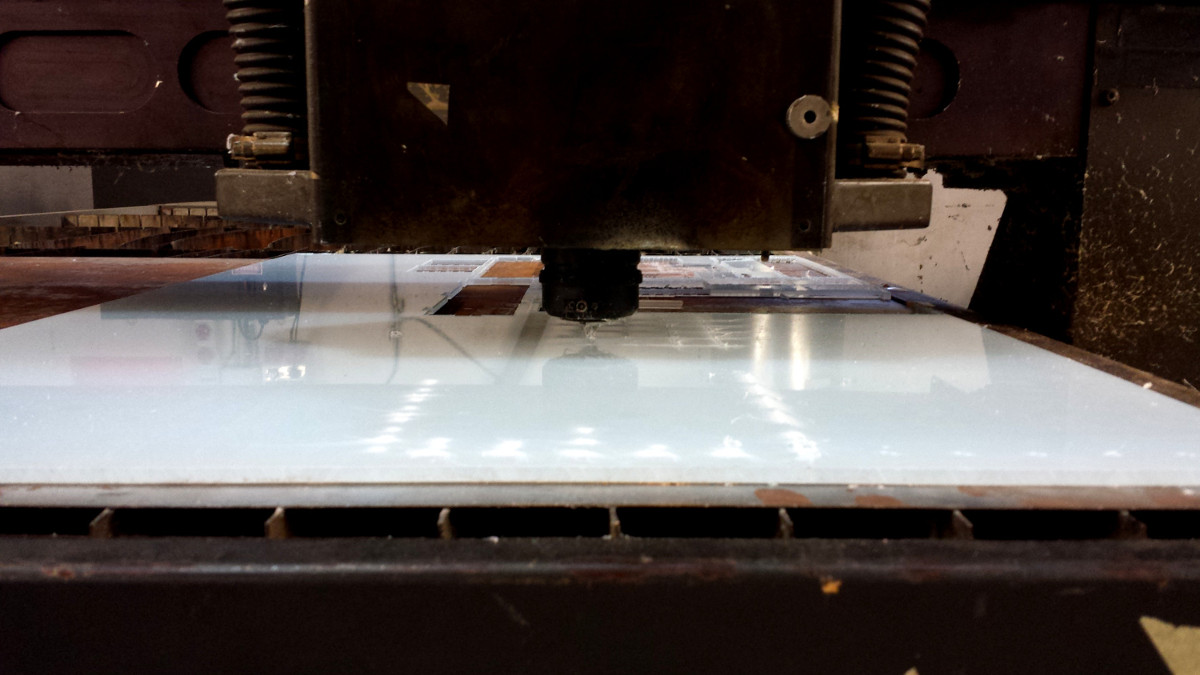
Computer-controlled cutting (Laser cutter Multicam 2000) on 5mm transparent acrylic, engrave (feedrate:60 / power:70), cut (feedrate:10 / power:200) :
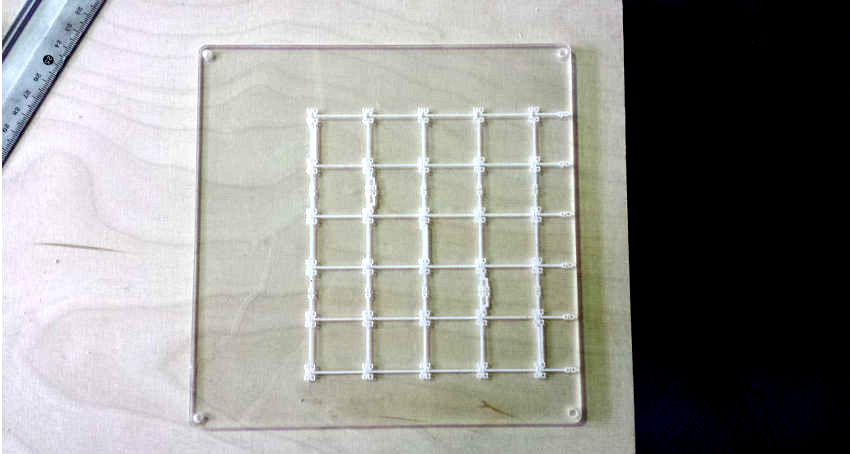
Engrave / cut:
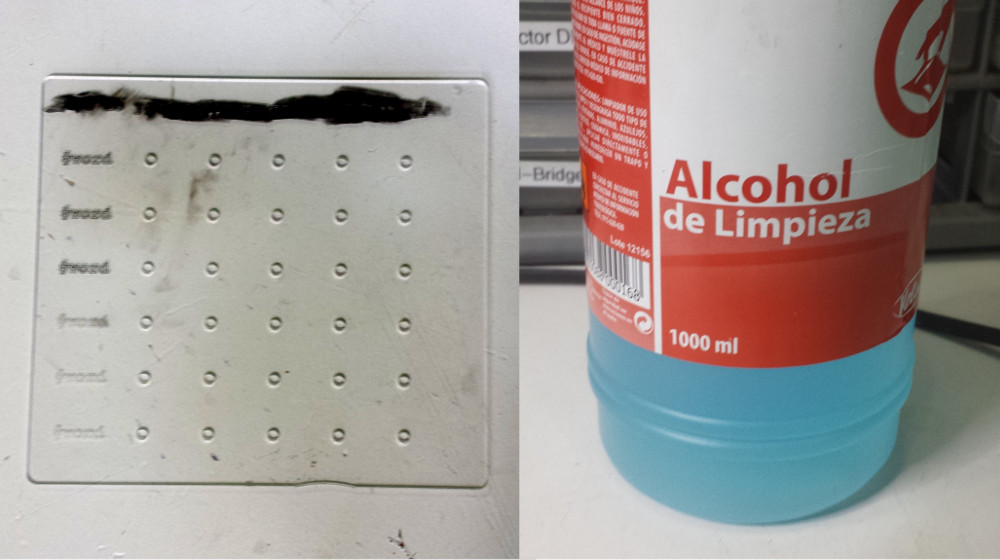
The engrave was too weak therefore I painted the letters with a black marker and then I cleaned it with alcohol:
For programming the charlieplexing I used a library for arduino, you can download it from
here. In order to use it you have to identify every led. For example Led1 is (1,0), this means that for turning on the led1 you have to go from the pin 1(output) to pin 0(input), but for turning on the led2 (0,1) you go from pin 0(output) to pin 1(input), the library changes the pins between inputs and outputs.
In my case I used pins 2,3,4,5,6,7, from the Arduino uno, so pin two would be zero, and pin three would be one, etc.
Programming:
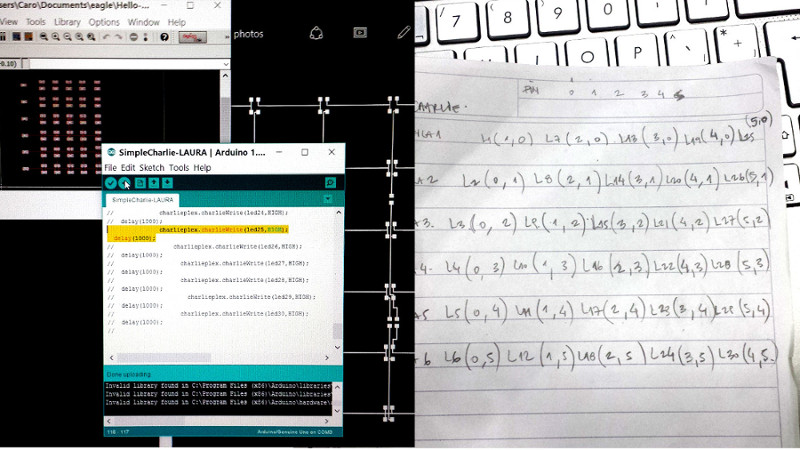
First test with Arduino uno:
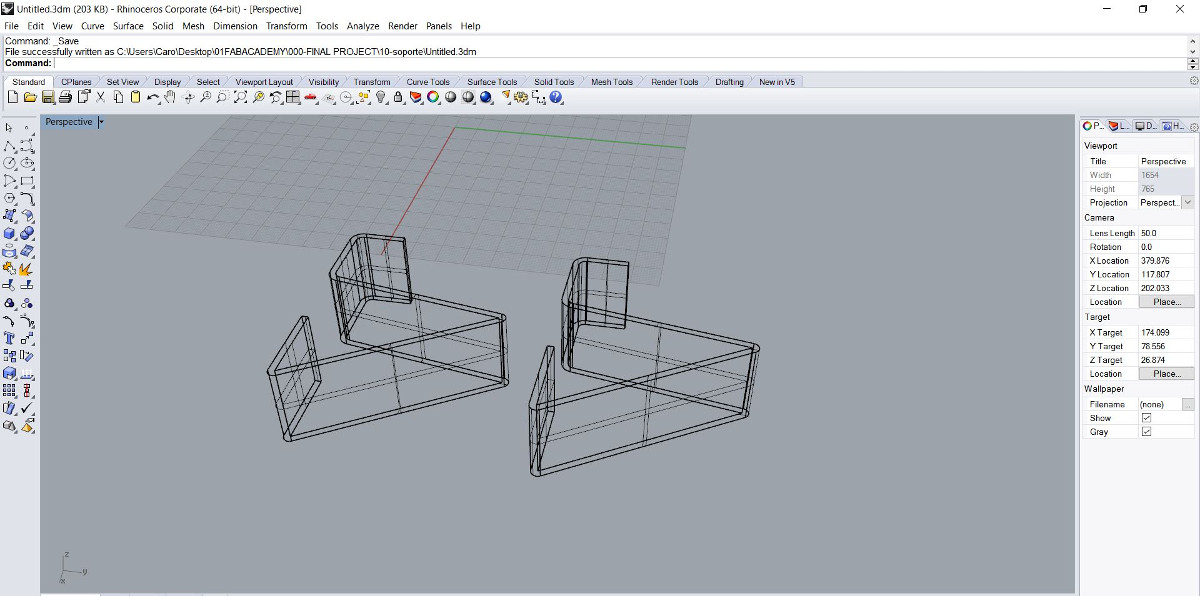
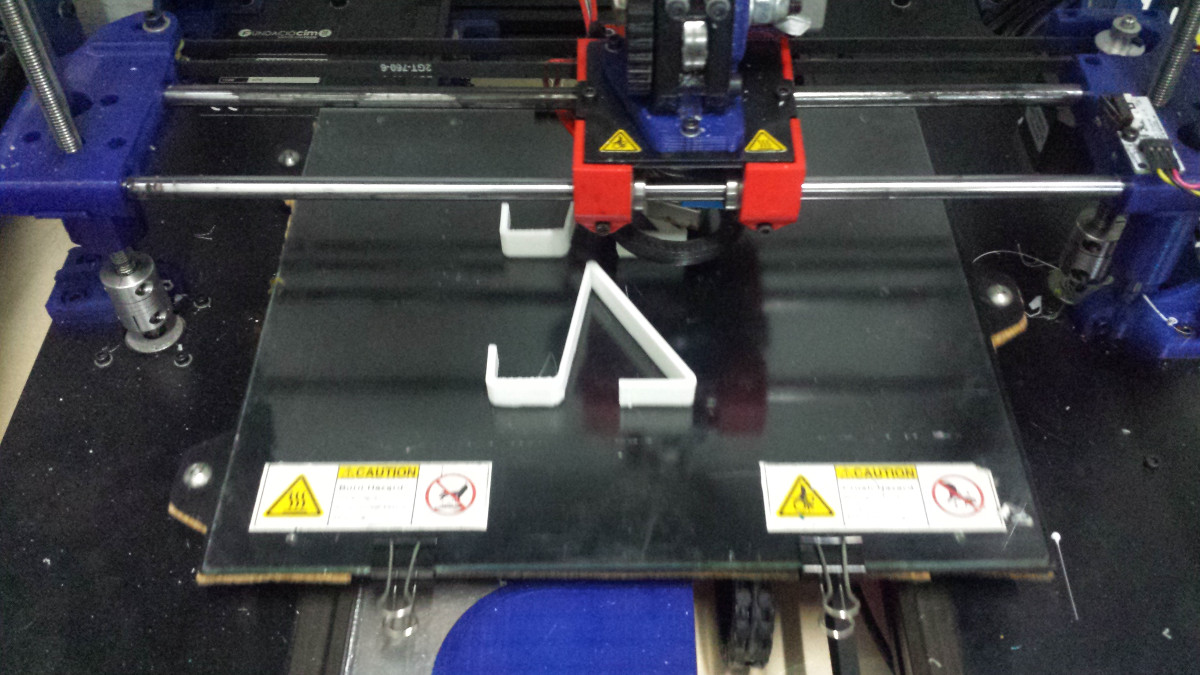
I made a 3d model for the support of the device, for making the 3d model I used Rhino and for the printing I used the
reprap machine.
3d model Rhino:
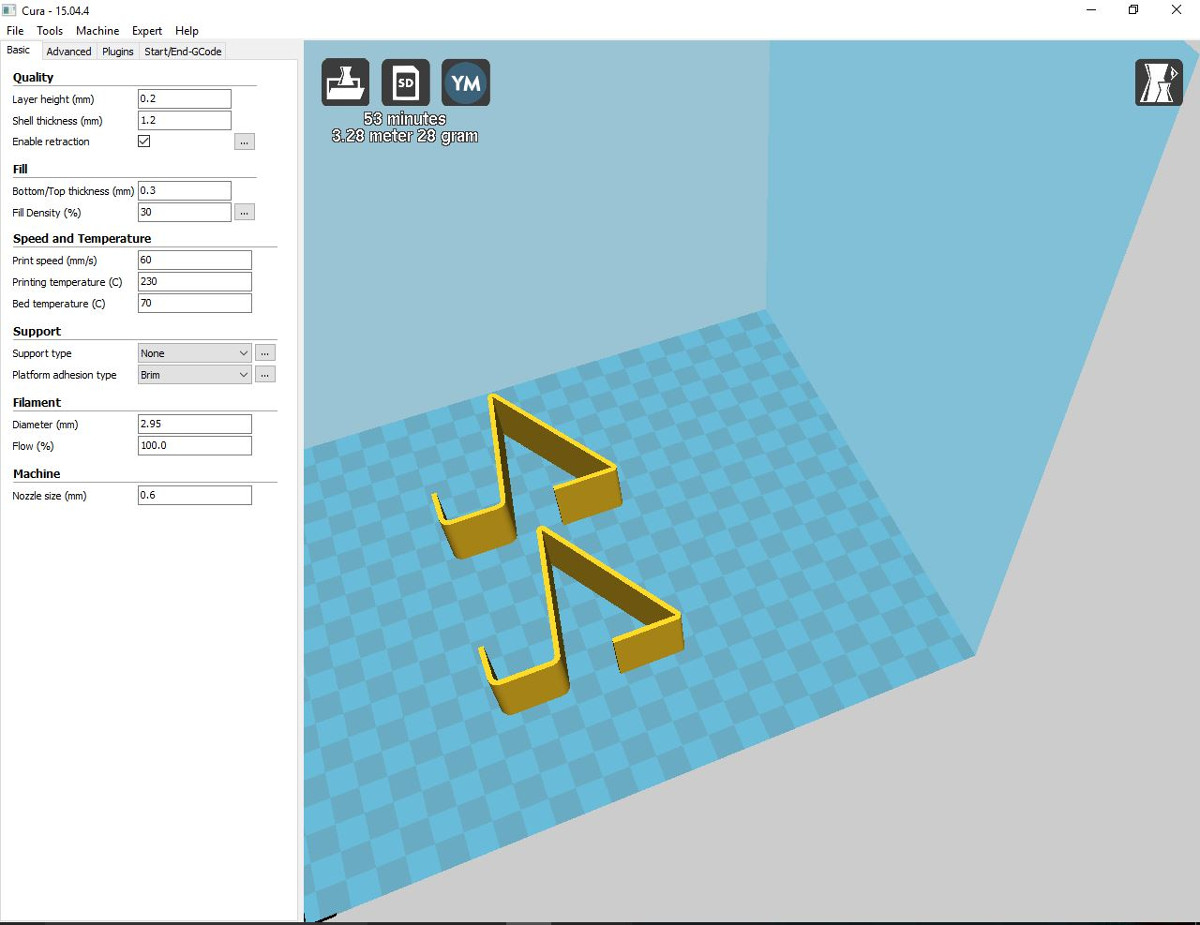
Settings (Cura):

Tasks:
Electronics design /
Electronics production /
Embedded programming
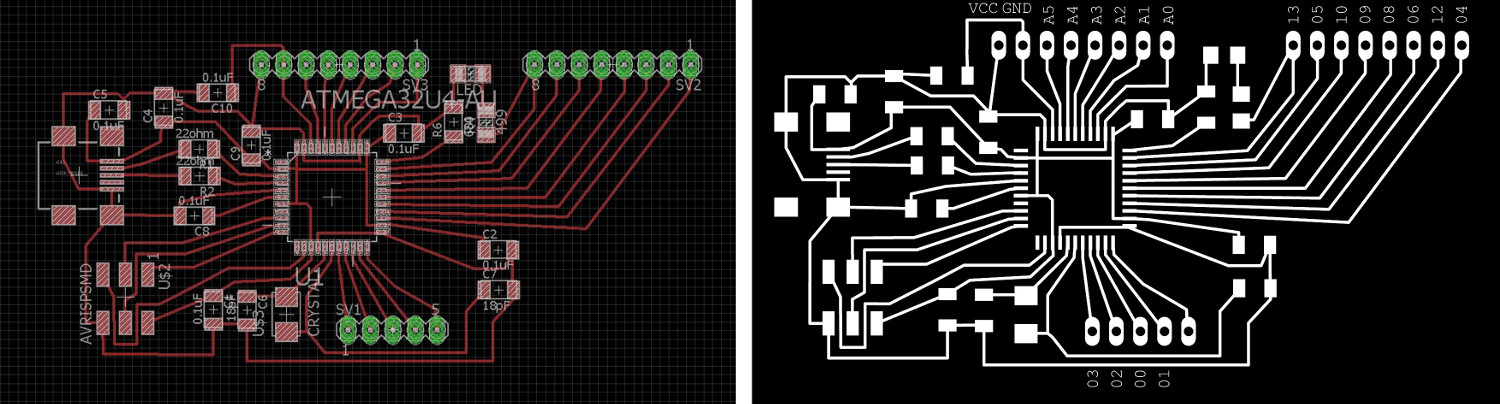
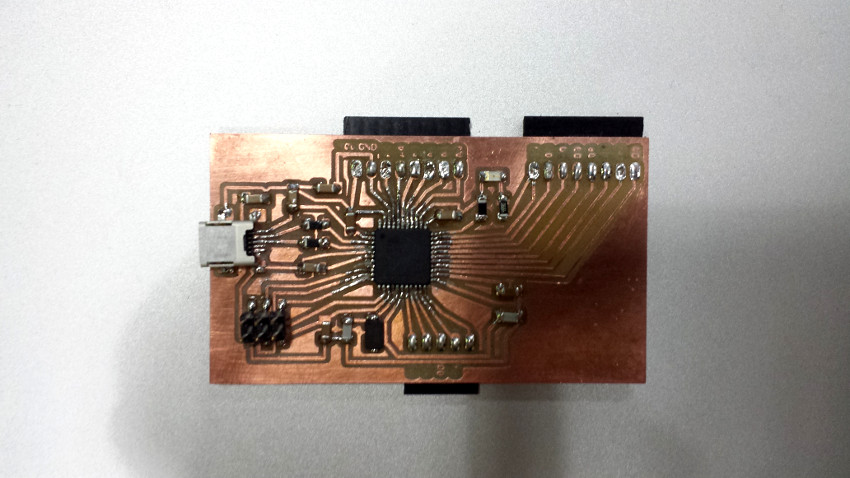
For the electronics I used the ATmega32U4 wich is the same microchip used on Arduino Leonardo. For doing the electronics design I used the Eagle Schematics from
Fableo and the version of one of my classmates
"Luizino" (No reset button, just one led on pin 13, an ICSP for its first programming, some Pins but not all available), and i modified a few things that I needed for my project.
The ATmega32U4 has FTDI integrated, so you can, after burning bootloader, program your board using an USB Mini B.
Electronics design (eagle):
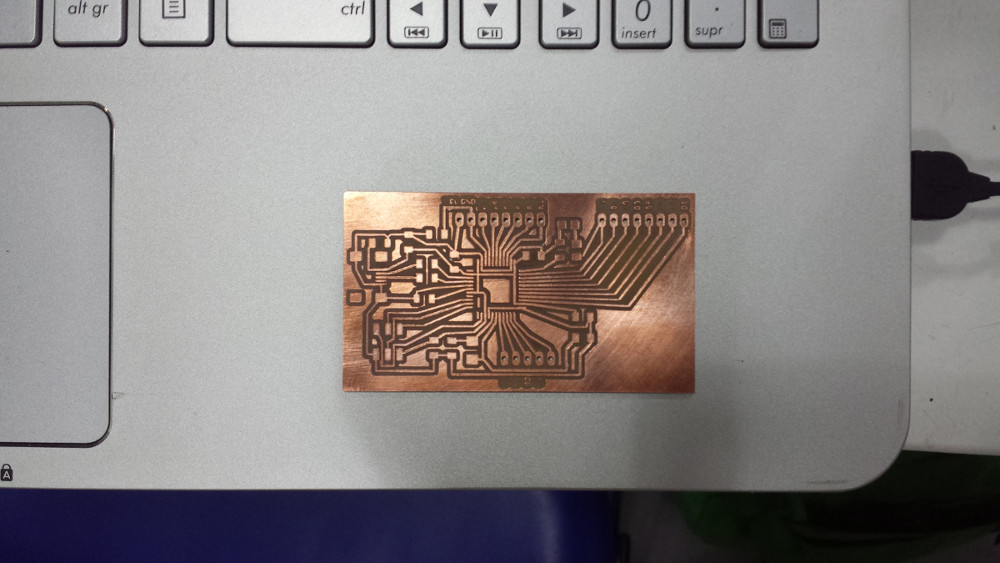
Electronics production (Roland SRM-20 mill):
List of components:
| Part | Value | Device | Package | Description | ||||||
| C1 | 0.1uF | CAP-US1206FAB | C1206FAB | |||||||
| C2 | 0.1uF | CAP-US1206FAB | C1206FAB | |||||||
| C3 | 0.1uF | CAP-US1206FAB | C1206FAB | |||||||
| C4 | 0.1uF | CAP-US1206FAB | C1206FAB | |||||||
| C5 | 0.1uF | CAP-US1206FAB | C1206FAB | |||||||
| C6 | 18pF | CAP-US1206FAB | C1206FAB | |||||||
| C7 | 18pF | CAP-US1206FAB | C1206FAB | |||||||
| C8 | 0.1uF | CAP-US1206FAB | C1206FAB | |||||||
| C9 | 0.1uF | CAP-US1206FAB | C1206FAB | |||||||
| C10 | 0.1uF | CAP-US1206FAB | C1206FAB | |||||||
| LED | LED1206 | 1206 | ||||||||
| R1 | 22ohm | RES-US1206FAB | R1206FAB | Resistor (US Symbol) | ||||||
| R2 | 22ohm | RES-US1206FAB | R1206FAB | Resistor (US Symbol) | ||||||
| R4 | 499 | RESISTOR1206 | 1206 | |||||||
| R6 | 680 | RES-US1206FAB | R1206FAB | Resistor (US Symbol) | ||||||
| SV1 | MA05-1 | MA05-1 | PIN HEADER | |||||||
| SV2 | MA08-1 | MA08-1 | PIN HEADER | |||||||
| SV3 | MA08-1 | MA08-1 | PIN HEADER | |||||||
| U$1 | USB_MINIB | USB_MINIB | USB_MINIB | |||||||
| U$2 | AVRISPSMD | AVRISPSMD | 2X03SMD | |||||||
| U$3 | CRYSTAL | CRYSTAL | 2-SMD-5X3MM | |||||||
| U1 | ATMEGA32U4-AU | ATMEGA32U4-AU | QFP80P1200X1200X120-44N | 8-bit Microcontroller with ISP Flash and USB Controller |
Soldering:
For program it I used my fabisp from week 4, and I burned the bootloader in arduino:
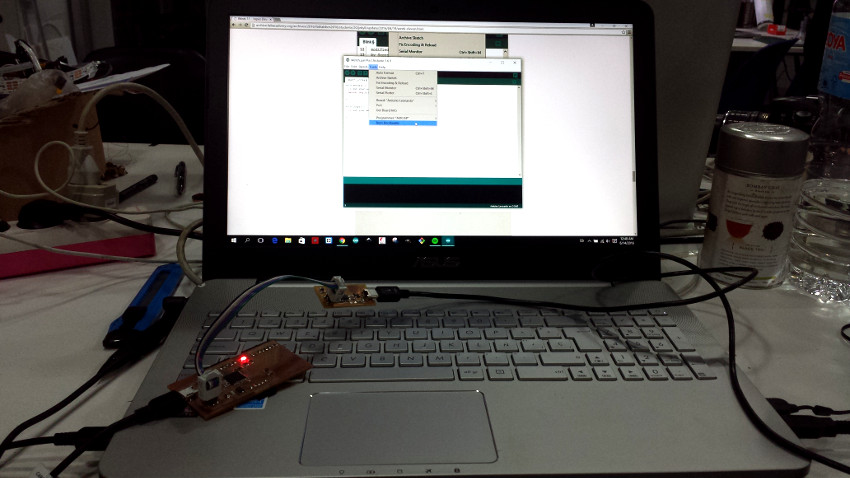
Fableo1
First test with the fableo and the output:
Fableo2
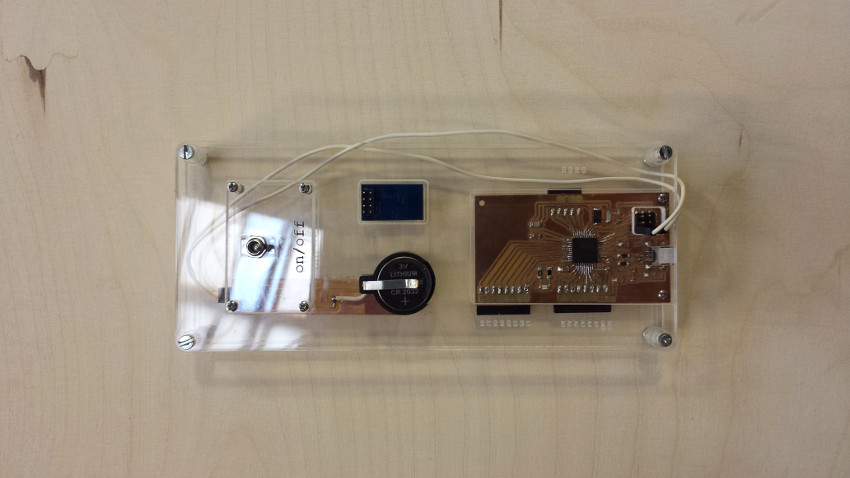
I made a voltage regulator for make the device autonomous and for connecting the esp8266(3.3V), I used
Xavi's Eagle Schematics as reference:
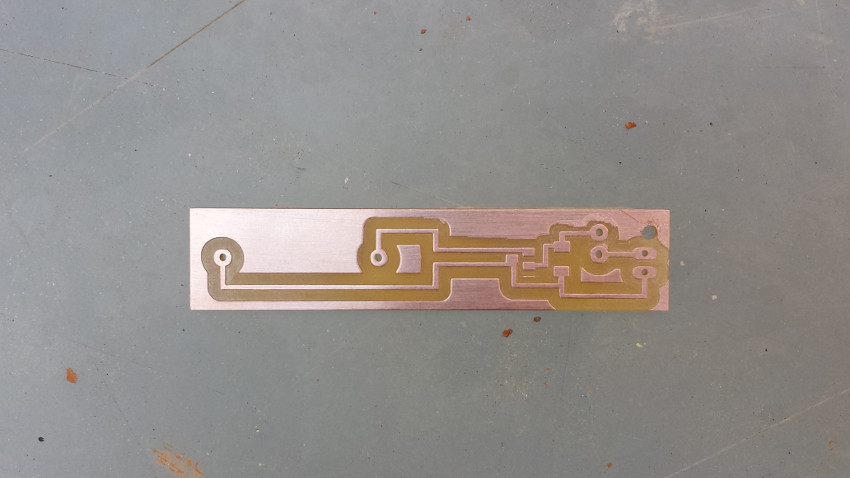
Traces/outline/holes:
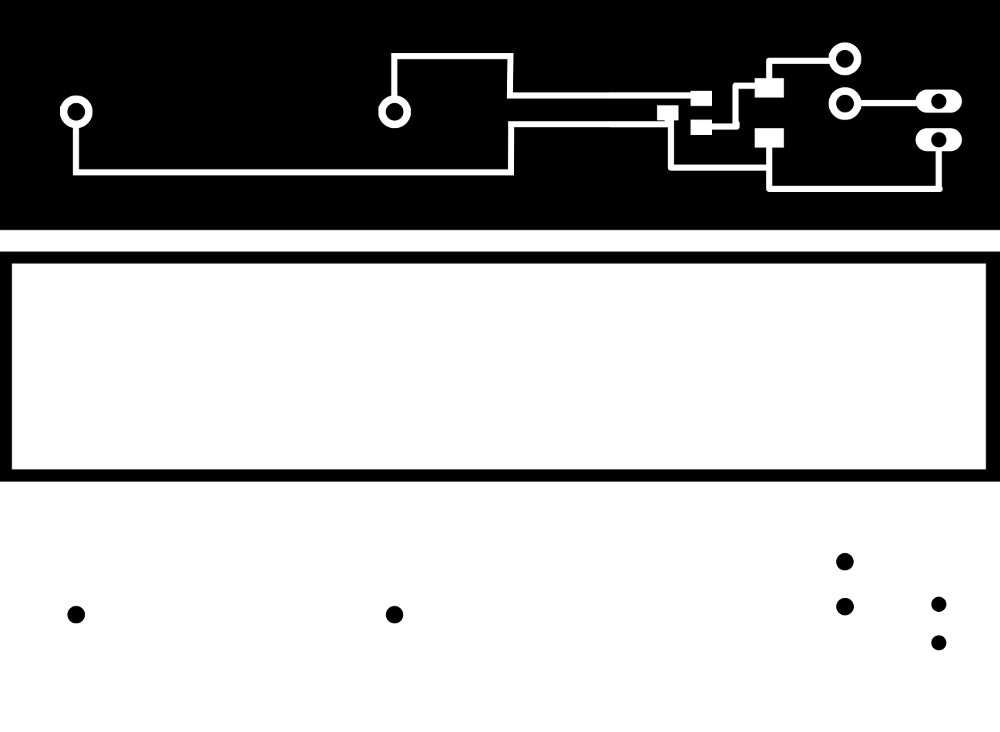
Electronics production (Roland SRM-20 mill):
| Part | Value | Device | Package | Description | |
| C11_POWER | 1uF | CAP-US1206FAB | C1206FAB | ||
| JP1 | PINHD-1X2 | 1X02 | PIN HEADER | ||
| POWER2 | TERM-1X03'-FABLAB' | TERM-1X03'-FABLAB' | ED555DS-3DS | 3.5mm terminal block, 3 positions ED555-3DS as found in the fablab inventory. | |
| REGULATOR_5V | 5V | REGULATORSOT23 | SOT23 | ||
| S1 |
Tasks:
Embedded programming /
Interface and application programming
ESP8266
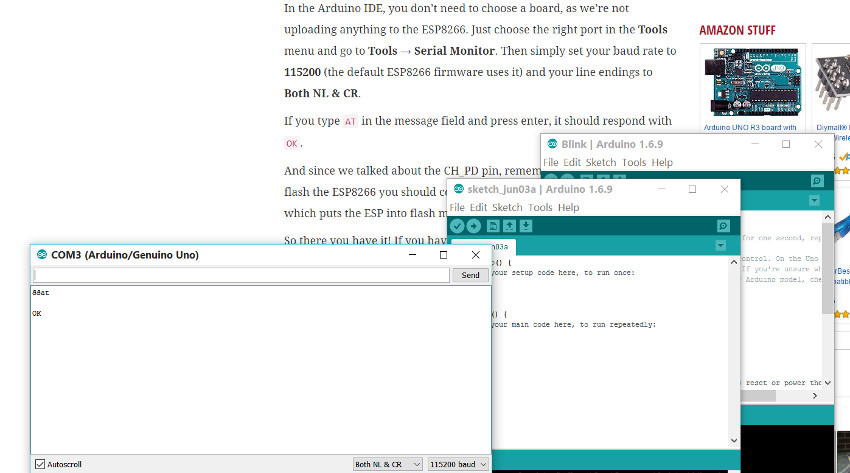
For the input I wanted to fetch data from twitter, searching for the most twitted emotions from a certain place, for a period of time and represent them visually. At first I made some test with a esp8266 wifi module so my device could have its own wifi, I followed this
Tutorial and the image below.
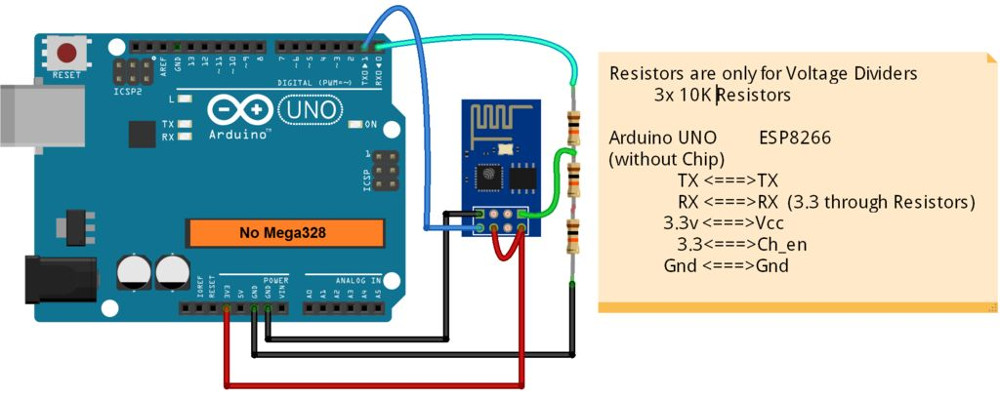
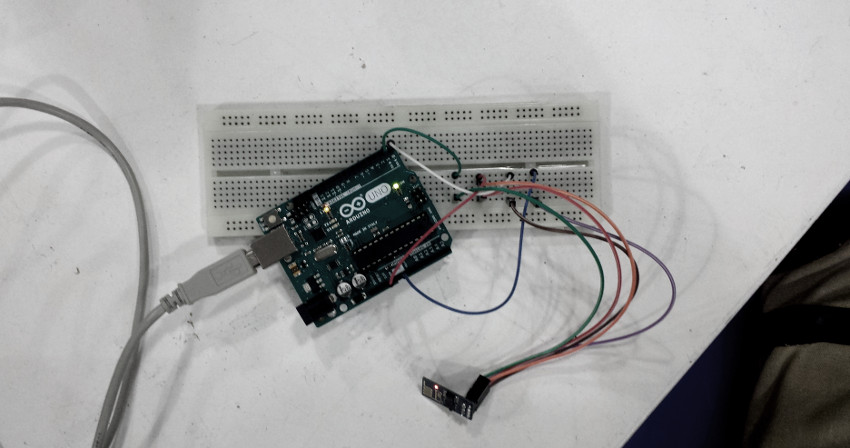
I managed to make it work with the arduino uno but when I tried with my fableo it didn't work, I will keep trying.
TWITTER-PROCESSING
For taking the data from twitter I first tryed with several processing codes. I used the twitter4j library, for accessing information from the Twitter API you first have to made the authentication on Twitter, you need four things to authenticate your sketch: A consumer key & secret, and an access token & secret. You can get all 4 of these things from the twitter developer page, I followed this Tutorials:
Tutorial
How to get the Token:
dev.twitter.com
Examples for using the API:
dev.twitter.com
Library:
twitter4j library
Code:
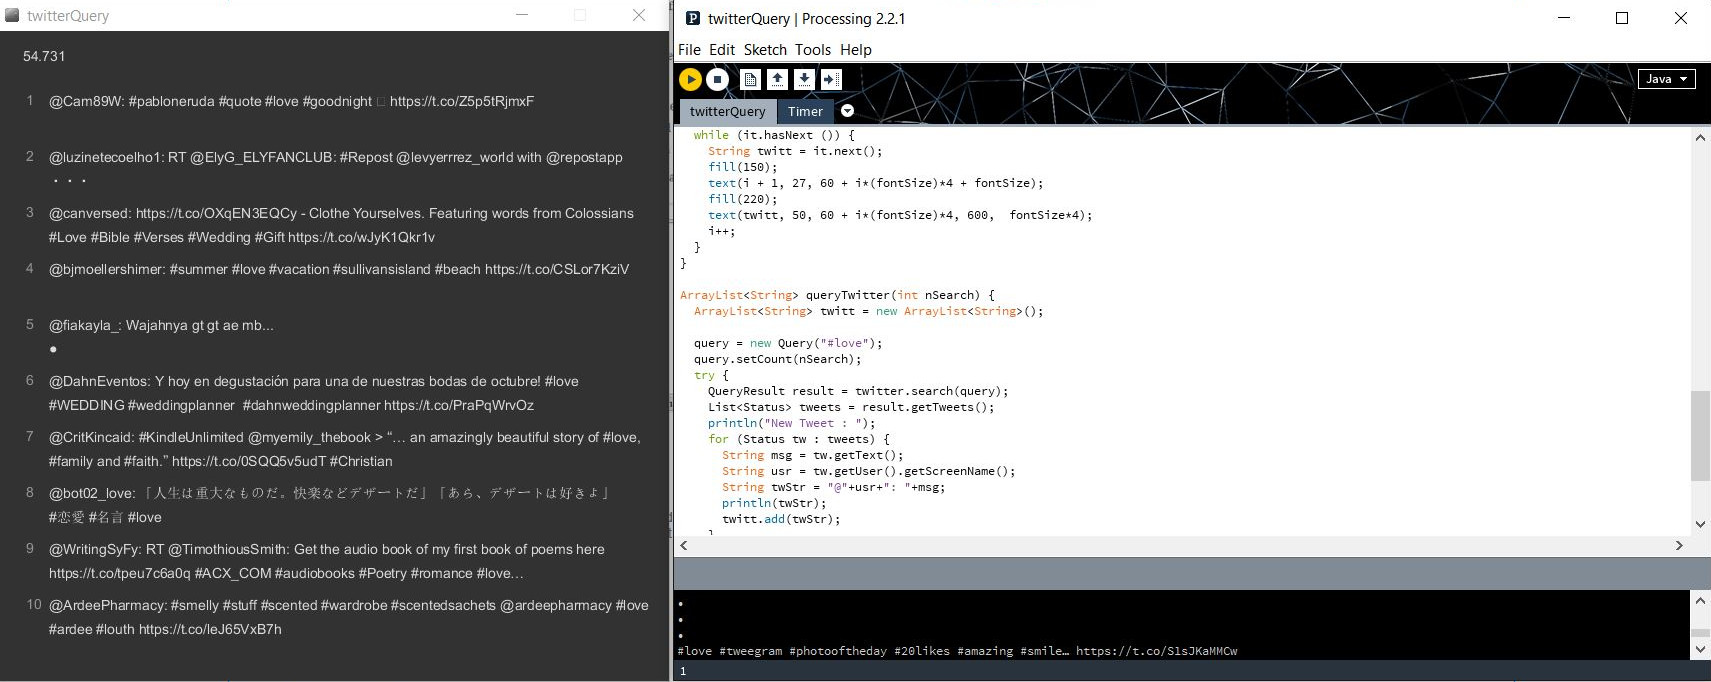
The original code is an example from the twitter4j library, the name is twitterQuery, you can search for the twitters that are related with a certain hashtag, for this code I used #love. Also it is posible to change the number of twitters, but you can not search more than 100.
Interface:
TWITTER-GRASSHOPPER
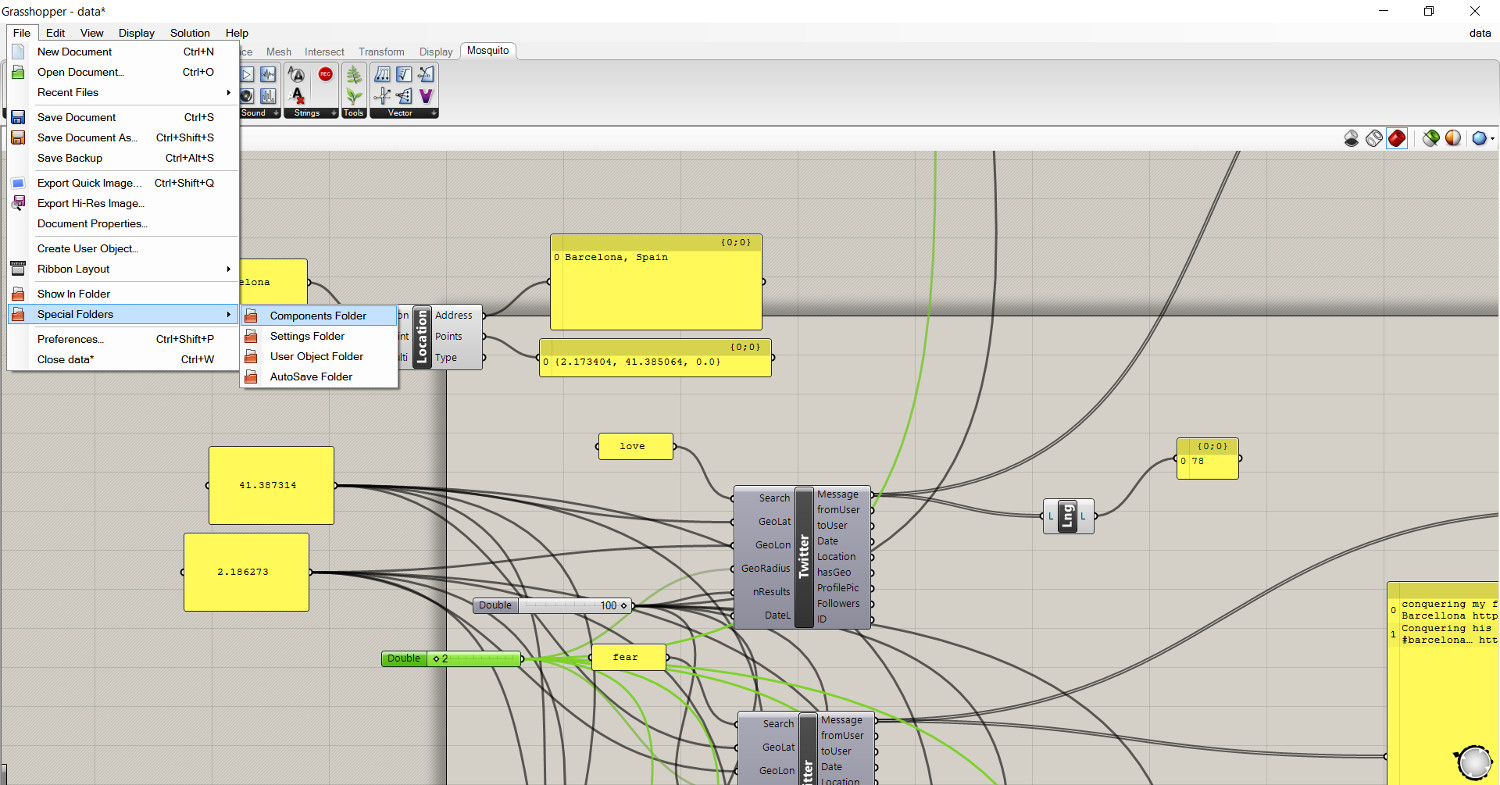
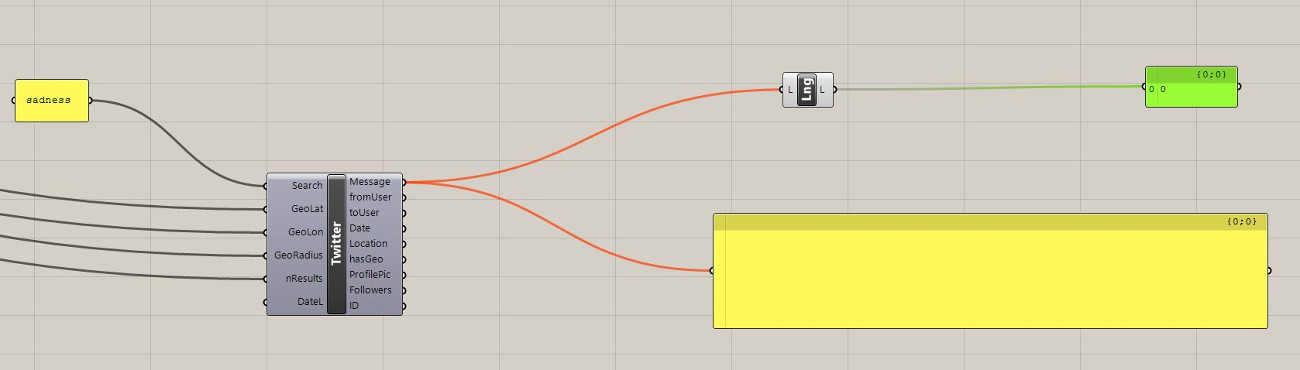
I wanted not only search for the number of words but also know the location of the searching therefore I used Mosquito wich is a plugin suite developed for Rhino and Grasshopper by Carson Smuts. The plugin allows you to tap into social, financial and popular media. Extracting location, profiles, images and messages from Facebook,Twitter, Topsy etc.
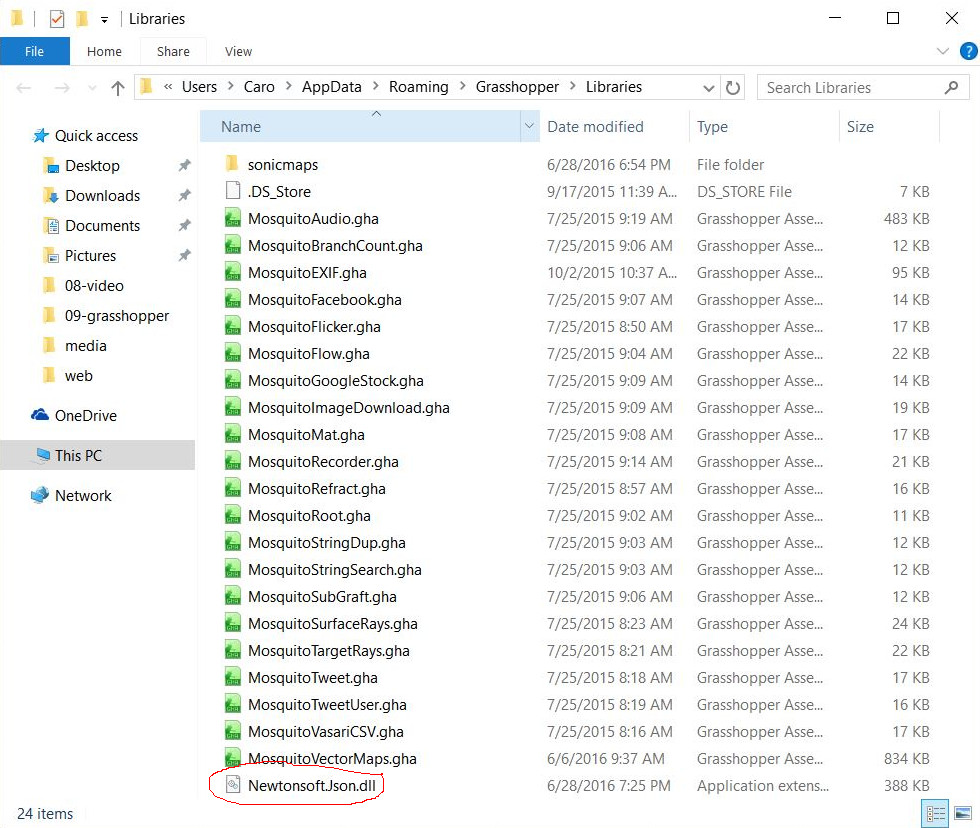
For downloading Mosquito plugin:
Mosquito download
Save the files in File / Special Folders
And you have to copy this file Newtonsoft.Json.dll in Rhinos folder C:\Program Files\Rhinoceros 5 (64-bit)\System:
With this
Tutorial
and Santi's help I could use Mosquito and get the data that I wanted.
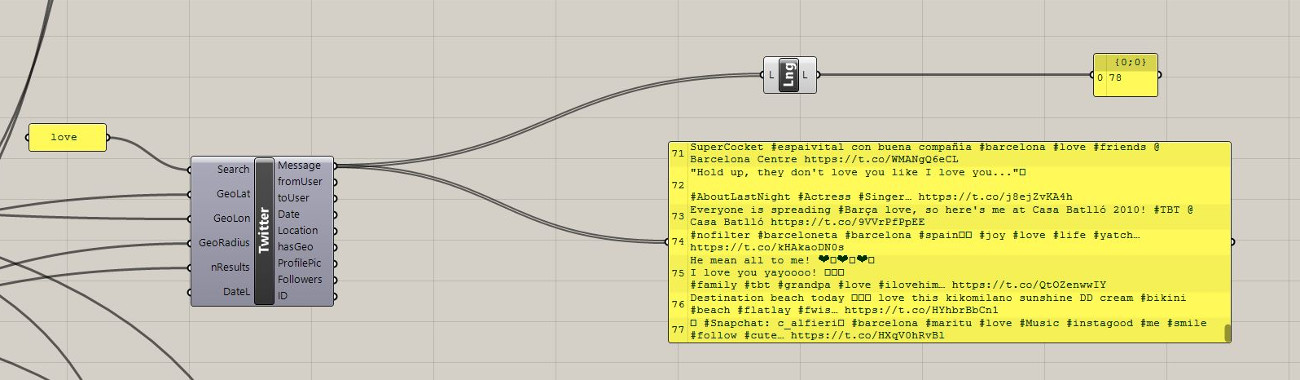
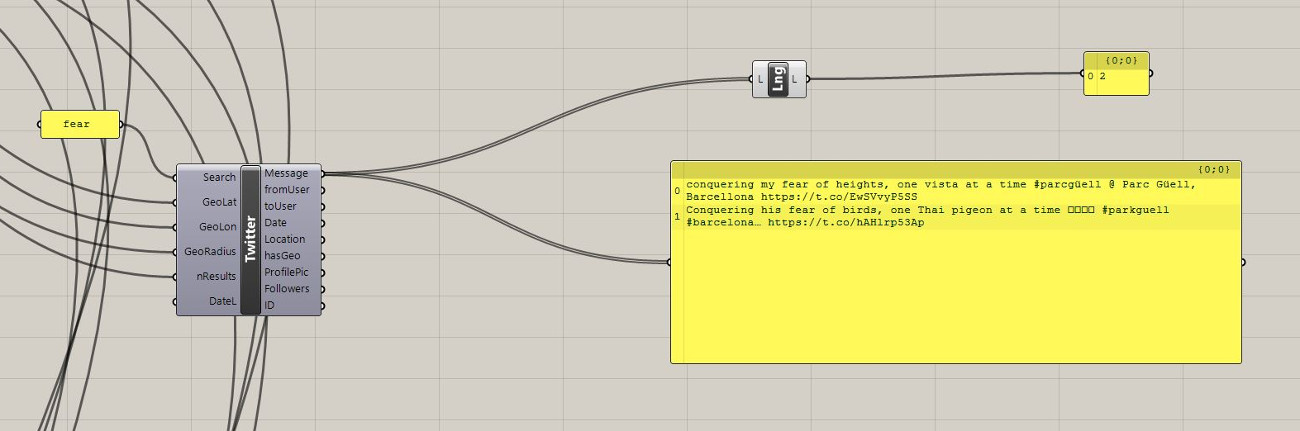
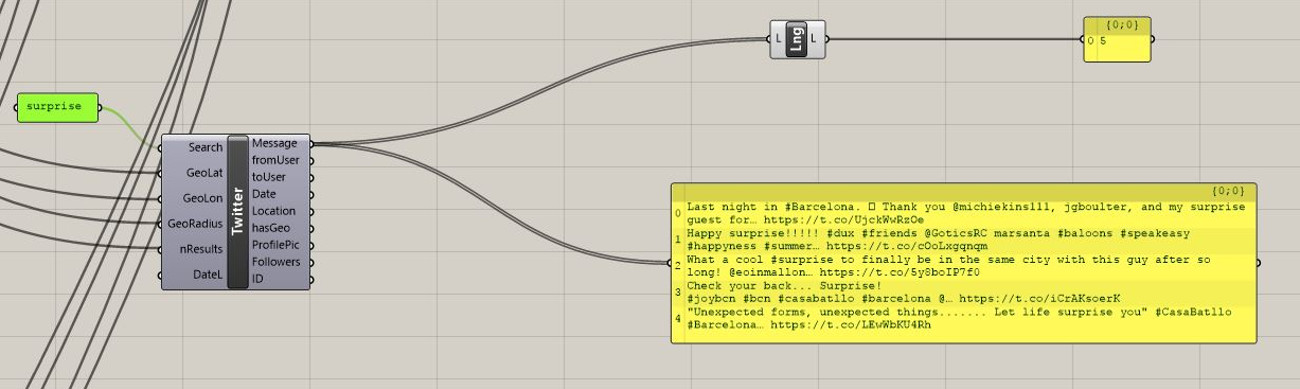
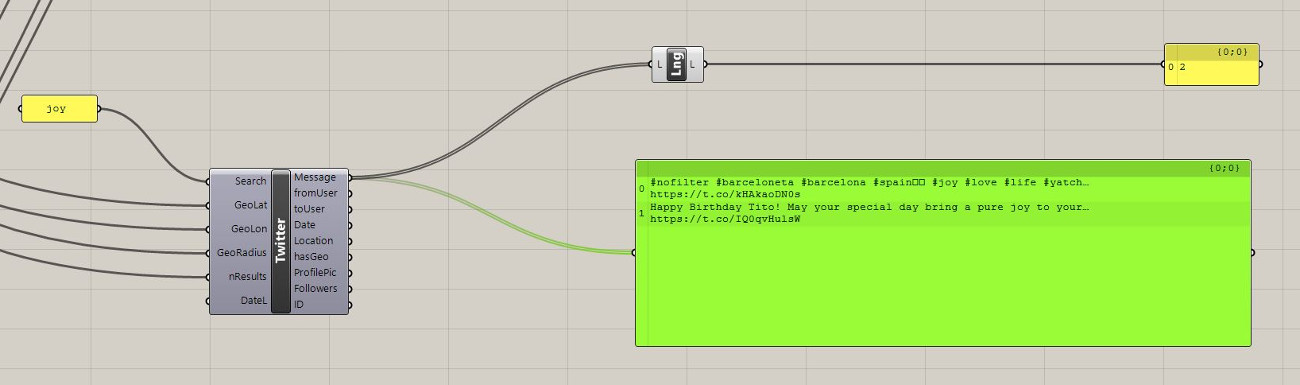
Example:
Date: 4/7 /
Time: 2am /
Localization: Barcelona (41.387314, 2.186273) /
Georadius: 2km
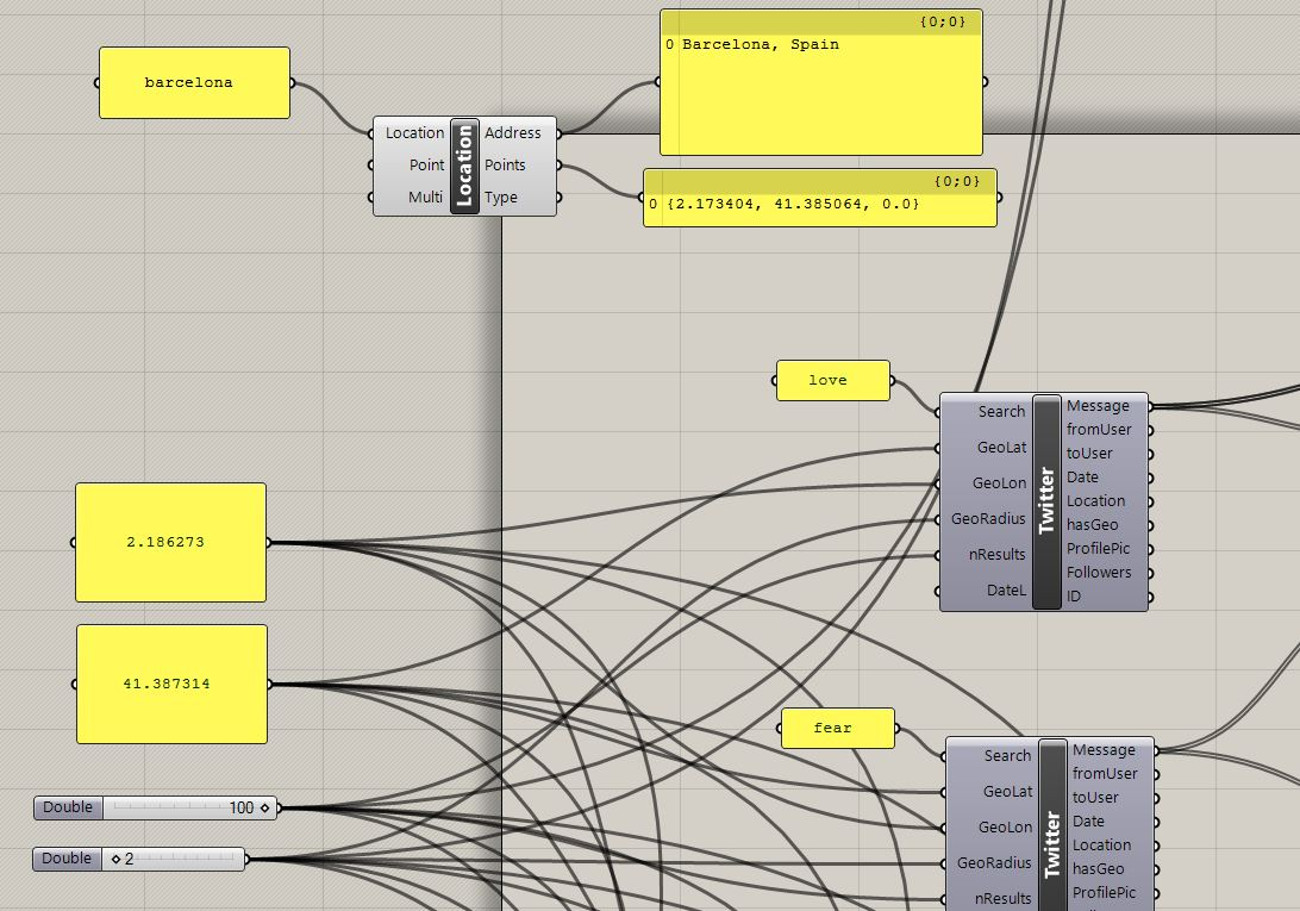
Love:78
Fear:2
Surprise:5
Joy:2
Anger:1
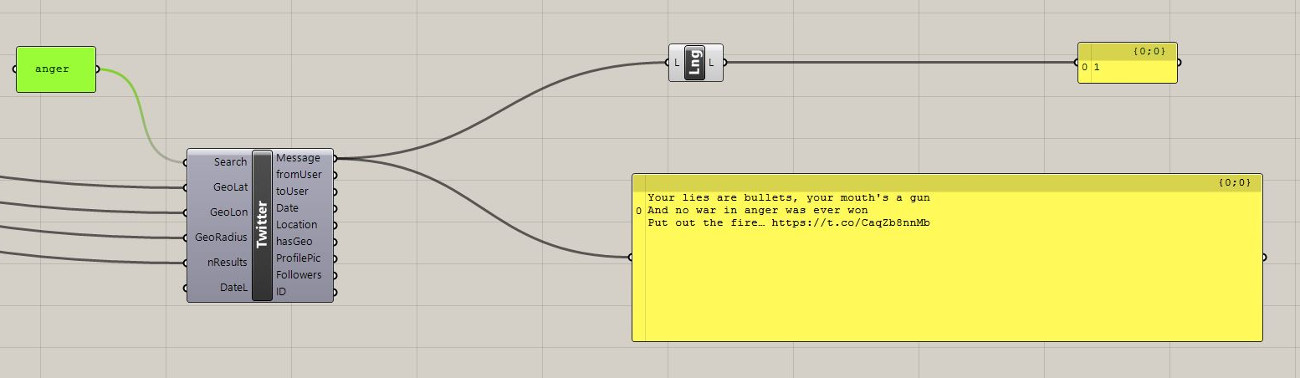
Sadness:0
For this stage I didn't manage to import the data from grasshopper to arduino in real time, so I did it manually but I will continue working on that. I used this values from grasshopper and I converted it to values from 0 to 5 for the code:
//Love:78--------5
//Fear:2---------2
//Surprise:5-----3
//Joy:2----------2
//Anger:1--------1
//Sadness:0------0
EmoT
Download files
Thanks to:
Ferdinand Meier
Santi Fuentemilla
Laura Vignoli
Florencia Manganelli
To my fabacademy
classmates

This work is licensed under a Creative Commons Attribution-ShareAlike 4.0 International License.