
Week 1

Week 1 Description:
Week 1
Principles and Practices
Assignment: Plan & Sketch Final Project
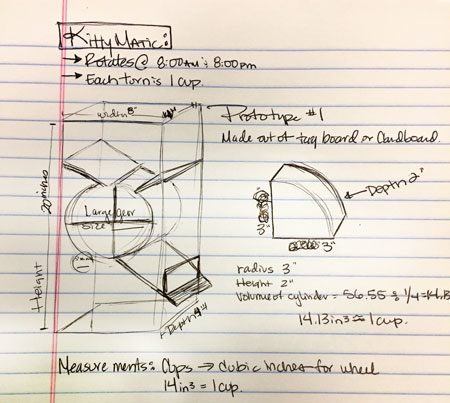
I am very interested in creating an automatic cat feeder. The feeder itself will serve 1 cup of cat food (the amount for 2 cats) twice a day. Once at 8:00AM and then again at 8:00PM. This will be a very handy thing to have when out of town for a weekend instead of having a friend or family check in to make sure the cats have food. I am hoping this will be reliable and that I can use it at all times to store food and feed our cats!
I used Illustrator to draw plans for the design of the Kitty Matic:

I have included 2 drawings at the bottom of this page. The first shows what the inside of the feeder will look like, the other shows the design of the feeder.
Project Management
Version Control- GIT, Class Archive Link
Web Development-HTML & Dreamweaver
Assignment: Work through GIT tutorial
Step 1: Download GIT https://git-scm.com/
Step 2: GIT tutorial https://git-scm.com/docs/gittutorial
I looked through GIT tutorial and it all looked like another language. So I started looking through 2016. Here are some helpful things I found.
http://archive.fabacademy.org/archives/2016/fablabdetroit/students/996/WK1.html
http://rogerdudler.github.io/git-guide/
Learning Git:
Once Git was downloaded from https://git-scm.com/downloads I found the Git program file and opened Git Bash.
- Generate a new SSH-Key using: ssh-keygen –t rsa –C “$youre-mail”
- Enter for location to store file
- Enter a unique passcode
- Show public key: cat ~/.ssh/id_rsa.pub
- Copy key: clip<~/.ssh/id_rsa.pub
- Go to Fab Academy GitLab – git.fabacademy.org
- Make sure you have logged in
- Go to profile settings in the left hand index
- SSH KEYS
- Paste key to space (Ctrl + V) & name it
- Copy SSH from your GitLab
- Go back to Git Bash
- Clone the repository: git clone git@git.fabacademy.org:fabacademy2017/fablabwaunakee.git
- Find repository where you saved it.
- Mine was on my C drive – users – kaylaproctor – fablabwaunakee – students – 88
- Drag all webpage files into folder
- Make sure all files are labeled with lowercase letters
- All files (html) should show on that folder (especially index)
- Css, images & js folders show here also
- Go back to Git Bash and enter: cd fablabwaunakee
- git add .
- git commit –m test
- git push
- Enter passphrase
- When working with multiple people in the same archive you will need to use the command: git pull (to become the branch master again) and then git push to post to the repository.
Assignment: Build a personal site in class archive describing you and final project.
Easier said than done! This was a very new concept for me. I have not worked with HTML before but oddly enough I was excited to learn and start the process.
I started by looking at past fab academy student pages. Getting ideas of what I would need to include and how to layout the page. Then I called my sister. See, she is a graphic designer who does a lot with building webpages. As I did not want to lean on her (or bug her) too much, I kept it pretty brief with only 10 more e-mails to follow. She recommended that I use notepad++. This is how she writes HTML and says it is the best thing she has found. So I downloaded it. I started learning with notepad++ and using Lynda.com. I already had a subscription to Lynda so it was an easy transition to make sure that I knew what I was doing and could start to understand the language. After a short amount of time I picked it up quite easily! I was well on my way. Then I completely changed my direction. I am a teacher, and I teach Illustrator and Photoshop both in my classroom. I realized that Dreamweaver was also an Adobe software that was part of the Creative Suite. I thought, why not. Instead of using notepad++, I dove right in to Dreamweaver.

I found that this point that it was a pretty intuitive program. I found a template online that I liked at http://www.templatemo.com/ and I started to scrap a lot of what it had and add what I wanted. There was quite a lot of rearranging things. I think it would have taken me WAY less time if I had used either a different template or something a lot less complex. But! It was going to have the look that I wanted. So, I now have entered my about me, my contact info, and my final project idea. I am still working on fixing a couple of issues I have with the page, but I am happy with it for the most part.
Issues I am having: I cannot get the stinking navigation bar to be black! That pink color is haunting me in my dreams right now. I also am having a hard time linking the “send” button on the contact page to actually send me an e-mail. Oh well. Better days ahead.
Things I am excited about: I did it! And it looks halfway decent. I figured out how to add a map that shows where we are located! Also that the Facebook icon links to our Innovation Center Facebook Page! Very exciting things.
Final Project Drawings