OBJECTIVES
Document the process of design and production to demonstrate correct workflows and identify areas for improvement if needed.

Document the process of design and production to demonstrate correct workflows and identify areas for improvement if needed.
I wanted to so something that had more than one funtuion, so modules were a good idea.
First, Illustrator for sketching.

So, I decided to make a table/bench, using as fewer parts as posible but at the same time being able to be used in different ways.

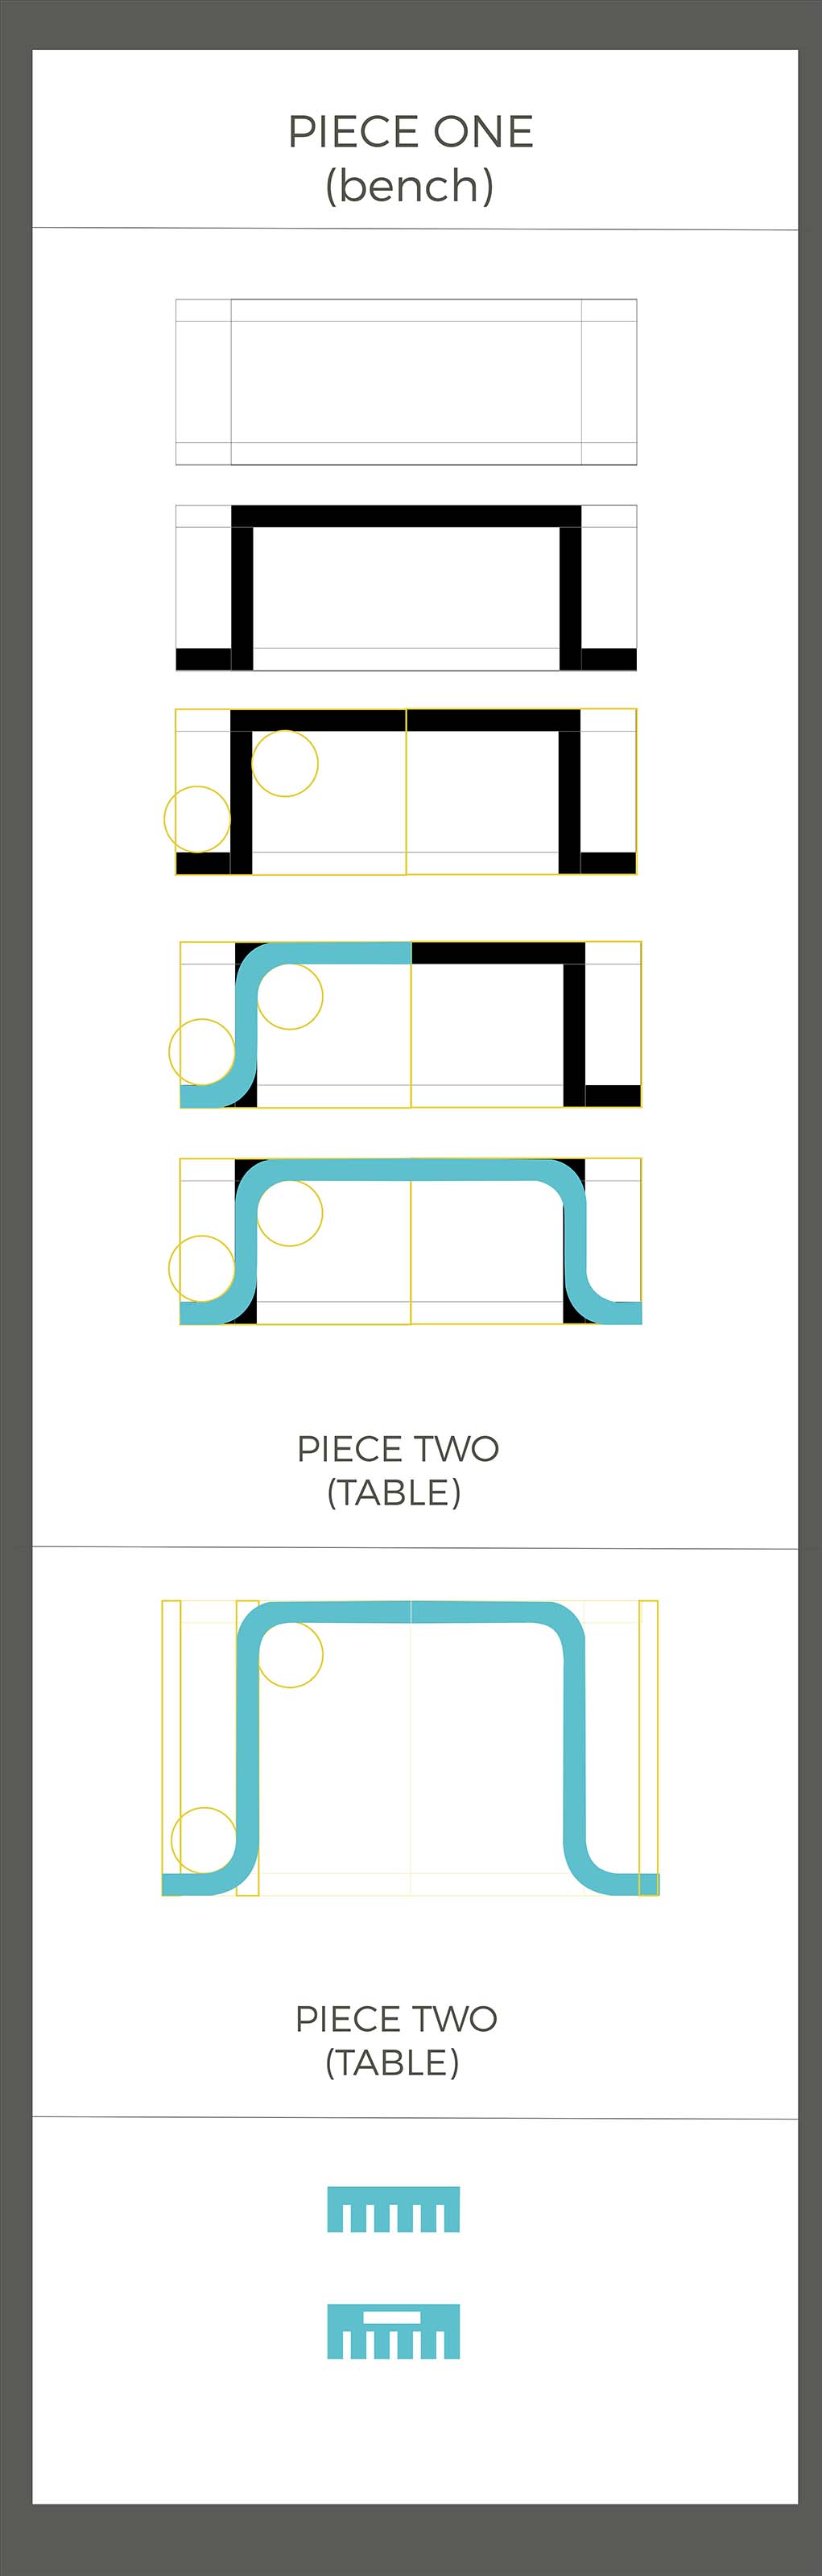
It´s going to be three pieces:
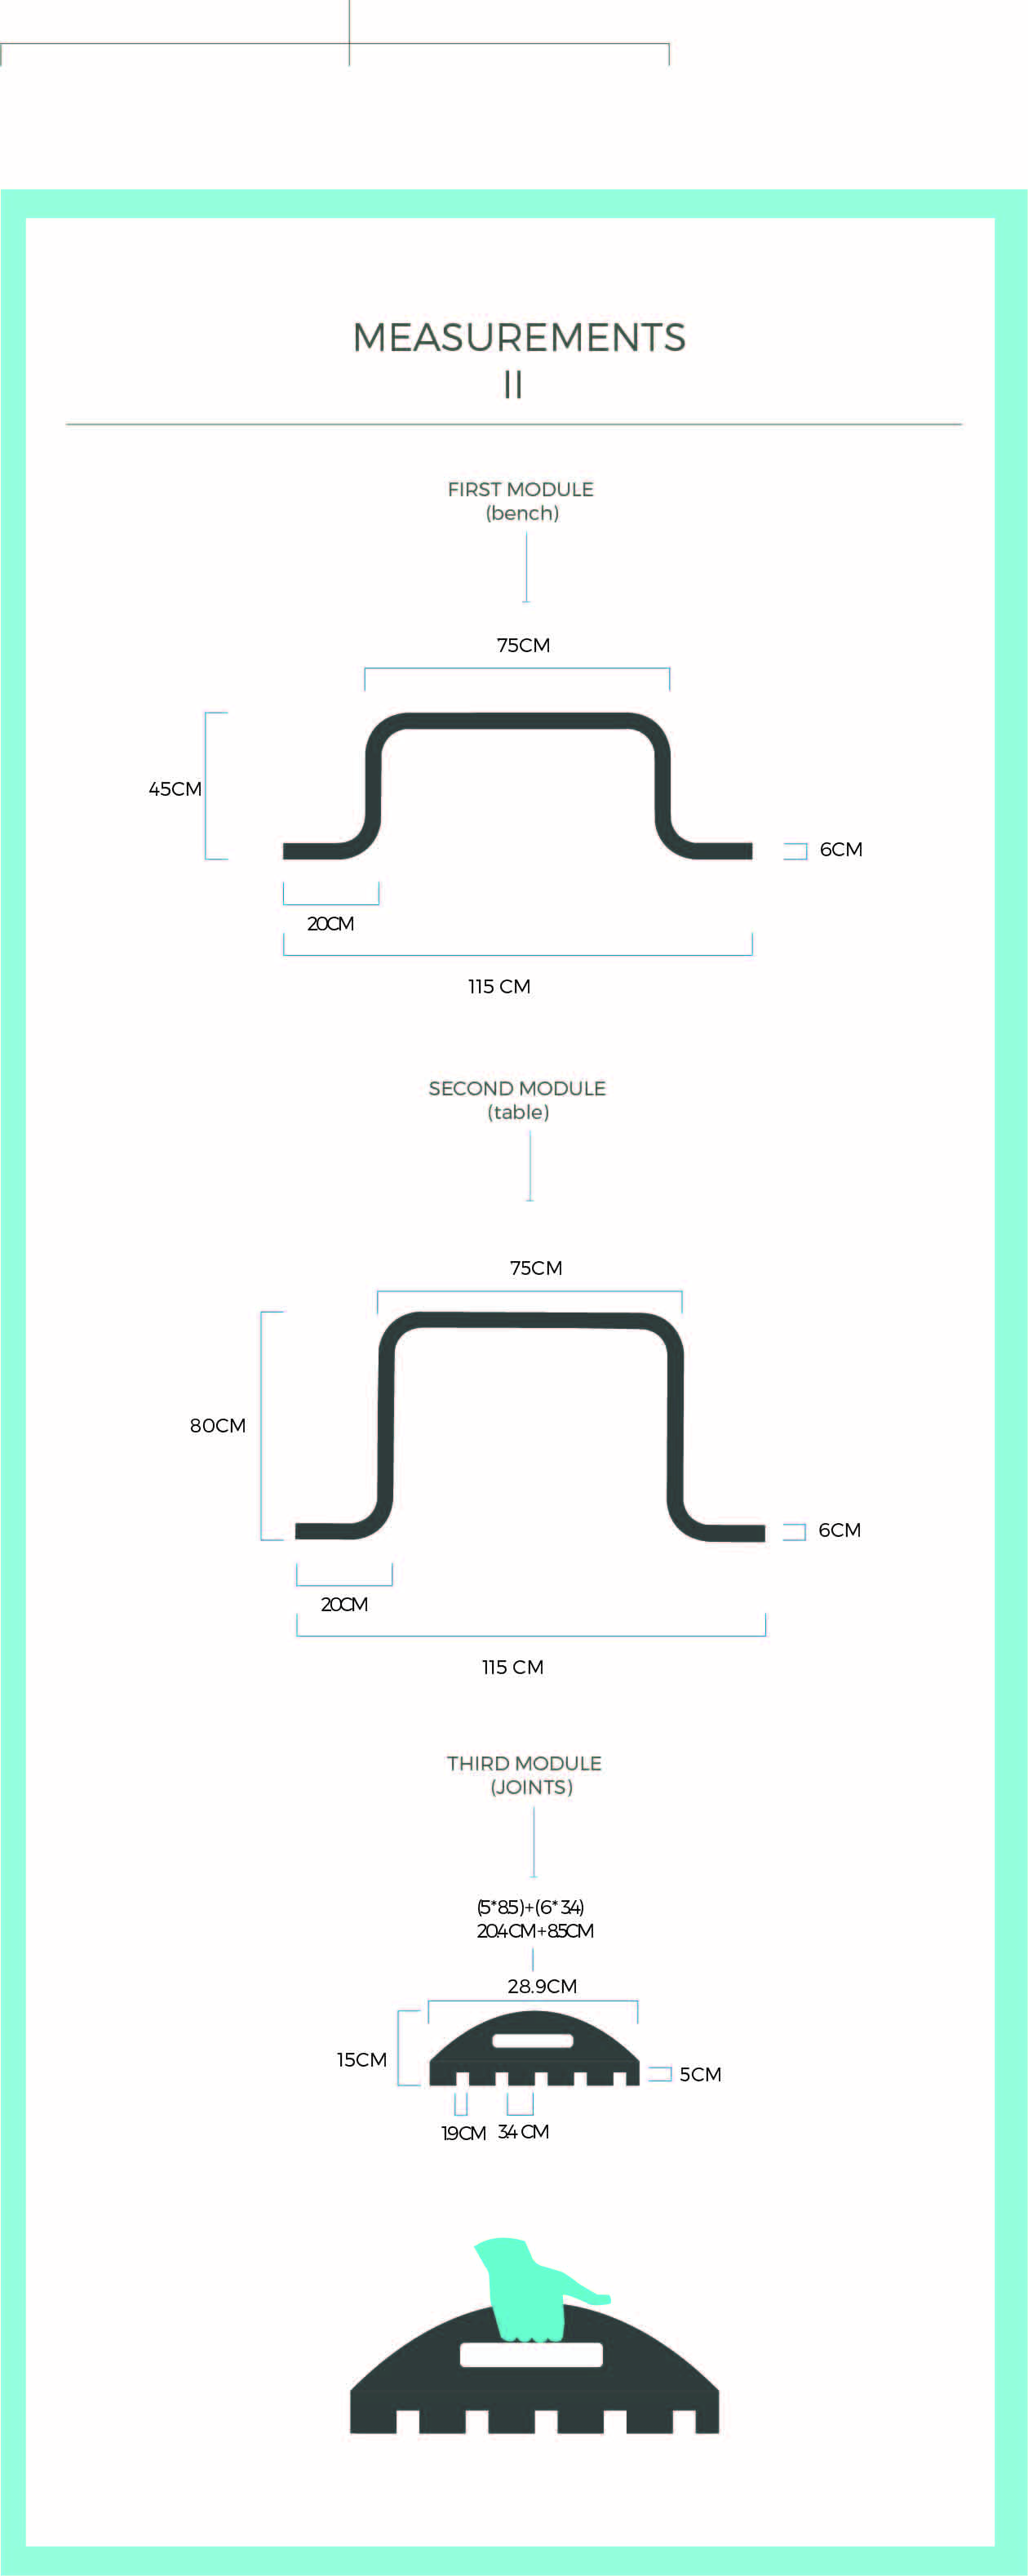
- The first one shape like a “C” but with support on the base that would have the heigh for a bench.
- The second one , same shape but higher so it have the size for a table.
- The third one, to join the other pieces.
I worked the pieces on scale on Illustrator to make a model using the laser cut machine.

With the result, i built:

The main problem i found on the model was the joints. They were not deep enought for the structure to hold extra weight safely.
Design:
Modifications and details:
The piece of wood measurements are 244 x 122 mm, so to try to fix the parts on it, I did some tests but It consumed too much Wood.

I really wanted the module to stay clean and use the joints to fix the parts together, so I checked the dimensions and re-design them.
With those changes, it was easier to fix them in the material.


To see if the parts fitted, I cuted one of the joints (one of each) and a segment of the bench module.
For that, I went from Illustrator to Vcarve.

What i got is that it works like this: You prepare your file in the program you want, 2d or 3d, in my case Illustrator. Then you open it in Vcarve, which is the program that code the file you design so the Shopbot understand it. The figures must be close and in this program you have to select each form and give the instructions of what it has to do. For example, which pieces must be cut or the ones that must be grave. So the machine can do one kind of work in all the pieces first and then the other job where it´s required.

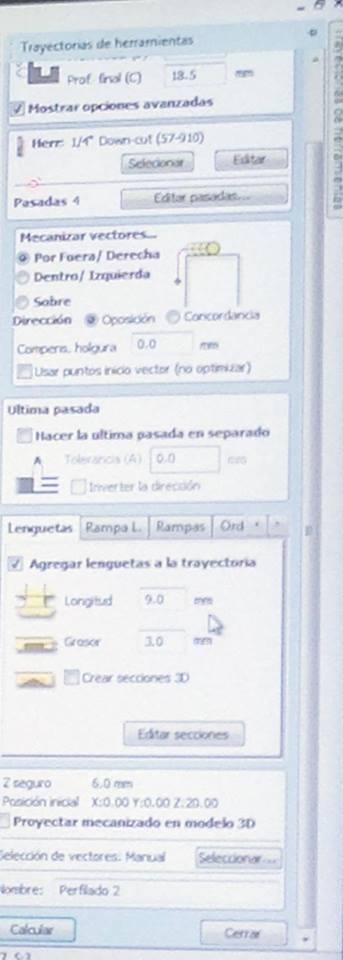
For each piece/work you must set: -How deep the cut must be: This would depend if you want to cut or grave and how thick the material is. In my case the wood is 18.4 so I tried with 18.5 to cut. -Herrs: Which herrs it´s going to be used. In this case 57287 descendent herr. The program has a library of herrs, but you can also download and add others.

-Where the endmill must go in relation to the piece to cut. For example, if you want it to cut the piece from outside or inside the line. Also, you can and should add tabs, so the pieces don´t pop up while the machine is working. When I did this the first time the program didn´t recognized one of the pieces ( the one with an “S” shape) What I found was that because I used the scissors tool, It didn´t close the form. So I went back on Illustrator to closet he shape. Then, on VCARVE went to the tool bar and on mechanisms, click on recalculate the tool trajectory (I´m translating the terms because here it´s set on Spanish but in the pic you can see where is everything) And start again!!!

Then the file must be open on the machine´s software. And it must recognize all the pieces to cut.


The ShopBot software ones a lot of Windows

Some things are already set from the VCARVE file, so, here what must be set is: -“X,Y”, The machines takes the left up corner as a 0 for X and Y, but it can be set to other places. -To set “ Z” is similar than the Roland machine used In previous weeks, you down the endmill, in this case until it touches an aluminium shingle.

-The RPM (revolution per minute) must be set as well, In this case 14 000 as seen in the picture.

It´s important to calculate how the MDF chips would be loaded.
For that it´s important to have in mind the Feed rate and the plunge rate.
Here are some recomended values explained to us by our instructor:


This CNC machine , on the bed of the machine is MDF to put the material you are going to work on top of. The material must be screwed to the MDF under it. So it doesn´t move while working far from where the herss it´s going to run. Another important thing to check before starting the work is that the RPM are the same on the computer and on the machine.

There are 3 buttons:

- The red is the panic one, if you think disaster it´s coming, just press it. - Reset - Start, important to see that everything it´s ok before pressing it! Then start the work


After the work, the pieces came out easily. The tabs were the only thing that needed cutting. Nothing sandpaper can´t repair.

About the fitting of the parts. They fitted but too tight for it to be easy to arm and disarm. So the joint piece needs some rethinking. The part to put in the hand came to be very useful.
To find ways to don´t waste material, I broke the pieces into modules that can do the same.


At the end, this were the modules, one curved, one straight and another straight one that works to get the pieces together-

For milling it, I used the same exact settings as in the test.


