Exercise 19 - Project Development
Read more here, most of the project process are documented in Final Project > Process
Project Timeline
Development Summary
I am thankful for my department and colleagues for their understanding that I am able to meet my weekly development on time. Therefore most of task met its deadline. The only tasks to complete are to finish up the reports and waiting for next phase of timing to improve the machine.
9 to 15 Apr 2017 - Soldering of Fabkit 0.4
17 to 22 Apr 2017 - designing of breakout boards
24 to 29 Apr - Testing out the Fabit with Arduino IDE Codes
1 to 6 May - Planning and designing of 2D and 3D designs of vacuum former.
7 to 13 May - Fabricating partial 2D designs of the Vacuum Former, making test cut
14 to 20 May - Fabricating 2D designs on plywood
21 to 27 May - Design and fabricating 3D design for Vacuum Former
29 to Present - Assemble of Vacuum Former and Spiral improvement to the Vacuum Former.
15 Apr 2017 - Soldering of Fabkit 0.4
Task: Soldering of the Fabkit was a big challenge to me. After soldering, I bootloaded the Fabkit with the instructions and did uploaded the Blink Example code and it works! Super delighted!
22 Apr 2017 - designing of breakout boards
Task: Designing 2 breakout boards, thermistor and button boards
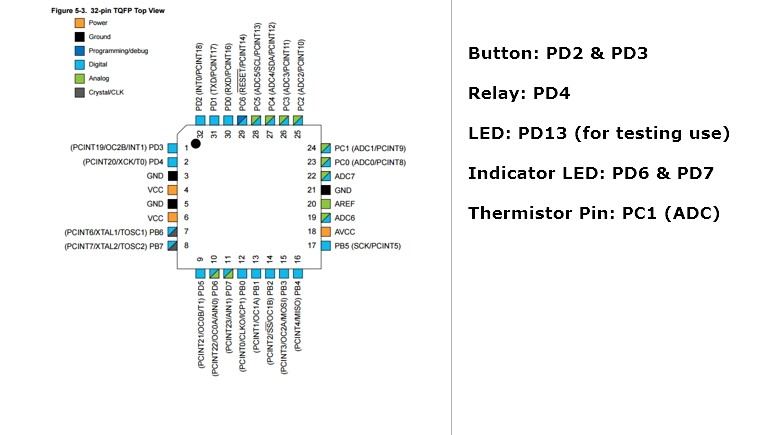
29 Apr - Testing out the Fabkit with Arduino IDE Codes
Task:Testing out with some basic codes and figuring out the IO pins. Reading the datasheet
6 May - Planning and designing of 2D and 3D designs of vacuum former.
Task: Looking at reference pictures of other compact Vacuum formers and gathering ideas on how to make it.
Watching YouTube videos on how people use vacuum formers.
13 May - Fabricating partial 2D designs of the Vacuum Former, making test cut
Task: Using the laser cutter and paper, I cut out the rough design of the vacuum former and test fit it.
20 May - Fabricating 2D designs on plywood
I decided to use plywood as I have no access to metal sheet nor I have prior knowledge to it.
27 May - Design and fabricating 3D design for Vacuum Former
Task: Design it on Fusion 360 and made some test prints for the project.
29 May to present - Assembly, testing and fabrication of Vacuum Former (and Spiral Improvements!)
Task:
After working on my Input devices, I decided to work on my programming part for my Fabkit.
1) Using the thermistor as in input
2) Display temperature to I2C
3) When the temperature reaches a certain temperature, it will trigger the relay to turn off the heater
4) Relay to maintain till condition is met to turn on the machine.
I will be designing the body of the Vacuum Former with Plywood. As the Fablab in library there is no Metal work and I have no experience in using the proper metal. Therefore, I decided to work on Plywood.
Answering Questions
What tasks needs to be completed?
- Understanding which heater to be used. Done
- Understand which material to be used for vacuum forming. Done
- Figuring out how to mount copper pipes on the vacuum former. Done
- 3D designing the mounts for copper pipes. Done
- 2D laser cut the body of the former. Done
- Design and construct microcontroller boards. Done, tweaked and modified Fabkit slightly and designed 2 Breakout boards
- Programming the board. Done
What questions need to be answered ?
- How do I make the rods stable?
I've designed 3D models that acts as a plugin for the copper rods, it is an extended design of a nut and bolt.
- How much heat will it produce from the heater?
While experiementing, I found out that surface temperature is different from the ambient temperature. I had to do compensation via code to make it measure close to the real temperature on the surface. I used a FLIR to do the comparison.
- How do you assure the safety of use of the machine?
I used to designed a rely breakoutboard with thermistor, but it shorted, therefore, I used a commercial Relay module to ensure that no shortage or leakage to the user.
- Can it vacuum form other materials?
Initally my design is used for HIPS (High Impact PolyStyrene) as the forming temperature was 80 Degrees, but my local Art store doesnt sell HIPS but only styrene sheet. And it works!
- Why is the build size so small?
The vacuum former is meant to form small objects like 3D print outs or packaging or Moulding and casting
How will it be evaluated?
- Successful in vacuum forming HIPS plastic (1mm thick)
As I am unable to get HIPS plastics, I managed to get styrene from local art shop. The forming temperature of the styrene is around 150 to 175 degrees celcius, I experiemented with my heater and it is able to reach that temperature with no problem at all.
- Some sort of indication(LED) or a switch to help user to be in control of the machine.
As part of the spiral improvments, I added a 'Start' and 'Stop' switch for the users to activate the machine, I also included LED lights to show that when the heater has reach its peak temperature and it is maintaining the heat.
- Little or no leakage on the Vacuum Chamber.
So far no issue, the only small issue is to make an adapter for multiple vaccum cleaners
- Relay able to control the temperature.
Relay switches off the heater upon reaching the coded temperature.