Assignment 8
15.3.2017
Topic: Embedded Programming
Read a microcontroller data sheet.
Program your board to do something, with as many different
programming languages and programming environments as possible.
Optionally, experiment with other architectures.
Learning outcomes:
Identify relevant information in a microcontroller data sheet.
Implement programming protocols.
Have you:
Documented what you learned from reading a microcontroller data
sheet.
What questions do you have? What would you like to learn more about?
Programmed your board.
Described the programming process/es you used.
Included your code.
ATTINY 24/44/84 Data Sheet
At first, I read data sheet of ATTINY44 family of microcontrollers.
I have read it some times earlier. However, I read it now thorough.
Typical readings are, for example, pin orders, drive
possibilities of individual pins, etc.
Also, many seldom needed information might be found there, such as
interrupts and sleep modes. Manufacturer publish short and long
story of the data sheet and publish also corrections if needed.
ATTiny44A features 4K fash memory, 8-bit and 16-bit Timer/Counter,
10-bit ADC, operating voltage 1.8 - 5.5 V, power consumption 210 uA
at 1.8 V and 1 MHz and temperature range -40 - +85 °C. Speed
grade is 0 - 4 MHz 1.8 - 5.5 V, 0 - 10 MHz 2.7 - 5.5 V and 0 - 20
MHz 4.5 - 5.5V. Pin order is following:

Programming ATTINY44A
I programmed my board earlier, when I made it. I documented it in
Assignment 6. It was simple Arduino based code that blinked a LED
and faster if button pressed. I used FAB TinyISP programmer
there. I have got help from page http://highlowtech.org/?p=1695.
Now, I want use Atmel Studio 7 and do the same blinking LED code at
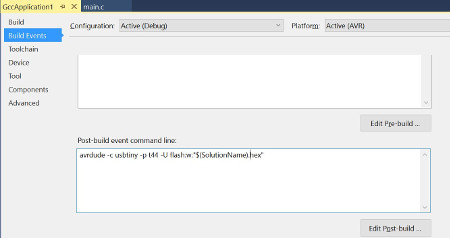
first. I created new project as GCC Executable Project.

Then, I selected proper device, ATtiny44A from ATtiny device family.
Then, as important thing to get Avrdude and FAB TinyISP working
seamlessly with Atmel Studio, I added command
avrdude -c usbtiny -p t44 -U flash:w:"$(SolutionName).hex"
to Project documentation as Build events and to Post-build event
command line.
This starts programming of the board after compile by this Avrdude
command and via FAB tinyISP programmer. Also, I found ready made old
cable from a computer I think. I used it as FTDI cable even it has
8x2 pins.

Blink and button programs
Then, I tested two programs. Both were written by C language and I
wrote them with help of page https://tinusaur.org/2014/01/06/tutorial-001-blinking-led/.
I compiled the code and programmed my board by Build command in
Atmel Studio IDE. This first one code blinks the LED connected to
PORT B as pin PB2.

The second code blinked the LED faster, if the button pressed.
Button was connected to PORT A as pin PA7. I have got help also from
page http://www.elecrom.com/avr-tutorial-2-avr-input-output/.

Echo program hello.ftdi.44.echo.c
The third program might send certain text to the computer, if some
text wrote first. I tested example program hello.ftdi.44.echo.c
from Fab Academy page. It compiled well, when I added proper clock
definition by #define F_CPU 20000000UL command at the beginning.
However, the text was unreadable, even I changed byte rates to FTDI
usb-to-serial cable and a terminal program. I used TeraTerm as
a terminal program. Maybe, the reason could be unprogrammed fuses.
I had also earlier problem with fuses, when I programmed my FAB
TinyISP programmer with Avrdude (version 5.11) program.
Earlier, I used one ready installed Atmel Studio 7 in our lab's
computer (Windows 7) and AtmelICE programmer. And, now I used the
same and succeeded. I set the fuses, but still the hello.ftdi.44.echo.c
text was unreadable.
Next, I coded similar program as Arduino program with help of page http://archive.fabacademy.org/2016/fablabsingapore/students/98/exercise08.html.
I added blinking LED to be sure of proper working. I set baud rate
to 9600 and used internal 1 MHz clock.
Then, I loaded empty sketch to Arduino and connected my hello board
to Arduino UNO: PA0 (TX) to Arduino's pin 1 (TX) and PA1 (RX) to
Arduino's pin 0 (RX). I opened Arduino's Serial monitor and I was
able to read some text, but there still exist extra marks.


It means the clock and baud rate problem solved. Further, I
commented the data echoing and now program sent only programmed
data. And, extra marks disappeared. I changed to 8 MHz internal
clock and set it by burning Bootloader.
And again, I was able to read text clearly. It means TX connection
to my board got disturbances somewhere. Then, I changed to external
20 MHz clock. Led blinks but text was now unreadable. It means
external 20 MHz clock problem. However, I was able to change clock
back to internal 1 MHz.
Next, I checked my board. I cleaned tracks for RX and TX pins and
HEUREKA, also the echoing started to work properly.
Only the external clock problem remained. Maybe I check signals by
oscilloscope later.
Wake-up Attiny44
 As a fourth program, I interested to
test wake-up function of Attiny microcontroller.
As a fourth program, I interested to
test wake-up function of Attiny microcontroller.
I made several trials and found lot of help from many internet
pages.
The final help found from page http://www.avrfreaks.net/forum/pcint-attiny44.
I edited the code with my earlier experiences and needs and got
the program for Attiny44, which blinks led for 10 times and go to
sleep. Parameter mode was not used.
It wakes-up, when button pressed, do the blinks 10 times and
sleep again.
I used PCINT interrupt mode, because button was connected to pin
PA7/PCINT7. In this mode, Attiny44 reacts, when pin change
occurs.
As a sleep mode, I used SLEEP_MODE_PWR_DOWN and it means internal
clock and everything stops, but interrupts only works. It drops
power consumption to minimum. Data sheet says 0.1 uA at 1.8 V.
I tested my code several times and wondered disturbances. Even I
didn't touch, the board woke up.
I checked my code again and found a mistake. Port A needed to
initialize also. I must read data sheet again. And, I added two
lines to my code as red mark shows. Then, it worked well.
I measured also power consumption. At 5 V operation voltage it took
maximum7 mA. Sleep current was 0.000 mA, because I couldn't measure
uAs. Further, it worked even by 1.8 V, but with very dim blinking
led.
Comments and To-do: Avrdude and fuses
Neil's Hello code got 2256 bytes of .hex file and my similar Arduino
code 6637 bytes. Thus, it is 3 times bigger.
My wake-up code got 816 bytes.
Could I still use Avrdude for fuses? I would like to test more the
command:
avrdude -p t44 -P usb -c usbtiny -U lfuse:w:0x5E:m.
Maybe later, if I have time.
Blink a led code: BlinkL_main.c
Blink a led by button code: BlinkButton_main.c
FABHello code: FABHello.ino
Wake-up Attiny44 code: IntB02_main.c.
Other boards and microcontrollers
I collected several boards with several microcontrollers I own
and wanted to test here with Atmel Studio IDE.
One interesting is Wemos D1 mini pro. It use
32-bit 80 MHz ESP8266 microcontroller and include Wifi
functioning.
Maybe, I test them later, if I have more time.