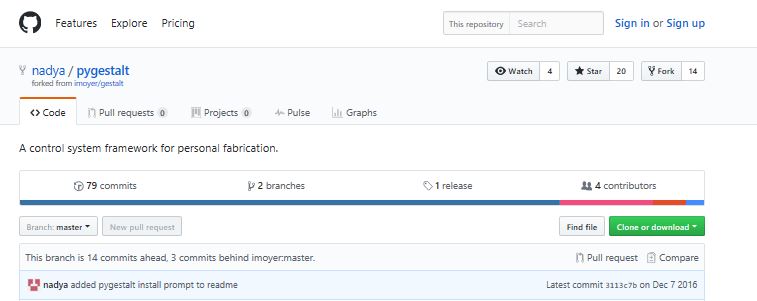
Nadya's Library
download from Github Nadya's Library
First we need to create our environment to work properly. We downloaded and
installed the following requirements:
-Python 2.7 + 'python ./setup.py install'
-Pyserial 2.7 + 'install'
- Downloaded and installed pyserial following this tutorial (https://learn.adafruit.
com/arduino-lesson-17-email-sending-movement-detector/installing-python-and-
pyserial):
- Download pyserial-2.7.tar.gz (md5) (https://pypi.python.org/pypi/pyserial)
and save it somewhere on the computer
-FTDI Drivers + 'install'
-Nadya Peek's Gestalt Master and save it
-086 and save it
Open command Prompt wherever you have saved the Pyserial-2.7 folder:
'cd' into the pyserial-2.7 folder, then run the command: 'sudo python setup.py install'
Testing RS 485 connections
List usbPorts : 'ls /dev/.*'
In the example file, change our port's name
download from Github Nadya's Library
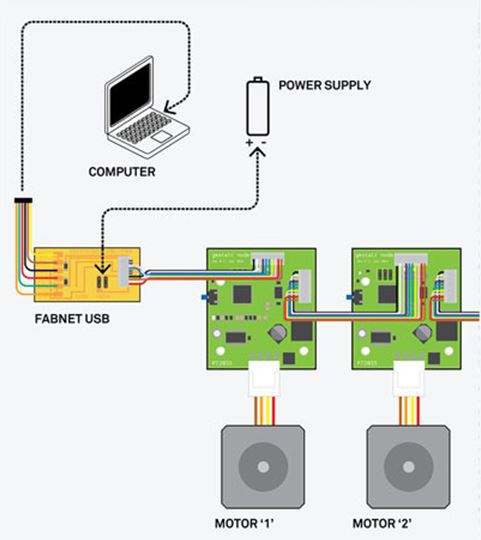
Fabnet is a multi-drop network, meaning that multiple modules (a.k.a. nodes) share a single set of communication wires. Signalling is differential based on the RS-485 specification. Each node is assigned a four-byte IP address which uniquely identifies it over the network. Besides communication, Fabnet provides power at two voltages: high voltage (12V - 24V) is intended to drive motors, lamps and actuators, while low voltage (7.5V) supplies power to the logic circuits of the nodes.
Establishing connectivity between nodes and a computer,
and providing proper power, requires several components: high and low voltage
power supplies, a USB-RS485 converter cable, and an adaptor board (076-000A)
with bias resistors.
OUR MACHINE have 3 Gestalt Nodes for control 3 AQS Nema 17 and for prepare
all the stuff we made a BOM downloable here :
Our motors need 700 mAh minimun for works and the Gestalt Nodes as our
instructor said us no to much so we decided to use an 12V- W Power supply for our Design.
2. The RS 485 : The FTDI cable provided is a little different than the other FTDI cables
we've been using; it is an RS-485 version. Here's its pinout for reference:
FABNET ADAPTOR BOARD ASSEMBLY DRAWING (076-000A)
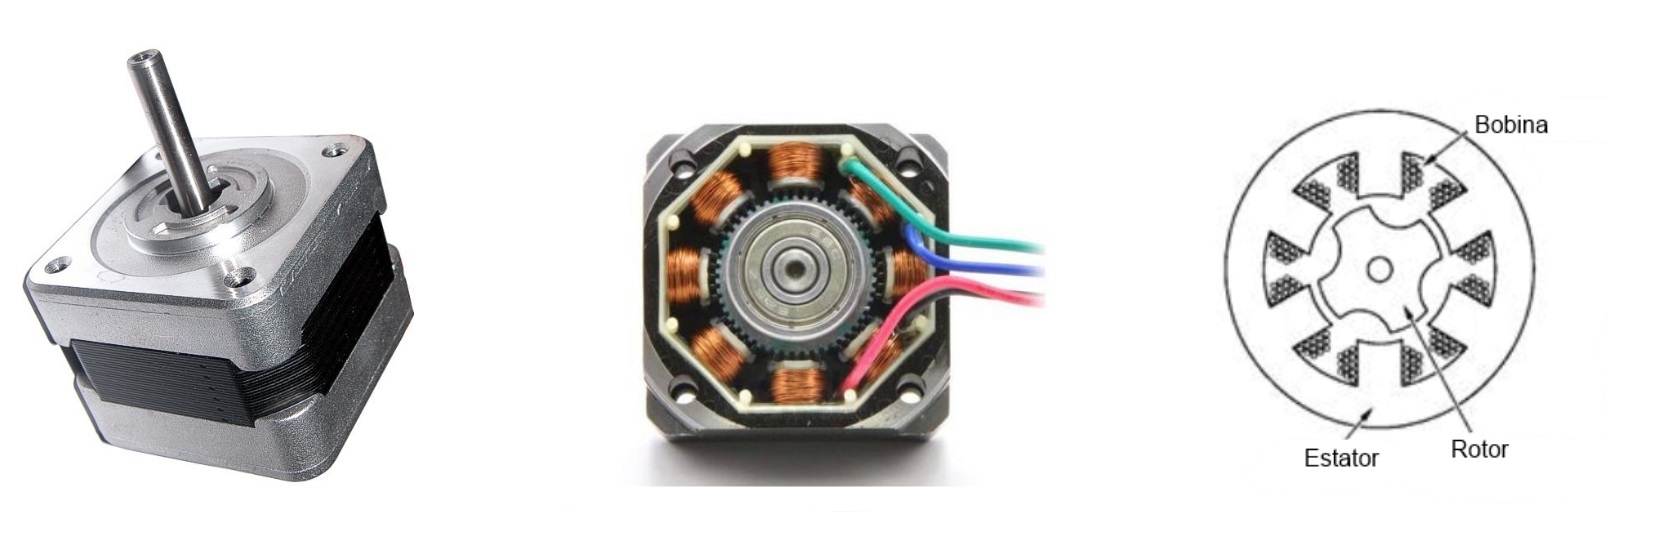
A stepper motor or step motor or stepping motor is a brushless DC electric motor
that divides a full rotation into a number of equal steps.
The motor's position can then be commanded to move and hold
at one of these steps without any feedback sensor (an open-loop
controller), as long as the motor is carefully sized to the
application in respect to torque and speed.
DC brushed motors rotate continuously when DC voltage is applied to their terminals.
The stepper motor is known by its property to convert a
train of input pulses (typically square wave pulses) into
a precisely defined increment in the shaft position. Each
pulse moves the shaft through a fixed angle.
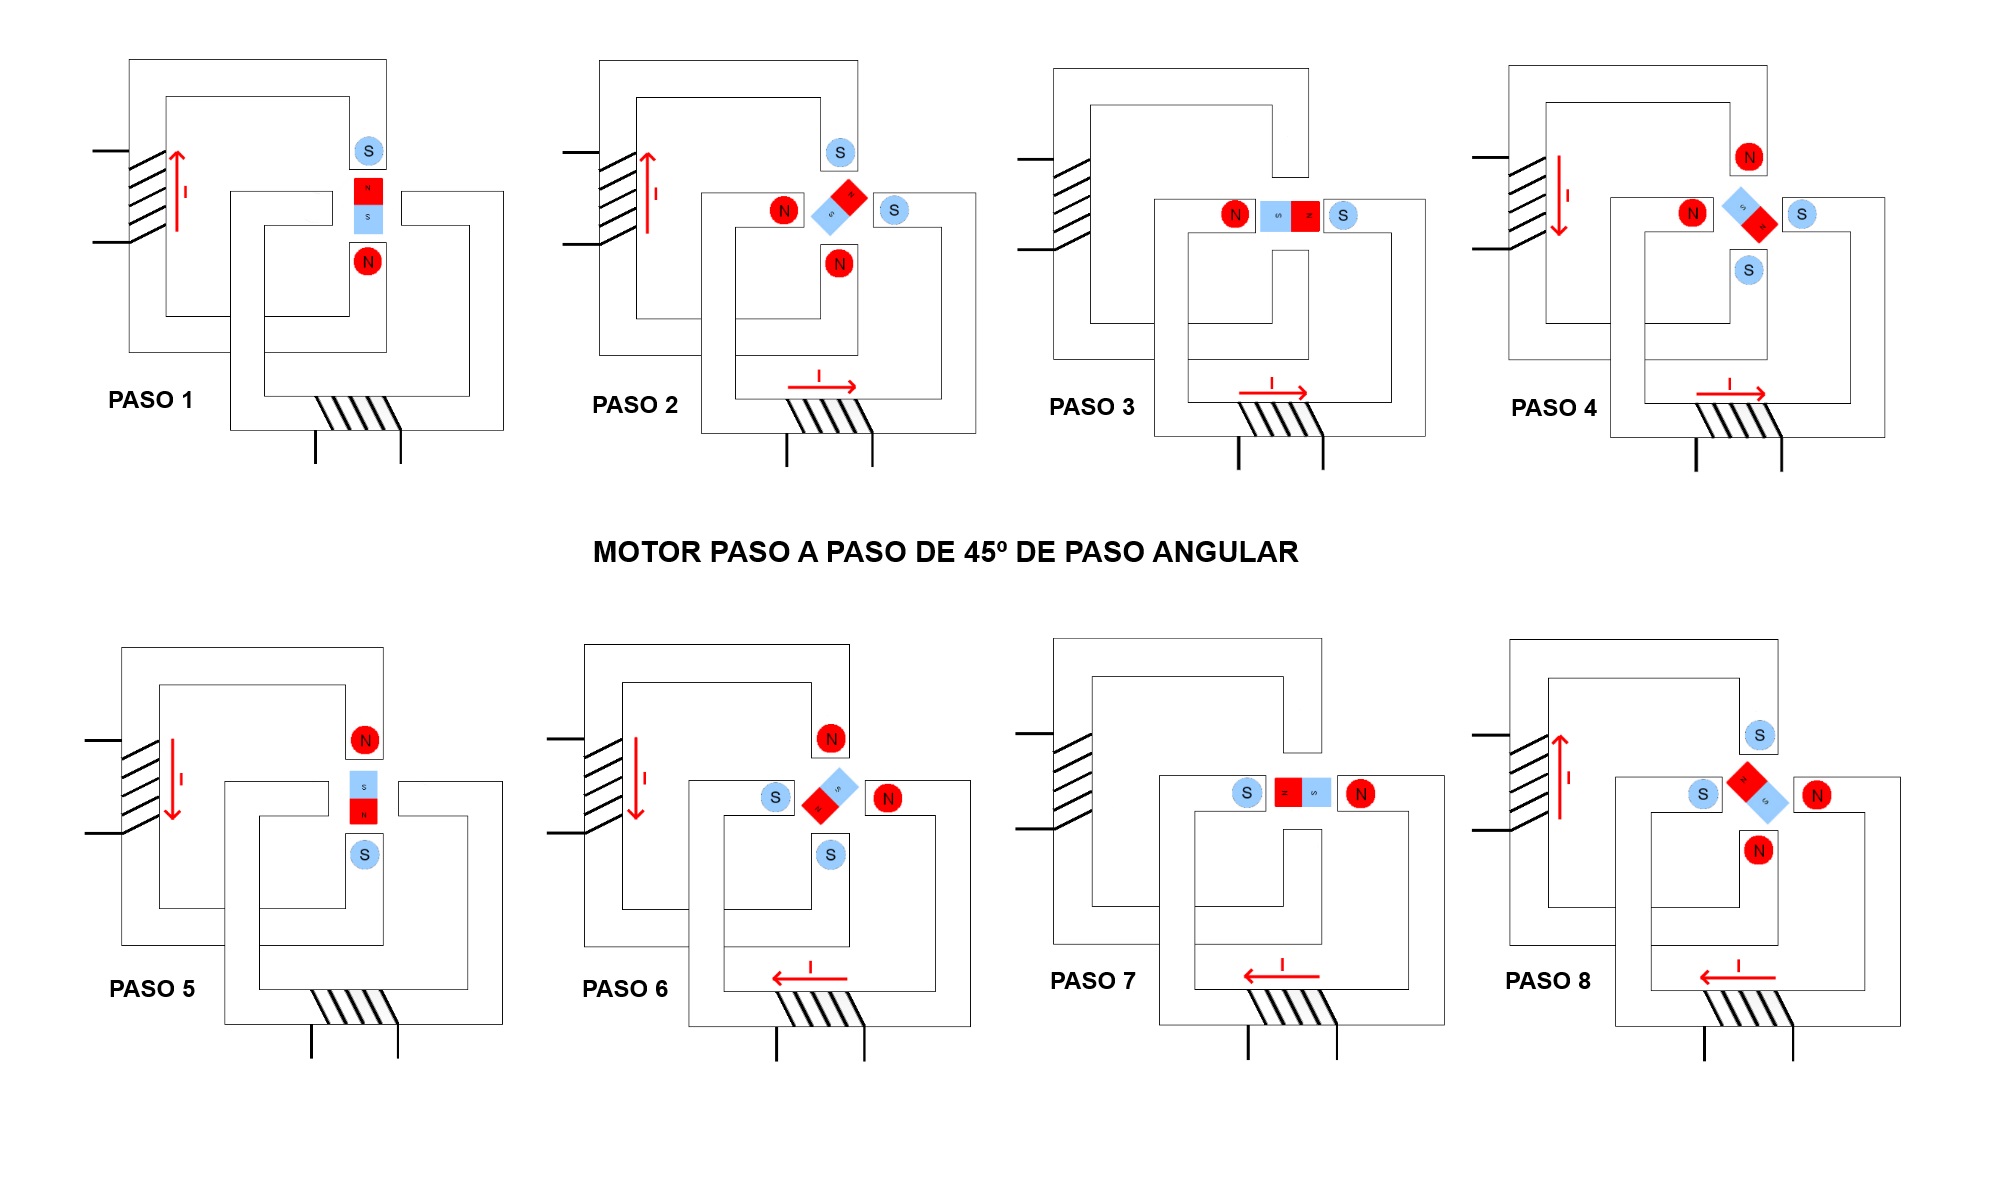
1. Permanent magnet stepper
2. Hybrid synchronous stepper
3. Variable reluctance stepper
-
Permanent magnet motors use a permanent magnet (PM) in the rotor and operate on the attraction or repulsion between the rotor PM and the stator electromagnets. Variable reluctance (VR) motors have a plain iron rotor and operate based on the principle that minimum reluctance occurs with minimum gap, hence the rotor points are attracted toward the stator magnet poles.
When current flows through one or more coils of the stator, a magnetic field is created creating the North-South poles. Then the rotor will be magnetically balanced by orienting its North-South poles towards the South-North poles of the stator. When the stator restores the orientation of its poles through a new received impulse towards its coils, the rotor will again move to balance magnetically. If this situation is maintained, we will obtain a permanent rotating movement of the shaft. The pitch angle depends on the relationship between the name of the magnetic poles of the stator and the name of the magnetic poles of the rotor.
-
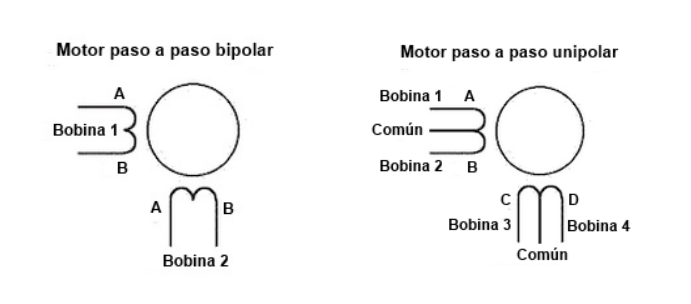
An unipolar stepper motor has one winding with center tap per phase.
Each section of windings is switched on for each direction
of magnetic field. Since in this arrangement a magnetic pole
can be reversed without switching the direction of current,
the commutation circuit can be made very simple (e.g., a single
transistor) for each winding.
-
A bipolar stepper motor needs to reverse the current flowing through its coils in a given sequence to cause the shaft to move.
-
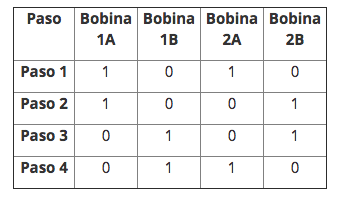
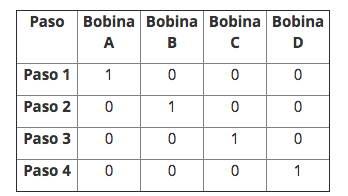
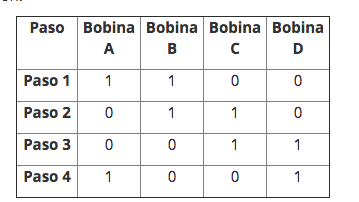
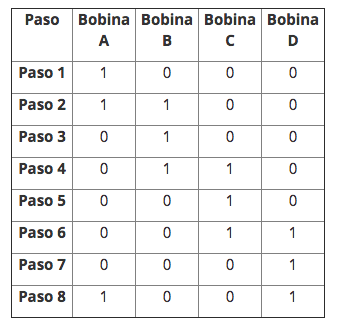
There are three sequences for controlling unipolar stepper motors.
Simple or wave drive: It is a sequence where one coil is activated at
a time. This causes the engine to have a smoother pitch but
instead has less torque and less retention.
-
Normal: It is the most used sequence and the one recommended by the manufacturers. With this sequence the motor advances one step at a time and there are always two coils activated. This results in greater torque and retention.
-
Two coils are first activated and then only one and so on. This causes the motor to advance half the actual pitch. This translates into a smoother and more accurate turn.
-
- CONNECT COMPONENTS WITHOUT CURRENT:
> FABNET TO POWER SUPPLY
> FABNET TO NODE 1
> NODE 1 TO NODE 2
- CONNECT USB TO COMPUTER and identify serial port
- change the serial port to mine in the example files (running in command line 'ls /dev/tty.usb*'to find it)
- SWITCH ON POWER SUPPLY
- RUN CODE IN TERMINAL:
htmaa folder
run singlenode.py example with:
'python singlenode.py'
Erase temporal file before testing each node
Repeat this operation for each one separately
Repeat this operation for each motor.
When more than one node are attached to the same
Fabnet, the command line will ask to identify each node,
which is done by pressing the button on the selected node.
Some files will be created in your folder:
- test.vmp
- motionPladebugfile.txt
- 086-005a.pyc
Sometimes these files give you some problems. The best thing
to do is to trash these files and restart the whole system. Every time these files are trashed you will need to re-identify each node.
If you don't plug in USB, power supply etc. in this order you might get
errors while running the code, like one of the nodes not being recognised after setup.

-

-

-

-

-

-

-
-
'python xy_plotter.py'
'python pilu.py'
Just below we have the codes we are using in our machine. Take a look!
We used the suggested example as the base of our code. I will be extracting the most relevant parts of the code
							# x axis has 30 notes
							with 2mm of space between
							notes, UNITS: MM
x_notes = {
'C3': 0, 'D3': 2, 'G3': 4, 'A3': 6, 'B3': 8,
'C4': 10, 'D4': 12, 'E4': 14, 'F4': 16, 'Gb4': 18,
'G4': 20, 'Ab4': 22, 'A4': 24, 'Bb4': 26, 'B4': 28,
'C5': 30, 'Db5': 32, 'D5': 34, 'Eb5': 36, 'E5': 38,
'F5': 40, 'Gb5': 42, 'G5': 44, 'Ab5': 46, 'A5': 48,
'Bb5': 50, 'B5': 52,
'C6': 54, 'D6': 56, 'E6': 58
}

# y axis is the stepper motor that does the perforation it needs to move a full turn to do a perforation UNITS: rev
y_perforation = 1

# z axis is the roller motor, there is a 4mm space between each line of the song UNITS: MM
z_roller = 4
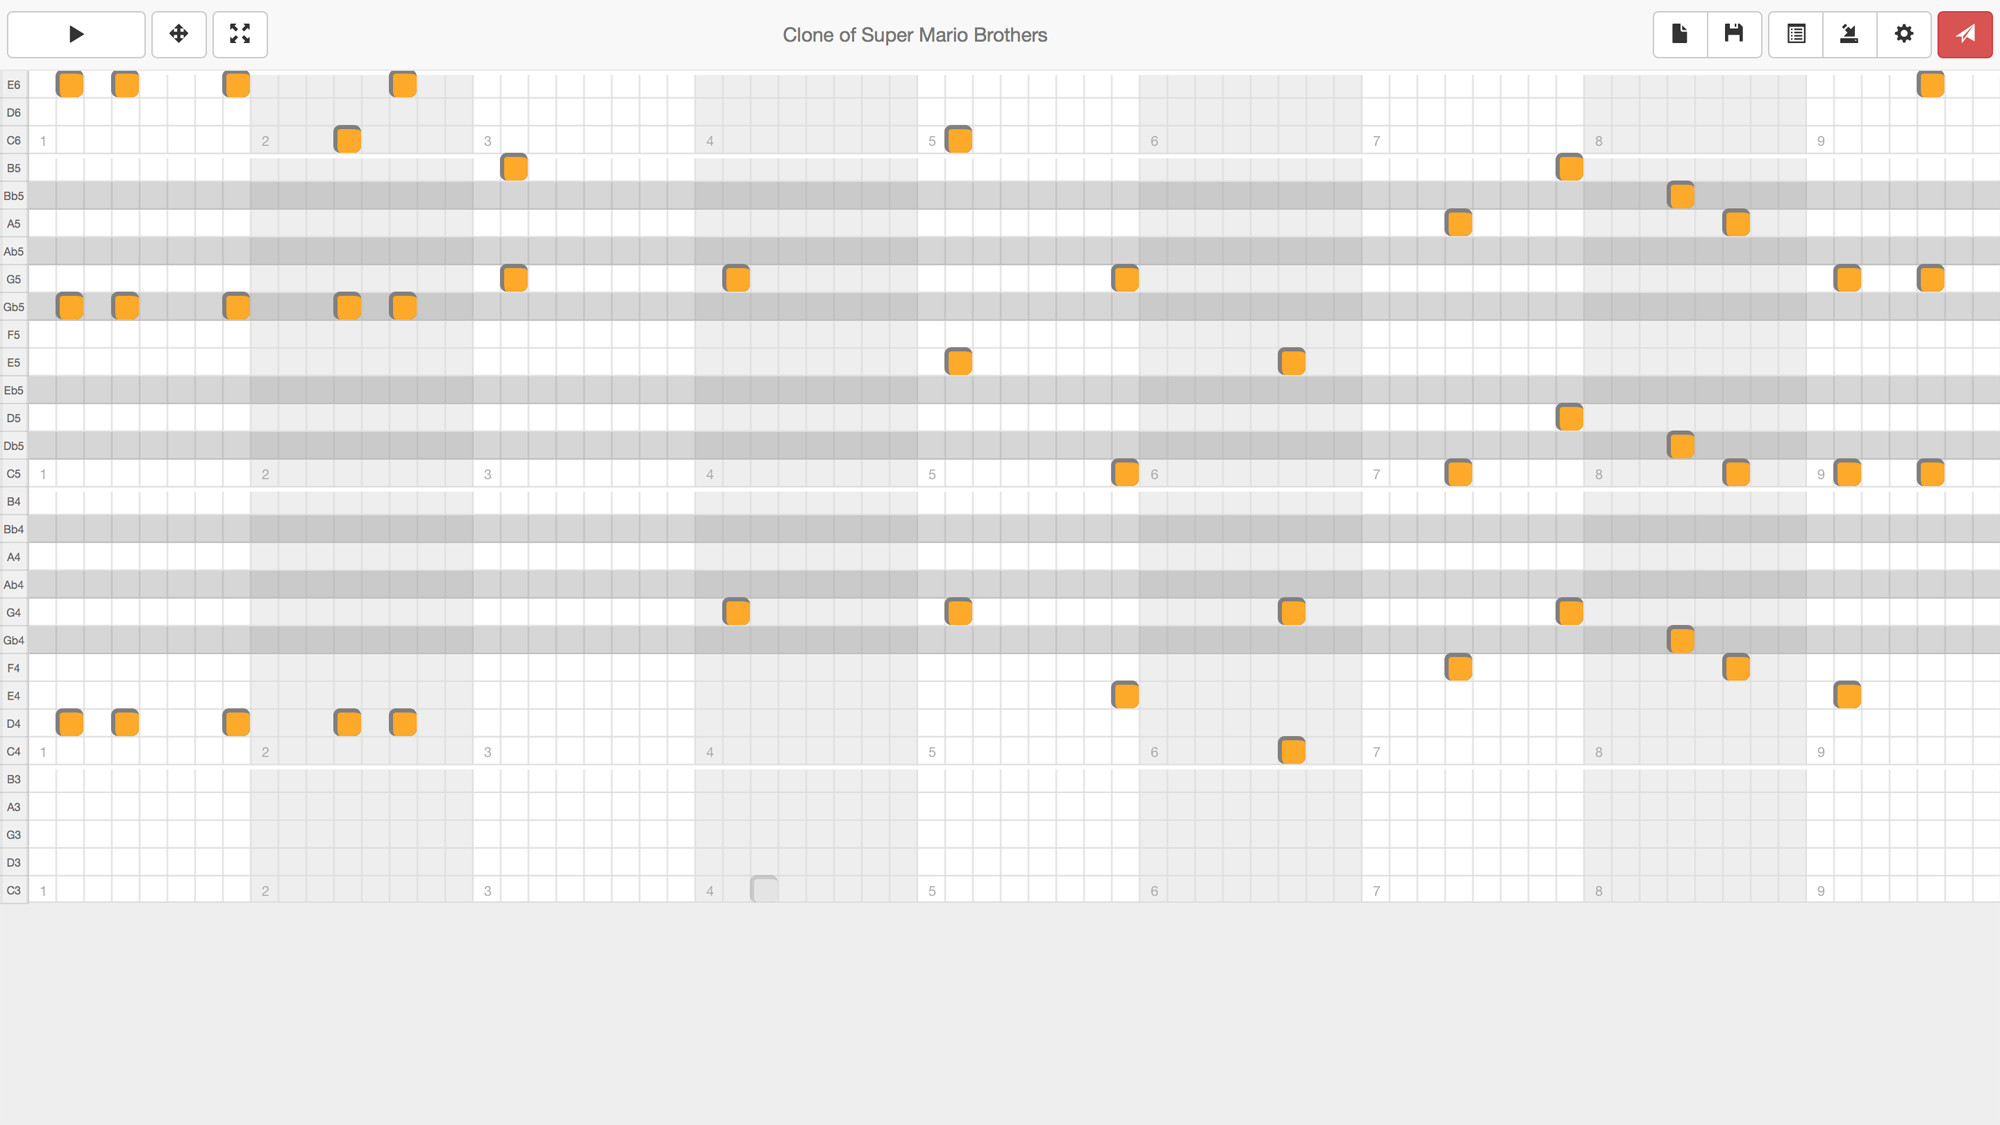
 song = [['Bb5', 'Bb4', 'F5'], [], [], [], [], [], ['Bb4'],[], [], [], [],
 [], ['Bb4', 'F5', 'D5'], [], [], [], [], [], ['Bb4'], [], [], [], [], [],
 ['Eb5', 'Bb4'], [], ['D5'], [], ['C5'], [], ['Bb5', 'Bb4', 'F5'], [], [],
 [], [], [], ['Bb4'], [], [], [], [], [], ['Bb4', 'D5', 'F5'], [], [], [],
 [], [], ['Eb5', 'Bb4'], [], ['D5'], [], ['C5'], [], ['Eb5', 'Bb5', 'Bb4'],
 [], [], [], [], [], ['Bb4'], [], [], [], [], [], ['Bb4', 'D5', 'F5'], [],
 [], [], [], [], ['Eb5', 'C5'], [], ['B4', 'D5'], [], ['Eb5', 'C5'], [],
 ['A4', 'C5'], [], [], [], [], [], ['A4'], [], [], [], [], [], ['F4'],
 [], [], [], ['F4'], [], ['G4'], [], [], [], [], [], ['Bb4'], [], [],
 ['G4'], [], [], ['Eb5', 'Bb4'], [], [], ['D5'], [], [], ['C5'], [], [],
 ['Bb4'], [], [], ['Bb4'], [], ['C5'], [], ['D5'], [], ['C5'], [], [], [],
 ['G4'], [], ['A4'], [], [], [], [], [], ['F4'], [], [], [], ['F4'], [],
 ['G4'], [], [], [], [], [], ['Bb4'], [], [], ['G4'], [], [], ['Eb5', 'Bb4'],
 [], [], ['D5'], [], [], ['C5'], [], [], ['Bb4'], [], [], ['Db5', 'F5'],
 [], [], [], [], [], ['A4', 'C5'], [], [], [], [], [], ['F4'], [], [], [],
 [], [], ['C4'], [], [], ['F4'], [], [], [], ['G4'], [], [], [], [], [],
 ['Bb4'], [], [], ['G4'], [], [], ['Eb5', 'Bb4'], [], [], ['D5'], [], [],
 ['C5'], [], [], ['Bb4'], [], [], ['Bb4'], [], ['C5'], [], ['D5'], [],
 ['C5'], [], [], [], ['G4'], [], ['F4', 'A4'], [], [], [], [], [],
 ['F4', 'F5'], [], [], [], ['F5'], [], ['Bb5', 'Gb5'], [], [], [],
 ['F5', 'Ab5'], [], ['Eb5', 'Gb5'], [], [], [], ['Db5', 'F5'], [],
 ['Eb5', 'C5'], [], [], [], ['Bb4', 'Db5'], [], ['Ab4', 'C5'], [], [], [],
 ['Gb4', 'Bb4'], [], ['F4', 'F5']]
 # JAVIBG
# Movement is defined
# 0. for each line in song
# 1. position the z_roller
# 2. if not empty then for each note
# 3. move the first x_note in the row
# 4. make the perforation with y_perforation one revolution
# 5. go back to the x_note 0
# 6. end for each note
# 7. end for each line

moves = [[0,0,0]]
current_z = 0

for line in song:
	if line:
		for note in line:
			aux = [x_notes[note],0, current_z]
			moves.append(aux)
			aux2 = [x_notes[note], y_perforation, current_z]
			moves.append(aux2)
		aux3 = [0,0,current_z]
		moves.append(aux3)
	current_z += z_roller
	moves.append([0,0,current_z])

for move in moves:
			stages.move(move, 0)
	status = stages.xAxisNode.spinStatusRequest()
	# This checks to see if the move is done.
	while status['stepsRemaining'] > 0:
		time.sleep(0.001)
		status = stages.xAxisNode.spinStatusRequest()
Without the ability of parsing song files and writting them into machine movement the
machine can't be considered completed. Initially I though it could be really difficult to
implement but I think I found a decent and pragmatic approach for this.
Coding a full GUI for writting the song was out of reach for this week so I spend some
time looking for preexisting music roll editors and found this really cool project Musicboxmaniacs.com
online editor. The app allows to make your own songs, play them online and export as mp3, PDF guides and
more interestingly MIDI files.
-
Supermario Bros theme song found at Musicboxmaniacs.com
	# define two arrays the full song and each line
song = []
line = []

# pattern[1] is the part of the midi object that I need where notes are described
for note in pattern[1]:
    if isinstance(note, midi.NoteOnEvent):
        linejump = note.tick/240
        for i in range(0,linejump):
            song.append([])
        aux = note.data[0]
        line.append(midinotes[aux])
    if isinstance(note, midi.NoteOffEvent):
        if line:
            song.append(line)
            line = []

print song
# The Picker Machine Code was developed by Javier Burón
GarcÃa and Pilu Caballero during Machine design Assignment.
Based on Nadya Peek xy_plotter example.Two stage example Virtual
Machine file moves get set in Main.
# Dec 2014
# The Picker Machine Team are : Juan GarcÃa, Daniel Amigo, Alvaro la Roja, Pilu Caballero and Javier Burón.
# FabLab CEU Madrid
# FabAcademy 2017
# The code is under Picker Machine License
# THE PICKER MACHINE : Our machine need to Pick and Cut A musicSheet based in 30 notes with 70 mm for works.
# The distance beetwen each notes are 2mm so the X Axis have to move there
# The punchHeader going DOWN/UP for make holes. Y Axis Moves.
# Finally cuts done the Z Axis, roll the MusicSheet every 4mm.
#------IMPORTS------- pyGestalt main Functions
from pygestalt import nodes
from pygestalt import interfaces
from pygestalt import machines
from pygestalt import functions
from pygestalt.machines import elements
from pygestalt.machines import kinematics
from pygestalt.machines import state
from pygestalt.utilities import notice
from pygestalt.publish import rpc
#remote procedure call dispatcher
import time
import io
# Variables : We defined the main variables as you see below
# X Axis : Has 30 Notes with a space between them : 2mm
# Y Axis : Does the perforation. It needs to move a full turn to do a perforation.
# Z Axis : Is the roller motor, there is a 4mm space between each line of the song.
# Our first attended we made an array based in the stepper moves 8, 16, 24... for x axis and Initialize Notes and Songs with the idea to change later for 30 notes.
# We was coding without the machine so was difficult for test the codes made but an array is an array with machine or not and we know each axis moves commented below.
# Javi had the stepper used for header design so gently could to try the first things and modify and advance.
# JAVIBG INITIALIZE NOTES AND SONG ARRAYS
# x axis UNITS:
MM
x_notes = {
'C3': 0, 'D3': 2, 'G3': 4, 'A3': 6, 'B3': 8,
'C4': 10, 'D4': 12, 'E4': 14, 'F4': 16, 'Gb4': 18, 'G4': 20, 'Ab4': 22, 'A4': 24,
'Bb4': 26, 'B4': 28,
'C5': 30, 'Db5': 32, 'D5': 34, 'Eb5': 36, 'E5': 38, 'F5': 40, 'Gb5': 42, 'G5': 44,
'Ab5': 46, 'A5': 48, 'Bb5': 50, 'B5': 52,
'C6': 54, 'D6': 56, 'E6': 58
}
# y axis UNITS: rev
y_perforation = 1
# z axis UNITS: MM
z_roller = 4
# SECOND DEFINE AN ARRAY TO WRITE THE SONG, EACH VECTOR IS ONE LINE, THIS SONG IS C MAJOR SCALE AND C MAJOR CHORD
song = [['Bb5', 'Bb4', 'F5'], [], [], [], [], [], ['Bb4'], [], [], [], [], [], ['Bb4', 'F5', 'D5'], [], [], [], [], [], ['Bb4'], [], [], [], [], [], ['Eb5', 'Bb4'], [], ['D5'], [], ['C5'], [], ['Bb5', 'Bb4', 'F5'], [], [], [], [], [], ['Bb4'], [], [], [], [], [], ['Bb4', 'D5', 'F5'], [], [], [], [], [], ['Eb5', 'Bb4'], [], ['D5'], [], ['C5'], [], ['Eb5', 'Bb5', 'Bb4'], [], [], [], [], [], ['Bb4'], [], [], [], [], [], ['Bb4', 'D5', 'F5'], [], [], [], [], [], ['Eb5', 'C5'], [], ['B4', 'D5'], [], ['Eb5', 'C5'], [], ['A4', 'C5'], [], [], [], [], [], ['A4'], [], [], [], [], [], ['F4'], [], [], [], ['F4'], [], ['G4'], [], [], [], [], [], ['Bb4'], [], [], ['G4'], [], [], ['Eb5', 'Bb4'], [], [], ['D5'], [], [], ['C5'], [], [], ['Bb4'], [], [], ['Bb4'], [], ['C5'], [], ['D5'], [], ['C5'], [], [], [], ['G4'], [], ['A4'], [], [], [], [], [], ['F4'], [], [], [], ['F4'], [], ['G4'], [], [], [], [], [], ['Bb4'], [], [], ['G4'], [], [], ['Eb5', 'Bb4'], [], [], ['D5'], [], [], ['C5'], [], [], ['Bb4'], [], [], ['Db5', 'F5'], [], [], [], [], [], ['A4', 'C5'], [], [], [], [], [], ['F4'], [], [], [], [], [], ['C4'], [], [], ['F4'], [], [], [], ['G4'], [], [], [], [], [], ['Bb4'], [], [], ['G4'], [], [], ['Eb5', 'Bb4'], [], [], ['D5'], [], [], ['C5'], [], [], ['Bb4'], [], [], ['Bb4'], [], ['C5'], [], ['D5'], [], ['C5'], [], [], [], ['G4'], [], ['F4', 'A4'], [], [], [], [], [], ['F4', 'F5'], [], [], [], ['F5'], [], ['Bb5', 'Gb5'], [], [], [], ['F5', 'Ab5'], [], ['Eb5', 'Gb5'], [], [], [], ['Db5', 'F5'], [], ['Eb5', 'C5'], [], [], [], ['Bb4', 'Db5'], [], ['Ab4', 'C5'], [], [], [], ['Gb4', 'Bb4'], [], ['F4', 'F5']]
#------VIRTUAL MACHINE------ Main functions
class virtualMachine(machines.virtualMachine):
#------Interfaces functions for RS 485 Serial Port Communication.
def initInterfaces(self):
# We need to change the name of our FabNet usbPort here. In my our case was : '/dev/tty.usbserial-FTZ29L92'
if self.providedInterface: self.fabnet = self.providedInterface #providedInterface is defined in the virtualMachine class.
else: self.fabnet = interfaces.gestaltInterface('FABNET', interfaces.serialInterface(baudRate = 115200, interfaceType = 'ftdi', portName = '/dev/tty.usbserial-FTZ29L92'))
#------Nodes/drivers Function for Gestalt Nodes. We modified the basic xy_plotter example adding zAxisNode and compounds
def initControllers(self):
self.xAxisNode = nodes.networkedGestaltNode('X Axis', self.fabnet, filename = '086-005a.py', persistence = self.persistence)
self.yAxisNode = nodes.networkedGestaltNode('Y Axis', self.fabnet, filename = '086-005a.py', persistence = self.persistence)
self.zAxisNode = nodes.networkedGestaltNode('Z Axis', self.fabnet, filename = '086-005a.py', persistence = self.persistence)
self.xyzNode = nodes.compoundNode(self.xAxisNode, self.yAxisNode, self.zAxisNode )
#------Function for state and position coordinates. We modified adding our apropiated Y axis variable in revolutions : ´rev´
def initCoordinates(self):
# JAVIBG Y MOTOR COORDINATE IN REVOLUTIONS
self.position = state.coordinate(['mm', 'rev' , 'mm' ])
#------Kinematics function for storage the initial arguments for each motor . This function must to adjust testing each step for each axis .
# We added the z Kinematics and the number for direct drive all axes to 3
def initKinematics(self):
self.xAxis = elements.elementChain.forward([elements.microstep.forward(4), elements.stepper.forward(1.8), elements.leadscrew.forward(7), elements.invert.forward(False)])
self.yAxis = elements.elementChain.forward([elements.microstep.forward(4), elements.stepper.forward(1.8), elements.leadscrew.forward(8), elements.invert.forward(False)])
self.zAxis = elements.elementChain.forward([elements.microstep.forward(4), elements.stepper.forward(1.8), elements.leadscrew.forward(8), elements.invert.forward(False)])
self.stageKinematics = kinematics.direct(3) #direct drive on all axes
def initFunctions(self):
self.move = functions.move(virtualMachine = self, virtualNode = self.xyzNode, axes = [self.xAxis, self.yAxis, self.zAxis ] , kinematics = self.stageKinematics, machinePosition = self.position,planner = 'null')
self.jog = functions.jog(self.move) #an incremental wrapper for the move function
pass
def initLast(self):
#self.machineControl.setMotorCurrents(aCurrent = 0.8, bCurrent = 0.8, cCurrent = 0.8)
#self.xNode.setVelocityRequest(0) #clear velocity on nodes. Eventually this will be put in the motion planner on initialization to match state.
pass
def publish(self):
#self.publisher.addNodes(self.machineControl)
pass
def getPosition(self):
return {'position':self.position.future()}
def setPosition(self, position = [None]):
self.position.future.set(position)
def setSpindleSpeed(self, speedFraction):
#self.machineControl.pwmRequest(speedFraction)
pass
#------IF RUN DIRECTLY FROM TERMINAL------
if __name__ == '__main__':
# The persistence file remembers the node you set. It'll generate the first time you run the
# file. If you are hooking up a new node, delete the previous persistence file.
stages = virtualMachine(persistenceFile = "test.vmp")
# You can load a new program onto the nodes if you are so inclined. This is currently set to
# the path to the 086-005 repository on Nadya's machine.
#stages.xyNode.loadProgram('../../../086-005/086-005a.hex')
# This is a widget for setting the potentiometer to set the motor current limit on the nodes.
# The A4982 has max 2A of current, running the widget will interactively help you set.
#stages.xyNode.setMotorCurrent(0.7)
# This is for how fast the stepper moves, we can change for precision more slow.
stages.xyzNode.setVelocityRequest(8)
# Some random moves to test with moves = [[10,10,10], [20,20,20], [0,0,0]]
# Move!
# JAVIBG
# Movement is defined
# 0. for each line in song
# 1. position the z_roller
# 2. if not empty then for each note
# 3. move the first x_note in the row
# 4. make the perforation with y_perforation one revolution
# 5. go back to the x_note 0
# 6. end for each note
# 7. end for each line
moves = [[0,0,0]] # Iniatilize moves Variable
current_z = 0 # Variable z value for initialize
# conditional about move in lines
if line:
for note in line:
aux = [x_notes[note],0, current_z]
moves.append(aux)
aux2 = [x_notes[note], y_perforation, current_z]
moves.append(aux2)
aux3 = [0,0,current_z]
moves.append(aux3)
current_z += z_roller
moves.append([0,0,current_z])
# JAVIBG this is the moves array for the current song. moves = [[0, 0, 0], [10, 0, 0], [10, 1, 0], [0, 0, 0], [0, 0, 4], [0, 0, 8], [12, 0, 8], [12, 1, 8], [0, 0, 8], [0, 0, 12], [0, 0, 16], [14, 0, 16], [14, 1, 16], [0, 0, 16], [0, 0, 20], [0, 0, 24], [16, 0, 24], [16, 1, 24], [0, 0, 24], [0, 0, 28], [0, 0, 32], [20, 0, 32], [20, 1, 32], [0, 0, 32], [0, 0, 36], [0, 0, 40], [24, 0, 40], [24, 1, 40], [0, 0, 40], [0, 0, 44], [0, 0, 48], [28, 0, 48], [28, 1, 48], [0, 0, 48], [0, 0, 52], [0, 0, 56], [0, 0, 60], [0, 0, 64], [0, 0, 68], [10, 0, 68], [10, 1, 68], [14, 0, 68], [14, 1, 68], [20, 0, 68], [20, 1, 68], [0, 0, 68], [0, 0, 72]]
for move in moves:
stages.move(move, 0)
status = stages.xAxisNode.spinStatusRequest()
# This checks to see if the move is done.
while status['stepsRemaining'] > 0:
time.sleep(0.001)
status = stages.xAxisNode.spinStatusRequest()
			# using python midi https://github.com/vishnubob/python-midi
# install python libray with this command
# pip install git+https://github.com/vishnubob/python-midi

# library reads mid file and creates a python object
# need to transform this format

# midi.NoteOnEvent(tick=720, channel=0, data=[62, 127]),
#   midi.NoteOnEvent(tick=0, channel=0, data=[60, 127]),
#   midi.NoteOffEvent(tick=240, channel=0, data=[62, 127]),
#  midi.NoteOffEvent(tick=0, channel=0, data=[60, 127]),
#  midi.NoteOnEvent(tick=0, channel=0, data=[64, 127]),
#   midi.NoteOnEvent(tick=0, channel=0, data=[65, 127]),
#   midi.NoteOffEvent(tick=240, channel=0, data=[64, 127]),
#   midi.NoteOffEvent(tick=0, channel=0, data=[65, 127]),

# into this form

# song = [
# [],
# [],
# [],
# [D,C],
# [],
# [E,F],
# []
#]

import midi
pattern = midi.read_midifile("starwars.mid")

midinotes = {
48: 'C3', 50: 'D3', 55: 'G3', 57: 'A3', 59: 'B3',
60: 'C4', 62: 'D4', 64: 'E4', 65: 'F4', 66: 'Gb4', 67: 'G4', 68: 'Ab4', 69: 'A4', 70: 'Bb4', 71: 'B4',
72: 'C5', 73: 'Db5', 74: 'D5', 75: 'Eb5', 76: 'E5', 77: 'F5', 78: 'Gb5', 79: 'G5', 80: 'Ab5', 81: 'A5', 82: 'Bb5', 83: 'B5',
84: 'C6', 86: 'D6', 88: 'E6'
}

# define two arrays the full song and each line
song = []
line = []

# pattern[1] is the part of the midi object that I need where notes are described
for note in pattern[1]:
    if isinstance(note, midi.NoteOnEvent):
        linejump = note.tick/240
        for i in range(0,linejump):
            song.append([])
        aux = note.data[0]
        line.append(midinotes[aux])
    if isinstance(note, midi.NoteOffEvent):
        if line:
            song.append(line)
            line = []

print song
This code is a modification of Nadya's example of two nodes for 3 nodes.
								# Two stage example Virtual Machine file
# moves get set in Main
# usb port needs to be set in initInterfaces
# Nadya Peek Dec 2014

#------IMPORTS-------
from pygestalt import nodes
from pygestalt import interfaces
from pygestalt import machines
from pygestalt import functions
from pygestalt.machines import elements
from pygestalt.machines import kinematics
from pygestalt.machines import state
from pygestalt.utilities import notice
from pygestalt.publish import rpc	#remote procedure call dispatcher
import time
import io


#------VIRTUAL MACHINE------
class virtualMachine(machines.virtualMachine):

	def initInterfaces(self):
		if self.providedInterface: self.fabnet = self.providedInterface		#providedInterface is defined in the virtualMachine class.
		else: self.fabnet = interfaces.gestaltInterface('FABNET', interfaces.serialInterface(baudRate = 115200, interfaceType = 'ftdi', portName = 'COM4'))

	def initControllers(self):
		self.xAxisNode = nodes.networkedGestaltNode('X Axis', self.fabnet, filename = '086-005a.py', persistence = self.persistence)
		self.yAxisNode = nodes.networkedGestaltNode('Y Axis', self.fabnet, filename = '086-005a.py', persistence = self.persistence)
		self.zAxisNode = nodes.networkedGestaltNode('Z Axis', self.fabnet, filename = '086-005a.py', persistence = self.persistence)

		self.xyzNode = nodes.compoundNode(self.xAxisNode, self.yAxisNode, self.zAxisNode)

	def initCoordinates(self):
		self.position = state.coordinate(['mm', 'mm' , 'mm'])

	def initKinematics(self):
		self.xAxis = elements.elementChain.forward([elements.microstep.forward(4), elements.stepper.forward(1.8), elements.leadscrew.forward(7), elements.invert.forward(False)])
		self.yAxis = elements.elementChain.forward([elements.microstep.forward(4), elements.stepper.forward(1.8), elements.leadscrew.forward(5.99), elements.invert.forward(True)])
		self.zAxis = elements.elementChain.forward([elements.microstep.forward(4), elements.stepper.forward(1.8), elements.leadscrew.forward(12.28), elements.invert.forward(False)])
		self.stageKinematics = kinematics.direct(3)	#direct drive on all axes

	def initFunctions(self):
		self.move = functions.move(virtualMachine = self, virtualNode = self.xyzNode, axes = [self.xAxis, self.yAxis, self.zAxis], kinematics = self.stageKinematics, machinePosition = self.position,planner = 'null')
		self.jog = functions.jog(self.move)	#an incremental wrapper for the move function
		pass

	def initLast(self):
		#self.machineControl.setMotorCurrents(aCurrent = 0.8, bCurrent = 0.8, cCurrent = 0.8)
		#self.xNode.setVelocityRequest(0)	#clear velocity on nodes. Eventually this will be put in the motion planner on initialization to match state.
		pass

	def publish(self):
		#self.publisher.addNodes(self.machineControl)
		pass

	def getPosition(self):
		return {'position':self.position.future()}

	def setPosition(self, position  = [None, None, None]):
		self.position.future.set(position)

	def setSpindleSpeed(self, speedFraction):
		#self.machineControl.pwmRequest(speedFraction)
		pass

#------IF RUN DIRECTLY FROM TERMINAL------
if __name__ == '__main__':
	# The persistence file remembers the node you set. It'll generate the first time you run the
	# file. If you are hooking up a new node, delete the previous persistence file.
	stages = virtualMachine(persistenceFile = "test.vmp")

	# You can load a new program onto the nodes if you are so inclined. This is currently set to
	# the path to the 086-005 repository on Nadya's machine.
	#stages.xyNode.loadProgram('../../../086-005/086-005a.hex')

	# This is a widget for setting the potentiometer to set the motor current limit on the nodes.
	# The A4982 has max 2A of current, running the widget will interactively help you set.
	#stages.xyNode.setMotorCurrent(0.7)

	# This is for how fast the
	stages.xyzNode.setVelocityRequest(8)

	# Some random moves to test with
	moves = [[0, 0, 0], [10, 0, 0], [10, 6, 0], [0, 0, 0], [0, 0, 1], [0, 0, 2], [12, 0, 2], [12, 6, 2], [0, 0, 2], [0, 0, 3], [0, 0, 4], [14, 0, 4], [14, 6, 4], [0, 0, 4], [0, 0, 5], [0, 0, 6], [16, 0, 6], [16, 6, 6], [0, 0, 6], [0, 0, 7], [0, 0, 8], [20, 0, 8], [20, 6, 8], [0, 0, 8], [0, 0, 9], [0, 0, 10], [24, 0, 10], [24, 6, 10], [0, 0, 10], [0, 0, 11], [0, 0, 12], [28, 0, 12], [28, 6, 12], [0, 0, 12], [0, 0, 13], [0, 0, 14], [0, 0, 15], [0, 0, 16], [0, 0, 17], [10, 0, 17], [10, 6, 17], [14, 0, 17], [14, 6, 17], [20, 0, 17], [20, 6, 17], [0, 0, 17], [0, 0, 72]]

	# Move!
	for move in moves:
		stages.move(move, 0)
		status = stages.xAxisNode.spinStatusRequest()
		# This checks to see if the move is done.
		while status['stepsRemaining'] > 0:
			time.sleep(0.001)
			status = stages.xAxisNode.spinStatusRequest()