WEEK 8 - EMBEDDED PROGRAMMING
ASSIGNMENT
- Read a microcontroller data sheet
- Program your board to do something, with as many different programming languages and programming enviroments as possible
- Extra credit for experiment with other architectures
DATA SHEET
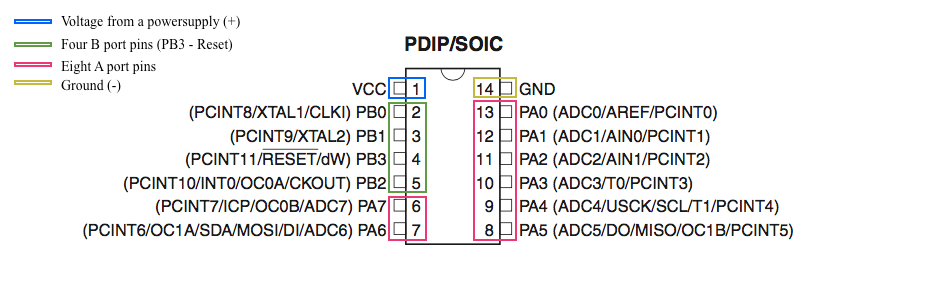
This week assignment was about programming the Echo Hello-World Board that I had designed on Electronics Design (week 6) and program it to do something with a chosen language. I began to look at the ATMEL Microcontroller Data Sheet to learn about how the ATtiny44 works and what each pin features.
Pin 1 is the VCC(+) and pin 14 is GND(-). It matters where and how everything is connected, for example pins PB1 and PB0 are for crystals and can also be used as a regular pins if there is no crystal on the board.
The image below shows the pin configurations on the microcontroller ATtiny44.
I decided to programm with arduino. The pins on the ATtiny44 does not mach the pins in the arduino so I found the image below that helps you find out the difference.
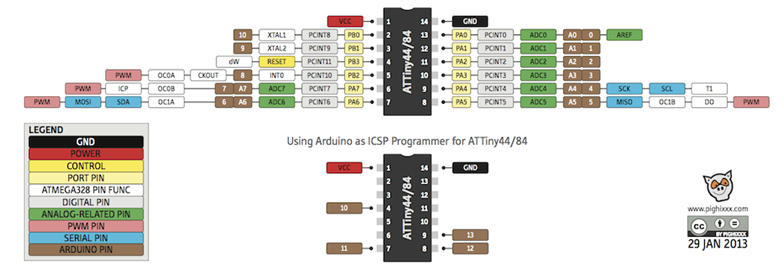
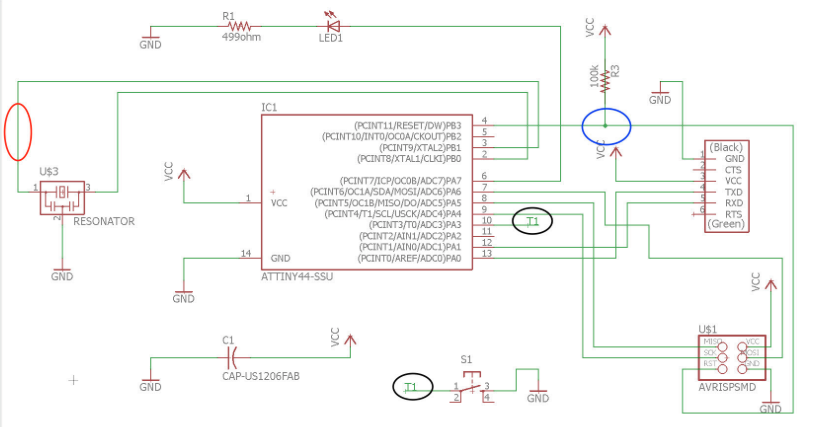
The image below is a schematic of the Hello-World Board that I made in week 6 in Electronics Designs. It shows all the components and how they are connected. For example in the black circles the T1 is connected to pin 10 (PA3) and if you look at the chart above of the of the arduino pin figuration you can see that pin PA3 is in arduino pin 3.
For example if you open arduino and go to File-->Examples-->Digital-->Button a new arduino window will open that has the code to turn on and off a light, for example a LED light.

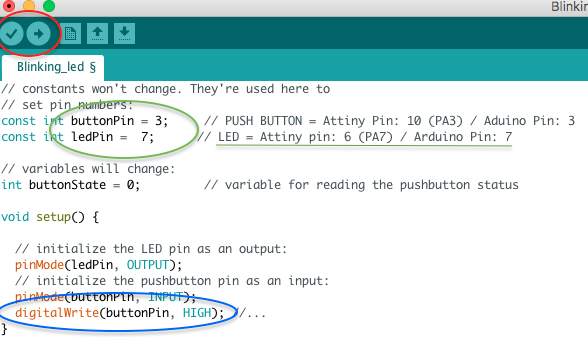
You can see that in the upper red circle that the buttonPin is set to 2 and the ledPin is set to 13. We have to change it to match the pins on the Echo Hello_World Board like in the red circle below. So we change the buttonPin and the ledPin to buttonPin = 3 and ledPin = 7 so it would work correctly.

INSTALLING ATTINY44 SUOPPORT IN ARDUINO
I opened the preferences dialog in the Arduino software and found the Additional Boards Manager URLs field and copied the following URL into the field: https://raw.githubusercontent.com/damellis/attiny/ide-1.6.x-boards-manager/package_damellis_attiny_index.json and then clicked OK.

Then I went to the boards manager in the Tools/Board menu and a Boards Manager window opened.
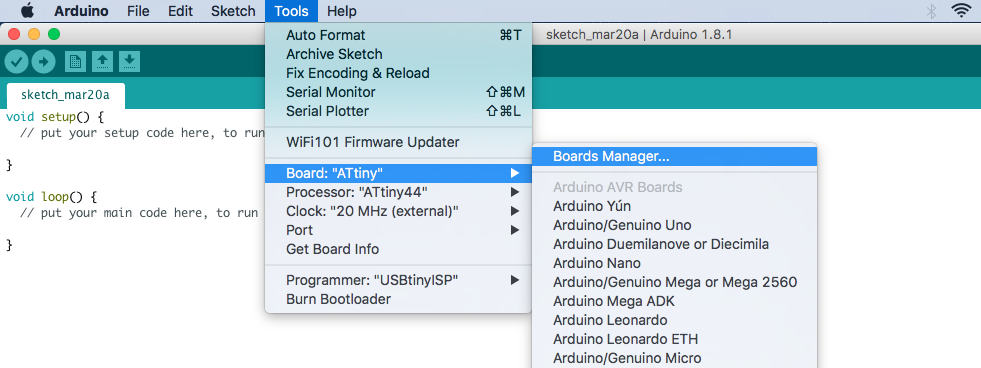
I scrolled down to the bottom of the list and installed the attiny by David A. Mells and when the word installed showed up I closed the board manager window and then I saw the entry for ATtiny in the Tools --> Board menu.

PROGRAMMING WITH ARDUINO
In week 6 I programmed the Hello-World board with the USBtinyISP programmer I made in week 4 to check if everyhting was okay. I programmed it to turn off the LED when pushing the button. I programmed it with Windows and everything was okay, when I was going to programm it in my MacBook it didn't work, this error came up: Could not find USBtiny device (0x1781/Oxc9f).
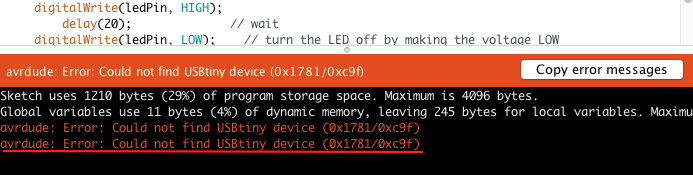
So I checked if my ISP programmer (USBtinyISP) was connected to the computer by going to System Information --> Hardware --> USB and I saw that my ISP programmer was not connected, so I knew that it was broken or something. Luckily I had two days off in my work so I made a new ISP programmer and connected it and the image below shows it is connected.

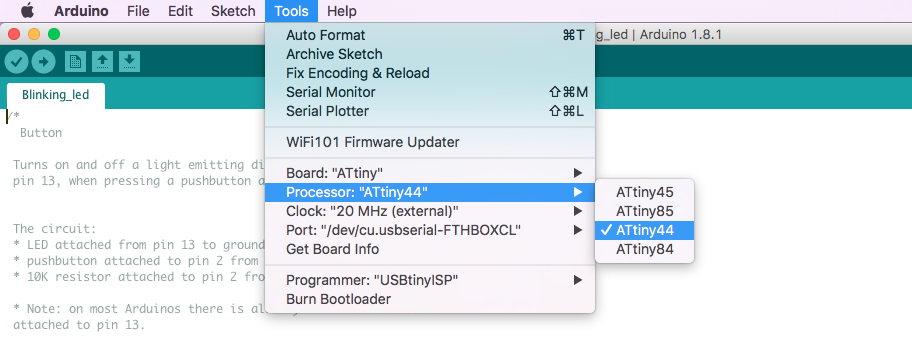
Then I opened an arduino project that blinks the LED and when I push the button it blinks faster (can also be reversed, depends how you program it). Then I set the settings for the Hello-World board. I went to Tools --> Board --> ATtiny.

Then I selcected the processor I was using which was ATtiny44, so I went to Tools --> Processor --> ATtiny44.
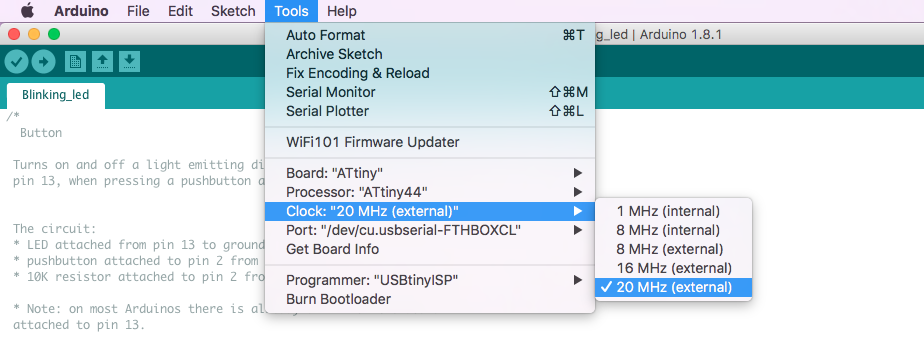
There is a 20 MHz external clock in the board which I seleced in Tools --> Clock --> 20MHz (external).
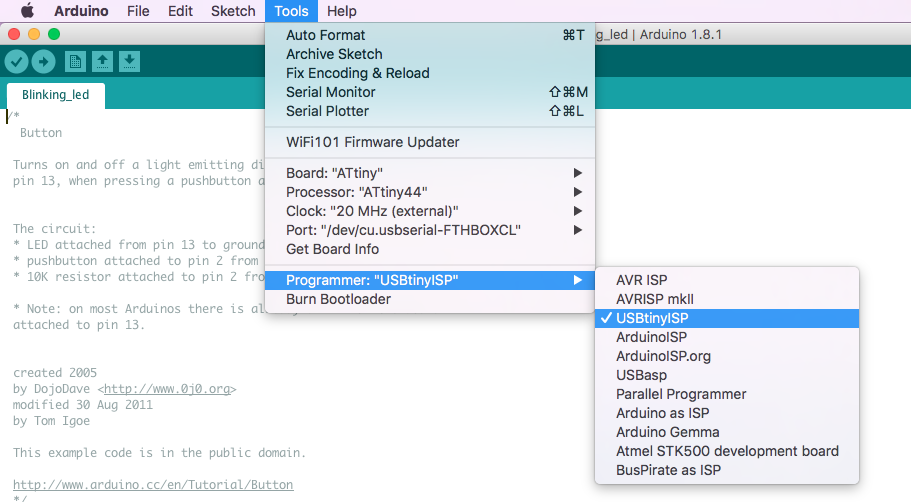
Then I selected a programmer which was the USBtinyISP I had made. Tools --> Programmer --> USBtinyISP.
If it's the first time using the programmer it's necessary to burn the bootloader before doing anything. See here what bootloader is.
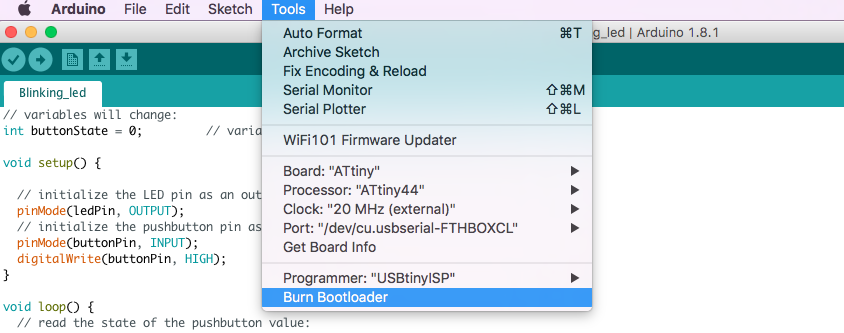
You go to Tools --> Burn Bootloader.
That's how the boards are connected.

Like before I had to change buttonPin and the ledPin so it would match to the ATtiny44 by using the chart that shows the pin figuration from above. I had to add a line in the code that activates the internal Pull-up Resistor of the button pin, which was digitalWrite(buttonPin, HIGH); as you can see in the blue circle on the image below. Than it was ready to be programmed. First I had to verify the code by clicking the verify button in the red circle. Everything was okay, I didn't get any errors this time so I clicked the upload button which is also in the red circle and sent the code out and the LED start blinking.
BLINKING LED
Here is a video that shows you how the blinking LED works.
Blinking_LED from BirkirThor on Vimeo.
LED ON/OFF
I programmed the board so when I push the button the LED will turn off and goes on when I release it. I opened arduino and went to File --> Examples --> Digital --> Button and change the pin figuration to buttonPin = 3 and ledPin = 7 and wrote digitalWrite(buttonPin, HIGH); in the void setup. It is the same process like I explaned before. The video below shows how it works.
Button on/off from BirkirThor on Vimeo.
MORSE CODE
The LED is on and when the button is pressed the SOS morse code starts and then goes back to normal.
LED ON_SOS from BirkirThor on Vimeo.
FADE IN/FADE OUT
The LED fades in and fades out. The button does not do anything.
Fade in/fade out from BirkirThor on Vimeo.
WHAT DID I LEARN?
This week I learned a lot about the ATtiny44, how it works, what each pin features and realise how much it can actually do. I also learned how to make basic LED light codes with arduino and how to install libraries in it. I didn't know why I should burn bootloader or what it was, but know I do. It was my first time programming my own circuit boards so I learned more about the components they have and what they do.
RELATED LINKS
Week 6
ATMEL Microcontroller Data Sheet
Arduino
Blinking LED
Button on/off
SOS Morse Code
Fade In/Out
FILES
ATMEL Microcontroller Data Sheet - Right click to download
Blinking LED - Right click to download
Button on/off - Right click to download
SOS Morse Code - Right click to download
Fade In/Out - Right click to download
HAVE QUESTIONS?
Contact me!
Höfn, Iceland
Email: birkirthorhauksson@gmail.com
Swing by for a cup of , or send me a message :)