
Assignment
- Write an application that interfaces with an input &/or output device that you made.
0. Idea.
For this assignment I want to write an application in python which can send and receive data from a given IP as TCP client and will make its GUI using tkinter.
1. Application Development and testing.
I have just started learning python from last week, still I am learning it. This week the first thing that I want to learn is "Tkinter". To design GUI.
I found following video tutorial series very helpful to learn Tkinter.
Last week I have written a simple program in python by looking at the examples of Neil. That was a simple script which connect with the client and send some message.
Now I want to write the application which and send and get the data and make a TCP connection as well with given IP address. And also design it's interface.
The following video will show the work fellow of my application.
I am using python 2.7 for this application, the script is given below. This script is also attached at the end of this page.
from Tkinter import *
import sys
import socket
import errno
flag = False
data = 0

sock = socket.socket(socket.AF_INET, socket.SOCK_STREAM)

datasent = ""

def main_label():
    main_label =Label(text='TCP Client - Assignment 16', font = "Helvetica 16 bold " , bg='dark sea green').place(x=40,y=40)

def ip_label():
    myip_label =Label(text='IP', bg='dark sea green').place(x=20,y=115)

def port_label():
    myport_label =Label(text='Port', bg='dark sea green').place(x=20,y=145)

def user0_label():
    user0_label =Label(text='Enter IP and port and click connect', bg='dark sea green').place(x=20,y=95)

def user1_label():
    user1_label =Label(text='Enter Data below to send', bg='dark sea green').place(x=20,y=205)

def user2_label():
    user0_label =Label(text='Transmitted data', bg='dark sea green').place(x=20,y=250)

def user3_label():
    user1_label =Label(text='Received data', bg='dark sea green').place(x=20,y=360)

def user4_label():
    user1_label =Label(text='Designed by: Sohail Ahmed Soomro -- FAB LAB BCB', bg='dark sea green').place(x=20,y=480)


def button_action():
	global datasent
	text1= msg_input.get()

	sock.sendall(text1)
	datasent = datasent + "\n" + text1
	echo_win =Label(text=datasent,width=43,height=5,bg="#fff",bd=2,relief=SUNKEN).place(x=25,y=270)

	msg_entry.delete(0,END)


def button_action1():
	data = sock.recv(100)
	rcv_win = Label(text=data, width=43, height=5, bg="#fff", bd=2, relief=SUNKEN).place(x=25, y=400)


def enter_action(self):
    button_action()

def button_ip_action():
	ip = ipinput.get()
	myport = port_input.get()
	print(sock.connect((ip,myport)))

	tk.after(100,recv_data)

def recv_data():
	sock.setblocking(0)
	try:
		data = sock.recv(100)
	except socket.error,e:
		err = e.args[0]
		if err== errno.EAGAIN or err ==errno.EWOULDBLOCK:
			sleep(1)
			print 'No data available'
		else:
			print e
			sys.exit(1)
	else:
		print(data)
		rcv_win = Label(text=data, width=43, height=5, bg="#fff", bd=2, relief=SUNKEN).place(x=25, y=400)
	tk.after(100,recv_data)

tk = Tk()
tk.geometry('400x500')
tk.configure(background='dark sea green')
tk.resizable(width=FALSE, height=FALSE)

tk.title('Sohail_client')
main_label()
ip_label()
port_label()
user0_label() #show msg "Enter IP and port and click connect"
user1_label() #show msg "Enter data below to send"
user2_label() #show msg "Transmitted data"
user3_label() #show msg "Received data"
user4_label() #show msg "Designed by"


##### SET IP
ipinput =StringVar()
ip_entry= Entry(tk,textvariable=ipinput,width=20)
ip_entry.place(x=50,y=115)


##### SET PORT
port_input =IntVar()
port_entry= Entry(tk,textvariable=port_input,width=20)
port_entry.place(x=50,y=145)
ip_Button = Button(tk,text='CONNECT', bd=0, bg="#FFBF00", activebackground="#FACC2E", command= button_ip_action).place(x=50,y=170)

##### SENDING MSG
msg_input=StringVar()
msg_entry= Entry(tk,textvariable=msg_input,width=35)
msg_entry.bind("",enter_action)
msg_entry.place(x=50,y=230)
send_button = Button(tk,text='Send', bd=0, bg="#FFBF00", activebackground="#FACC2E", command= button_action).place(x=275,y=230)


#### ECHO window. 192.168.1.106
echo_win =Label(width=43,height=5,bg="#fff",bd=2,relief=SUNKEN).place(x=25,y=270)

#### Receive window
#recv_button = Button(tk,text='update buffer',bd=0, bg="#FFBF00", activebackground="#FACC2E", command= button_action1).place(x=275,y=360)
rcv_win = Label(width=43, height=5, bg="#fff", bd=2, relief=SUNKEN).place(x=25, y=400)

tk.mainloop()
The big problem that I faced in writting this script is that I was unble to recived the data automatically, at the start I was using a button so that when it is pressed the action is called and in action I can display the data. but it is not a good strategy. data must be displayed automatically as it recived. To solve this problem I tried a lot using different techniques but finally I found a instruction in some forum regarding use of "sock.setblocking(0)", that help me a lot. There must be many ways to encounter this problem but I thought to mention here my experience as well.
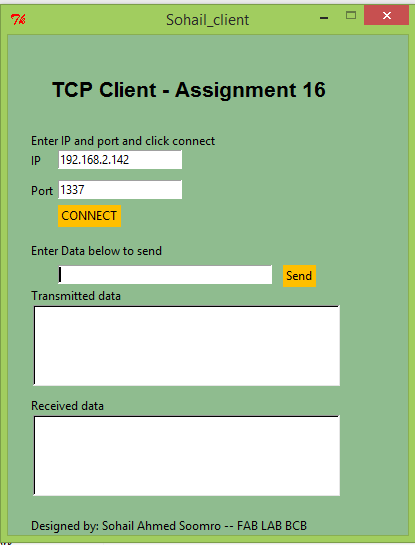
Following picture shows the interface of my application
And the following video is showing the output and work flow of my application.
2. Interfacing resistive touch with my application.
In my Network assignment (week 15) I used resistive touch to interface it with Atmega32u4 which send the data to serial monitor of Arduino IDE and Moblie phone using the ESP8266, this time I use that program to send data to my Application. The wifi configuration is the same as described in last week assignment.
At the Arduino side I am using the Following Arduino program to interface touch with my application using ESP8266. ESP8266 is connected on "Serial1" of Atmega32u4. It is already configured as tcp server i just need to send the data to serial port where the esp8266 is connected and it will transmit the data to the Application which is a TCP client.
#include <stdint.h<
#include "TouchScreen.h"

#define YP A0
#define XM A1
#define YM A2
#define XP A3

TouchScreen ts = TouchScreen(XP, YP, XM, YM, 250);

int pxvalue = -1;
int pyvalue = -1;

void setup(void) {
  Serial.begin(9600);
  Serial1.begin(115200);
}

void loop(void) {
  TSPoint p = ts.getPoint();

  if ((p.z > (ts.pressureThreshhold))) {

    int xvalue = p.x/200;
    int yvalue = p.y/200;

    if (pyvalue != yvalue || pxvalue != xvalue)
                  { pyvalue = yvalue;
                    pxvalue = xvalue;

                    switch (yvalue) {

                    case 1:    // your hand is on the sensor
                    switch (xvalue) {
                      case 1:    // your hand is on the sensor
                        Serial.println("0");
                        Serial1.println("0");
                        break;
                      case 2:    // your hand is close to the sensor
                        Serial.println("1");
                        Serial1.println("1");
                        break;
                      case 3:    // your hand is a few inches from the sensor
                        Serial.println("2");
                        Serial1.println("2");
                        break;
                      case 4:    // your hand is nowhere near the sensor
                        Serial.println("3");
                        Serial1.println("3");
                        break;  }

                      break;

                  case 2:    // your hand is close to the sensor
                          switch (xvalue) {
                      case 1:    // your hand is on the sensor
                        Serial.println("4");
                         Serial1.println("4");
                         break;
                      case 2:    // your hand is close to the sensor
                        Serial.println("5");
                        Serial1.println("5");
                        break;
                      case 3:    // your hand is a few inches from the sensor
                        Serial.println("6");
                        Serial1.println("6");
                        break;
                      case 4:    // your hand is nowhere near the sensor
                        Serial.println("7");
                        Serial1.println("7");
                        break;  }
                      break;

                  case 3:    // your hand is a few inches from the sensor
                          switch (xvalue) {
                      case 1:    // your hand is on the sensor
                        Serial.println("8");
                        Serial1.println("8");
                      break;
                      case 2:    // your hand is close to the sensor
                        Serial.println("9");
                        Serial1.println("9");
                        break;
                      case 3:    // your hand is a few inches from the sensor
                        Serial.println("10");
                        Serial1.println("10");
                        break;
                      case 4:    // your hand is nowhere near the sensor
                        Serial.println("11");
                        Serial1.println("11");
                        break;  }
                      break;

                  case 4:    // your hand is nowhere near the sensor
                          switch (xvalue) {
                      case 1:    // your hand is on the sensor
                        Serial.println("12");
                        Serial1.println("12");
                        break;
                      case 2:    // your hand is close to the sensor
                        Serial.println("13");
                        Serial1.println("13");
                        break;
                      case 3:    // your hand is a few inches from the sensor
                        Serial.println("14");
                        Serial1.println("14");
                        break;
                      case 4:    // your hand is nowhere near the sensor
                        Serial.println("15");
                        Serial1.println("15");
                        break;  }
                      break;
                }
                }
      }  // touch function ends here


}
Following video will show the interfacing of resistive touch with my application.
Now the following videos will show both send data to and from application and display it on E-paper display.
Sending streanings to EPD.
Download All file of this week Here

This work is licensed under a Creative Commons Attribution-NonCommercial-ShareAlike 4.0 International License
.