17 - applications and implications
My final project will consist of a series of LEGO-compatible bricks that hold sensors and electronics inside so others can make their own hardware without the need for soldering or using 3D printing and/or laser cutting. The bricks will be connected to the internet via WiFi so you ccacn monitor or control them in real-time
Each brick will hold a different sensor, allowing users to build their own citizen science sensor kit, or use them for ultra-rapid prototyping.
During the previous weeks I already worked on this a lot and made prototypes of bricks that hold sensors and microcontrollers. And I found a software platform to aggregate the data.
COMPONENTS LIST
The components required vary slightly between various bricks, but in general this is what is needed to build them:
-micro controllers and processors, currently I’m using the ESP8266 on a breakout called Wemos D1 mini which adds USB connectivity and WiFi.
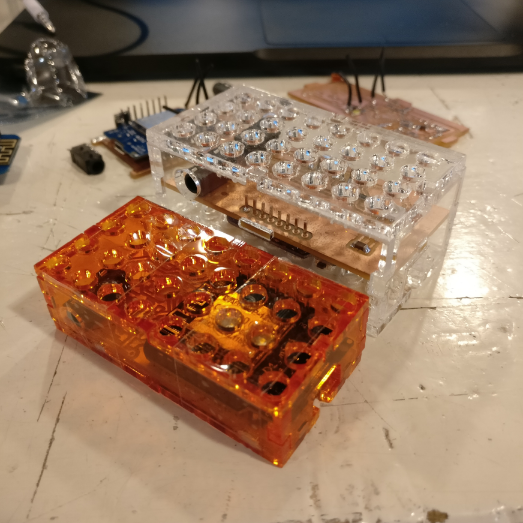
-acrylic casing, the majority of the casing will be made of laser cut acrylic.
-3D printed top, the top part will be 3D printed so I can insert pogo pins with high precision.
-pogo pins, gold plated pogo pins will make the connection between two bricks when you stack them.
-PCB, each brick holds a custom PCB with various components, microcontrollers, status LEDs etc.
-audio jacks, each brick has two standard audio jacks which I don’t use for sound but for data transmission.
-various sensors, I’m building one brick with a BME280 temperature and humidity sensor and one with a VOC sensor.
-battery, I will build a brick that holds a li-po battery and charging circuit.
-LED, one brick will hold a number of WS2812b LEDs with integrated drivers.
SOURCING MATERIAL
The acrylic and 3D printer filament come from local suppliers, the electronic components mostly come from Farnell, and some components I ordered directly from China through AliExpress.
COST
My goal is to keep the cost of each brick under $15,- but it varies by the type of sensor that’s inside. The VOC sensor itself costs $20,- so that brick will total at around $30,-.
The total bill of materials for my final project will be around $100,- but that is also due to the fact that I know I will make some mistakes and re-do certain pieces.
PARTS AND SYSTEM
For this system to work, there are only three requirements, one is power, one is an internet connection and the other is having either an output or an input. The bricks will communicate over I2C.
What I want to show is that you can use an input to generate data, an output to visualize that data, and make a complete system with very little effort.
To demonstrate this I will build the following bricks:
1 - battery brick, this brick will hold a Li-po battery so the system can work without wires.
2 - WiFi brick, this brick will hold an ESP8266 and will act as the master for the other bricks.
3 - Temperature and humidity brick, this brick will give data on temperature and humidity.
4 - VOC brick, this brick will measure VOC gasses in the air and give data on those values. This, unlike the temperature sensor, is an analog sensor, which means there will be a microcontroller on this board to convert the analog value to I2C.
5 - LED brick, this brick will hold a number of LEDs with integrated drivers which will allow users to visualize any type of data, either from local sensors or from the web.
PROCESSES
To make my final project, I will use a combination of:
-laser cutting
-PCB milling
-3D printing
-Embedded programming
TASKS
To complete my final project I have to:
-design and manufacture the different PCBs
-design and manufacture the laser cut casing
-design and manufacture the 3D printed top
-research the best way to make the different bricks stackable and compatible
-program the bricks to send their data to the WiFi brick which will have to send it to a server
QUESTIONS/CHALLENGES
The biggest challenge to be dealt with is how to make the bricks electronically connect with each other whilst still being compatible with regular LEGO bricks. To do this I plan on using pogo pins and double-sided PCBs. I’m currently researching various brands and sizes of pogo pins to find the type that makes the best connection, but also that is easy enough to handle.
Another issue I need to resolve is the tolerance and kerf of the holes and studs of my bricks to match the original LEGO pieces. There is quite some warping with the laser cutter that results in less than perfect fit with other pieces. I’m experimenting with ways to decrease the warping by lowering power settings and making different cut jobs.
SCHEDULE
This week I will have all the PCBs finished, and I already have the design for the laser cut case ready.
Next week I will make the 3D printed part with the pogo pins and I will start programming it and also will improve the laser cut parts if needed.
Then I have two more days for fine-tuning and preparing the video, slide and presentation.
EVALUATION
The project is a success if I manage to show that this a beginning for a system that can find many different applications and that proves to be easy for others to work with. If it inspires non-technical people to build their own sensor kit and they intuitively know how to use it, it is a success for me.
UPDATE 06-25-2017
After completing my final project, I answered these questions again. Full documentation can be found here.
what will it do?
The bricks I made are the foundation for an expandable, modular system of connected IoT devices which allow for easy hardware development.
The current bricks I made allow you to make a temperature and humidity sensor kit which sends data to a server over WiFi and the LED module allows you to visualize humidity data on the device itself.
I have integrated the code to work with a 3rd-party platform called AllThingsTalk which lets you see the data of the sensor brick in real time and store the data.
who's done what beforehand?
The bricks have LEGO dimensions and use the LEGO system to interconnect, so the industrial design of the stackable form factor has been developed by LEGO.
There are other somewhat integrated rapid development kits for IoT and hardware, but they all differ in form factor. You could compare this to a combination of Seeedstudio's Grove system, Littlebits and LEGO.
what materials and components will be required?
See bill of material above which lists all components and materials used.
how much will it cost?
See bill of materials above.
what parts and systems will be made?
See full documentation on final project page, but in short: a brick which connects to the internet, an input brick with a sensor and an output brick with LEDs all of which connect to an online data platform.
what processes will be used?
Electronics design and production, 3D design, 3D printing, laser cutting, programming in Arduino language, general parts assembly.
what tasks need to be completed?
I had to design a stackable system, make sure the bricks interconnect while stacked, design a standard size for the PCBs and casing and program everything.
what questions need to be answered?
I needed to find a suitable wireless technology to connect to the internet, find the right chip for WiFi communication, find the right communication protocol for the bricks to communicate, find a way to connect the bricks electronically when stacked.
how will it be evaluated
The evaluation on a technical level consists of simply checking to see if the bricks work as I have intended and to feel if they are well designed and constructed and can be connected and disconnected frequently without problems.
I found that the bricks turned out exactly as I intended, but I do see a lot of room for improvement in a next iteration. Both in terms of system, tolerances and build quality. I'm not entirely happy with the tolerances and the way they are glued.
Another point for evaluation is how easy others find them to work with. To test this I am hosting a series of workshops and hackathons with them over the summer with various groups of people, young to old to see how they react to it.
Based on user feedback I will make improvements for the next version.