In this week exercise, we are required to make networking capable microcontroller boards to perform some form of communications such as I2C, SPI, or TCP/IP. this week i am going to make the ESP8266 ESP12-E boards talk over the Internet with TCP/IP, to acquire the necessary know-how and pave the way that leads to my final project. Prior experiences accumulated is valuable. The following are my prior week of experiments.
. In the week on Electronics Design I have fabricated boards for ESP8266, on top on the board for the Hello ISP and the Hello ATtiny44 boards. In the week of Embedded Programming I have stuffed and programmed the Hello ATtiny44 board and also stuffed my board that uses ESP8266. In the week of Input devices I have fabricated boards for ESP8266 ESP12-E to use with a temperature sensor ESP8266 ESP 12E with input devices and in the week of Output devices I have fabricated boards for ESP8266 ESP12-E to use with Solid State Relay (SSR) ESP8266 ESP 12E with output devices
Background
yours truly is no stranger to sending data from a sensor to the internet. Back in 2015, he has written an instructables about it and it is available here http://www.instructables.com/id/ESP8266-NodeMCU-v10-ESP12-E-with-Arduino-IDE/
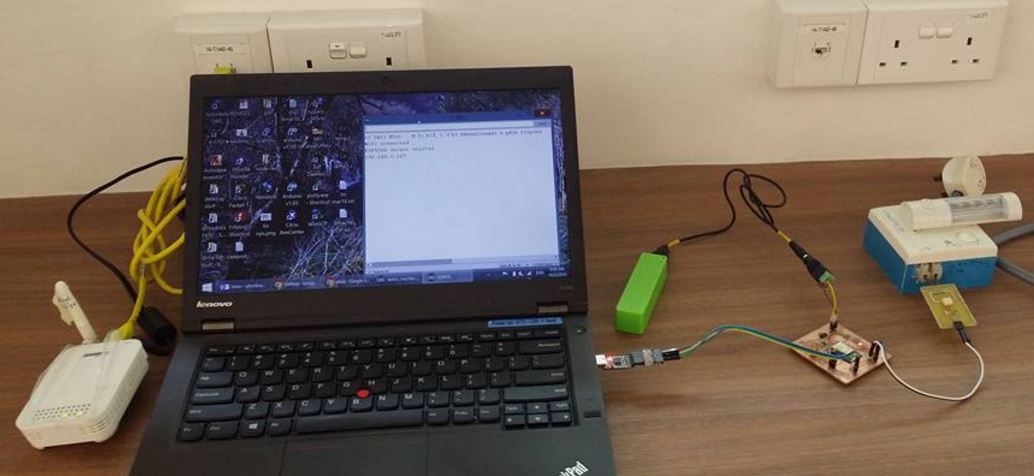
The following picture describes my setup for this week assignment. it consist of a small access point that is connected to the internet, and my ESP8266 ESP12-E boards. The boards are configured with the SSID and password necessary to connect to the internet via the access point. laptop and cpc2102 is for debuggin over the usb-serial monitor.
Source files Download
The source code for sending temperature data from ESP8266 ESP12-E to
internet to be received by thingspeak.com is available here
The soure code for the operations of sending off/on command from browser
to web server in ESP8266 ESP12-E to control the AC light is available here
TCP/IP
The TCP/IP is defacto set of protocols speak over the Internet, connecting many devices and services over the network. There are some other protocols occured over the years, but TCP/IP stayed on. To explain the internet protocols such as the TCP/IP, one have to use OSI protocol stack or the working TCP/IP protocol stack. In short, The internet protocols such as TCP/IP addressed how data are supposed to be packed, to be put on the wire (or wireless), to be sent to the intended recipient, to be routed in the collection of routers, and handling of loss of data packets.
I have used arduino IDE with ESP8266 ESP12-E, and a suite of libraries. The source code at the corresponding subsection is self-explanatory with useful comments and such.
Programming workflow
I have choosed to use Arduino IDE with the ESP8266 board installed to it as the programmer of choice to program my ESP8266 ESP12-E board. The programming workflow is as follow.
plug in CPC2102 to the ESP8266 board. TX, RX, GND, and VCC pin at the respective position on the ESP8266 ESP12E custom board.
fire up the Arduino IDE, select the appropriate board, which is the ESP12E, select 80MHz, select the com port.
write the source code as per required
To program the the ESP8266 ESP12E board, ensure that GPIO15 and GPIO0 is held to ground during programming. Press the download button from Arduino IDE. The programming of the firmware on ESP8266 with Arduino IDE will take some time as compared to programming the Atmel MCU.
Once programming is completed, remove the custom ESP8266 ESP12E board, and remove the jumpers that held GPIO0 to ground. Execution mode, GPIO0 is held at VCC. GPIO15 continue to held at ground.
observe the desire output.
ESP8266 ESP12E transmit data over TCP/IP
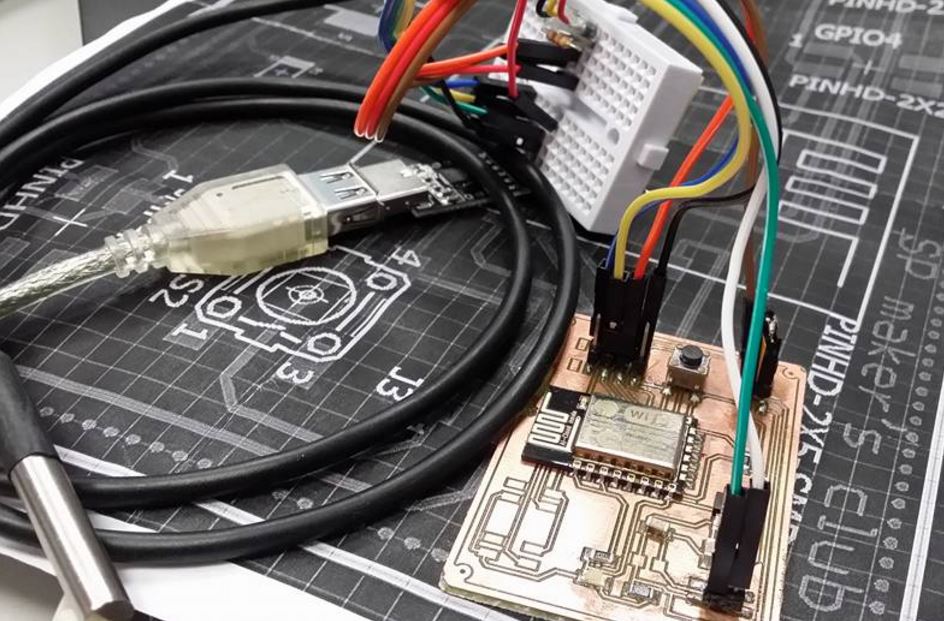
The following picture describes the fabricated ESP8266 ESP12-E board and DS18B20 temperature sensor connected to GPIO4 of ESP12E. The source code in the firmware will connect this board to the access point mentioned earlier, and the temperature data acquired via the DS18B20 will be sent to thingspeak.com via TCP/IP network, using HTTP protocol.
The following video describes the operations of sending temperature data from ESP8266 ESP12-E to internet to be received by thingspeak.com. source code is available here
ESP8266 ESP12E receive command over TCP/IP
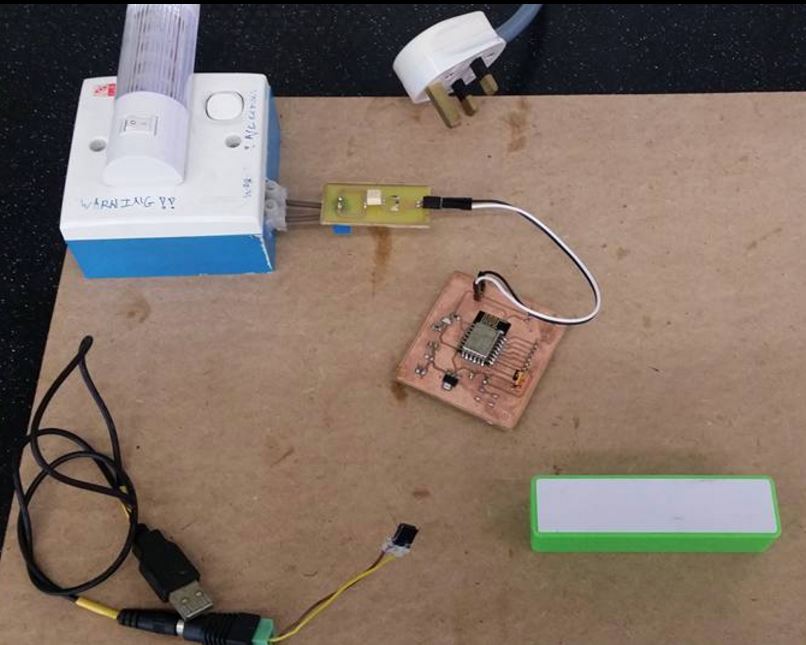
The following picture describes the fabricated ESP8266 ESP12-E board and SSR board connected to GPIO5 of the ESP12E. The source code in the firmware will connect this board to the access point mentioned earlier, and function as a mini webserver in the ESP8266. The control command is sent from a web browser to the web server that is running off ESP8266 ESP12-E. The value that is preset in the buttons of the web page will be sent over the network to the web server hosted from the ESP12E board. The ESP12E board will turn on or off the SSR connected at GPIO5 depending on the value sent by the web page via HTTP push.
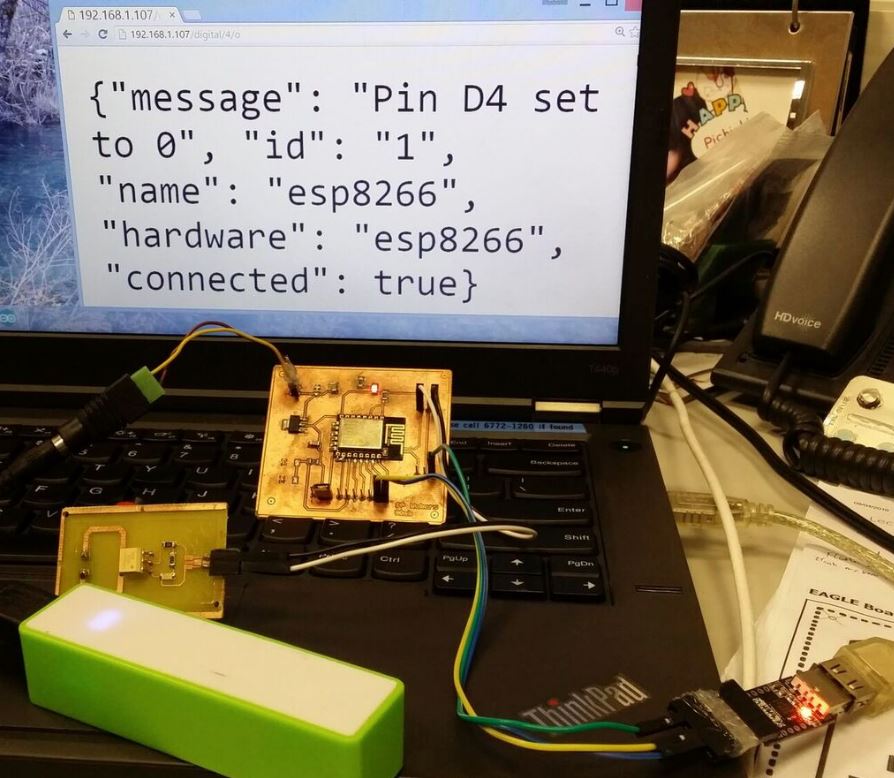
The following picture describes the opertion of turning the SSR on/off via URL in a web browser.
The following video describes the operation of turning the SSR on/off via a URL in web browser without AC load.
The following video describes the operation of turning the SSR on/off via a GUI in web browser without AC load.
The following video describes the operations of sending off/on command from browser to web server in ESP8266 ESP12-E to control the AC light. source code is available here