Final Project: Documentation
Final Poster and Video
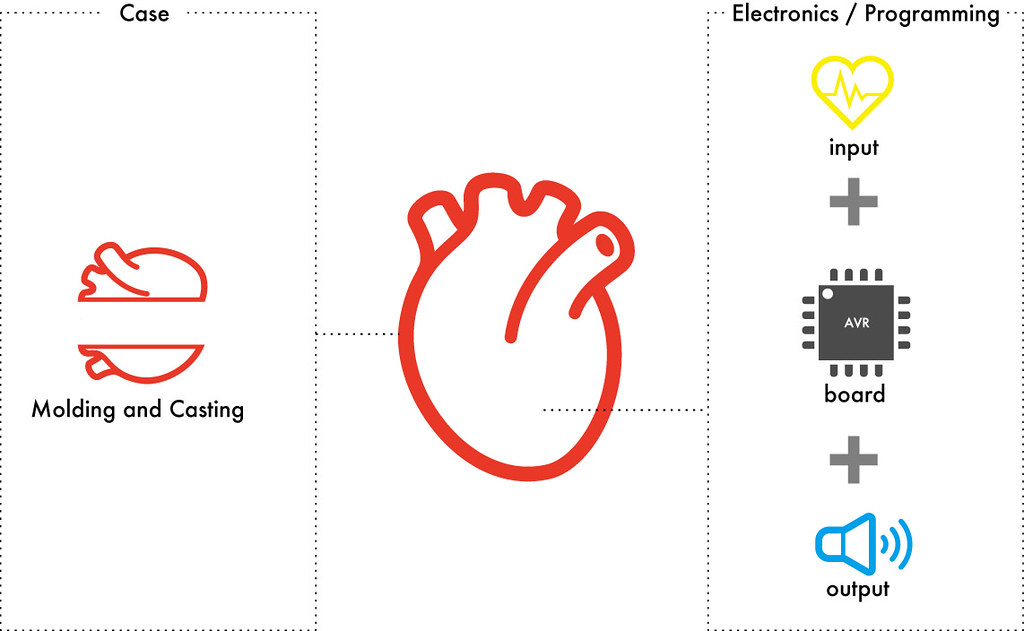
Molding and Casting
■ Making Heart needs following processes:
First thing I have to do is making the 3D file to mill the mold to make heart. I started with making the left heart. But, I have got a trouble...
Trouble
I had a trouble with making 3D data of the positive mold. I have made the heart model during week2 with Sculptris. I had to combine the heart model and box for molding. I tried several ways and tools to make box and combine those, but it did't go smoothly.
Making box with Meshmixer and combine the box and heart with 123D Design was failed. This didn't work well. When I tried to convert the heart's mesh to solid on 123D Design, the software has been down. I reduced the number of meshs with Meshlab, but didn't help.

Fusion 360:This is the heart and box on Fusion360. However on Fusion360 I couldn't join those two parts on Fusion 360 with boolean command.
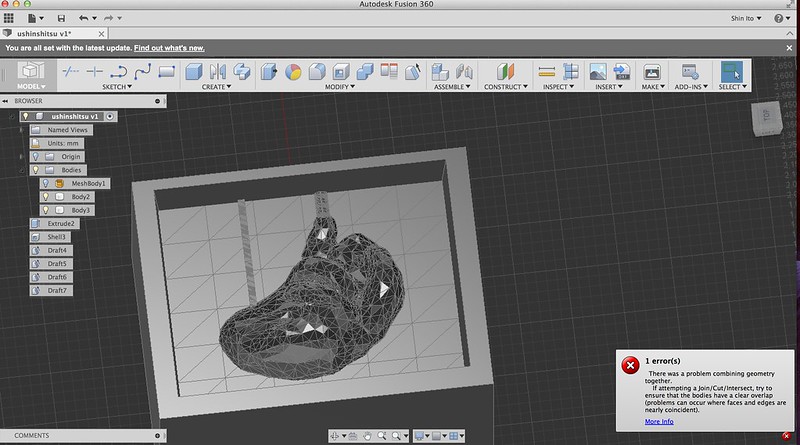
Finally, I made the box on Meshmixer and combined it with the heart model on Meshmixer. I worked well. What I've learn is that to be careful when I use various 3D software and it's better to recognize what kind of 3D format can be managed with the 3D software.
Milling
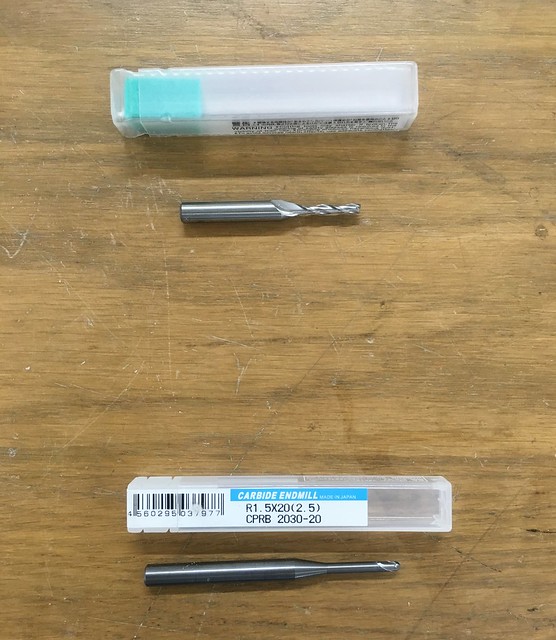
tools
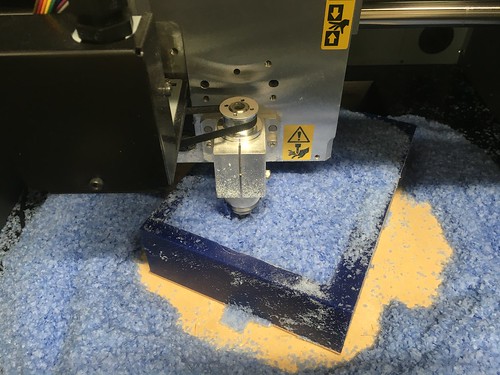
The machine is Roland MDX-40.
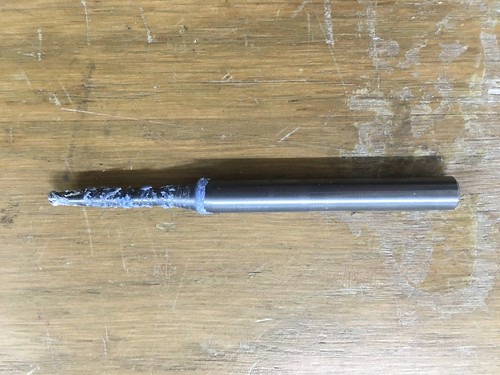
For rough cuttting I used 3mm square endmill.
For finish cutting I used 3mm ball endmill
I used FabModules to make RML file to mill the mold with Roland MDX-40. It took so long time to calculate Rough cut data and Finish cut data(about 5-6 hours each?). It might happen because of the dirty mesh structure of the STL.
■ Note: don't forget to change the unit "units/in:25.4" on Fabmodules.
■ Note: don't change the view before finishing all calcuration on Fabmodules. That leads terrible and wrong milling files.
rough cut with 3mm square endmill:
finish cut with 3mm ball endmill:
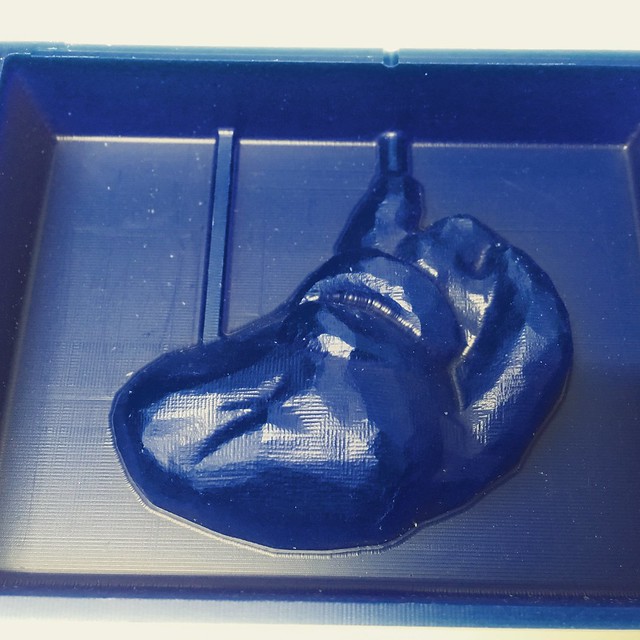
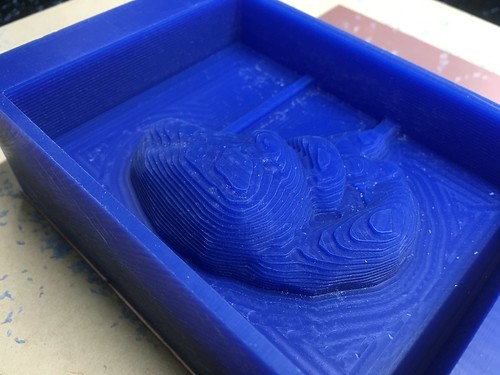
molding
Making mold with a silicon. See document of week 12
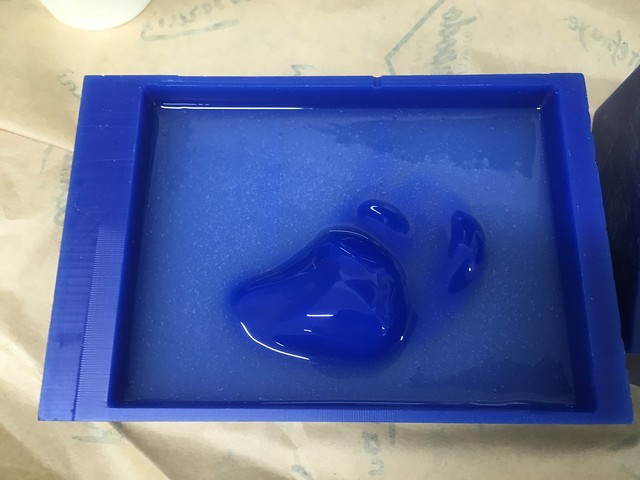
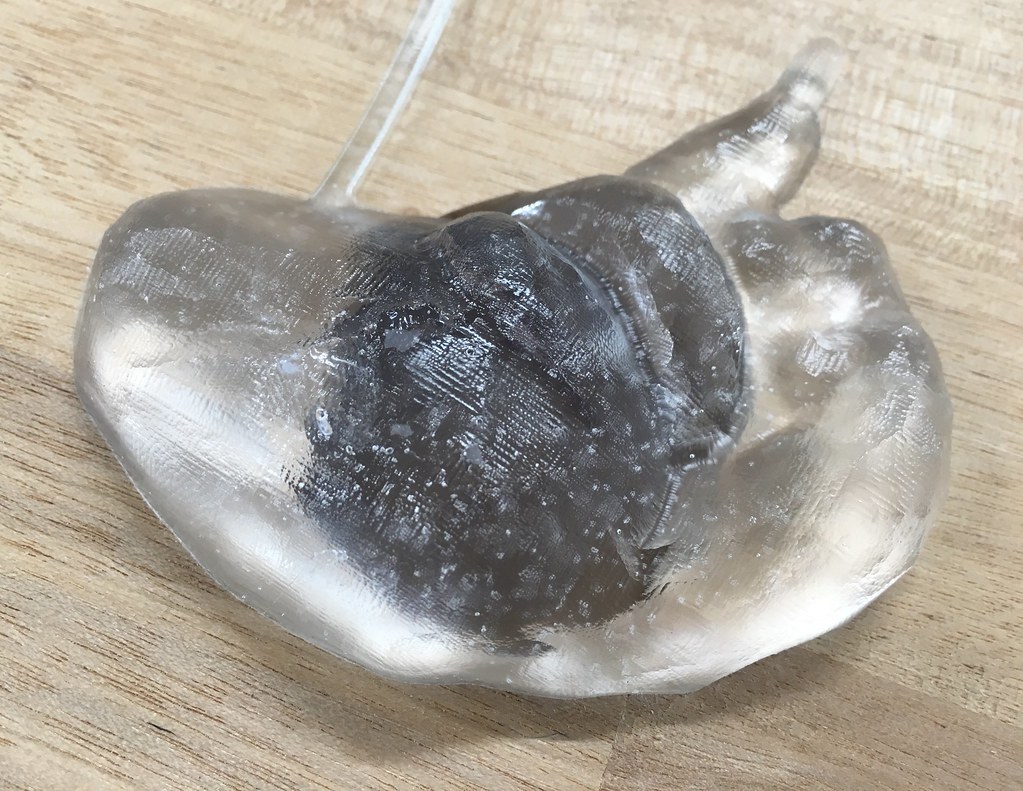
It looks good!
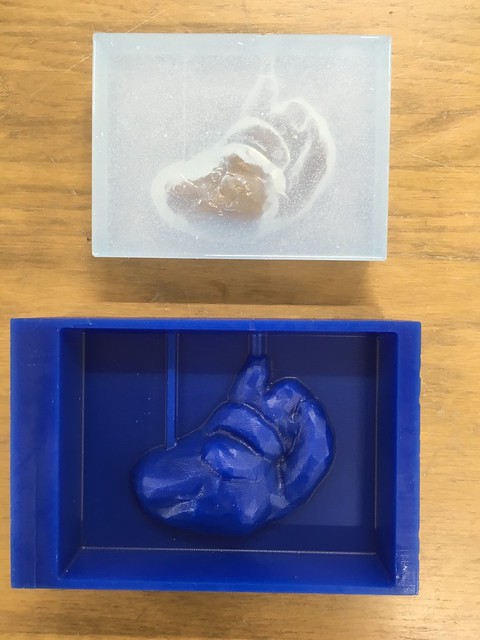
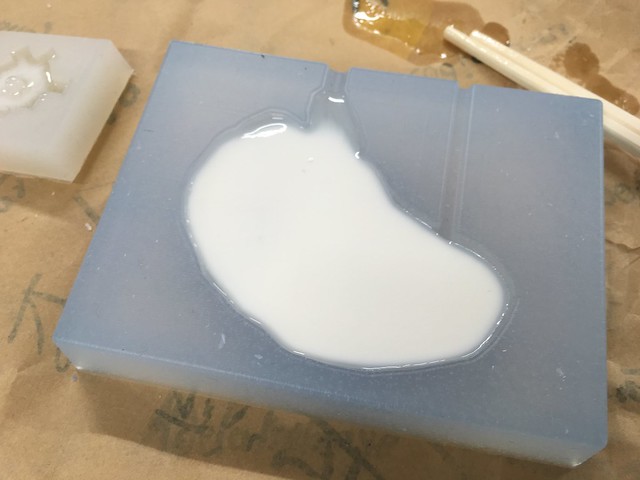
Casting
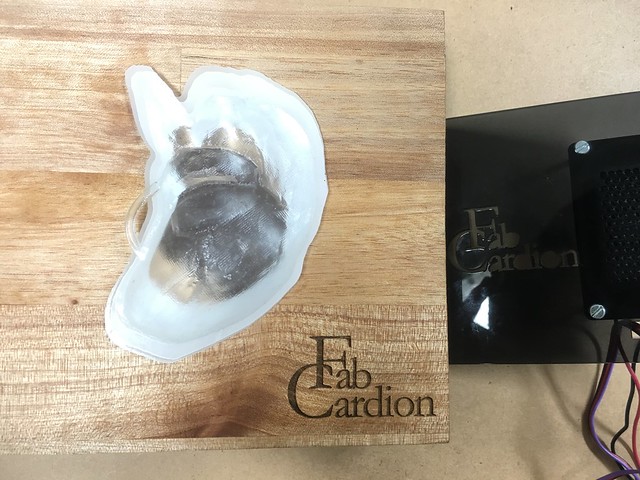
I wanted the soft sensation for the heart, so I used soft casting material called Gummy Cast.
Trouble: milling
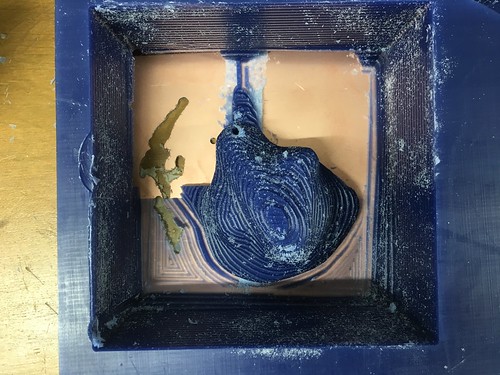
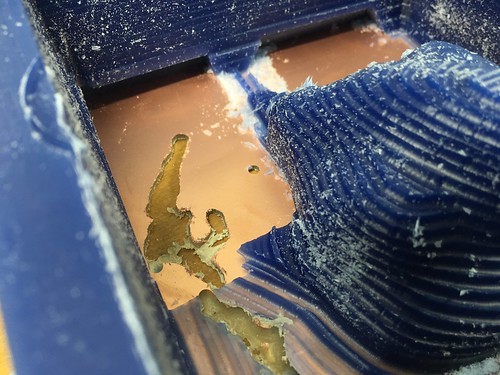
I was trying to make right heart with Molding and Casting, however it failed.
At night I runned MDX-40 to mill the rough cut for right heart. Next morning I found that the machine stopped and machine wax moved from original position. I put the copper board as a base at the bottom of the machine wax for better attachement. The endmill penetrated the bottom copper board. The reason was that the depth of milling was too deep for the material. Besides, I didn't know how to stop MDX40 temporary. We didn't have enough long endmill for this milling job, so I changed my plan to use only left heart for final project.
After that incident I learned how to stop MDX-40. Just press "View" button during the job. Then it stops the rotation of endmill and set the view mode. To resume the job just press "View" button for 1 sec. Then it restarts. Having mistake always lead us new learning.
Download Molding & Casting files
Making Case
The functions of the case are:
■ Hiding electronics boards and cables
■ Stand the body
■ The beauty of the object
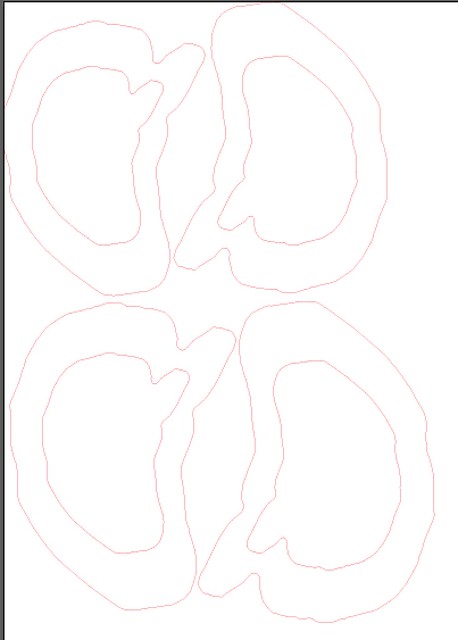
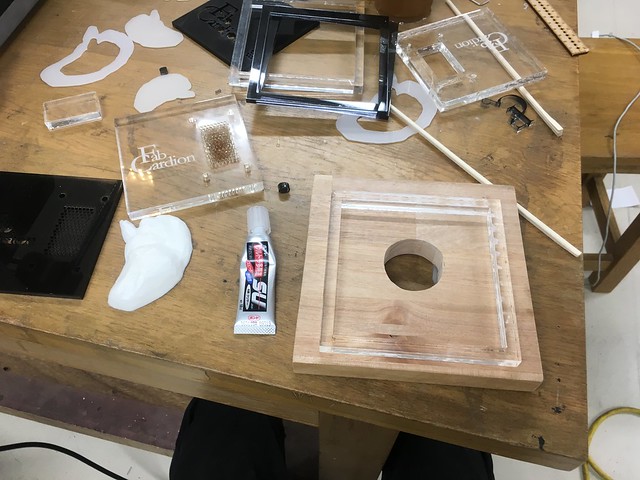
First, I made a base for soft heart object. I took a photo of the heart, then traced the outline of the heart with Photoshop.
Next I put the outline to illustrator and "outlined".
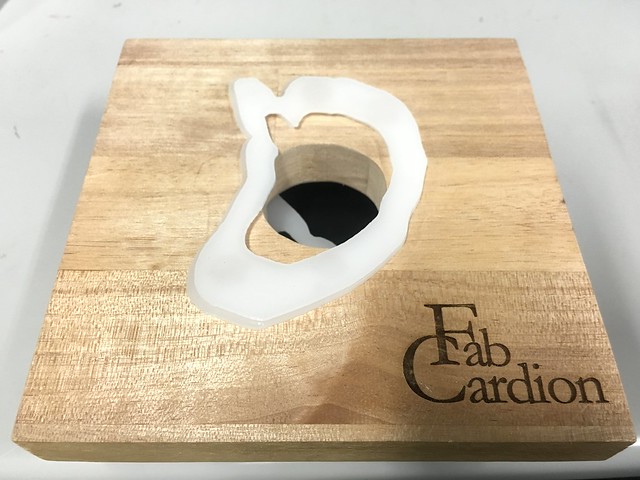
It's time to cut with laser cutter! I used Epilog mini laser(50W). The process is documented on week3
I used 2mm thickness acrylic.

I found a nice wood panel in our wood trash box. Let's use it for my project. I sticked the heart shape acrylic on the wooden board.
I finished the wood with a orange oil.
Also engraved a logo on the front.
Looks good.
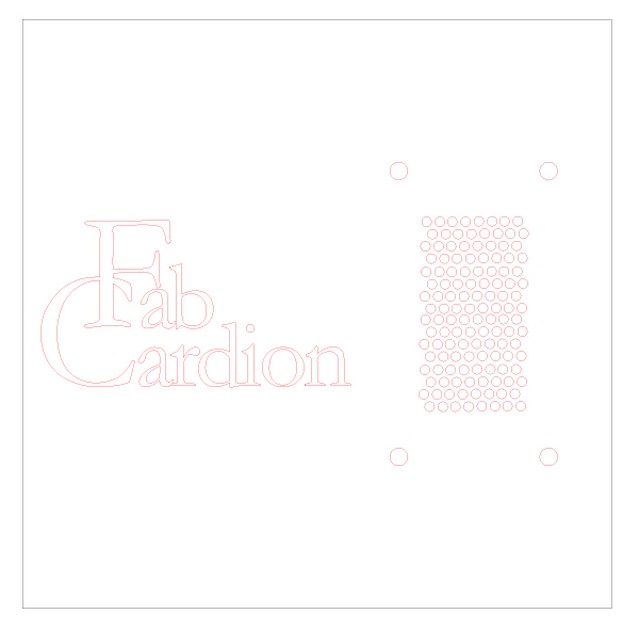
Back cover
The idea is that all electronics components fit to the back of the case. Also speaker is attached to the back cover.
For that the back cover should have the speaker attachement system. I put the holes to attache speaker on the right side of the cover. Many small holes helps sound go well.
The left side is logo of FabCardion.
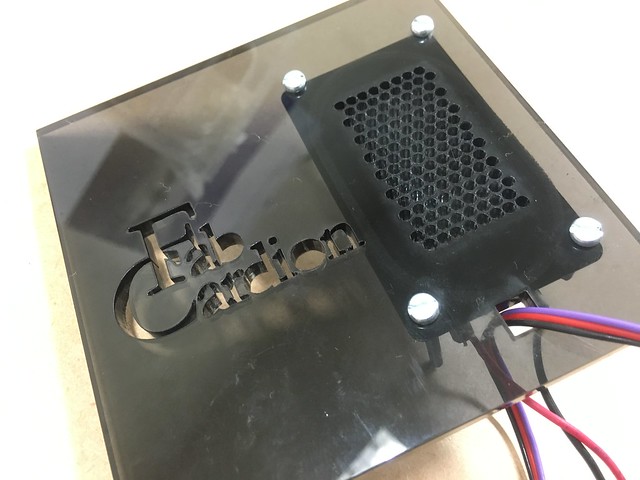
Assembly
Then assembly all parts. To attach wood and acrylic together I used a super glue called S・U
Download Case files
Electronics
hello.arduino.328P board
I plan to make a Arduino capable board with ATmega328. For the board, I first planed to make hello.arduino.328P from embedded programming week.
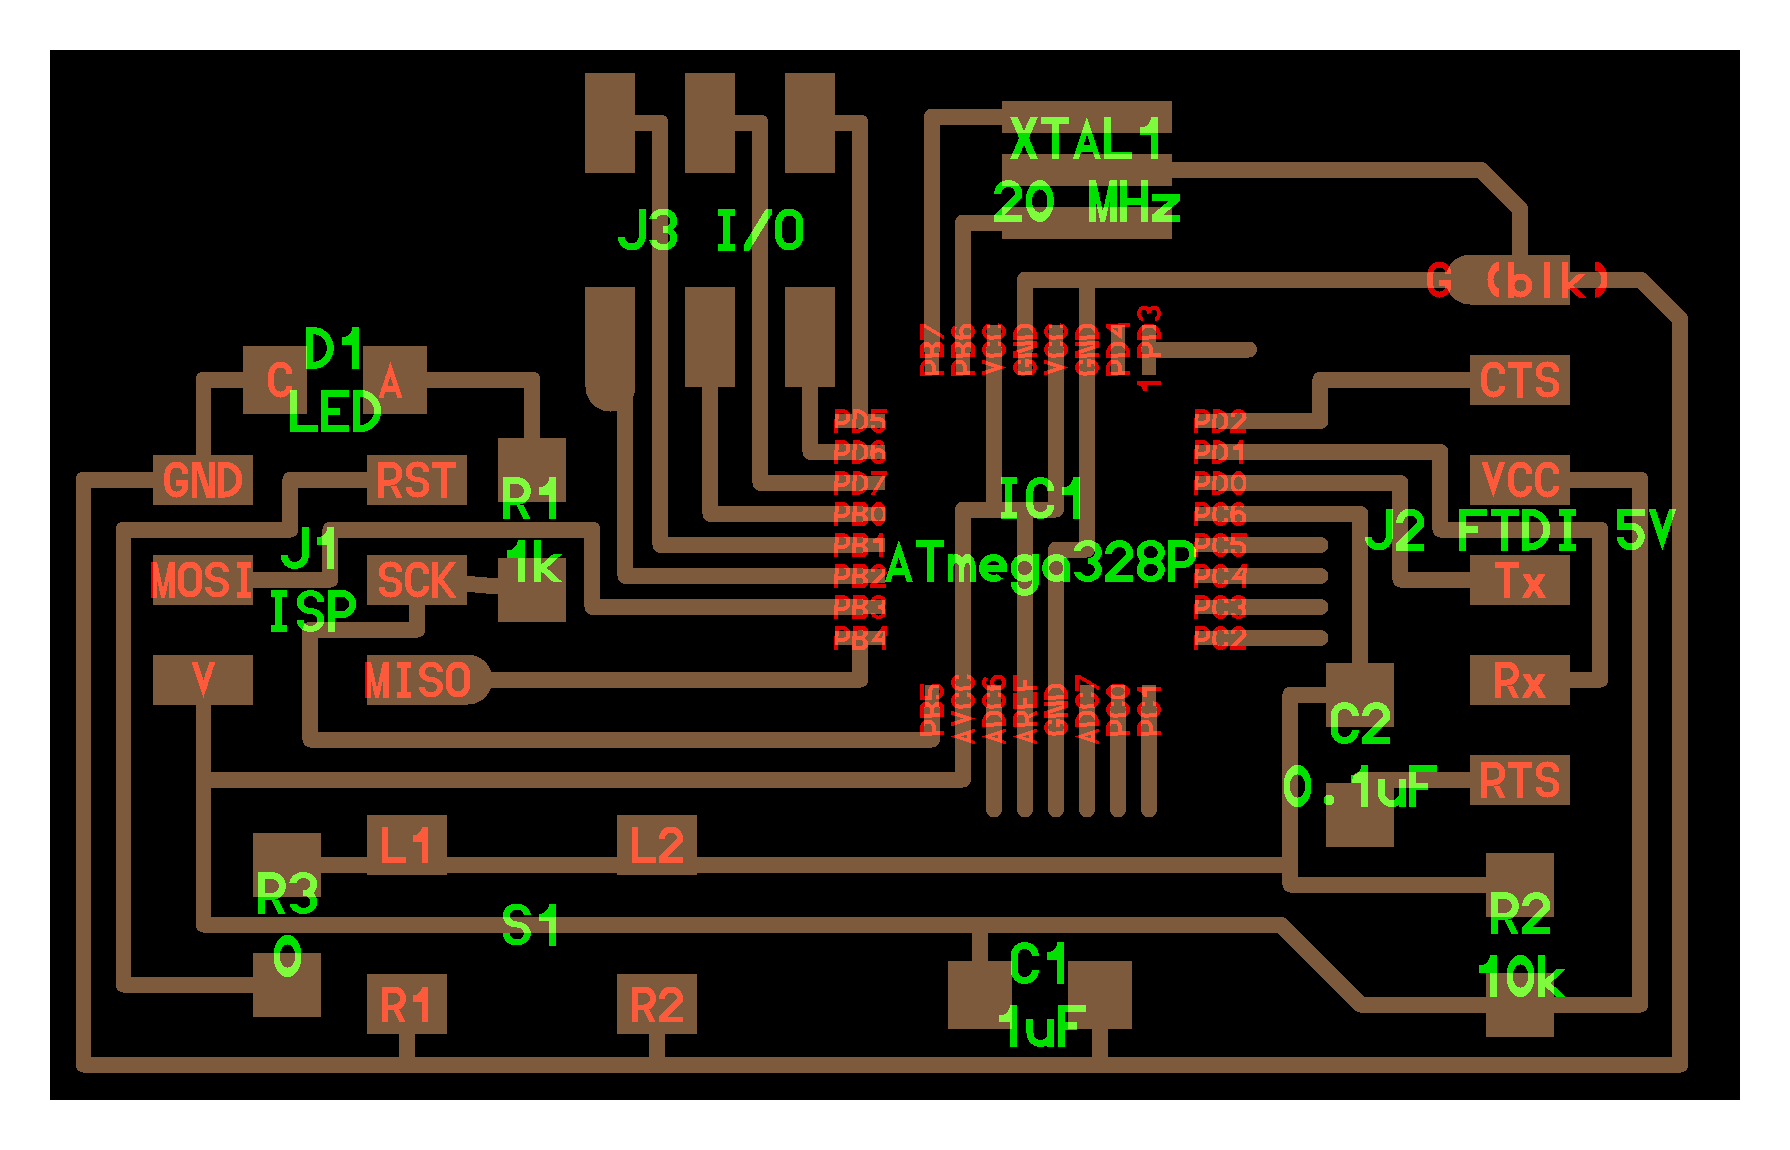
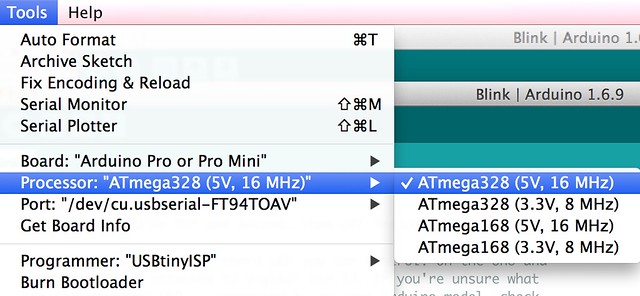
I could not figure out how to program ATmega328p board with external 20MHz resonator "XC1109CT-ND" with Arduino IDE.
The answer is to choose right Board and Processor in Arduino IDE. The following setting is the right one.
Board: "Arduino Pro or Pro Mini"
Processor: "ATmega328(5V, 16MHz)"
Here I put some pictures for notes.
ATmega pin layout and the hint for the board connection.

 http://www.pighixxx.com/test/portfolio-items/328/
<
http://www.pighixxx.com/test/portfolio-items/328/
<
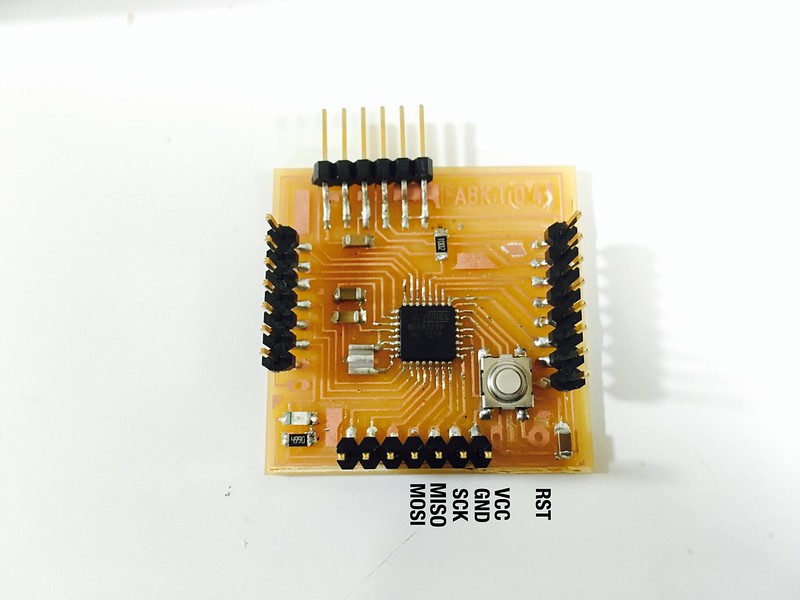
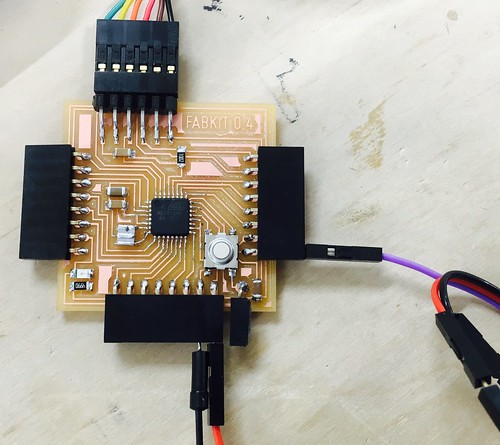
Fabkit v0.4
I realized that fabduino has no Analog in port on the board. So, I changed the plan to make the other board which has analog output.
Fabkit v0.4 seemd best for me, so I made it.
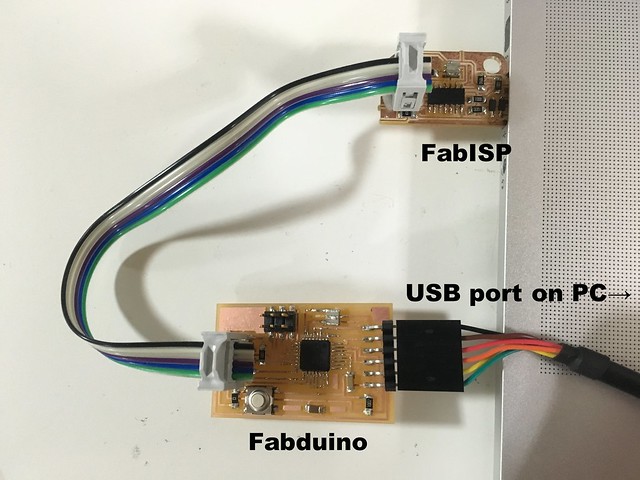
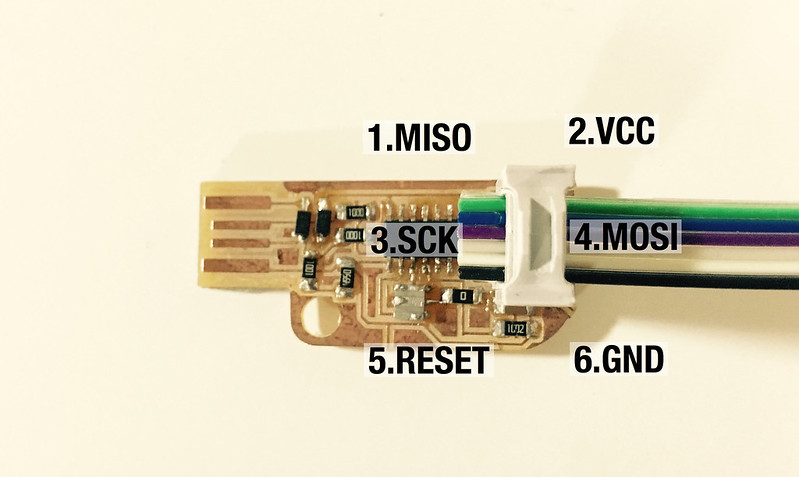
To connect the board and PC with FTDI cable, these images help.
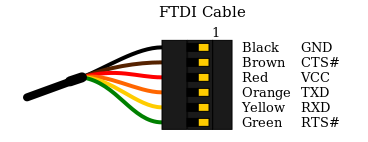
by http://fab.cba.mit.edu/classes/863.14/tutorials/Programming/serialwifi.html
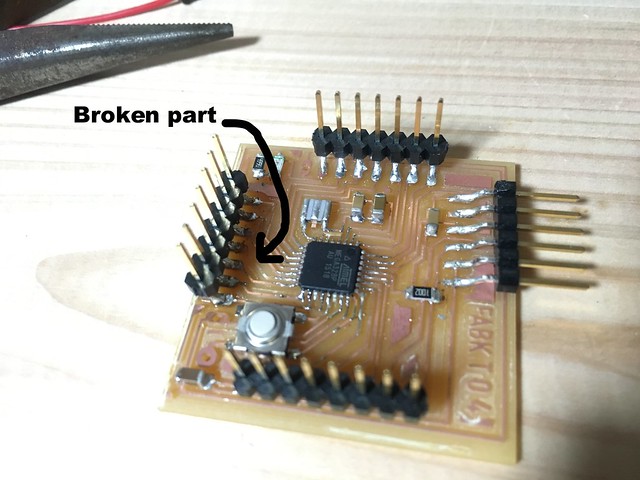
I realized that the male pins are not confortable to use this board. So, I tried to change the pin to female one. When I was desoldering pins I broke the board. One part of copper rail has gone. I decided to make new one with female pins.
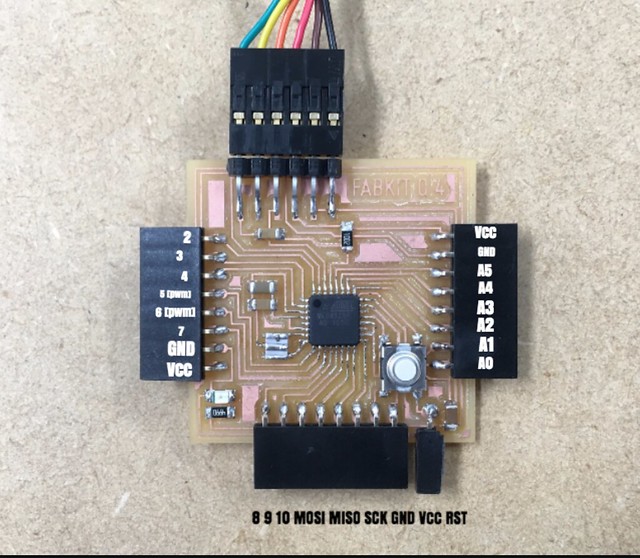
I made a pin layout map of Fabkit v0.4 for arduino programming. That made me relaxed :)
Download Fabkit files
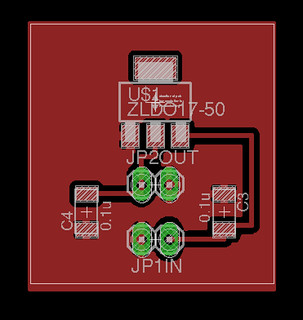
5V regulator
To make this FabCardion survive without any power cable from the wall, in other words, to make it stand alone, 5V regulator is needed to drive the Fabkit with battery.
Following parts are needed for 5V regulator:
Use fabmodules to make rml files to mill PCB board with Roland SRM-20.
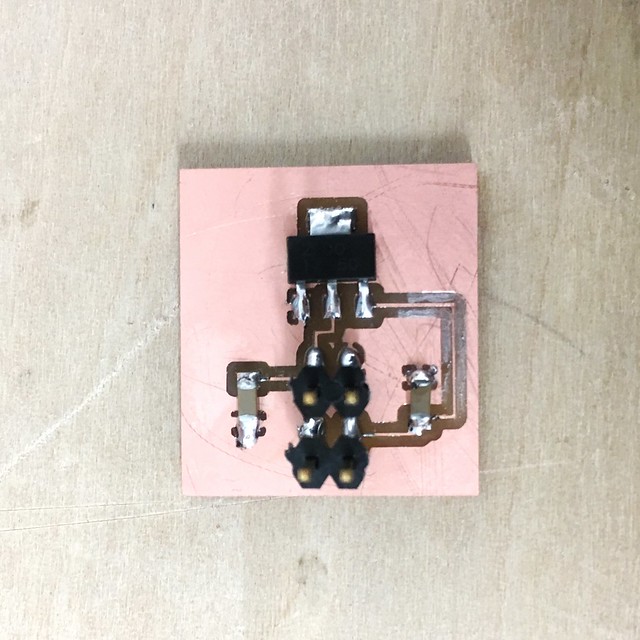
Download 5V regulator files
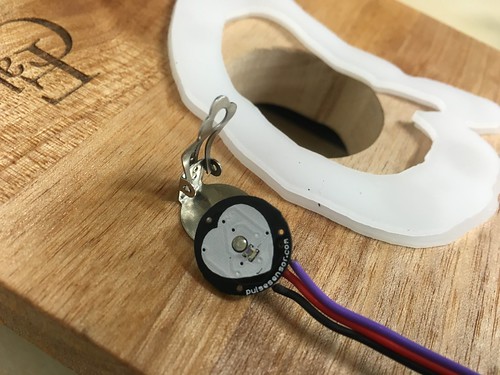
Input & Output
For input I used Pulse Sensor by spark Fun. For next version I would like to use FabECG.
Programming
I modified the library for pulse sensor for Arduino.
                        //  VARIABLES
                        int pulsePin = 0;                 // Pulse Sensor purple wire connected to analog pin 0
                        int blinkPin = 13;                // pin to blink led at each beat
                        int fadePin = 5;                  // pin to do fancy classy fading blink at each beat
                        int fadeRate = 0;                 // used to fade LED on with PWM on fadePin
                        int speaker = 9;                  // speaker on pin2 makes a beep with heartbeat


                        // these variables are volatile because they are used during the interrupt service routine!
                        volatile int BPM;                   // used to hold the pulse rate
                        volatile int Signal;                // holds the incoming raw data
                        volatile int IBI = 600;             // holds the time between beats, must be seeded!
                        volatile boolean Pulse = false;     // true when pulse wave is high, false when it's low
                        volatile boolean QS = false;        // becomes true when Arduoino finds a beat.


                        void setup(){
                          pinMode(blinkPin,OUTPUT);         // pin that will blink to your heartbeat!
                          pinMode(fadePin,OUTPUT);          // pin that will fade to your heartbeat!
                          Serial.begin(115200);             // we agree to talk fast!
                          interruptSetup();                 // sets up to read Pulse Sensor signal every 2mS
                           // UN-COMMENT THE NEXT LINE IF YOU ARE POWERING The Pulse Sensor AT LOW VOLTAGE,
                           // AND APPLY THAT VOLTAGE TO THE A-REF PIN
                           //analogReference(EXTERNAL);
                        }


                        void loop(){
                          sendDataToProcessing('S', Signal);     // send Processing the raw Pulse Sensor data
                          if (QS == true){                       // Quantified Self flag is true when arduino finds a heartbeat
                                fadeRate = 255;                  // Set 'fadeRate' Variable to 255 to fade LED with pulse
                                sendDataToProcessing('B',BPM);   // send heart rate with a 'B' prefix
                                sendDataToProcessing('Q',IBI);   // send time between beats with a 'Q' prefix
                                QS = false;                      // reset the Quantified Self flag for next time
                                tone(speaker,1047);              // tone pin, frequency, duration in mS
                             }

                          ledFadeToBeat();

                          delay(20);                             //  take a break
                        }


                        void ledFadeToBeat(){
                            fadeRate -= 15;                         //  set LED fade value

                            fadeRate = constrain(fadeRate,0,255);   //  keep LED fade value from going into negative numbers!
                            if(fadeRate == 0){ noTone(speaker); }
                            analogWrite(fadePin,fadeRate);          //  fade LED
                          }


                        void sendDataToProcessing(char symbol, int data ){
                            Serial.print(symbol);                // symbol prefix tells Processing what type of data is coming
                            Serial.println(data);                // the data to send culminating in a carriage return
                          }
Download Arduino program.
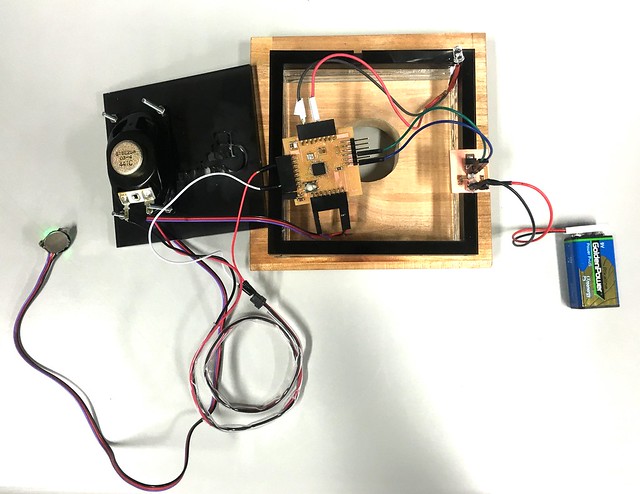
Packing all components
componts are:
Final Poster and Video

How to spread it to the universe!
What I have learned
Download all files
acknowledgments
Thank you all: FabLab Kyushu Univ. members, Taichi Hisatsune for local tutoring, All Japanese tutors, All Asian tutors, Fabguru Alex as my fab maestro, Zerc for video recording and good voices, Great professor Niel, all FabFoundation staffs and all fabbers!