Interface & Application Programming
Assignment:
1. Write an application that interfaces with an input and/or output device that you made.
2. Comparing as many tool options as possible.Write an application with input and/or output.
For this week I programmed and interface with Processing and another one in Nodejs. Those interfaces react to my input: a stepresponse sensor.
Processing
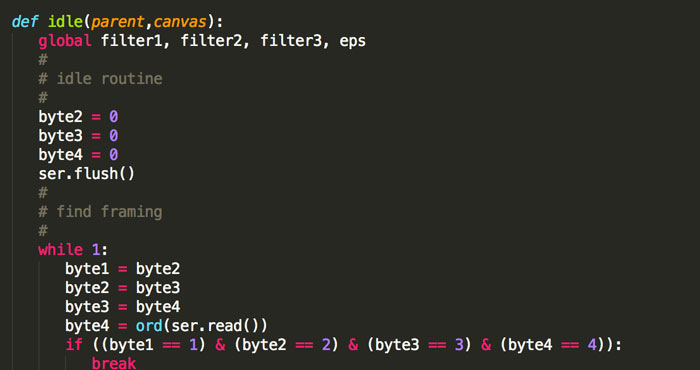
The first thing is to understand Neil's python and c files. In my case, the files were the ones I used for programming the input: hello.load.45.py and hello.load.45.c
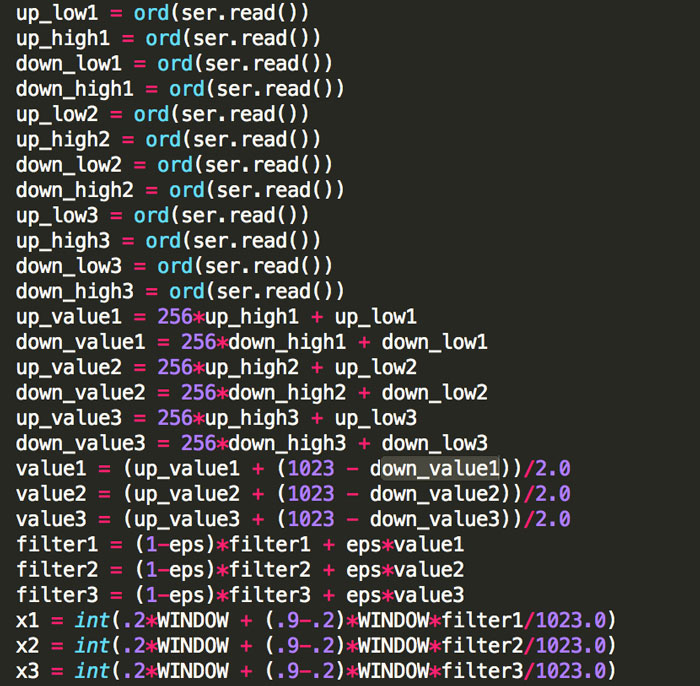
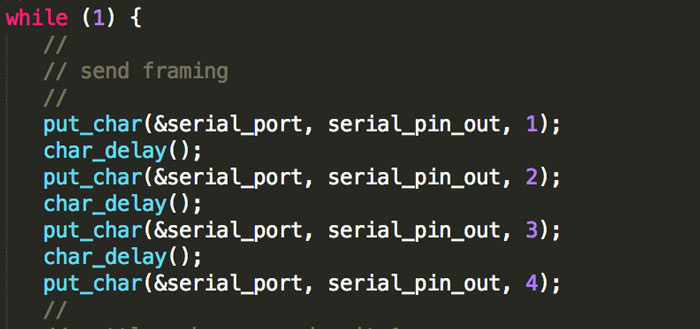
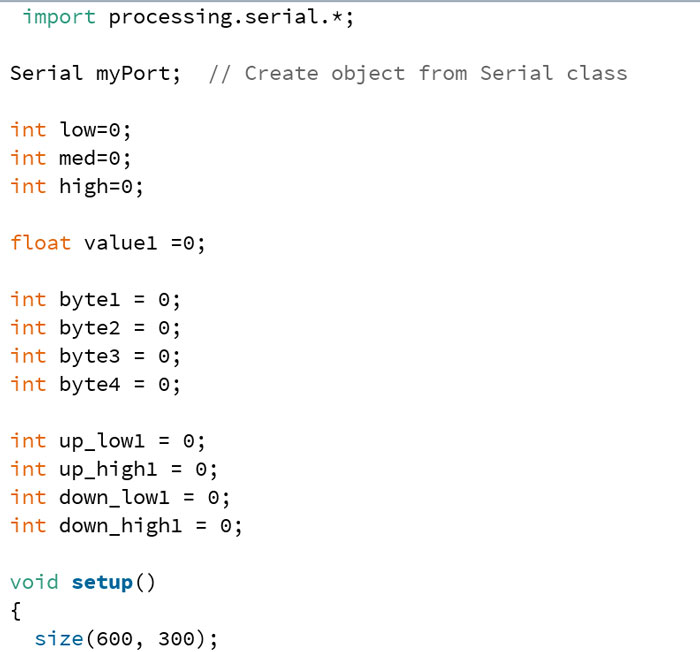
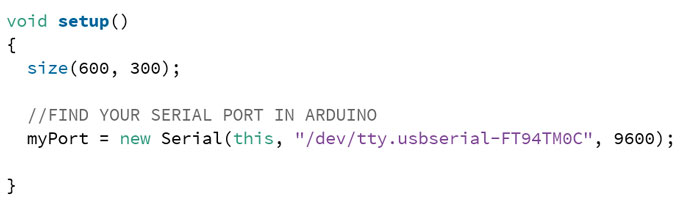
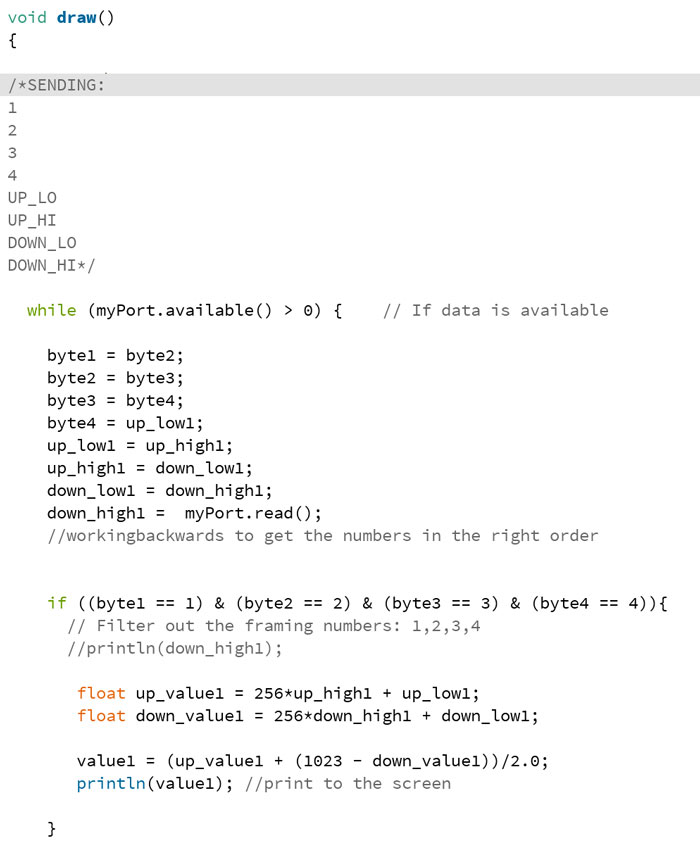
Starting with the python file we see the variables byte2, byte3... and in the while loop how those variables are assigned one to each other in order to read them. The last one: byte4 is assigned to serial read in order to get the values that are coming from the serial port, in other words, the sensor.If we keep reading the in the python file we see how we get low and high values in three different moments.Now let's take a look at the c file. We have a while loop, where this chunk of code is repited 4 times (we have a pattern here). 4 bytes declared in the python and this chunk of code repited 4 times. Reading values "up_low", "up_high" / "down_low", "down_high", for each byte four times.Now, we jump into Processing. We import the processing serial library on the first line, create a serial class. And create the variables according to what we learned from Neil's files.
3 variables with the values low/mid/high. A float variable for the values that we are getting from the sensor. 4 variables (one for each byte). And the variables for the values "up_low", "up_high", "down_low", "down_high". All variables are initialized as 0.In the void setup we are asking Processing to find our serial port where is connected our FTDI cable.In the void draw is where we are going to write part of the Neil's code: We will use,inside a while loop, the byte equivalences we found on the python file and the up_low, up high... assigned to the reading of serial port.
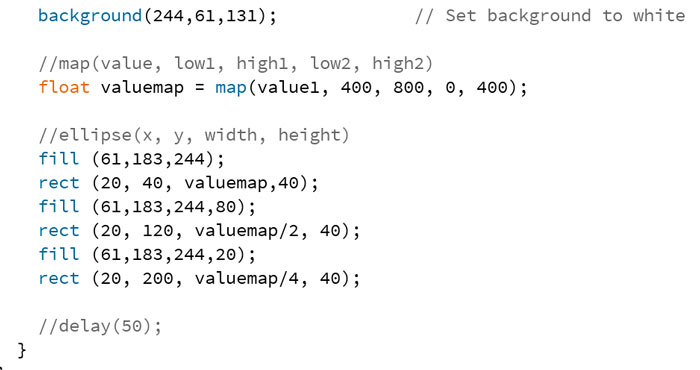
We create an if statement to get the up and down value in a float datatype.Finally, in the last part of the draw void, we can play with the visualization style: colors and shapes using the valuemap as a value for modify those shapes and the main agent of the interaction.
I did two more interfaces with Processing, the process is almost the same, just a few changes in the visualization part and with different elements on the void draw. Check the files for understanding the code.Password for the video: fablab
Video Stepresponse Interface 1
Password for the video: fablab
Video Stepresponse Interface 2
Password for the video: fablab
Video Stepresponse Interface 3
NodeJs
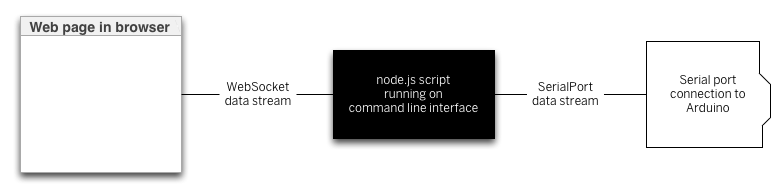
NodeJs is a JavaScript runtime uses an event-driven, non-blocking I/O model. The idea here is to use your browser as a server. NodeJs follow the schematics that shows the next image.
First things first, you need to download and install NodeJS. When you’ve installed node.js, type this command (node -v) at the command prompt to get the version of node that you’re running. The node installer should also install the node package manager (npm). You can check that in the same way:npm -v
Once node and npm are in place, you’re ready to create a new project.
You’ll also need the node serialport library, which you can install from the npm registry like so: npm install serialport
This command will make a new subdirectory called node_modules, and in that directory it will install all the necessary assets for the serialport library. Now you’re ready to use the serialport library.
We need to install one more thing, a NodeJs library for listening the webSocket connections, you can install it typing this in the command line: npm install ws
With everything installed we are able to begin the process of creating the files, we need:
1. a web page (.html file for the visualization)
2. NodeJS script (.js file for reading the data from the serial port)
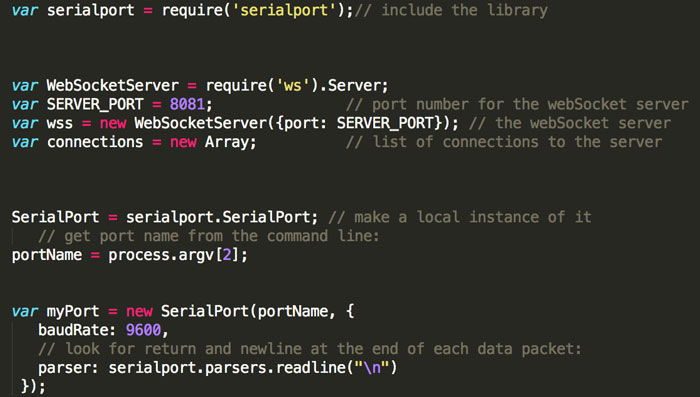
We start creating the .js file We need to include the library, webSocket server, the port the server is using and list of connections.
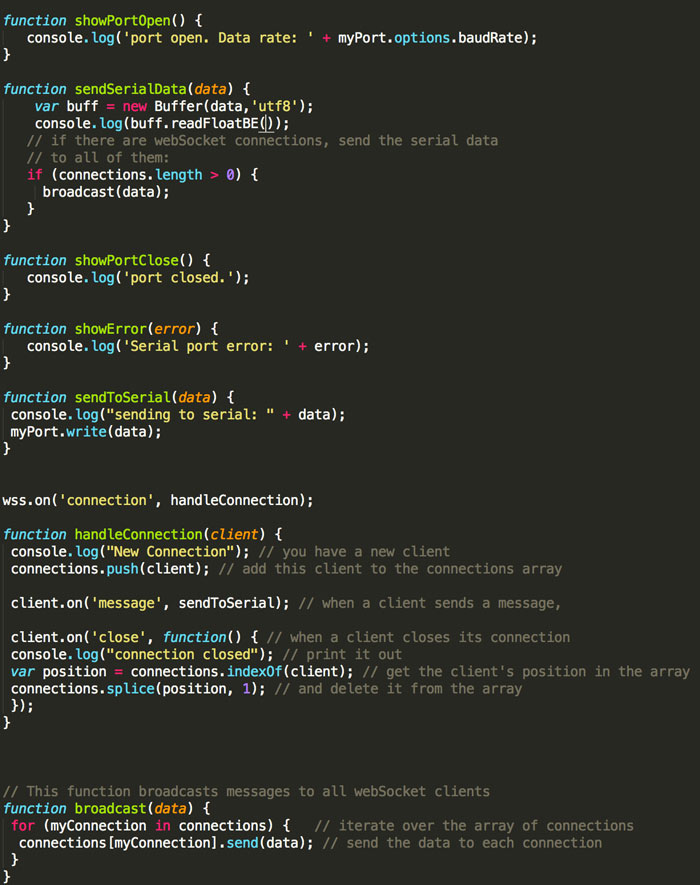
The baud rate is also very important in order to establish how many bits per second is the serial port transmitting.Because the serial port library is event-based, the library will deal with those events when serial port is open. When the program is running the operating system and the user's actions will generate events and the program will porvide functions to deal with those events called callback functions. This is the list of events we should include: open and close part, data transferring and error message.Now is time to create all the functions that will our NodeJs file work: the functions include show when the port is open, when is closed, send serial data, show errors and handle connections.The next step is creating an .html file. No css is required, for this simple example and just one div taht will include text as the information we are reading. At this moment we don't need anything fancy. We need to add the p5.js library, the .js file we created on the last step and the functions:
- set up function to open the socket and create the div for displaying the information.
- open socket function.
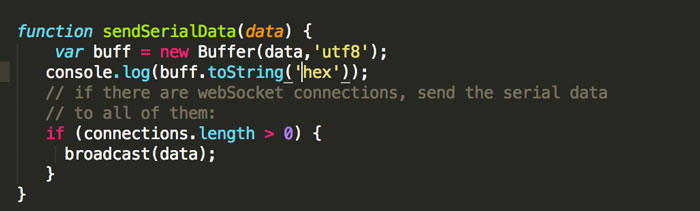
- the show data function, where I needed to change the buffer data to utf8 and hex.
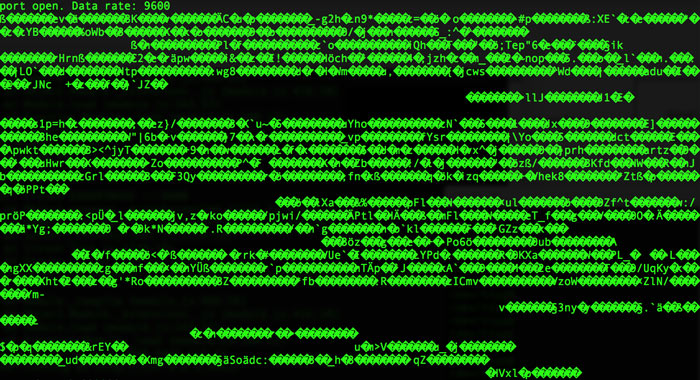
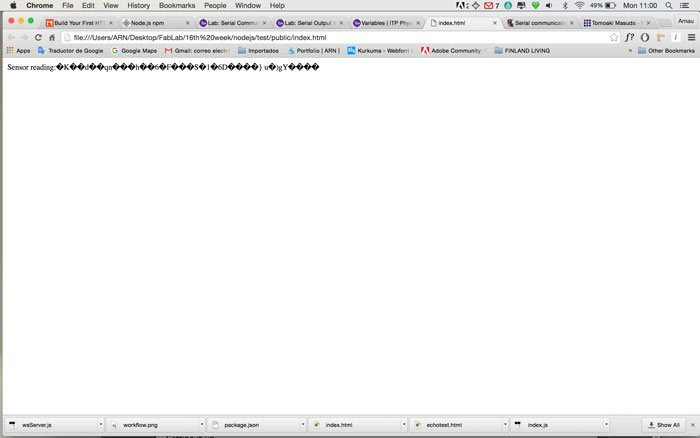
I had some problems with this last one, until I figured out how to manage the different data types.Here are the results:
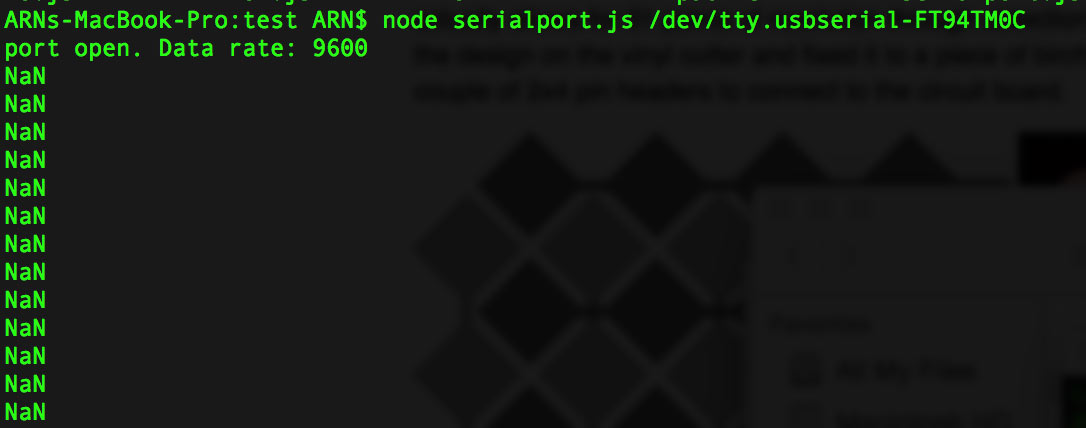
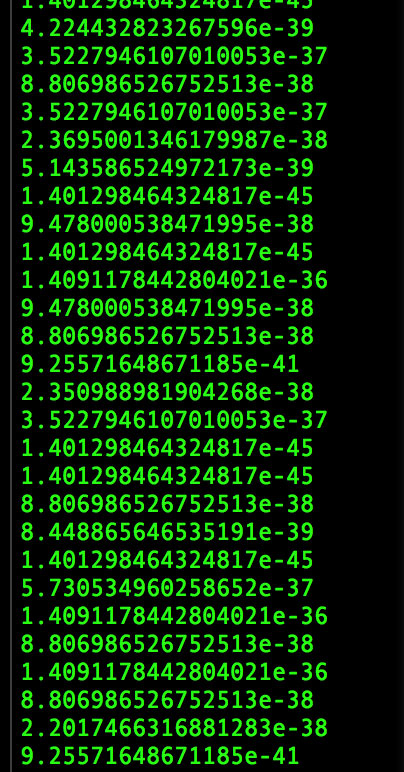
First I started with a simple example just to know if the system is working. That was just a test.From the terminal, you navigate to the folder where your files are alocated and type in the terminal node name of your .js file name of your port and press enter. You should get a message like the one in the image below.Once the port was open I got this. I got communication, but the data types are not the same it took me a while till I figured this out.When I opened the index.html file on the browser where I linked the .js file I got the same problem.Trying to solve the problem of the data types I focused on the function save serial data.At some point I started to get some different results. The NaN (Not a Number), is an indicator that I'm in the right directionFinally I managed to get values on the terminal, very similar to the values that Processing was reading, but with a decimal point after the first digit.The next link is a video of how the sensor is responding, at this point I'm having problems with the browser but I managed to make it work through the terminal.
NodeJS interface video, the password: fablab
I keep working on this.
Things I learned: starting to understand how to manage datatypes, how to setup a web socket server in NodeJS, how to create variables in Processing from variables defined in python and c.
Download the files here