
Week 14
This week was about composites. I've worked with fiber glass composites before and is also a subject that I like. There's a lot of possibilities with this technique, just imagine for example that this is the process that car manufacturers use for some specialized parts.
The objective was to design a mold and then cast in it, so first I wanted to try with some of the different fibers that we have in the lab see what happened. Also I tried with cardboard. The results were good!
Objectives
Design and make a 3D mold
Produce a fiber composite part
Weekly Progress >
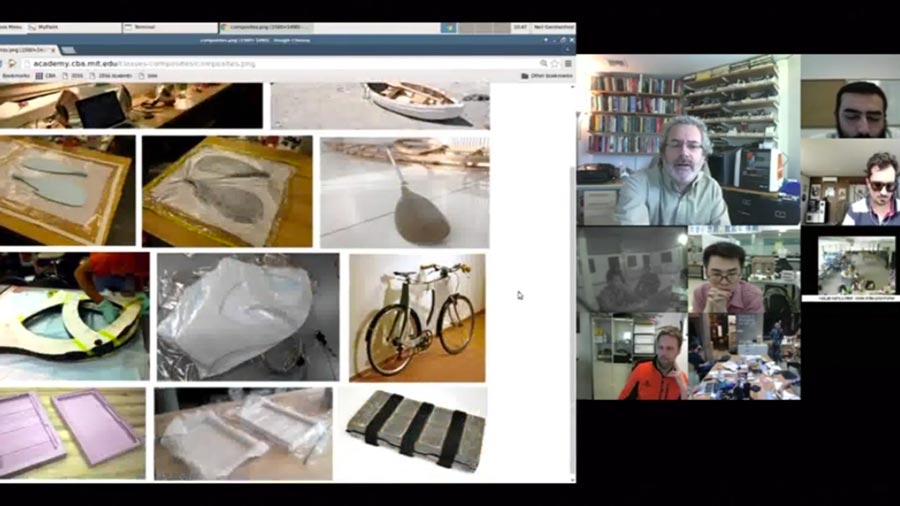
First, we had our weekly lecture with Neil Gershenfeld, you can watch it here.
James Coleman from A. Zahner Company gave this week’s lecture, he talked about the Large Scale Digital Fabrication.
Making Machines that Make Buildings. James Coleman is a Research and Development Engineer at A. Zahner Company, a company that has digitally fabricated some of the worlds most interesting buildings. James holds masters degrees in architecture and mechanical engineering from MIT. While at MIT he acted as a teaching assistant for How to Make Almost Anything for 5 years and has been involved with many wonderful FabLab workshops and projects including the Machines that Make project (go cardboard!).
At Zahner he tackles problems of advanced geometry, machine building, robotic fabrication, and gets to utilize a suite of digital fabrication tools that may even make Neil jealous. During this recitation he will talk about exciting potential (and challenges) of large scale digital fabrication and mass customization.
Assingment >

I have previous experience working with composites, so in a way I know what to expect, but the way of doing it at the lab was a little bit different of what I know, so it was an interesting and fun week for me. I wanted to try the different material we have in the lab and also see how natural fibers react with resin, before I've just work with fiberglass.
Unluckily, we had some problems with the milling machine and that made us lose two days of work more or less, so I had to change my plans, anyway, I used that time to experiment a little.

First composite test with different fibers with Cansu and Norma. We decided to it in group because making a composite alone is hard.

The layering of each piece is one of the most important parts in the process of making a composite, follow this scheme to make it right, if you miss or misplace a layer it can be really bad, so pay attention.
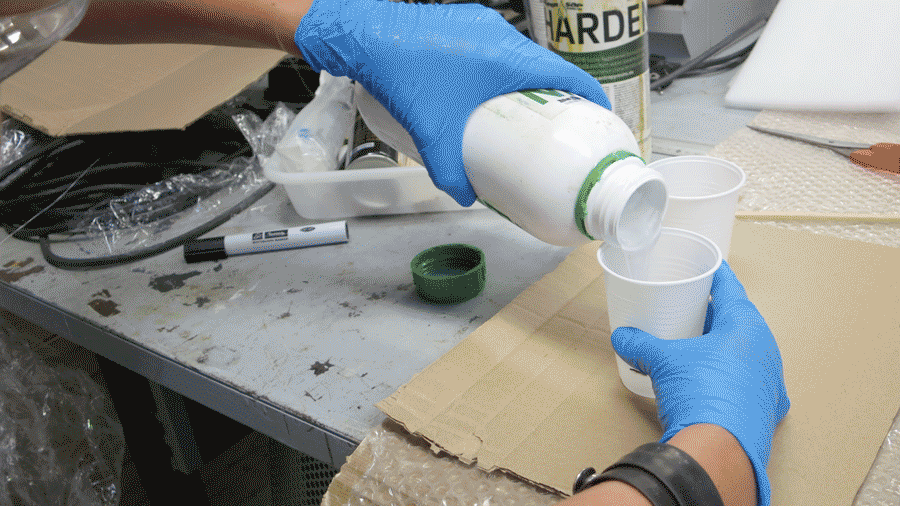
Before you start with the resin you need to have all your layering pieces ready for the process, this is the part that working with more people helps a lot, because one person will be in charge of putting resin to the pieces, other in charge of the layers and another in charge of making more resin mix and document.
You'll need a scale to measure the amounts. In our case we are using Super Sap Epoxi Resin, the proportion of the mix is 100% Epoxy and 47% Hardener, mix time: 5min-10min.

Use a flat piece of MDF, Wood or other hard material to spread the mix on the fibers, avoid cardboard as it will get soaked with resin.
Remember to do this in a well ventilated area, using gloves and protect yourself of not touching the resin, it can be really nasty.

If you see bubbles, it is normal, its unavoidable at this point, that's why we use the vacuum later to get rid of them.

Vacuum / Revealing the composite
After preparing the molds and the layering we have to vacuum the pieces to get rid of the bubbles mainly and also the excess of resin.
When putting the pieces on the vacuum table be careful of not block the suction holes, if you do it you'll get uneven results.
The pieces should stay in the machine something in between 18 to 24 hours, so it's a good idea to leave them overnight.
After taking the pieces you'll notice that you can save some of the layers you used.
For de-molding I used a chisel because it was wood, that means that I can use that mold piece again, If you are using something softer you might need to sacrifice the mold.


First test results. I was surprised of the strength of the burlap, I've never worked with it before and I like it, is a good substitute for other fibers, also depending on how you play with it, you can do things like this translucent sign.
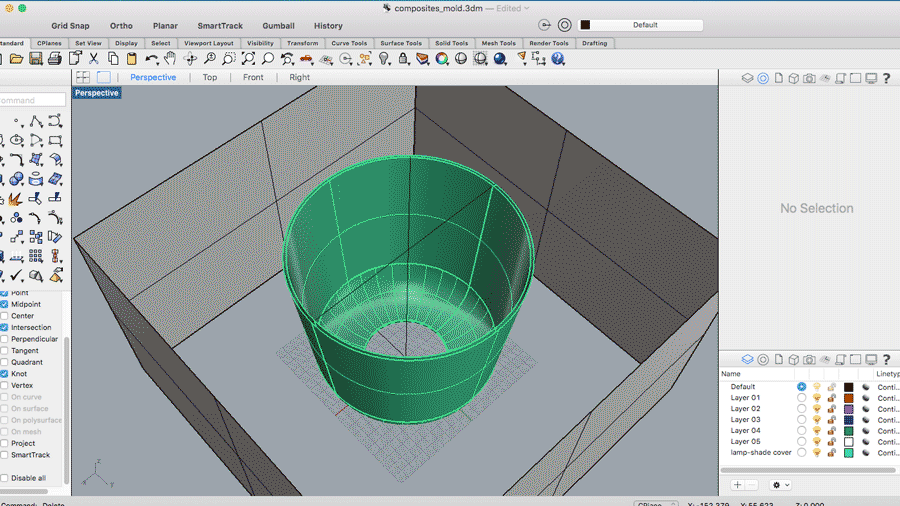
After all the testing it was time to design a mold. My idea was to make a lamp shade, so I designed this mold with evacuation channels to let excess material get out of the mold and prevent uneven an uneven surface and bubbles, it is important to do this.
And this is the final model for the mold. Be aware that if you want to make this model, you'll need to do it by layers in the milling machine, it is not small.
If you want to make one, I share my file with you here.

Unfold the 3D surface to laser cut the fabric. We do this to avoid wrinkles later on the final model.
You can download the model here.
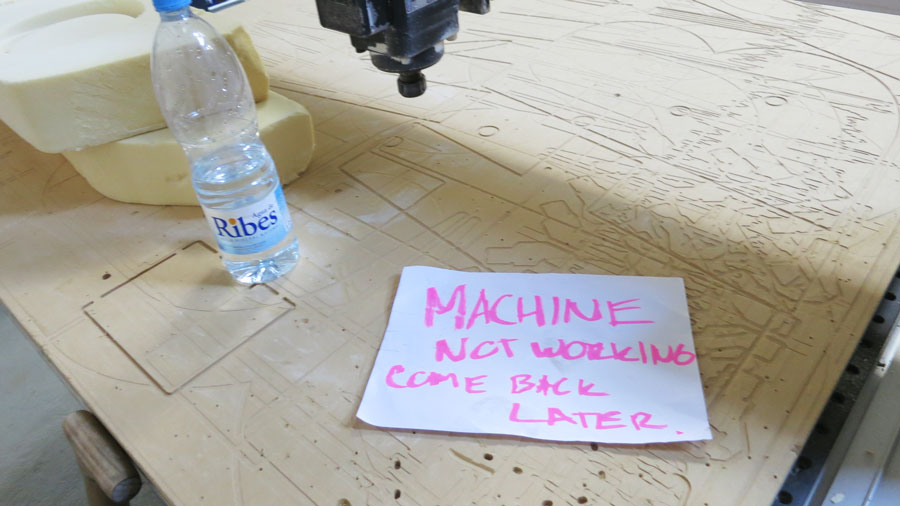
Unluckily for us it was a very busy week at the lab, to much people wanting to use the milling machines, and on top of it we had problems with our milling machine, so I decided to join with other people for the milling, that meant that I needed to design a smaller object, so I did that.
I really wanted to make the model I presented before, but because of the circumstances, it was wiser to do something small, and because I've made some test before, I thought that doing something smaller also makes sense, and I will save a lot a material.
So I made a small square-shape object that can be used as a small cactus pot, screw holder, ashtray or whatever use you can find for it.
You can download the model here.

I made a small mold from styrofoam (milled together with other friends pieces). I agree that It would be better to make this mold in a different material, maybe even in the SRM-20, but again no time...

The milling process was the same I followed on the make something big week, If you want to see it in detail please read it here.
I've sent my model in the same job with two friends to save time. Team effort!

Then I repeated the same steps that I described before for making the composite.
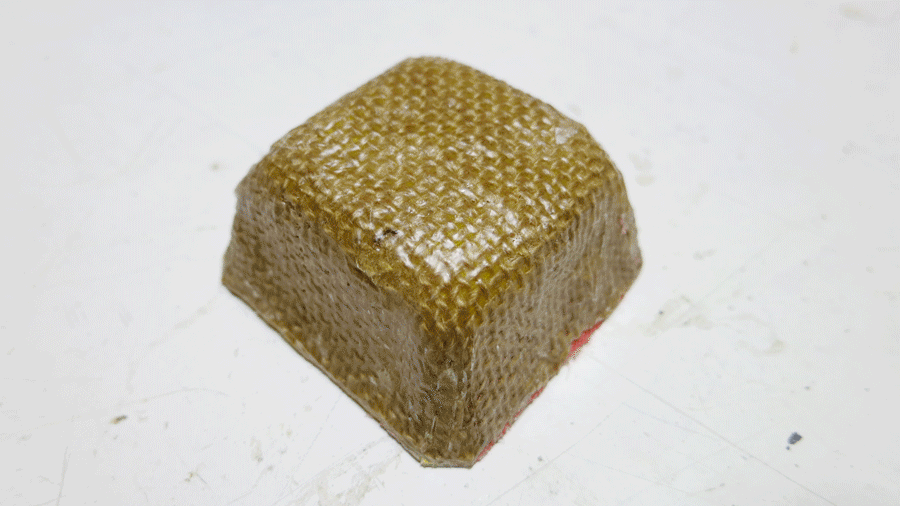
And this is the final model. I wanted to do more but time and machine availability where scarce, I'll make my lamp idea in the future.
As I said before, the material that I used for making the mold was not appropriate, if you do something small I advise you to use a stronger material like wood or a really strong foam, this way you'll get better quality.
