Computer-Aided Design (Feb. 3)
Sketching and Different CAD Softwares
Below you will find my dictation, notes and documentation about the processes I went throught with regards to sketching and using different CAD softwares. Each of the topics will be covered in seperate sections. A link at the bottom of the page will take you to all of the files that I created for this exercise. In general, I like the free and open-source nature of these software and their possible usses for my students in my classroom. I learned so much during this week.
Sketching - 2D and 2.5D
Description of the sketching process:
Hand Sketches
I began this design process by sketching thumbnail images on graph paper. These images will be used as the foundation for my CAD section. I created an orthographic and isometric drawings with scale and sizes. I used a caliper and a ruler to create my dimensions for my drawings. I used these tools to gain sizes from a mini pan-tilt with micro servos that I want to be able to put my batman spot light housing on it. My drawings show the the different views of my project, the sizes, and the breakdown of the spot like section into three pieces. Finally, I than scanned the drawings as PDFs to be used for my documentation.You can see the three drawings below:


The sketches below are for my laser cut box ideas that will house the electronics for the spotlight. Plus, the box will be made out of wood with engraved logos. The sketches are the top, front and side views of the box.


AutoDesk Sketchbook
One of my colleagues showed how to use AutoDesk Sketchbook. I download the app onto my iPad. This software was very straight forward with regards to being user friendly. The app gave you the ability to draw, sketch and design pictures quickly as well as make adjustments very easily. It gave me the ability to sdraw with different sizes and thickness with simulated pencils, pens, airbrushing, erasers, and more. It gave you the ability to import other images as well as use measurement and symmetry. You can export the image in different ways, such as email. This software would be great for using it with my students, because, my students all have iPads and they could sketch quick drawings as well as import images to trace or be able to draw on graph paper. I spent about an hour using this software. I also draw like a child. I do feel this can be a very powerful tool, especially when using a stylist instead of your finger as well as creating detailed pictures. I used my finger for my drawing.

Inkscape
To begin using Inkscape you need to download it as . I used it to create a box that I could laser cut to hold my electronic components. When you open Inkscape, you need to setup your properties by changing you dimensions from px to either to standard or metric. You can also setup your gridlines as well under properties. Next, I used the square tool to make two rectangles, one being 8" x 4" and the other being 4" x 4". Plus, I made a .5" x .5" by dimensioning their width and height. I made individual squares to create tabs on the side plate. After placing 4 tabs on the shape and highlighting it, I used the Union tool to make all one object. Next, I made copies of this shape and than placed one of them on each side of the largest pieces on both sides of it. I than highlighted them all and used the Difference tool to create cut out sections. I did this same process for the pieces that will be for the top and bottom of the box. This will allow the box to fit together. Finally, I set the pieces to have an outline of red with a line of 0.001, so that it will cut through.
Next, I went to the links above and download the images. I imported the images into Inkscape and trace them as bitmaps. Finally, I placed my images in the different sections as well as created a circle that will cut through on the top piece, so cords can run through it. I really like using this software. It is user friendly and great for middle school students to use at school and home. The only negative I have with Inkscape is that it gets "buggy" when using it on a Mac as compared to using it on a Windows machine.

I have used the basics of Inkscape in my middle school engineering class before this week. I find it very handy and user friendly. I like using it and so do my students. I spent more time trying so time out for this exercise. I worked on my assignment for about 2 hours. The tutorial helped me with learning Inkscape.
Krita Desktop
I began using Krita by downloading and installing the software. I begane exploring the software by looking at the different temples, such as cinema and comicbook. The different templates gave you different possibilities for creating unique sketches. I began drawing my batman parts using the US comicbook template, which provided me the ability to draw different individual images on one page. I experiemented using the different pen, penical, brushes, and etc. drawing tools to create different images. This was very cool due to the ability to draw and create different features. I do wish I was using a touch screeen computer to create better drawings than using my mouse. I also used to different framing tools that allowed you color and draw only within their parameters, such as a square or circle. Before I could save my work, the software frooze and crashed. While it was froozen, I was able to take a screen shot of my work.

After restarting the software, I realized Krita has a recovery mode, which is awesome. This is very useful in a classroom setting with students. I spent a lot of time just learning how to use the different tools on left hand side as well as exploring the different layering capabilities of the software. I learned how to rotate and move objects as well as record my work and use the text tool.
Sketching Conclusion
I enjoyed using all of these softwares, because, it has helped me gain a vision for my designs. It actually made the process of using the 3D softwares, with regards to planning, was much easier. I already had dimensions, style and general aspects planned out. I found the Inkscape software my favorite due to the ability to create pieces that can go together in my own mind. The Krita software was very creatie and I feel the artistic value of the software is very high. Both of these softwares, I believe, can be a being hit with students as well as support their learning and creative development.
3D Software Review
Description of the each learning process:
TinkerCAD
TinkerCAD is a wonderful software for middle and upper elementary school students as well as beginners to CAD. It is a browser-based software that provides users practice lessons to develop skills as well as it allows the user to be a part of a gallery community that shares projects by other users, which helps with users learning through backwards design. I did not spend a lot of time on this software, since I have been using in my own classroom for multiple years. I used it to just help me develop my sketches in 3D perspective. The software uses pre-made shapes with the ability to scale or change specific sizes using the ruler tool. The Inspector tool allows objects to group and turned into holes. The use of the basic alignment, adjustment, pre-made shapes, and instructor tools provides a user a process of doing a creative method that uses an additive and subtractive skills together to create unique objects. I used the pre-made shapes along with the inspector and ruler tools to create the spotlight box into three pieces on the workplane. The batman logo was from a pre-made object that I found on Thingiverse. The images below are from my spotlight:


SketchUp
I have used SketchUp before in my own classes to design structures. I created a a box for housing my electronics. I did not spend a lot of time on SketchUp due to me already knowing how to use it. I wanted to spend more time on other softwares that I did not know how to use before this assignment. SketchUp is a great tool, and my students seem to like using it to create structures. I used the rectangel tool to create the box and the push/pull tool to extrude the box. I also used the push/pull tool shell out the box as well as cut out the circle hole on the top side after I used the circle tool to create the circle. I used the guide lines to find the center of different sides when creating an object. I also used the drawing line and squiggley line tools to create the batman and city skyline. I used the word tool to create the batman on the top and than I scaled and rotated it. I change the color of the different parts of the box and made a copy of the batman. This probable took me about an hour, because, I made it than the software frooze before I could save it which lead to me redoing me work.

123D Design
I used 123D Design to create a general 3D design of my Batman Spotlight and the box for housing the electronics. I used the Primitives tools to create foundationary basic shapes. When creating this shape you can dimension each of the shapes in their width, height and depth sizes. You can manipulate the scale of an object as well as the unit, such as metric and standard. The modify, combine, and construct tools allowed me to extrude the shapes, make subtractions and trim pieces. Plus, I used the grouping and ungrouping features when assembling the individual pieces I made along the way. I was able to use the snap tool to combine these individual pieces, which helped with centering and attaching the sections together. The materials tool allowed me to color and texturize my product. The software was tricky at times to use due to the specific process of doing specific tasks, such as when I was trying to attempt to cut a hole in the top of the box, it took me over 5 times to figure out the specific process of clicking of the box than the circle while using the subtraction tool. Over all, the software has a slight learning curve and can be very useful for middle school students, but it does run slowly at times due to the cloud capability and depending on your graphic cards which can affect your work. It allows the user to creative unique objects from “scratch” or use pre-made shapes to develop products. I spent about two and a half hours working on this project. Once again, the batman logo was from a pre-made object that I found on Thingiverse.The images below are different views of my 123D Design work:


AutoDesk Fusion 360
I spent about seven and a half hours trying to learn this software as well as attempted to build my spotlight housing box. I begin this journey by experimenting with with different features and looking at random information on the internet. I was able to create basic 2D and 3D shapes. This lead me to using a tutorial on creating a book shelf by ShopBot (http://www.shopbottools.com/mSupport/tutorials.htm). I learned how to set parameters as well as be able to use a sketch efficiently with dimensions. I went to use the mirror and extrude tools under create as well as the split body tool under modify. I was able to create a book shelf while learning how to use the body and sketch tree to my advantage by turning on or off the view light bulb as well as how to use the midline tool underconstruct. I did struggle with being able to make the book shelf into multiple bodies, which I was never able to do after many, many attempts. I had the same problem with creating my electronics housing box, but I did learn how to make holes and filleted edges. This is a powerful software, but it has a steep learning curve. I would most likely not use it with my middle school students, due to the possible frustrations that would cause them to shut down, but I would possible show them some basics features of the software. I am going to still do more work with this software and hopefully I will learn enough to teach it to my students. I plan on doing work with the AutoDesk Fusion tutorials. The images below are from my work:


After a long period of time, I figured out how to extrude parts and keep them as individual bodies. After you extrude the parts, you need to make sure you keep them as new body after you change the extents to TO. You did to specifically click on the body piece and not a face, if not, it will make them join. Check out my image below of the improvements to the shelf, you can see the separate bodies:

Antimony
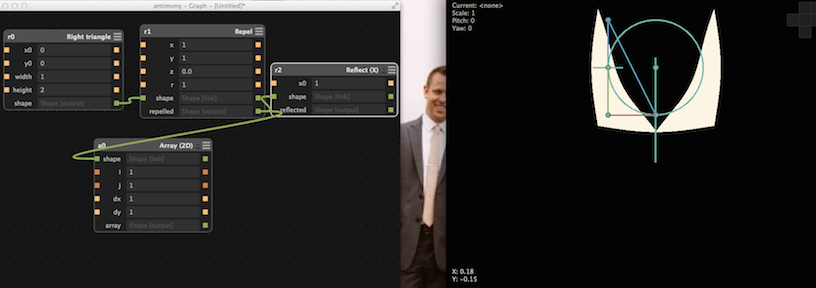
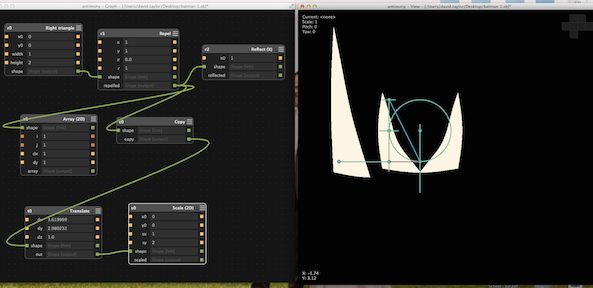
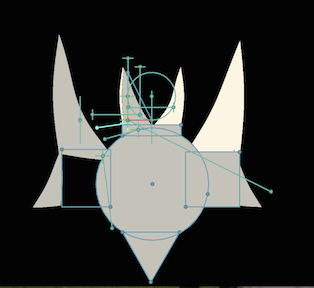
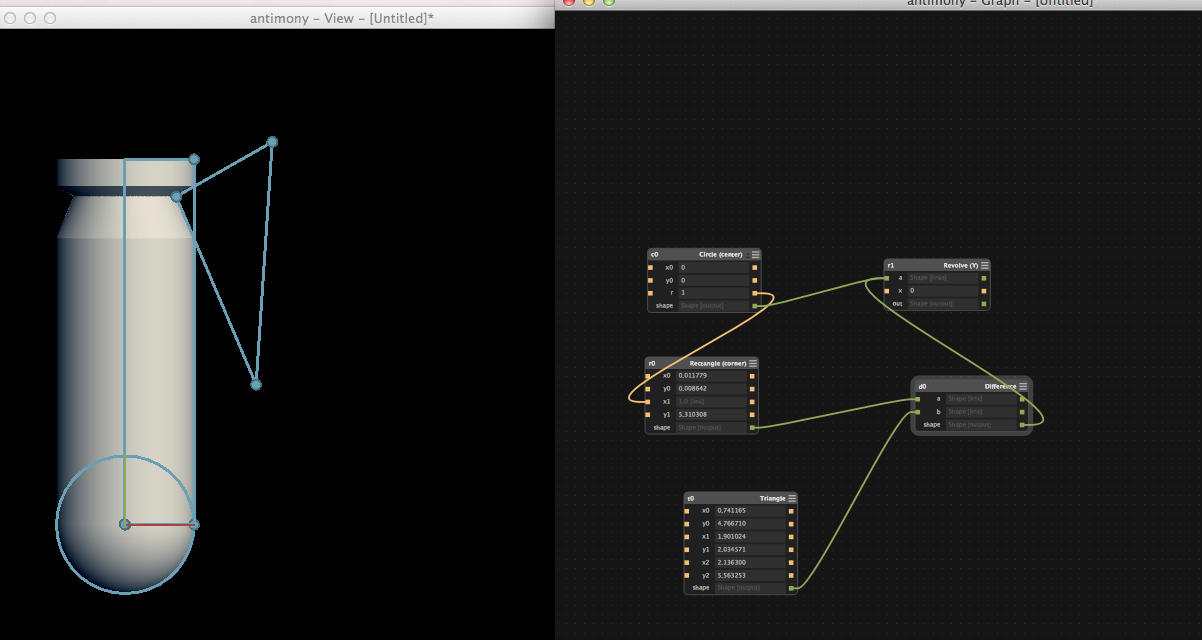
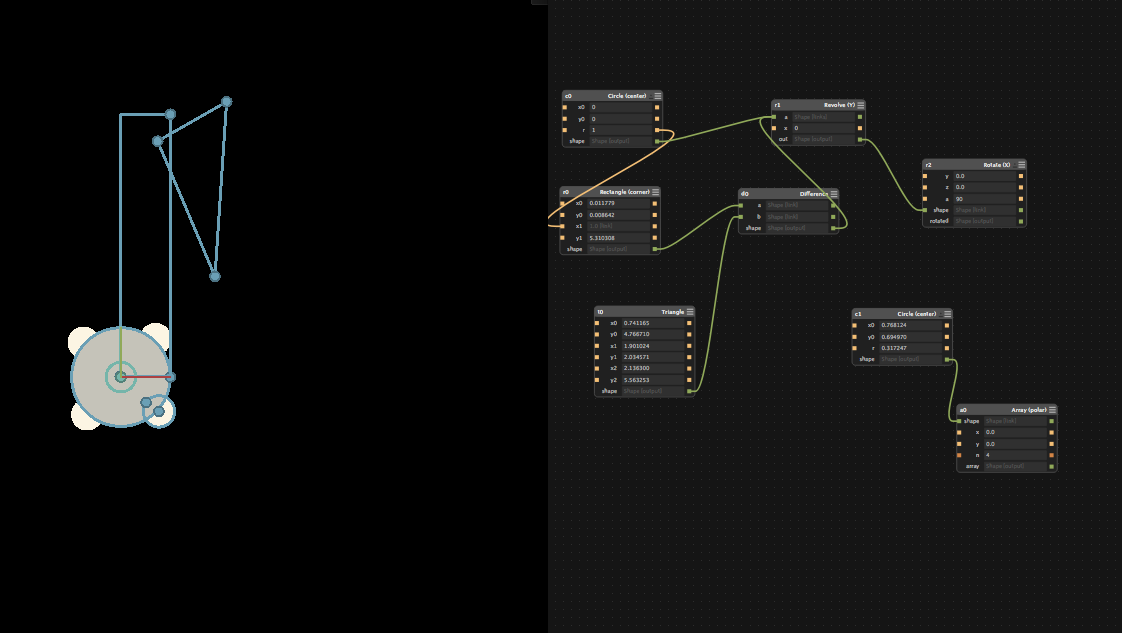
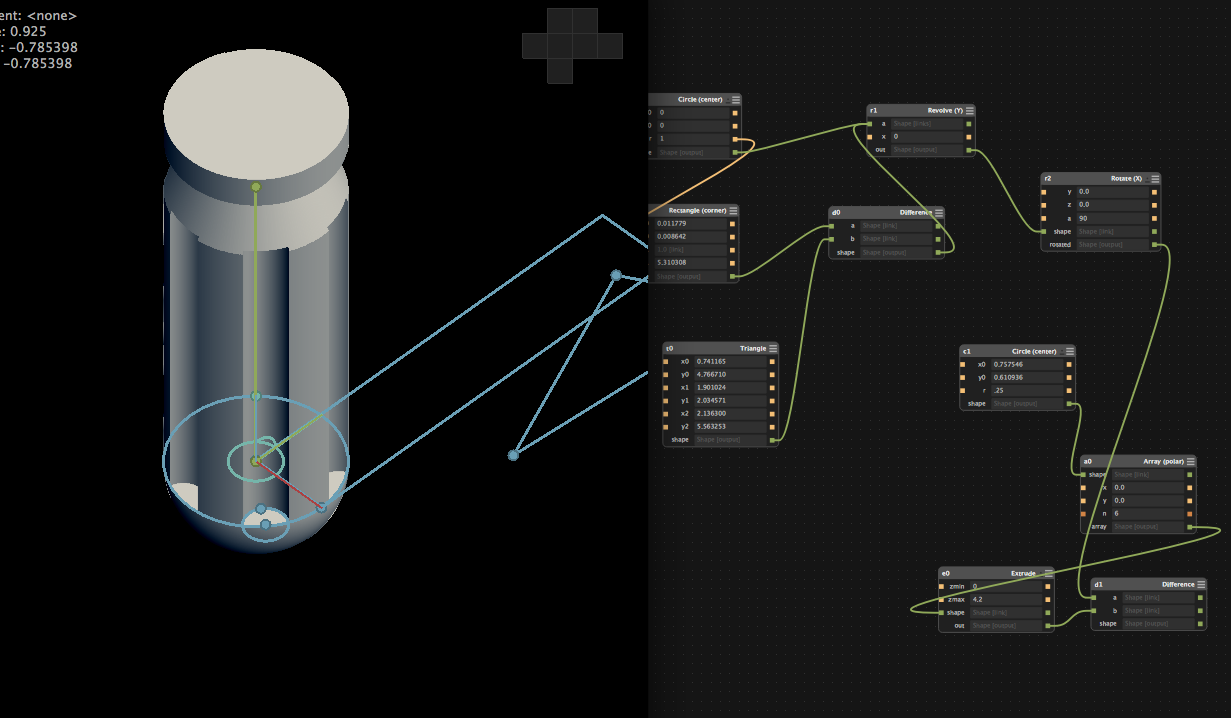
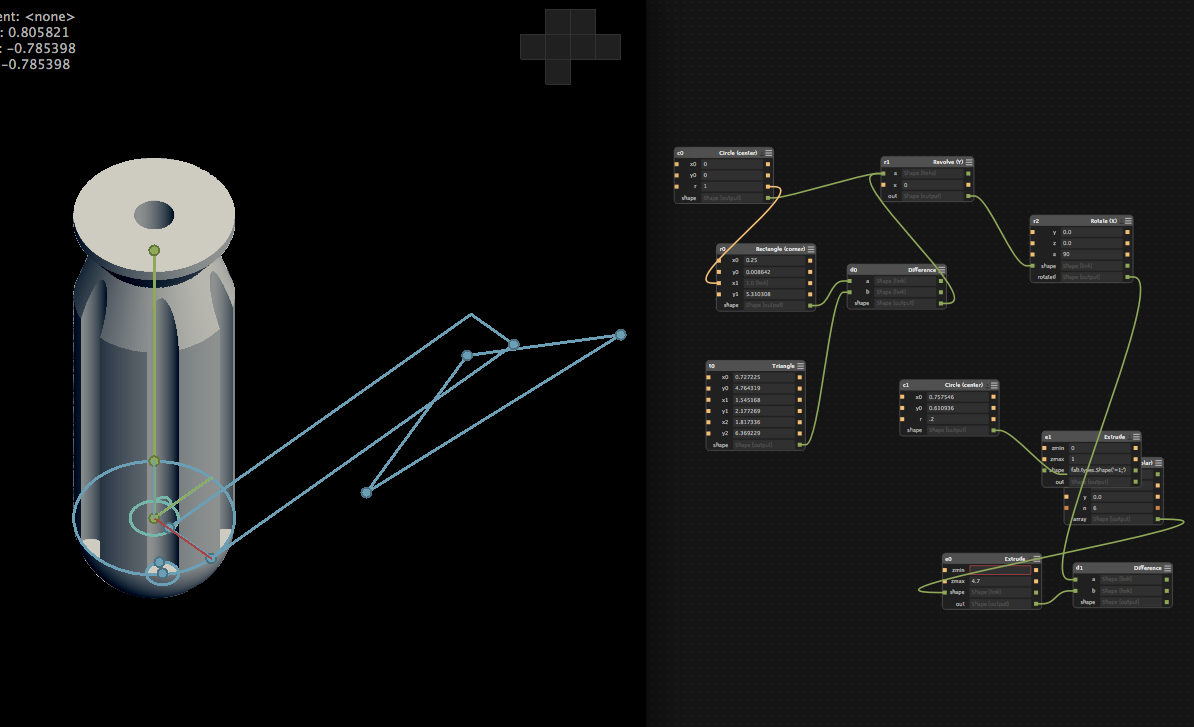
I worked on Antimony for about three and half hours. This was by far the hardest software that I worked with for this assignment. My biggest success with it was being able to install it. I was able to make 3D shapes and blend them, but I wasn’t successful every time I used the blend tool. I learned how to use the light blue dots to resize the figure in the GUI. If you hold the control key + the mouse left to pan and rotate the image.You can also make 2D ffigures, and you can use the center feature with them too. By changing the different values in the graph view, you can make new dimensions and alter the location the 3D or 2D shapes. I was able to crash the software a few times by running multiple features together at once. I have not quite figured out how to truly blend objects or use any of the CSG aspects. I figured out how to take a 2D shape and make it 3D. For example, I took an edge circle and rotated it to make a doughnut. In the view window, I learned that there is a view tool in the top right corner of the window by accidentally clicking on it. I than learned how to create text and move it. I created the word “Batman” to model the word that would be on the spot light box.


Terence and I did a google hangout for almost 2 hours working on Antimony. He taught me a lot about the software with regards to controls and the different ways to make an object as well as different functions. He helped lay the foundation for me to create a batman logo in antimony. I also watched Matt Keeter's video on using Antimony. I learned how to sue the difference, extrude, revolve, and array. This taught me a lot and started to put the udnerstanding piece together for me. At times, it was confusing to follow along with the tutorial due to the versions of the software being different between mine and the videos, such as as the array (polar) and the iteration (polar) functions. I am getting close to having my Batman logo finished, but I need some help finishing it. I do not like how to software crash a lot. It crashed on my 3 times within a two and half hour timeframe, which taught to make sure I am saving my work often. I learned that you need to use a combine to mesh the file to create an .stl file. I did learn that when you try to load the .stl file from Antimony to another CAD software, it imports very poorly. I tried this with the batman logo. I do not undererstand what unit I am working in while I am using Antimony. I emailed the batman logo to Terence when I ran into some issues, and I will continue workign to improve with his support.
Images of the creation of my Batman logo:
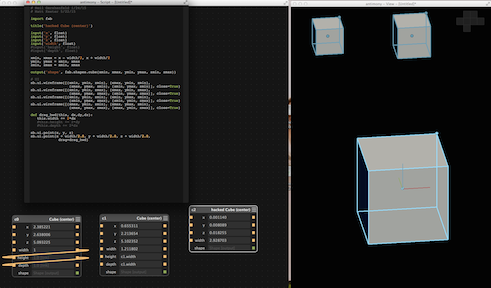
Screw driver images I created from following the tutorial by Matt Keeter:
3D Conclusion
This has been a humbling process. It really made me realize how little I know, but I did learn a lot. I pushed myself into learning new software as well as gaining helpful insight into curriculum ideas that can be used in my own classroom. All of the softwares that I used had the ability to export files in multiple ways, such as .stl, .svg and etc. Each software have its pros and cons for me. Inkscape is an awesome software. It helps you really bring 2D figures to life. TinekrCAD is quick to learn, but very basic in with regards to truly understanding what you are creating. 123D Design is a good stepping stone before Fusion, because, they have similar features. It does begin to allow you to build from a sketch but it runs slow at times. Fusion 360 has grown on me due to its ability to train you to think in multiple dimensions. It has a step learning curve, but it has a great functionality with regards to developing product using additive and subtractive methods. Antimony by far has been the hardest software for me. It has pushed me a lot and made me realize the physics and code that can go into CAD. Overall, I am still trying to understand constraints, but I do understand that it is related to dimensioning.
CAD Files
This is a button to access the files created for this exercise course for all of the above softwares.
Primavera de Filippi - Fab Academy Recitations
I watched her presentation. I found it insightful as well as I learned a lot about BITCOIN. I realized I knew very little about BITCOIN before watching this presentation. I do like the ideas for using it with the Fab Lab community.